2015 MERCEDES-BENZ S-COUPE trunk release
[x] Cancel search: trunk releasePage 88 of 286
RPress the remote operating switch on the
driver's door, or
R In vehicles with HANDS-FREE ACCESS:
kick into the sensor detection range
under the bumper with your foot.
iIf the F button on the SmartKey is
pressed or HANDS-FREE ACCESS is initi-
ated after the closing process is stopped,
the trunk lid opens.
Vehicles with trunk lid remote closing
feature and KEYLESS-GO: when all the
doors are closed, you can simultaneously
close the trunk lid and lock the vehicle. The
key must be located to the rear of the vehicle. X Press and release locking button ;on the
trunk lid.
If a KEYLESS-GO key is detected outside
the vehicle, the trunk lid closes and the
vehicle locks.
iIf KEYLESS-GO detects a SmartKey in the
trunk, the trunk lid opens again after it is closed.
If KEYLESS-GO detects a second SmartKey outside the vehicle, the trunk lid remains closed.
HANDS-FREE ACCESS
Important safety notes
GWARNING
The vehicle's exhaust system may be very hot. You could burn yourself by touching the
exhaust system if you use HANDS-FREE
ACCESS. There is a risk of injury. Always
ensure that you only make the kicking move-
ment within the detection range of sensors.
!If the SmartKey is within the rear detec-
tion range of KEYLESS-GO, the following
situations, for example, could lead to the
unintentional opening of the trunk:
R using a car wash
R using a power washer Make sure that the SmartKey is at least
10 ft (3 m) away from the vehicle.
General notes
With KEYLESS-GO and HANDS-FREE
ACCESS, you can open or close the trunk lid
or stop the procedure without using your
hands. This is useful if you have your hands
full. To do this, make a kicking movement
under the bumper with your foot.
Observe the following points:
R Carry your KEYLESS-GO key about your
person. The KEYLESS-GO key must be in
the rear detection range of the vehicle.
R When making the kicking movement, make
sure that you are standing firmly on the
ground and that there is sufficient clear-
ance to the rear of the vehicle. You could
otherwise lose your balance e.g. on ice.
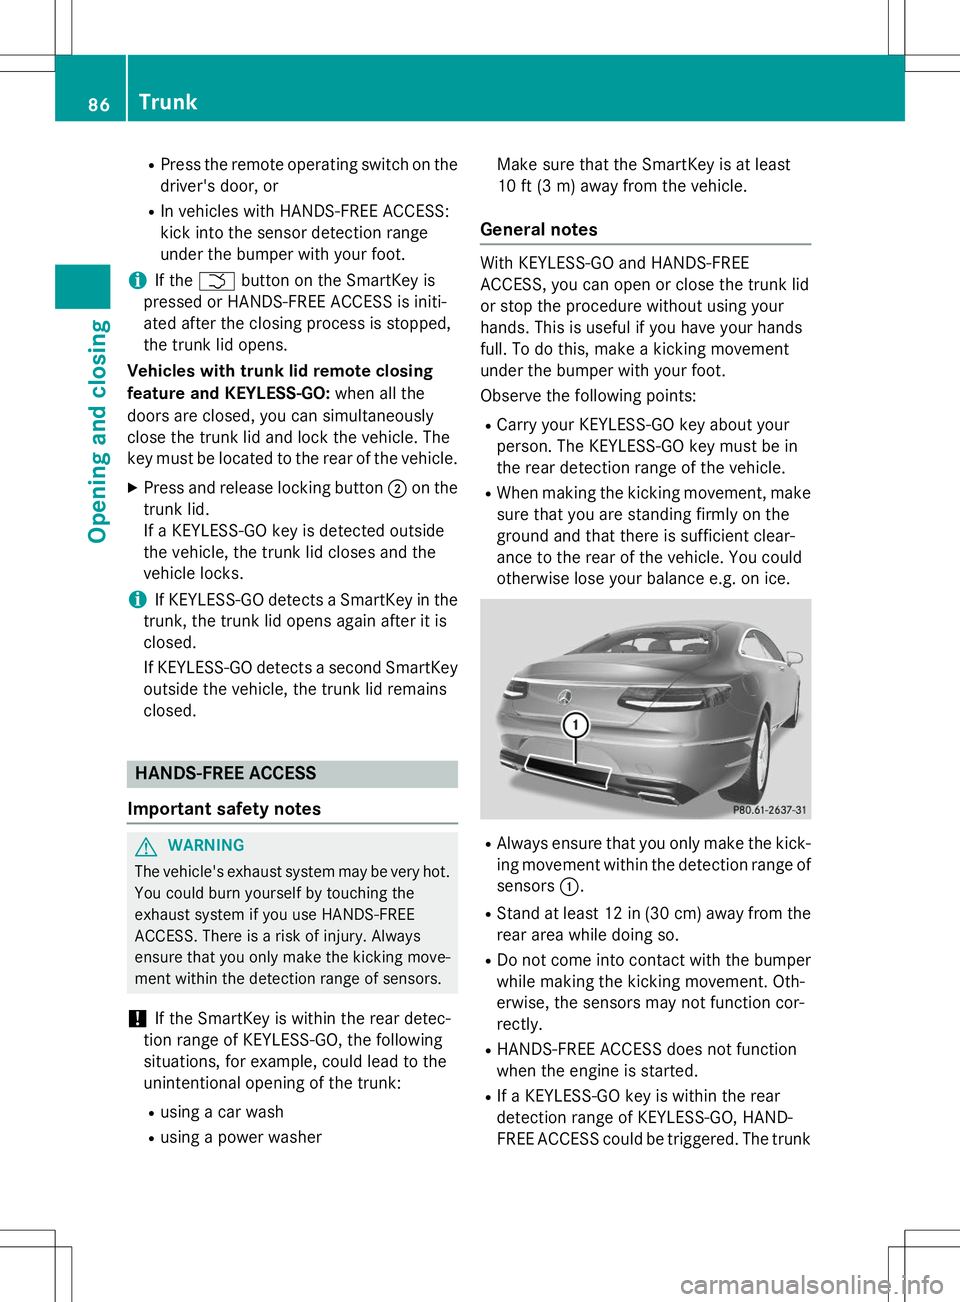
R Always ensure that you only make the kick-
ing movement within the detection range of sensors :.
R Stand at least 12 in (30 cm) away from the
rear area while doing so.
R Do not come into contact with the bumper
while making the kicking movement. Oth-
erwise, the sensors may not function cor-
rectly.
R HANDS-FREE ACCESS does not function
when the engine is started.
R If a KEYLESS-GO key is within the rear
detection range of KEYLESS-GO, HAND-
FREE ACCESS could be triggered. The trunk
86Trunk
Opening and closing
Page 90 of 286
iThe opening dimensions of the trunk lid
can be found in the "Vehicle data" section ( Y page 281).
Opening and closing
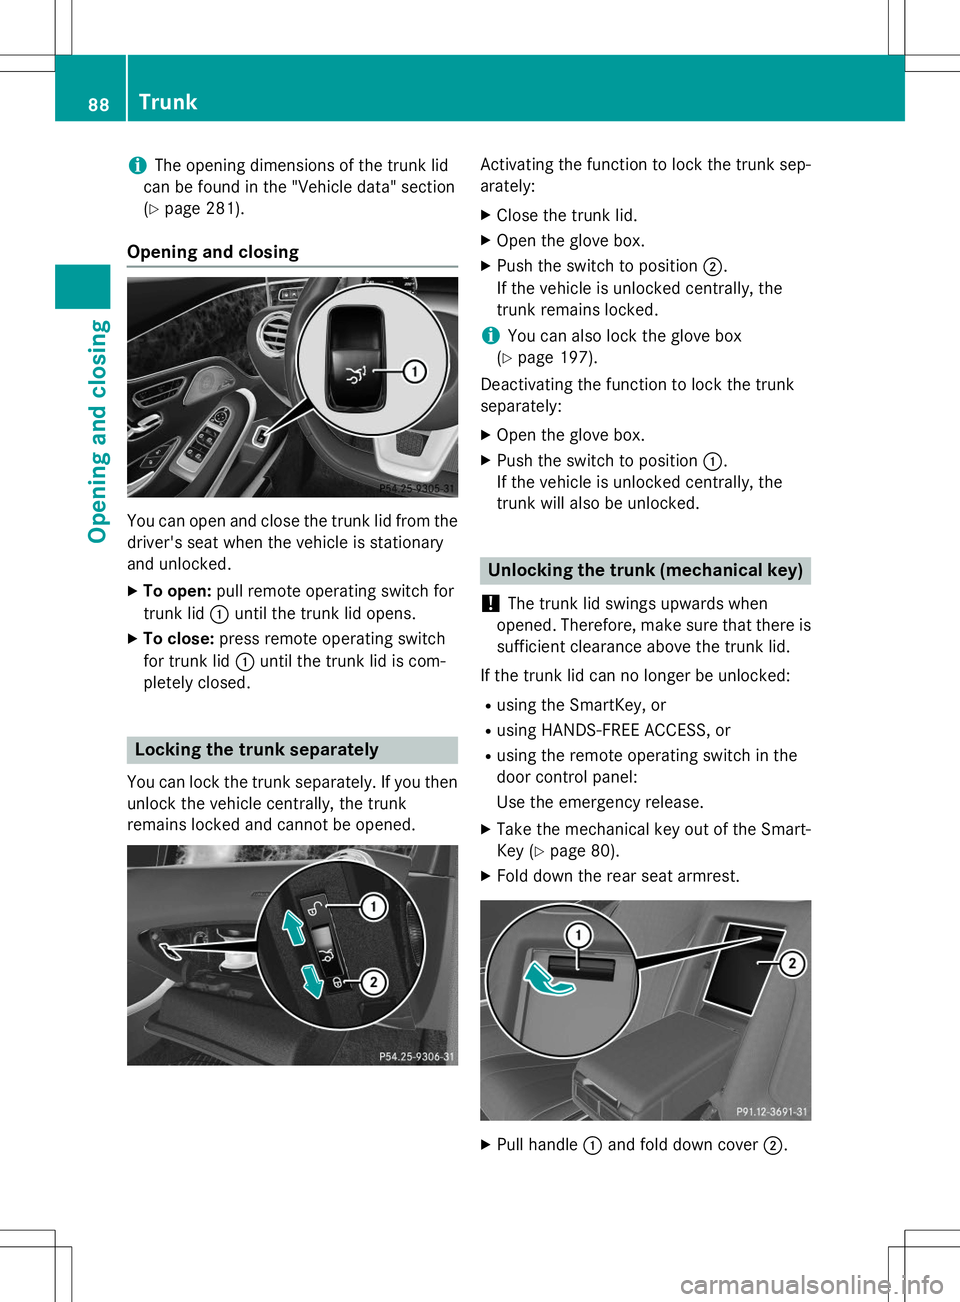
You can open and close the trunk lid from the
driver's seat when the vehicle is stationary
and unlocked.
X To open: pull remote operating switch for
trunk lid :until the trunk lid opens.
X To close: press remote operating switch
for trunk lid :until the trunk lid is com-
pletely closed.
Locking the trunk separately
You can lock the trunk separately. If you then
unlock the vehicle centrally, the trunk
remains locked and cannot be opened.
Activating the function to lock the trunk sep- arately:
X Close the trunk lid.
X Open the glove box.
X Push the switch to position ;.
If the vehicle is unlocked centrally, the
trunk remains locked.
iYou can also lock the glove box
( Y page 197).
Deactivating the function to lock the trunk separately:
X Open the glove box.
X Push the switch to position :.
If the vehicle is unlocked centrally, the
trunk will also be unlocked.
Unlocking the trunk (mechanical key)
!
The trunk lid swings upwards when
opened. Therefore, make sure that there is sufficient clearance above the trunk lid.
If the trunk lid can no longer be unlocked: R using the SmartKey, or
R using HANDS-FREE ACCESS, or
R using the remote operating switch in the
door control panel:
Use the emergency release.
X Take the mechanical key out of the Smart-
Key ( Ypage 80).
X Fold down the rear seat armrest.
XPull handle :and fold down cover ;.
88Trunk
Opening and closing
Page 91 of 286
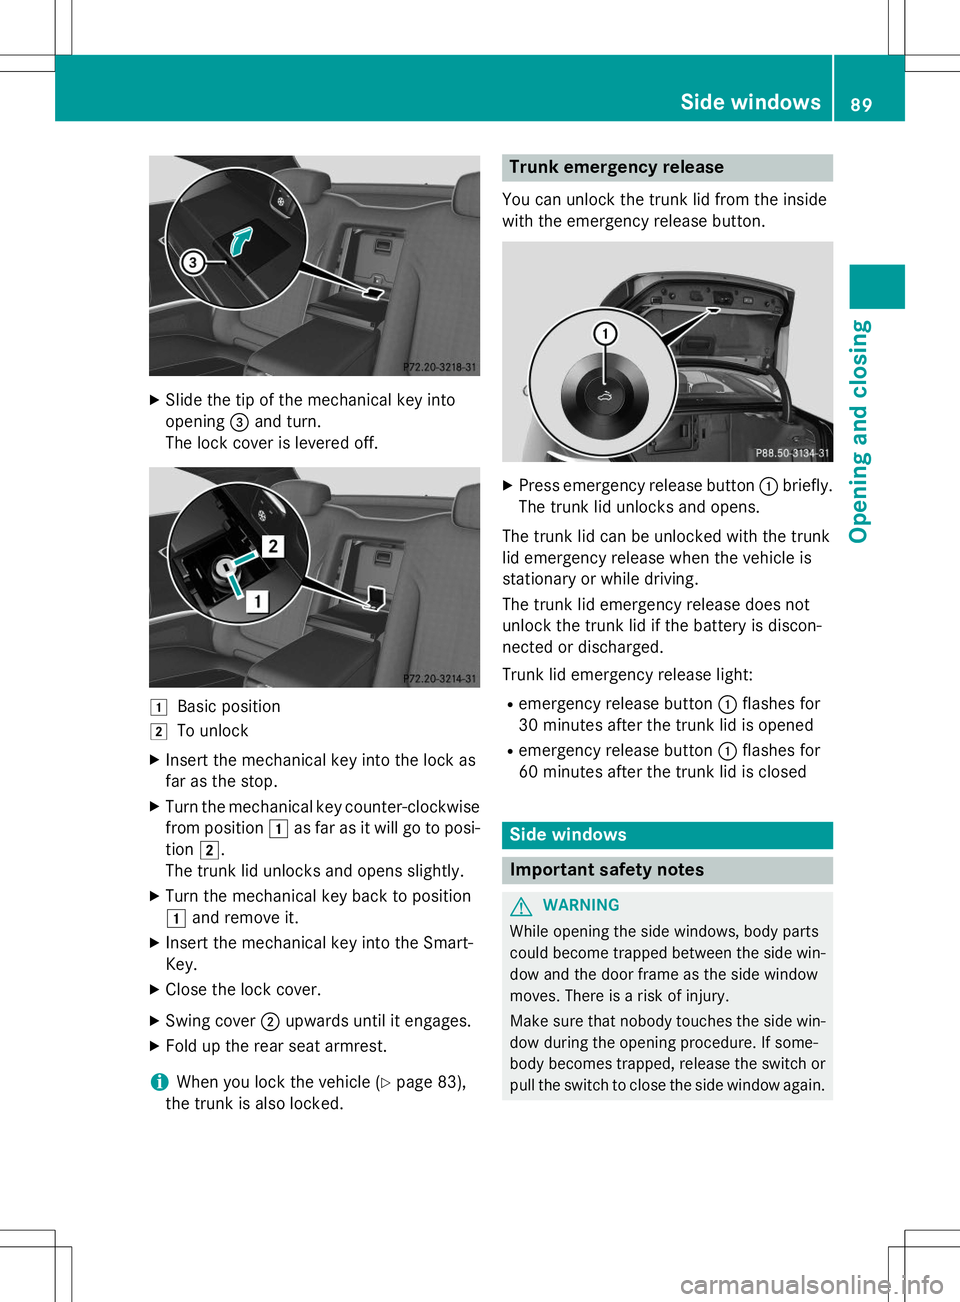
XSlide the tip of the mechanical key into
opening =and turn.
The lock cover is levered off.
1Basic position
2To unlock
X Insert the mechanical key into the lock as
far as the stop.
X Turn the mechanical key counter-clockwise
from position 1as far as it will go to posi-
tion 2.
The trunk lid unlocks and opens slightly.
X Turn the mechanical key back to position1 and remove it.
X Insert the mechanical key into the Smart-
Key.
X Close the lock cover.
X Swing cover ;upwards until it engages.
X Fold up the rear seat armrest.
iWhen you lock the vehicle ( Ypage 83),
the trunk is also locked.
Trunk emergency release
You can unlock the trunk lid from the inside
with the emergency release button.
X Press emergency release button :briefly.
The trunk lid unlocks and opens.
The trunk lid can be unlocked with the trunk
lid emergency release when the vehicle is
stationary or while driving.
The trunk lid emergency release does not
unlock the trunk lid if the battery is discon-
nected or discharged.
Trunk lid emergency release light: R emergency release button :flashes for
30 minutes after the trunk lid is opened
R emergency release button :flashes for
60 minutes after the trunk lid is closed
Side windows
Important safety notes
GWARNING
While opening the side windows, body parts
could become trapped between the side win- dow and the door frame as the side window
moves. There is a risk of injury.
Make sure that nobody touches the side win-
dow during the opening procedure. If some-
body becomes trapped, release the switch or pull the switch to close the side window again.
Side windows89
Opening and closing
Z
Page 219 of 286
!If the SmartKey is within the rear detec-
tion range of KEYLESS-GO, the following
situations, for example, could lead to the
unintentional opening of the trunk:
R using a car wash
R using a power washer
Make sure that the SmartKey is at least
10 ft (3 m) away from the vehicle.
!Make sure that the automatic transmis-
sion is in neutral position Nwhen washing
your vehicle in a tow-through car wash. The
vehicle may otherwise be damaged.
R Operating with the SmartKey:
Do not remove the SmartKey from the
ignition lock. Do not open the driver's
door when the engine is switched off or
at very low speeds. Otherwise, when in
transmission position Dor Rthe auto-
matic transmission will automatically
switch to park position Pand block the
wheels.
R Operating with the Start/Stop button:
Do not open the driver's door when the
engine is switched off or at very low
speeds. Otherwise, when in transmission
position Dor Rthe automatic transmis-
sion will automatically switch to parkposition Pand block the wheels.
Observe the following to make sure that the
automatic transmission stays in position N
neutral:
Operating with the SmartKey:
X Make sure that the ignition is switched on.
X Make sure that the vehicle is stationary.
X Depress and hold the brake pedal.
X Shift to neutral N.
X Release the brake pedal.
X Release the electric parking brake, if nec- essary.
X Switch off the ignition and leave the Smart-
Key in the ignition lock. Operating with the Start/Stop button:
X Make sure that the ignition is switched on.
X Make sure that the vehicle is stationary.
X Depress and hold the brake pedal.
X Engage park position P.
X Release the brake pedal.
X Remove Start/Stop button from ignition
lock ( Ypage 115).
X Insert the SmartKey into the ignition lock.
X Switch on the ignition.
X Depress and hold the brake pedal.
X Shift to neutral N.
X Release the brake pedal.
X Release the electric parking brake, if nec-essary.
X Switch off the ignition and leave the Smart-
Key in the ignition lock.
You can wash the vehicle in an automatic car
wash from the very start.
If the vehicle is very dirty, pre-wash it before
cleaning it in an automatic car wash.
After using an automatic car wash, wipe off
wax from the windshield and the wiper
blades. This will prevent smears and reduce
wiping noises caused by residue on the wind- shield.
Information in the Digital Operator'sManual
In the Digital Operator's Manual you will find
information on the following topics: R Washing by hand
R Power washers
R Cleaning the paintwork
R Matte finish care
R Cleaning the wheels
R Cleaning the windows
R Cleaning wiper blades
R Cleaning the exterior lighting
R Cleaning the mirror turn signals
R Cleaning the sensors
R Cleaning the rear view camera
Care217
Maintenance and care
Z
Page 238 of 286
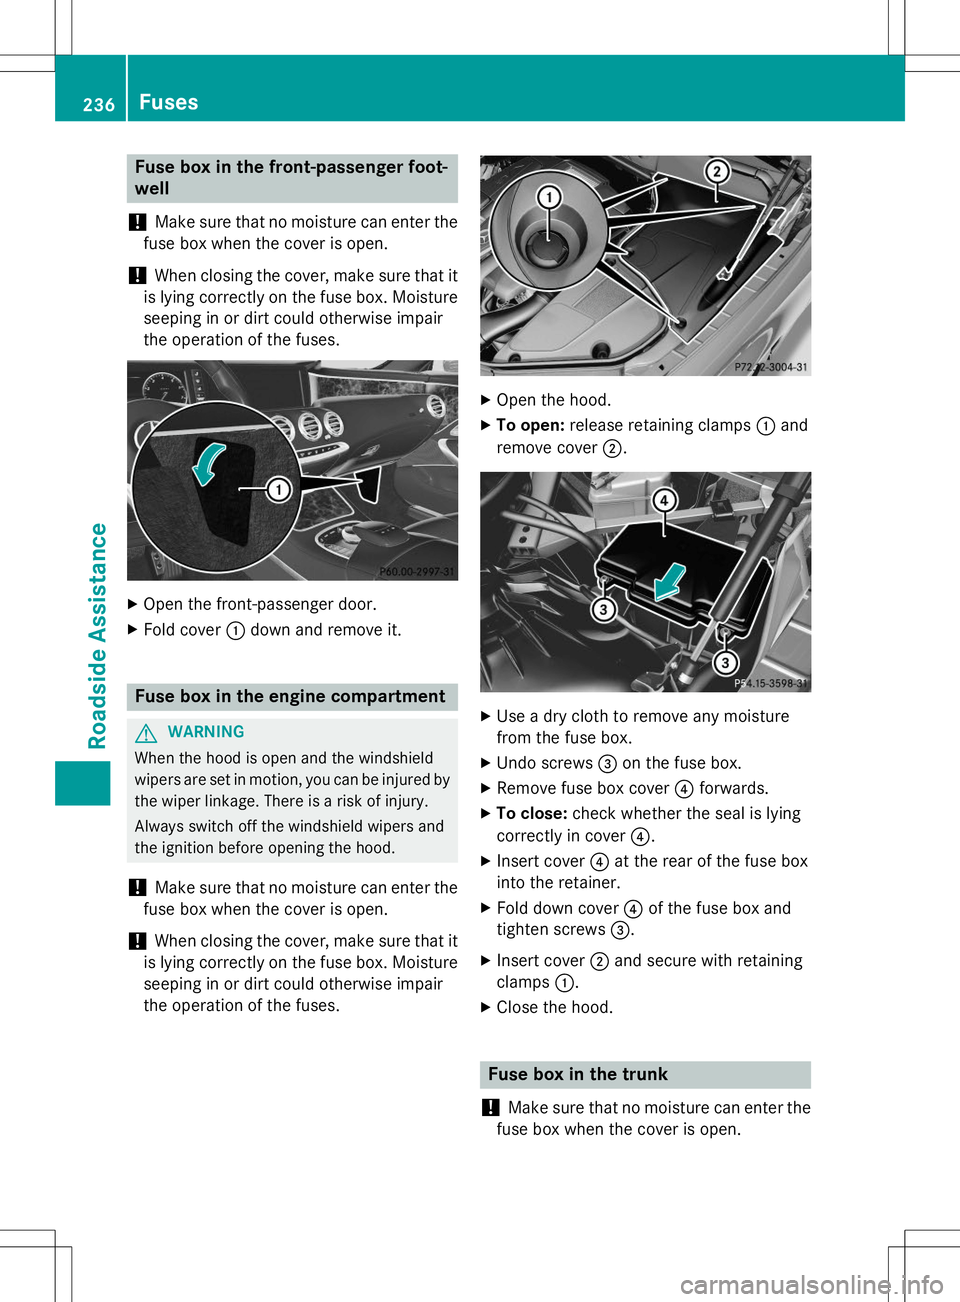
Fuse box in the front-passenger foot- well
!
Make sure that no moisture can enter the
fuse box when the cover is open.
!When closing the cover, make sure that it
is lying correctly on the fuse box. Moisture seeping in or dirt could otherwise impair
the operation of the fuses.
X Open the front-passenger door.
X Fold cover :down and remove it.
Fuse box in the engine compartment
GWARNING
When the hood is open and the windshield
wipers are set in motion, you can be injured by
the wiper linkage. There is a risk of injury.
Always switch off the windshield wipers and
the ignition before opening the hood.
!Make sure that no moisture can enter the
fuse box when the cover is open.
!When closing the cover, make sure that it
is lying correctly on the fuse box. Moisture
seeping in or dirt could otherwise impair
the operation of the fuses.
X Open the hood.
X To open: release retaining clamps :and
remove cover ;.
X
Use a dry cloth to remove any moisture
from the fuse box.
X Undo screws =on the fuse box.
X Remove fuse box cover ?forwards.
X To close: check whether the seal is lying
correctly in cover ?.
X Insert cover ?at the rear of the fuse box
into the retainer.
X Fold down cover ?of the fuse box and
tighten screws =.
X Insert cover ;and secure with retaining
clamps :.
X Close the hood.
Fuse box in the trunk
!
Make sure that no moisture can enter the
fuse box when the cover is open.
236Fuses
Roadside Assistance
Page 239 of 286
!When closing the cover, make sure that it
is lying correctly on the fuse box. Moisture
seeping in or dirt could otherwise impair
the operation of the fuses.
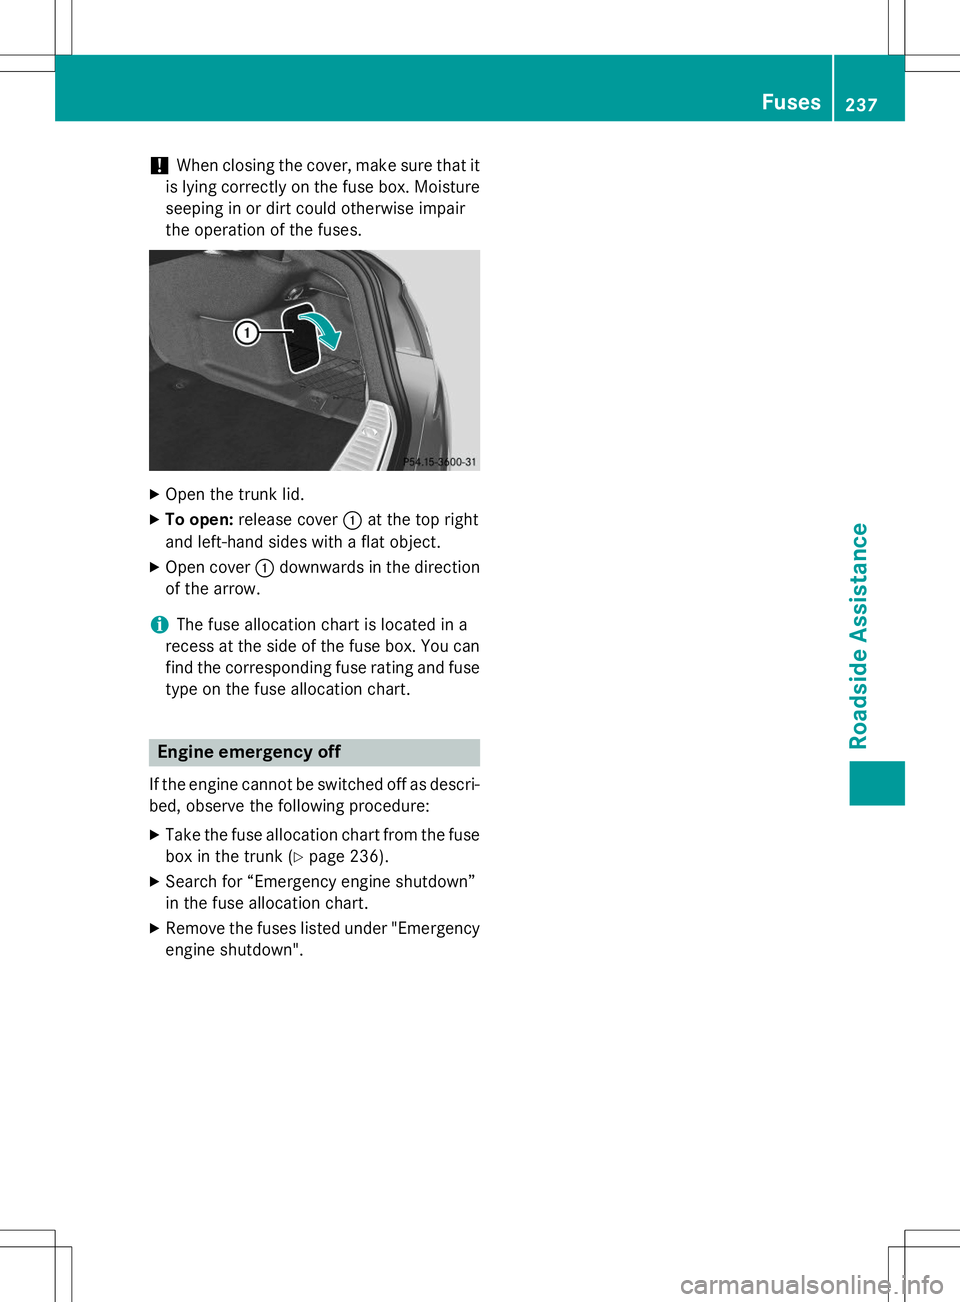
X Open the trunk lid.
X To open: release cover :at the top right
and left-hand sides with a flat object.
X Open cover :downwards in the direction
of the arrow.
iThe fuse allocation chart is located in a
recess at the side of the fuse box. You can find the corresponding fuse rating and fuse
type on the fuse allocation chart.
Engine emergency off
If the engine cannot be switched off as descri- bed, observe the following procedure:
X Take the fuse allocation chart from the fuse
box in the trunk ( Ypage 236).
X Search for “Emergency engine shutdown”
in the fuse allocation chart.
X Remove the fuses listed under "Emergency
engine shutdown".
Fuses237
Roadside Assistance
Z