2015 MERCEDES-BENZ S-COUPE oil change
[x] Cancel search: oil changePage 264 of 286

Rotate the wheels before a clear wear pattern
has formed on the tires. Front tires typically
wear more on the shoulders and the rear tiresin the center.
If your vehicle's tire configuration allows, you
can rotate the wheels according to the inter-
vals in the tire manufacturer's warranty book in your vehicle documents. If no warranty
book is available, the tires should be rotated
every 3,000 to 6,000 miles (5,000 to
10,000 km), or earlier if tire wear requires.
Ensure the direction of rotation is maintained.
Clean the contact surfaces of the wheel and
the brake disc thoroughly every time a wheel
is rotated. Check the tire pressure and reac-
tivate the tire pressure monitor if necessary( Y page 248).
Direction of rotation
Tires with a specified direction of rotation
have additional benefits, e.g. if there is a risk
of hydroplaning. These advantages can only
be gained if the tires are installed correspond-ing to the direction of rotation.
An arrow on the sidewall of the tire indicates
its correct direction of rotation.
Storing wheels
Store wheels that are not being used in a cool, dry and preferably dark place. Protect the
tires from oil, grease, gasoline and diesel.
Mounting a wheel
Preparing the vehicle
X Stop the vehicle on solid, non-slippery and
level ground.
X Apply the electric parking brake manually.
X Bring the front wheels into the straight-
ahead position.
X Shift the transmission to position P. X
Make sure that "normal" level is selected
for AIRMATIC ( Ypage 140).
X Switch off the engine.
X Open the driver's door.
The on-board electronics now have status0. This is the same as the SmartKey having
been removed.
X Remove Start/Stop button from ignition
lock ( Ypage 115).
or, if the SmartKey is inserted in the ignition
lock: X Remove the SmartKey from the ignition
lock.
X If included in the vehicle equipment,
remove the tire-change tool kit from the
vehicle.
X Secure the vehicle to prevent it from rolling
away.
Securing the vehicle to prevent it from
rolling away
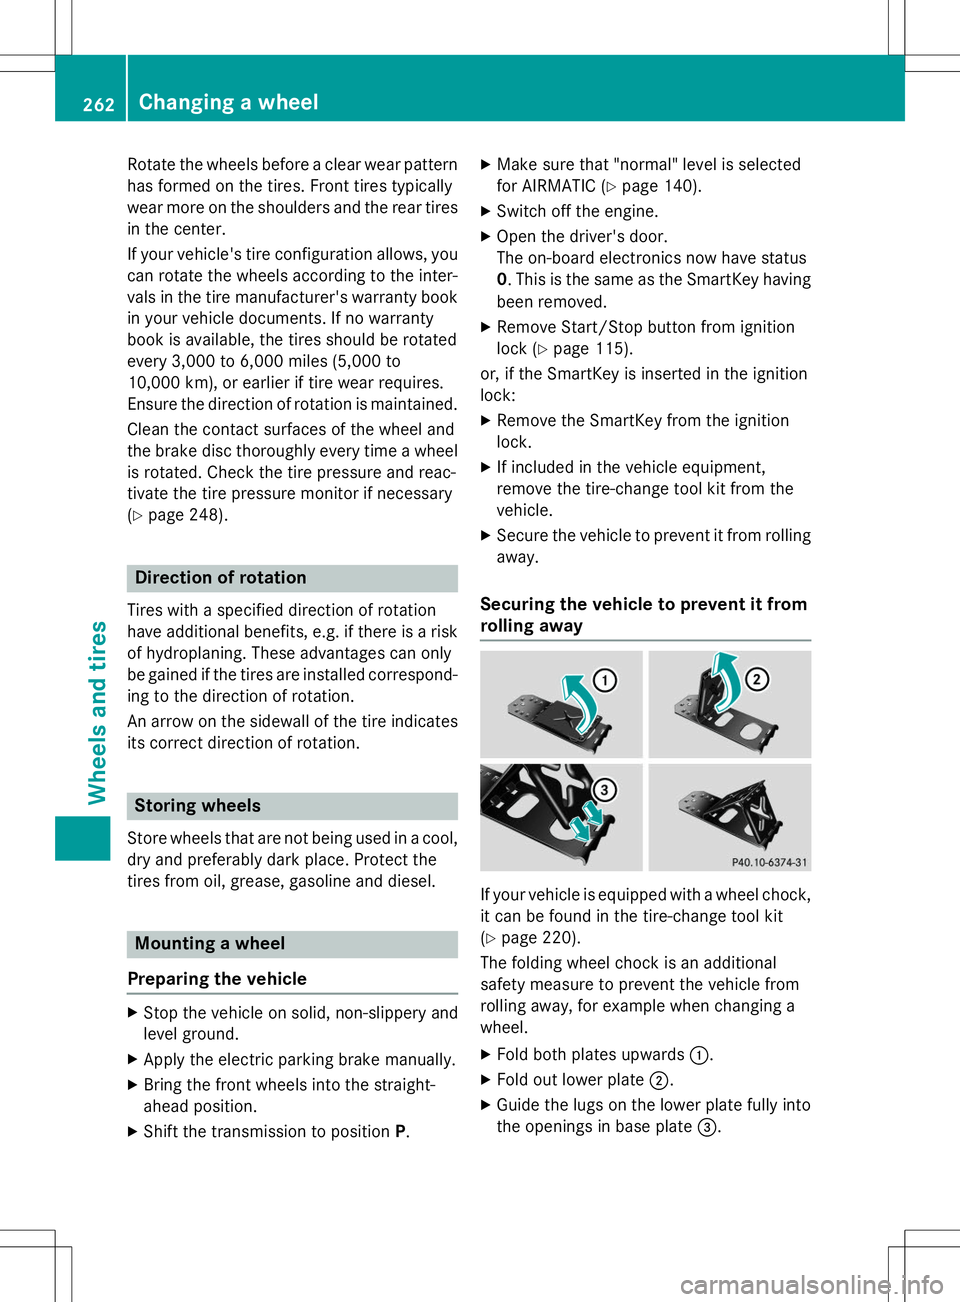
If your vehicle is equipped with a wheel chock, it can be found in the tire-change tool kit ( Y page 220).
The folding wheel chock is an additional
safety measure to prevent the vehicle from
rolling away, for example when changing a
wheel.
X Fold both plates upwards :.
X Fold out lower plate ;.
X Guide the lugs on the lower plate fully into
the openings in base plate =.
262Changing a wheel
Wheels and tires
Page 266 of 286

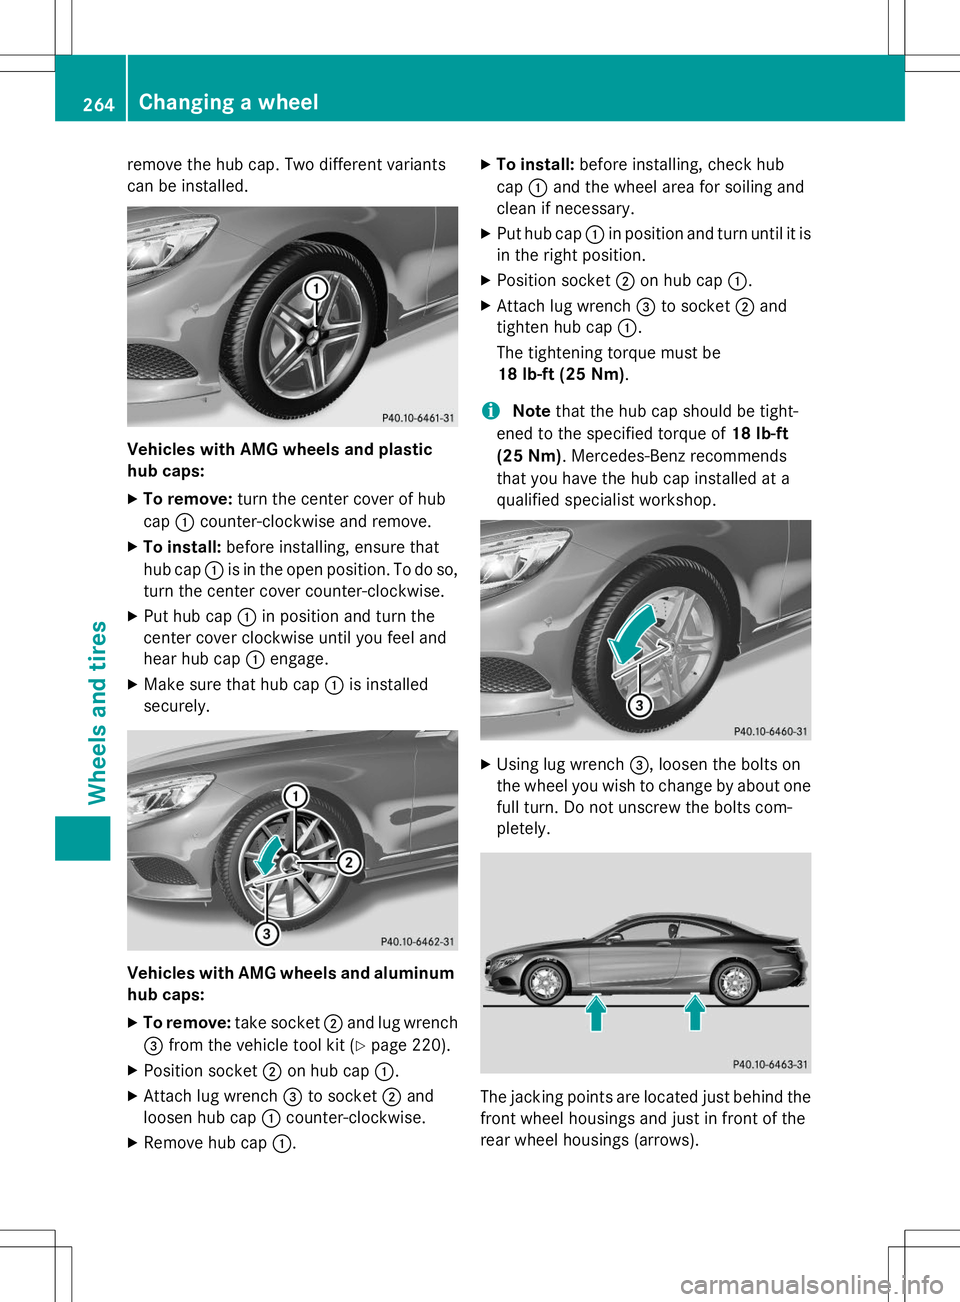
remove the hub cap. Two different variants
can be installed.
Vehicles with AMG wheels and plastic
hub caps:
X To remove: turn the center cover of hub
cap :counter-clockwise and remove.
X To install: before installing, ensure that
hub cap :is in the open position. To do so,
turn the center cover counter-clockwise.
X Put hub cap :in position and turn the
center cover clockwise until you feel and
hear hub cap :engage.
X Make sure that hub cap :is installed
securely.
Vehicles with AMG wheels and aluminum
hub caps:
X To remove: take socket;and lug wrench
= from the vehicle tool kit ( Ypage 220).
X Position socket ;on hub cap :.
X Attach lug wrench =to socket ;and
loosen hub cap :counter-clockwise.
X Remove hub cap :. X
To install: before installing, check hub
cap :and the wheel area for soiling and
clean if necessary.
X Put hub cap :in position and turn until it is
in the right position.
X Position socket ;on hub cap :.
X Attach lug wrench =to socket ;and
tighten hub cap :.
The tightening torque must be
18 lb-ft (25 Nm) .
iNotethat the hub cap should be tight-
ened to the specified torque of 18 lb-ft
(25 Nm) . Mercedes-Benz recommends
that you have the hub cap installed at a
qualified specialist workshop.
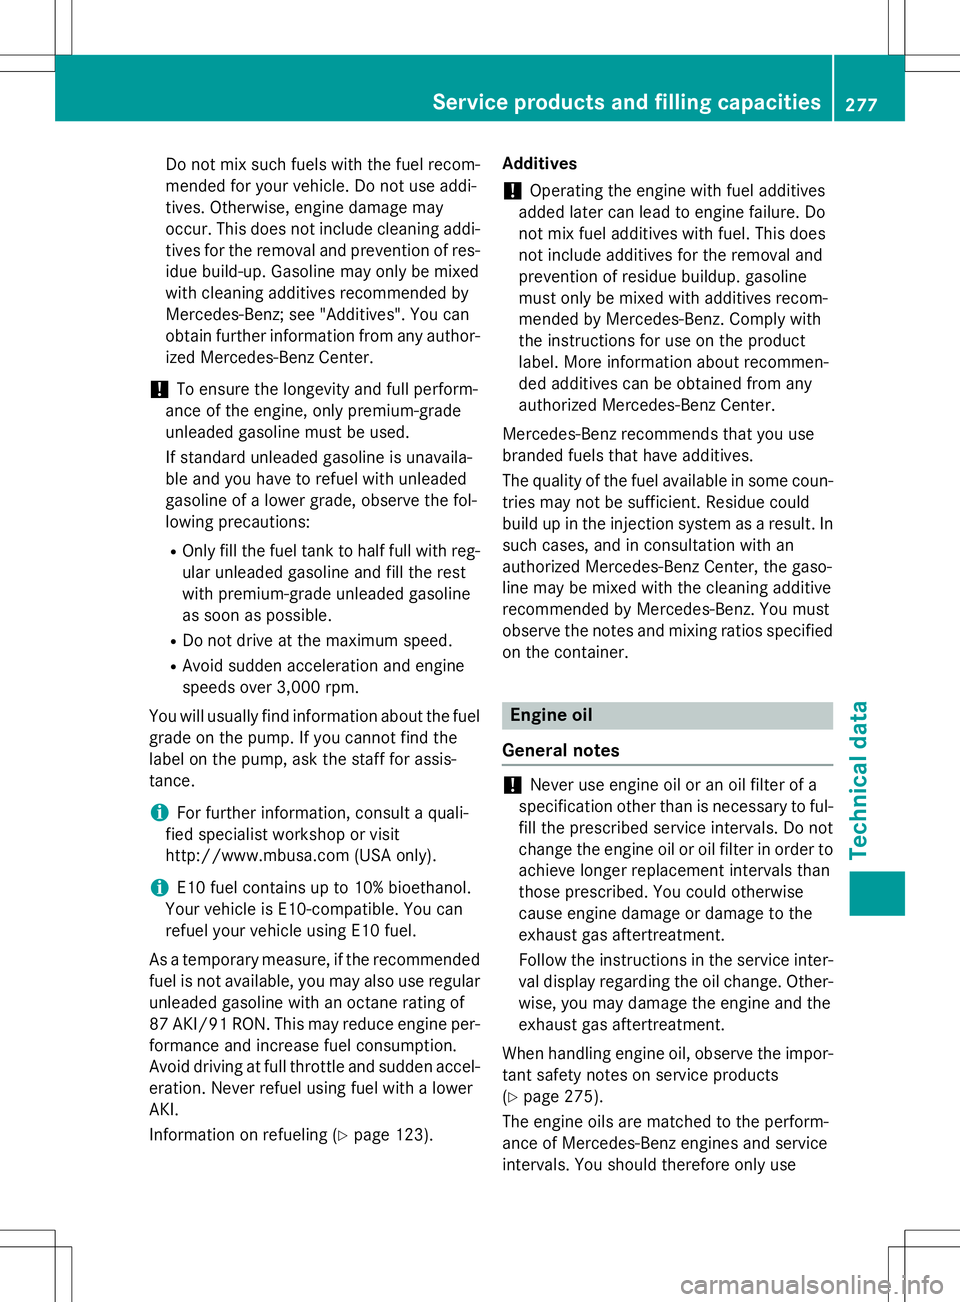
X Using lug wrench =, loosen the bolts on
the wheel you wish to change by about one full turn. Do not unscrew the bolts com-
pletely.
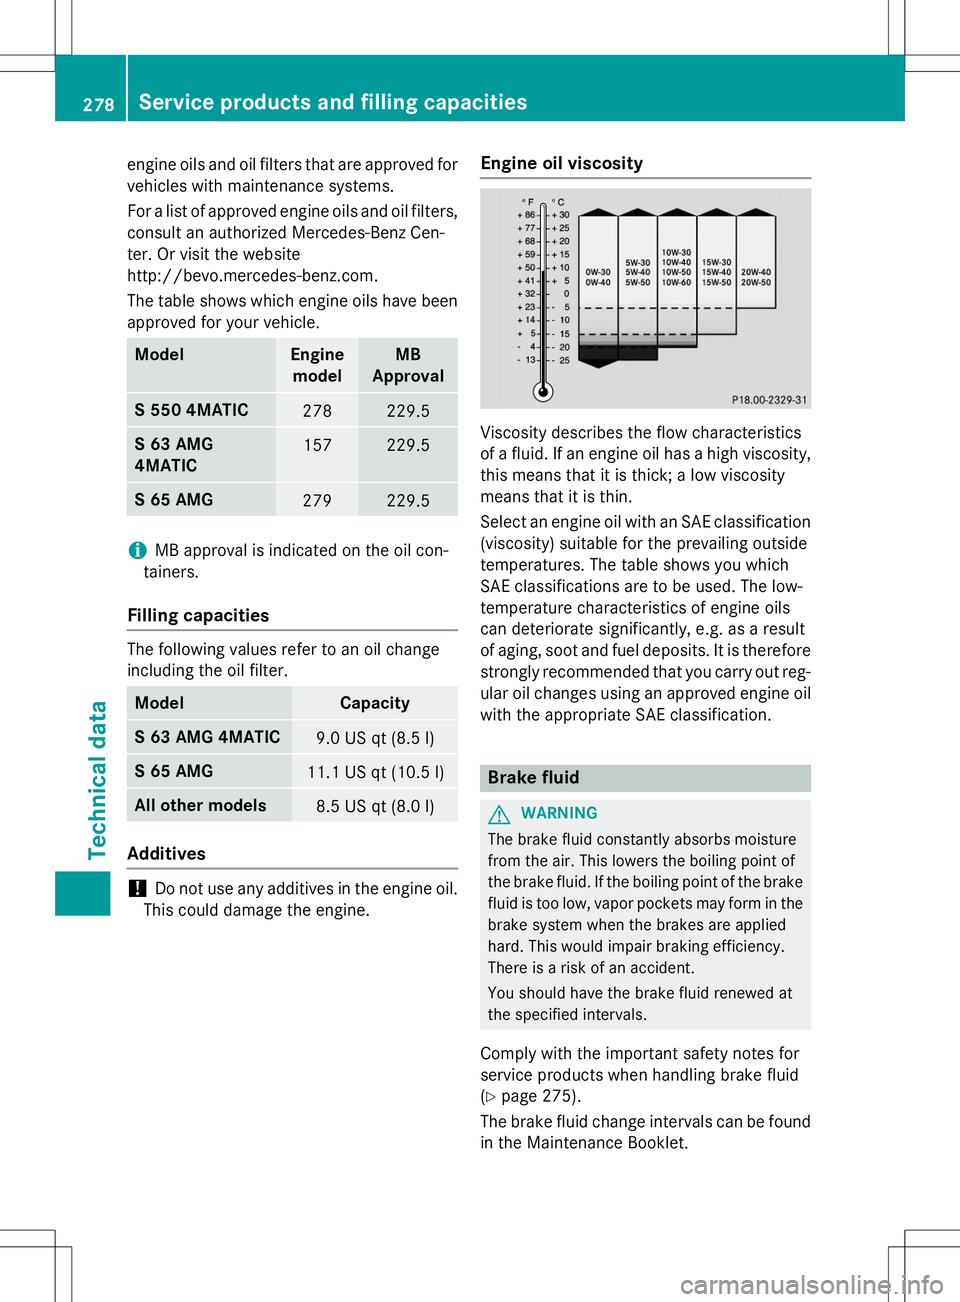
The jacking points are located just behind the
front wheel housings and just in front of the
rear wheel housings (arrows).
264Changing a wheel
Wheels and tires
Page 279 of 286

Do not mix such fuels with the fuel recom-
mended for your vehicle. Do not use addi-
tives. Otherwise, engine damage may
occur. This does not include cleaning addi-
tives for the removal and prevention of res- idue build-up. Gasoline may only be mixed
with cleaning additives recommended by
Mercedes-Benz; see "Additives". You can
obtain further information from any author-ized Mercedes-Benz Center.
!To ensure the longevity and full perform-
ance of the engine, only premium-grade
unleaded gasoline must be used.
If standard unleaded gasoline is unavaila-
ble and you have to refuel with unleaded
gasoline of a lower grade, observe the fol-
lowing precautions:
R Only fill the fuel tank to half full with reg-
ular unleaded gasoline and fill the rest
with premium-grade unleaded gasoline
as soon as possible.
R Do not drive at the maximum speed.
R Avoid sudden acceleration and engine
speeds over 3,000 rpm.
You will usually find information about the fuel
grade on the pump. If you cannot find the
label on the pump, ask the staff for assis-
tance.
iFor further information, consult a quali-
fied specialist workshop or visit
http://www.mbusa.com (USA only).
iE10 fuel contains up to 10% bioethanol.
Your vehicle is E10-compatible. You can
refuel your vehicle using E10 fuel.
As a temporary measure, if the recommended fuel is not available, you may also use regularunleaded gasoline with an octane rating of
87 AKI/91 RON. This may reduce engine per-
formance and increase fuel consumption.
Avoid driving at full throttle and sudden accel- eration. Never refuel using fuel with a lowerAKI.
Information on refueling ( Ypage 123). Additives
!Operating the engine with fuel additives
added later can lead to engine failure. Do
not mix fuel additives with fuel. This does
not include additives for the removal and
prevention of residue buildup. gasoline
must only be mixed with additives recom-
mended by Mercedes-Benz. Comply with
the instructions for use on the product
label. More information about recommen-
ded additives can be obtained from any
authorized Mercedes-Benz Center.
Mercedes-Benz recommends that you use
branded fuels that have additives.
The quality of the fuel available in some coun-
tries may not be sufficient. Residue could
build up in the injection system as a result. In
such cases, and in consultation with an
authorized Mercedes-Benz Center, the gaso-
line may be mixed with the cleaning additive
recommended by Mercedes-Benz. You must
observe the notes and mixing ratios specified on the container.
Engine oil
General notes
!Never use engine oil or an oil filter of a
specification other than is necessary to ful-
fill the prescribed service intervals. Do not
change the engine oil or oil filter in order to achieve longer replacement intervals than
those prescribed. You could otherwise
cause engine damage or damage to the
exhaust gas aftertreatment.
Follow the instructions in the service inter-
val display regarding the oil change. Other-
wise, you may damage the engine and the
exhaust gas aftertreatment.
When handling engine oil, observe the impor- tant safety notes on service products( Y page 275).
The engine oils are matched to the perform-
ance of Mercedes-Benz engines and service
intervals. You should therefore only use
Service products and filling capacities277
Technical data
Z
Page 280 of 286

engine oils and oil filters that are approved for
vehicles with maintenance systems.
For a list of approved engine oils and oil filters,
consult an authorized Mercedes-Benz Cen-
ter. Or visit the website
http://bevo.mercedes-benz.co m.
The table shows which engine oils have been
approved for your vehicle.
ModelEngine modelMB
Approval
S 550 4MATIC278229.5
S 63 AMG 4MATIC157229.5
S 65 AMG279229.5
iMB approval is indicated on the oil con-
tainers.
Filling capacities
The following values refer to an oil change
including the oil filter.
ModelCapacity
S 63 AMG 4MATIC9.0 US qt (8.5 l)
S 65 AMG11.1 US qt (10.5 l)
All other models8.5 US qt (8.0 l)
Additives
!Do not use any additives in the engine oil.
This could damage the engine.
Engine oil viscosity
Viscosity describes the flow characteristics
of a fluid. If an engine oil has a high viscosity, this means that it is thick; a low viscosity
means that it is thin.
Select an engine oil with an SAE classification
(viscosity) suitable for the prevailing outside
temperatures. The table shows you which
SAE classifications are to be used. The low-
temperature characteristics of engine oils
can deteriorate significantly, e.g. as a result
of aging, soot and fuel deposits. It is therefore strongly recommended that you carry out reg-
ular oil changes using an approved engine oil with the appropriate SAE classification.
Brake fluid
GWARNING
The brake fluid constantly absorbs moisture
from the air. This lowers the boiling point of
the brake fluid. If the boiling point of the brakefluid is too low, vapor pockets may form in the brake system when the brakes are applied
hard. This would impair braking efficiency.
There is a risk of an accident.
You should have the brake fluid renewed at
the specified intervals.
Comply with the important safety notes for
service products when handling brake fluid( Y page 275).
The brake fluid change intervals can be found
in the Maintenance Booklet.
278Service products and filling capacities
Technical data