2015 MERCEDES-BENZ S-COUPE check engine light
[x] Cancel search: check engine lightPage 7 of 286
Special service requirements ......... 216
ATA (Anti-Theft Alarm system)
Activating/deactivating ................... 76
Function ........................................... 76
Switching off the alarm .................... 76
ATTENTION ASSIST
Activating/deactivating ................. 164
Display message ............................ 165
Function/note s............................. 148
Authorized Mercedes-Benz Center
see Qualified specialist workshop
Authorized workshop
see Qualified specialist workshop
AUTO lights
Display message ............................ 165
Automatic car wash (care) ............... 216
Automatic engine start (ECO start/
stop function) .................................... 119
Automatic engine switch-off (ECO
start/stop function) .......................... 119
Automatic headlamp mode .............. 103
Automatic transmission
Accelerator pedal position ............. 121
Automatic drive program ............... 121
Changing gear ............................... 121
DIRECT SELECT lever ..................... 120
Display message ............................ 165
Driving tips .................................... 121
Emergency running mode .............. 121
Engaging drive position .................. 120
Engaging neutral ............................ 120
Engaging park position automati-
cally ............................................... 120
Engaging reverse gear ................... 120
Engaging the park position ............ 120
Kickdown ....................................... 121
Manual drive program (AMG vehi-
cles) ............................................... 121
Overview ........................................ 120
Problem (malfunction) ................... 121
Program selector button ................ 121
Pulling away ................................... 118
Starting the engine ........................ 118
Steering wheel paddle shifters ...... 121
Transmission position display ........ 121
Transmission positions .................. 121 Automatic transmission emer-
gency mode
....................................... 121
B
Back button ....................................... 193
BAS (Brake Assist System) ................. 66
BAS PLUS Q (Brake Assist System
PLUS) with Cross-Traffic Assist
Function/note s................................ 67
Important safety notes .................... 67
Battery (SmartKey)
Checking .......................................... 81
Important safety notes .................... 81
Replacing ......................................... 81
Battery (vehicle)
Charging ........................................ 227
Important safety notes .................. 225
Jump starting ................................. 229
Belt
see Seat belts
Blind Spot Assist
see Active Blind Spot Assist
Bluetooth ®
see also Digital Operator's Man-
ual .................................................. 188
Brake Assist
see BAS (Brake Assist System)
Brake fluid
Display message ............................ 169
Notes ............................................. 278
Brake force distribution, elec-
tronic
see EBD (electronic brake force
distribution)
Brake lamps
Display message ............................ 165
Brakes
ABS .................................................. 66
Adaptive Brake Assist ...................... 70
BAS .................................................. 66
BAS PLUS with Cross-Traffic
Assist ............................................... 67
Brake fluid (notes) ......................... 278
Display message ............................ 166
EBD .................................................. 73
High-performance brake system .... 128
Hill start assis t............................... 118
Index5
Page 9 of 286
Setting the airflow ......................... 111
Setting the climate mode............... 111
Setting the temperature ................ 111
Switching air-recirculation modeon/of f............................................ 111
Switching on/of f........................... 111
Switching residual heat on/off ...... 111
Switching the rear window
defroster on/of f............................ 111
Switching the synchronization
function on and off ........................ 111
Climate control system
Automatic engine start .................. 119
Automatic engine switch-off .......... 119
Deactivating/activating ................. 119
Important safety notes .................. 119
Introduction ................................... 119
Cockpit
Overview .......................................... 32
see Instrument cluster
COLLISION PREVENTION ASSIST
PLUS
Activating/deactivating ................. 164
Operation/note s.............................. 68
COMAND
Controller ...................................... 192
Display ........................................... 192
Combination switch .......................... 103
Connecting a USB device
see also Digital Operator's Man-
ual .................................................. 188
Consumption statistics (on-board
computer) .......................................... 164
Coolant (engine)
Checking the level ......................... 214
Display message ............................ 174
Filling capacity ............................... 279
Important safety notes .................. 279
Temperature gaug e........................ 160
Warning lamp ................................. 183
Coolbox .............................................. 198
Cooling
see Climate control
Copyright ............................................. 30
Cornering light function
Display message ............................ 165
Function/note s............................. 103 Crash-responsive emergency light-
ing ....................................................... 105
Crosswind Assist (vehicles with
MAGIC BODY CONTROL) ................... 140
Crosswind Assist (vehicles with-
out MAGIC BODY CONTROL) ............... 72
Cruise control
Activation conditions ..................... 130
Cruise control lever ....................... 130
Deactivating ................................... 130
Display message ............................ 165
Driving system ............................... 129
Function/note s............................. 129
Important safety notes .................. 129
Selecting ........................................ 130
Setting a speed .............................. 130
Storing and maintaining current
speed ............................................. 130
Cup holder
Important safety notes .................. 198
Rear compartment ......................... 198
Customer Assistance Center
(CAC) ..................................................... 28
Customer Relations Department ....... 28
D
Data
see Technical data
Daytime running lamps
Display message ............................ 165
Function/note s............................. 103
Switching on/off (on-board com-
puter) ............................................. 164
Declarations of conformity ................. 27
Diagnostics connection ...................... 27
Digital Operator's Manual
Help ................................................. 21
Introduction ..................................... 21
Digital speedometer ......................... 164
DIRECT SELECT lever
Automatic transmission ................. 120
Display
see Display messages
see Warning and indicator lamps
Display (cleaning instructions) ........ 218
Display messages
ASSYST PLUS ................................ 216
Index7
Page 12 of 286
Important safety information ........... 71
Warning lamp .................................181
ETS/4ETS (Electronic Traction Sys-
tem) ...................................................... 71
Exhaust check ................................... 127
Exhaust pipe (cleaning instruc-
tions) ................................................. .217
Exterior lighting
see Lights
Exterior mirrors
Adjusting ......................................... 99
Dipping (automatic) ......................... 99
Folding in/out (automatically )......... 99
Folding in/out (electrically) ............. 99
Out of position (troubleshooting) ..... 99
Setting ............................................. 99
Storing settings (memory func-
tion) ................................................. 99
Storing the parking position ............. 99
Eyeglasses compartment ................. 197
F
Features............................................. 198
Filler cap
see Fuel filler flap
Filling capacities (Technical data) ... 275
Flat tire
Changing a wheel/mounting the
spare wheel ................................... 261
MOExtended tire s.......................... 221
Preparing the vehicle ..................... 220
TIREFIT kit ...................................... 222
Floormats ........................................... 206
Fuel
Additives ........................................ 277
Consumption statistics .................. 164
Displaying the current consump-
tion ................................................ 164
Displaying the range ...................... 164
Driving tip s.................................... 127
Fuel gauge ....................................... 33
Grade (gasoline )............................ 276
Important safety notes .................. 276
Problem (malfunction) ................... 125
Refueling ........................................ 122
Tank content/reserve fue l............. 276 Fuel filler flap
Opening ......................................... 123
Fuel level
Calling up the range (on-board
computer) ...................................... 164
Fuel tank
Capacity ........................................ 276
Problem (malfunction) ................... 125
Fuses
Allocation chart ............................. 236
Before changing ............................. 235
Dashboard fuse box ....................... 235
Engine emergency stop ................. 237
Fuse box in the engine compart-
ment .............................................. 236
Fuse box in the front-passenger
footwell .......................................... 236
Fuse box in the trunk ..................... 236
Important safety notes .................. 235
G
Garage door openerClearing the memory ..................... 206
General notes ................................ 203
Important safety notes .................. 204
Opening/closing the garage doo r..2 06
Programming (button in the rear-
view mirror) ................................... 204
Synchronizing the rolling code ....... 204
Gasoline ............................................. 276
Gear or selector lever (cleaning
guidelines) ......................................... 218
Genuine parts ...................................... 23
Glove box .......................................... .197
Google™ Local Search
see also Digital Operator's Man- ual.................................................. 188
H
HANDS-FREE ACCESS .......................... 86
Hazard warning lamps ...................... 102
Head bags
Display message ............................ 170
Head restraints
Adjusting (rear) ................................ 98
10Index
Page 36 of 286
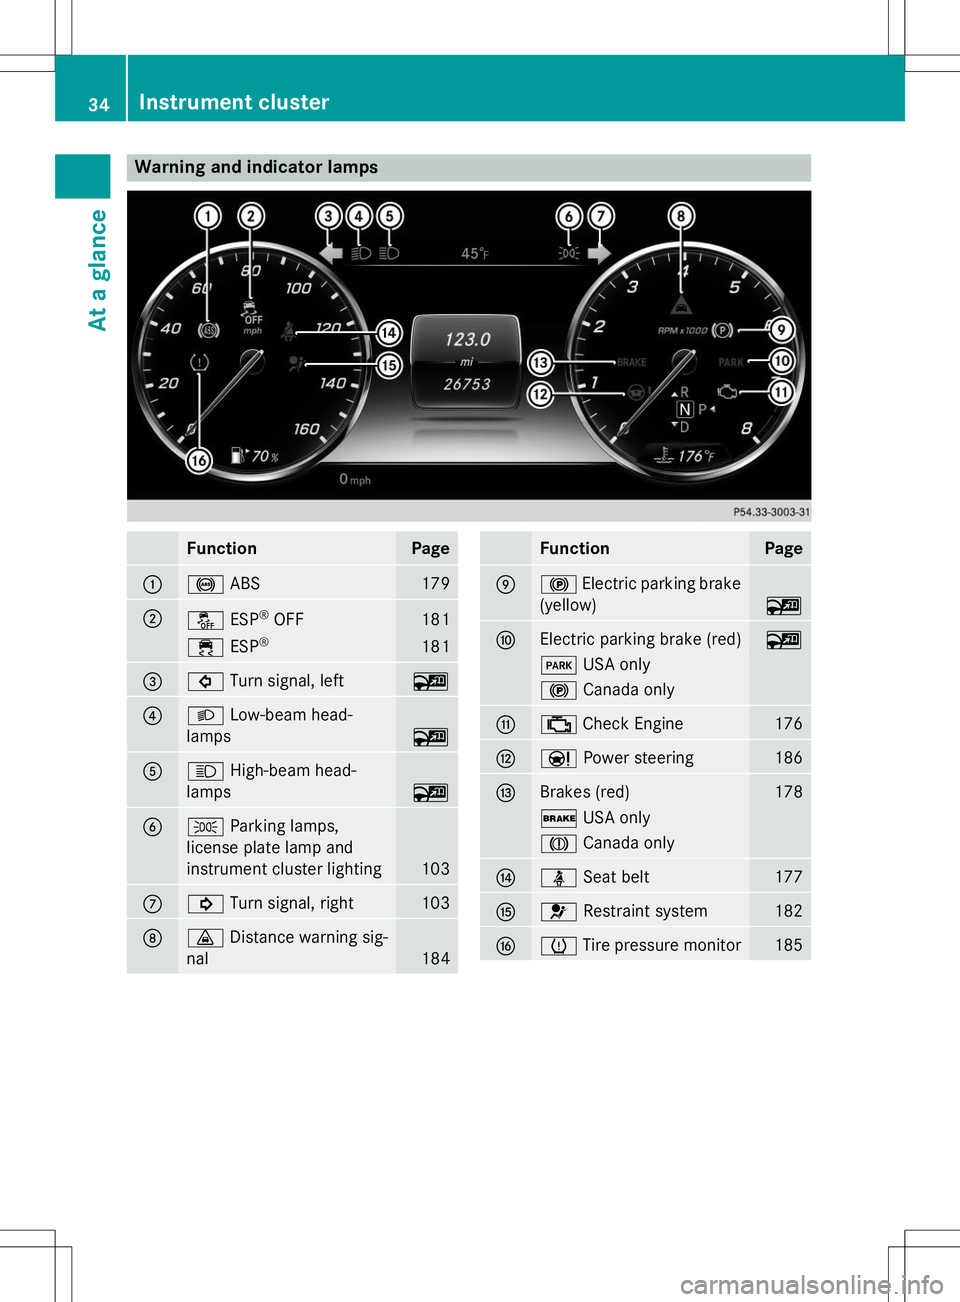
Warning and indicator lamps
FunctionPage
:!ABS179
;åESP®
OFF181
÷ ESP®181
=#
Turn signal, left~
?LLow-beam head-
lamps
~
AK High-beam head-
lamps
~
BT Parking lamps,
license plate lamp and
instrument cluster lighting
103
C! Turn signal, right103
D·Distance warning sig-
nal
184
FunctionPage
E! Electric parking brake
(yellow)
~
FElectric parking brake (red)~
F USA only
!Canada only
G;Check Engine176
HÐ Power steering186
IBrakes (red)178
$USA only
JCanada only
JüSeat belt177
K6Restraint system182
LhTire pressure monitor185
34Instrument cluster
At a glance
Page 68 of 286
The driving safety systems described only
work as effectively as possible when there is
adequate contact between the tires and the
road surface. Pay particular attention to the
information regarding tires, recommended
minimum tire tread depths etc. in the "Wheelsand tires" section ( Ypage 240).
In wintry driving conditions, always use winter tires (M+S tires) and if necessary, snow
chains. Only in this way will the driving safety
systems described in this section work as
effectively as possible.
ABS (Anti-lock Braking System)
General information
ABS regulates brake pressure in such a way
that the wheels do not lock when you brake.
This allows you to continue steering the vehi-
cle when braking. The ! ABS warning lamp in the instrument
cluster lights up when the ignition is switched on. It goes out when the engine is running.
Important safety notes
iObserve the "Important safety notes" sec-
tion ( Ypage 65).
GWARNING
If ABS is faulty, the wheels could lock when
braking. The steerability and braking charac-
teristics may be severely impaired. Addition-
ally, further driving safety systems are deac-
tivated. There is an increased danger of skid-
ding and accidents.
Drive on carefully. Have ABS checked imme-
diately at a qualified specialist workshop.
When ABS is malfunctioning, other systems,
including driving safety systems, will also
become inoperative. Observe the information on the ABS warning lamp ( Ypage 179) and
display messages which may be shown in the
instrument cluster ( Ypage 166).
ABS works from a speed of about 5 mph
(8 km/ h), regardless of road-surface condi- tions. ABS works on slippery surfaces, even
when you only brake gently.
Braking
X
If ABS intervenes: continue to depress the
brake pedal vigorously until the braking sit- uation is over.
X To make a full brake application:
depress the brake pedal with full force.
If ABS intervenes when braking, you will feel a pulsing in the brake pedal.
The pulsating brake pedal can be an indica-
tion of hazardous road conditions, and func-
tions as a reminder to take extra care while
driving.
BAS (Brake Assist System)
General information
BAS operates in emergency braking situa-
tions. If you depress the brake pedal quickly,
BAS automatically boosts the braking force,
thus shortening the stopping distance.
Important safety notes
iObserve the "Important safety notes" sec-
tion ( Ypage 65).
GWARNING
If BAS is malfunctioning, the braking distance
in an emergency braking situation is
increased. There is a risk of an accident.
In an emergency braking situation, depress
the brake pedal with full force. ABS prevents
the wheels from locking.
Braking
X
Keep the brake pedal firmly depressed until
the emergency braking situation is over.
ABS prevents the wheels from locking.
The brakes will function as usual once you
release the brake pedal. BAS is deactivated.
66Driving safety systems
Safety
Page 73 of 286
The brakes will work normally again if:
R you release the brake pedal.
R there is no longer any danger of a collision.
R no obstacle is detected in front of your vehicle.
Adaptive Brake Assist is then deactivated.
If adaptive Brake Assist demands particularly
high braking force, preventative passenger
protection measures (PRE-SAFE ®
) are activa-
ted simultaneously.
Up to a speed of approximately 155 mph
(250 km/ h), adaptive Brake Assist is capable
of reacting to moving objects that have
already been detected as such at least once
over the period of observation.
Up to a speed of approximately 44 mph
(70 km/h), adaptive Brake Assist reacts to
stationary obstacles.
ESP®(Electronic Stability Program)
General notes
iObserve the "Important safety notes" sec-
tion ( Ypage 65).
ESP ®
monitors driving stability and traction,
i.e. power transmission between the tires and
the road surface.
If ESP ®
detects that the vehicle is deviating
from the direction desired by the driver, one
or more wheels are braked to stabilize the
vehicle. The engine output is also modified to keep the vehicle on the desired course within
physical limits. ESP ®
assists the driver when
pulling away on wet or slippery roads. ESP ®
can also stabilize the vehicle during braking.
ETS/4ETS (Electronic Traction System)
iObserve the "Important safety notes" sec-
tion ( Ypage 65).
ETS traction control is part of ESP ®
. On vehi-
cles with 4MATIC, 4ETS is part of ESP ®
.
Traction control brakes the drive wheels indi-
vidually if they spin. This enables you to pull away and accelerate on slippery surfaces, for
example if the road surface is slippery on one side. In addition, more drive torque is trans-
ferred to the wheel or wheels with traction.
Traction control remains active, even if you
deactivate ESP ®
.
Important safety notes
GWARNING
If ESP ®
is malfunctioning, ESP ®
is unable to
stabilize the vehicle. Additionally, further driv- ing safety systems are deactivated. This
increases the risk of skidding and an accident.
Drive on carefully. Have ESP ®
checked at a
qualified specialist workshop.
Vehicles without 4MATIC: observe the notes
on ESP ®
(Y page 234) when towing the vehi-
cle with a raised rear axle.
ESP ®
is only deactivated if the åwarning
lamp is lit continuously.
If the ÷ warning lamp lights up continu-
ously, ESP ®
is not available due to a malfunc-
tion.
Observe the information on warning lamps ( Y page 181) and display messages which
may be shown in the instrument cluster( Y page 166).
Only use wheels with the recommended tire
sizes. Only then will ESP ®
function properly.
Characteristics of ESP®
General information
If the ÷ ESP warning lamp goes out before
beginning the journey, ESP ®
is automatically
active.
If ESP ®
intervenes, the ÷ESP®
warning
lamp flashes in the instrument cluster.
Driving safety systems71
Safety
Z
Page 81 of 286
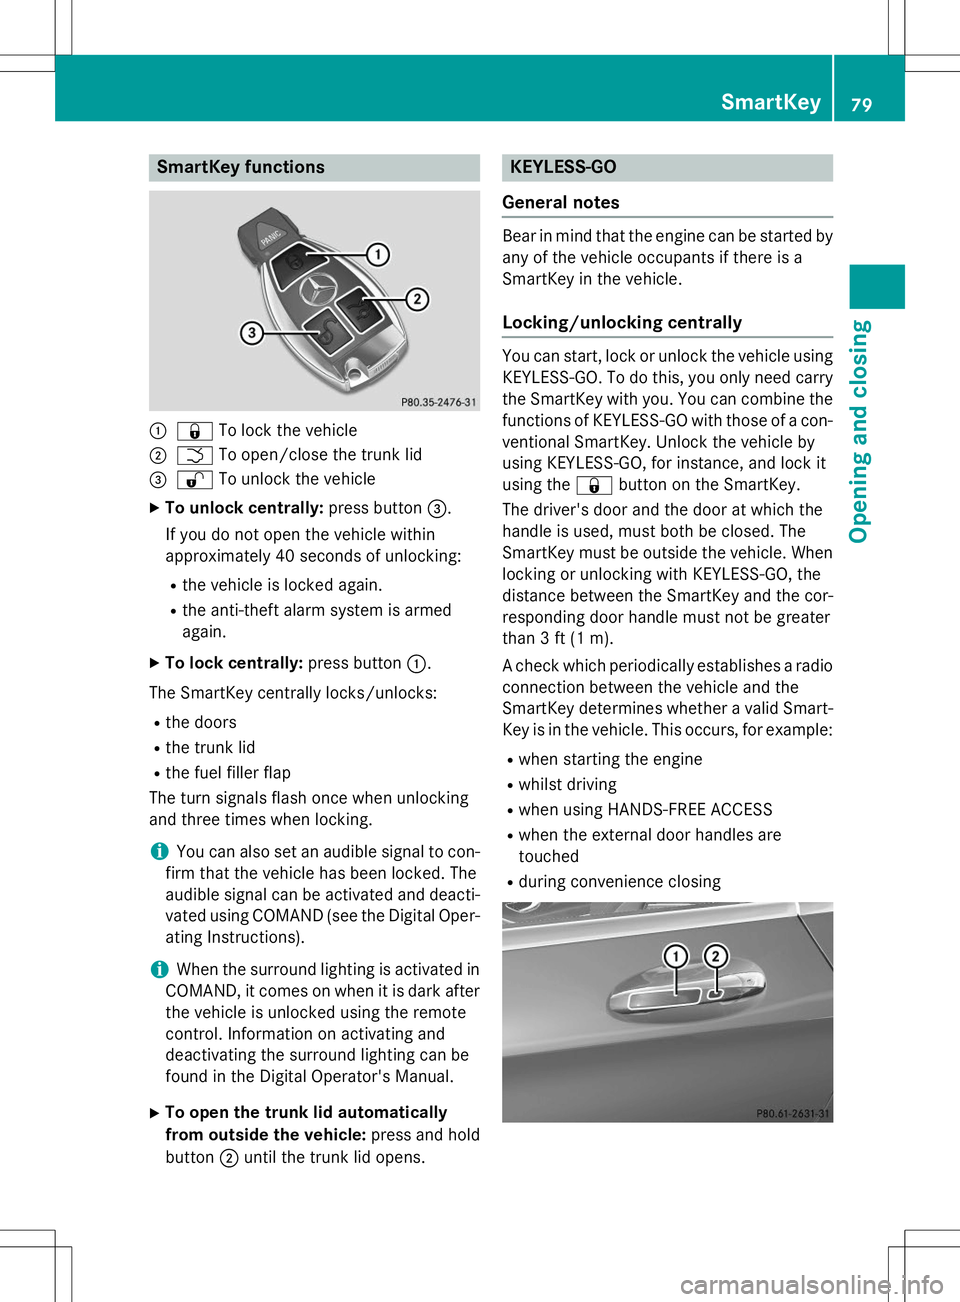
SmartKey functions
:&To lock the vehicle
;FTo open/close the trunk lid
=%To unlock the vehicle
X To unlock centrally: press button=.
If you do not open the vehicle within
approximately 40 seconds of unlocking:
R the vehicle is locked again.
R the anti-theft alarm system is armedagain.
X To lock centrally: press button:.
The SmartKey centrally locks/unlocks:
R the doors
R the trunk lid
R the fuel filler flap
The turn signals flash once when unlocking
and three times when locking.
iYou can also set an audible signal to con-
firm that the vehicle has been locked. The
audible signal can be activated and deacti-
vated using COMAND (see the Digital Oper- ating Instructions).
iWhen the surround lighting is activated in
COMAND, it comes on when it is dark after
the vehicle is unlocked using the remote
control. Information on activating and
deactivating the surround lighting can be
found in the Digital Operator's Manual.
X To open the trunk lid automatically
from outside the vehicle: press and hold
button ;until the trunk lid opens.
KEYLESS-GO
General notes
Bear in mind that the engine can be started by any of the vehicle occupants if there is a
SmartKey in the vehicle.
Locking/unlocking centrally
You can start, lock or unlock the vehicle using KEYLESS-GO. To do this, you only need carry
the SmartKey with you. You can combine the
functions of KEYLESS-GO with those of a con- ventional SmartKey. Unlock the vehicle by
using KEYLESS-GO, for instance, and lock it
using the &button on the SmartKey.
The driver's door and the door at which the
handle is used, must both be closed. The
SmartKey must be outside the vehicle. When
locking or unlocking with KEYLESS-GO, the
distance between the SmartKey and the cor-
responding door handle must not be greater
than 3 ft (1 m).
A check which periodically establishes a radio
connection between the vehicle and the
SmartKey determines whether a valid Smart- Key is in the vehicle. This occurs, for example:
R when starting the engine
R whilst driving
R when using HANDS-FREE ACCESS
R when the external door handles aretouched
R during convenience closing
SmartKey79
Opening and closing
Z
Page 82 of 286
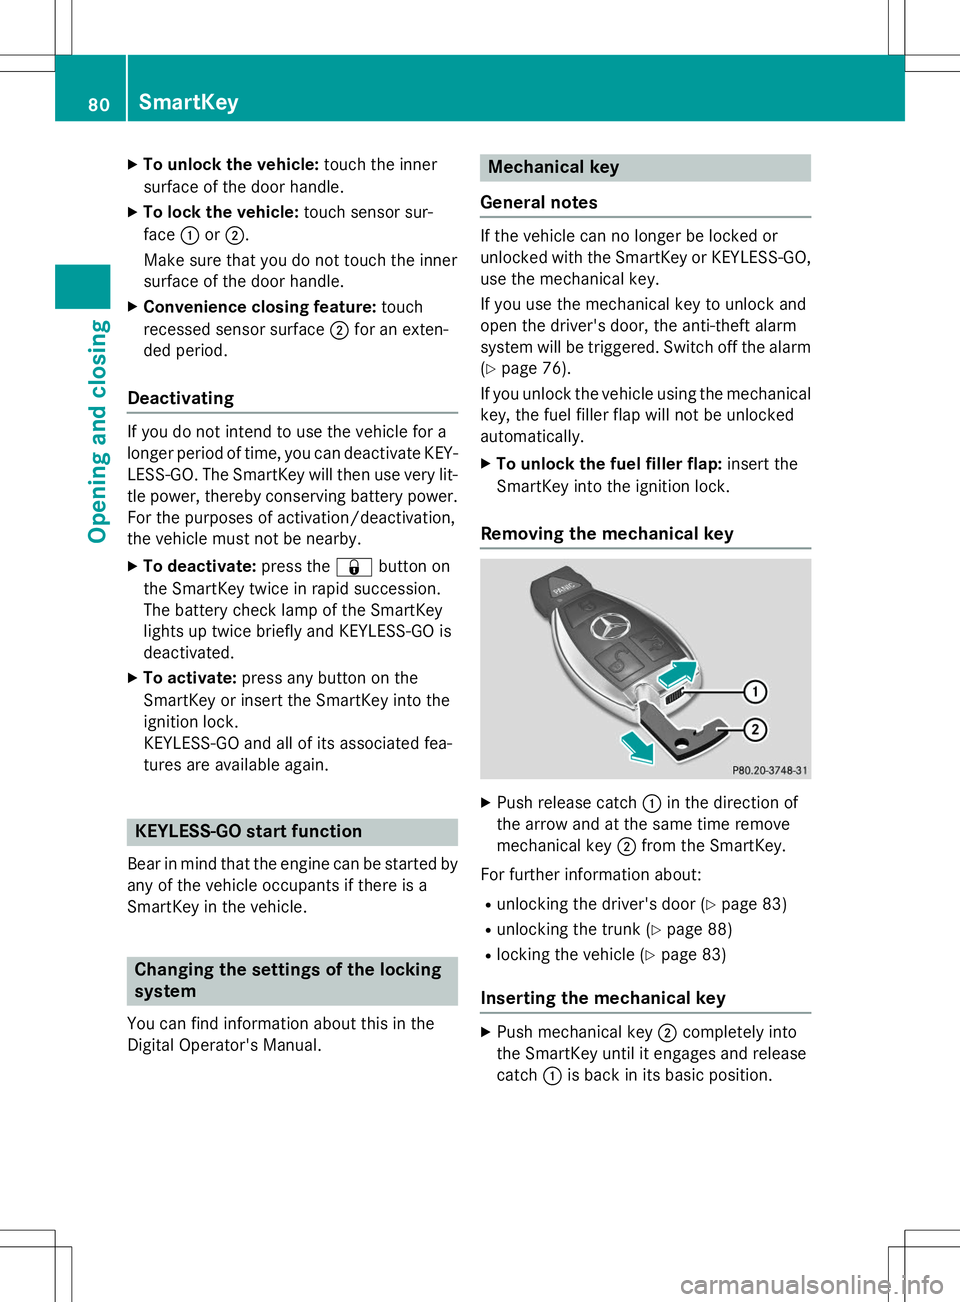
XTo unlock the vehicle: touch the inner
surface of the door handle.
X To lock the vehicle: touch sensor sur-
face :or; .
Make sure that you do not touch the inner
surface of the door handle.
X Convenience closing feature: touch
recessed sensor surface ;for an exten-
ded period.
Deactivating
If you do not intend to use the vehicle for a
longer period of time, you can deactivate KEY-
LESS-GO. The SmartKey will then use very lit-
tle power, thereby conserving battery power.
For the purposes of activation/deactivation,
the vehicle must not be nearby. X To deactivate: press the&button on
the SmartKey twice in rapid succession.
The battery check lamp of the SmartKey
lights up twice briefly and KEYLESS-GO is
deactivated.
X To activate: press any button on the
SmartKey or insert the SmartKey into the
ignition lock.
KEYLESS-GO and all of its associated fea-
tures are available again.
KEYLESS-GO start function
Bear in mind that the engine can be started by any of the vehicle occupants if there is a
SmartKey in the vehicle.
Changing the settings of the locking
system
You can find information about this in the
Digital Operator's Manual.
Mechanical key
General notes
If the vehicle can no longer be locked or
unlocked with the SmartKey or KEYLESS-GO, use the mechanical key.
If you use the mechanical key to unlock and
open the driver's door, the anti-theft alarm
system will be triggered. Switch off the alarm
( Y page 76).
If you unlock the vehicle using the mechanical key, the fuel filler flap will not be unlocked
automatically.
X To unlock the fuel filler flap: insert the
SmartKey into the ignition lock.
Removing the mechanical key
X Push release catch :in the direction of
the arrow and at the same time remove
mechanical key ;from the SmartKey.
For further information about: R unlocking the driver's door ( Ypage 83)
R unlocking the trunk ( Ypage 88)
R locking the vehicle ( Ypage 83)
Inserting the mechanical key
X
Push mechanical key ;completely into
the SmartKey until it engages and release catch :is back in its basic position.
80SmartKey
Opening and closing