2015 MERCEDES-BENZ S-COUPE fuel cap
[x] Cancel search: fuel capPage 11 of 286
Break-in period .............................. 114
DISTRONIC PLUS ........................... 135
Downhill gradient ........................... 128
Drinking and driving ....................... 127
Driving abroad ............................... 102
Driving in winter ............................. 128
Driving on flooded roads ................ 128
Driving on wet roads ...................... 128
Exhaust check ............................... 127
Fuel ................................................ 127
General .......................................... 127
Hydroplaning ................................. 128
Icy road surfaces ........................... 128
Limited braking efficiency on sal-
ted roads ....................................... 128
Snow chains .................................. 242
Symmetrical low beam.................. 102
The first 1000 miles (1500 km) ..... 114
Wet road surface ........................... 128
DVD video
Operating (on-board computer) ..... 164
see also Digital Operator's Man-
ual .................................................. 188
E
EASY-ENTRY featureFunction/note s................................ 99
EASY-EXIT feature
Function/note s................................ 99
EBD (electronic brake force distri-
bution)
Display message ............................ 169
Function/note s................................ 73
ECO display
Function/note s............................. 128
ECO start/stop function
General information ....................... 119
Electronic Stability Program
see ESP ®
(Electronic Stability Program)
Emergency
Automatic measures after an acci-
dent ................................................. 60
Emergency release
Driver's door .................................... 83
Trunk ............................................... 89
Vehicle ............................................. 83 Emergency Tensioning Devices
Activation ......................................... 57
Emissions control
Service and warranty information .... 24
Engine
Check Engine warning lamp ........... 176
Display message ............................ 174
ECO start/stop function ................ 119
Engine number ............................... 275
Irregular running ............................ 119
Jump-starting ................................. 229
Starting problems .......................... 119
Starting the engine with the
SmartKey ....................................... 118
Starting with the Start/Stop but-
ton ................................................. 118
Switching off .................................. 126
Switching off with the Start/Stop
button ............................................ 126
Switching off with the vehicle key .. 126
Tow-starting (vehicle) ..................... 234
Engine electronics
Problem (malfunction) ................... 119
Engine emergency stop .................... 237
Engine oil
Adding ........................................... 213
Additives ........................................ 278
Checking the oil level ..................... 211
Checking the oil level using the
dipstick .......................................... 211
Checking the oil level using the
on-board computer ........................ 213
Display message ............................ 165
Filling capacity ............................... 278
Notes about oil grade s................... 277
Notes on oil level/consumption .... 211
Viscosity ........................................ 278
Entering an address
see also Digital Operator's Man-
ual .................................................. 188
ESP ®
(Electronic Stability Pro-
gram)
Characteristics ................................. 71
Deactivating/activating ................... 72
Display message ............................ 166
ETS/4ETS ........................................ 71
Function/note s................................ 71
General notes .................................. 71
Index9
Page 12 of 286
Important safety information ........... 71
Warning lamp .................................181
ETS/4ETS (Electronic Traction Sys-
tem) ...................................................... 71
Exhaust check ................................... 127
Exhaust pipe (cleaning instruc-
tions) ................................................. .217
Exterior lighting
see Lights
Exterior mirrors
Adjusting ......................................... 99
Dipping (automatic) ......................... 99
Folding in/out (automatically )......... 99
Folding in/out (electrically) ............. 99
Out of position (troubleshooting) ..... 99
Setting ............................................. 99
Storing settings (memory func-
tion) ................................................. 99
Storing the parking position ............. 99
Eyeglasses compartment ................. 197
F
Features............................................. 198
Filler cap
see Fuel filler flap
Filling capacities (Technical data) ... 275
Flat tire
Changing a wheel/mounting the
spare wheel ................................... 261
MOExtended tire s.......................... 221
Preparing the vehicle ..................... 220
TIREFIT kit ...................................... 222
Floormats ........................................... 206
Fuel
Additives ........................................ 277
Consumption statistics .................. 164
Displaying the current consump-
tion ................................................ 164
Displaying the range ...................... 164
Driving tip s.................................... 127
Fuel gauge ....................................... 33
Grade (gasoline )............................ 276
Important safety notes .................. 276
Problem (malfunction) ................... 125
Refueling ........................................ 122
Tank content/reserve fue l............. 276 Fuel filler flap
Opening ......................................... 123
Fuel level
Calling up the range (on-board
computer) ...................................... 164
Fuel tank
Capacity ........................................ 276
Problem (malfunction) ................... 125
Fuses
Allocation chart ............................. 236
Before changing ............................. 235
Dashboard fuse box ....................... 235
Engine emergency stop ................. 237
Fuse box in the engine compart-
ment .............................................. 236
Fuse box in the front-passenger
footwell .......................................... 236
Fuse box in the trunk ..................... 236
Important safety notes .................. 235
G
Garage door openerClearing the memory ..................... 206
General notes ................................ 203
Important safety notes .................. 204
Opening/closing the garage doo r..2 06
Programming (button in the rear-
view mirror) ................................... 204
Synchronizing the rolling code ....... 204
Gasoline ............................................. 276
Gear or selector lever (cleaning
guidelines) ......................................... 218
Genuine parts ...................................... 23
Glove box .......................................... .197
Google™ Local Search
see also Digital Operator's Man- ual.................................................. 188
H
HANDS-FREE ACCESS .......................... 86
Hazard warning lamps ...................... 102
Head bags
Display message ............................ 170
Head restraints
Adjusting (rear) ................................ 98
10Index
Page 19 of 286
Mechanical key ................................ 80
Overview .......................................... 78
Positions (ignition lock) ................. 115
Problem (malfunction) ..................... 82
Starting the engine ........................ 118
SMS
see also Digital Operator's Man-
ual .................................................. 188
Snow chains ...................................... 242
Sockets
Center console .............................. 198
General notes ................................ 198
Rear compartment ........................ .198
Trunk ............................................. 198
Special seat belt retractor .................. 61
Specialist workshop ............................ 27
Speed, controlling
see Cruise control
Speedometer
In the Instrument cluster ................. 33
Selecting the unit of measure-
ment .............................................. 164
see Instrument cluster
Standing lamps
Display message ............................ 165
Switching on/off ........................... 103
Start/Stop button
Removing ....................................... 117
Starting the engine ........................ 118
Start/stop function
see ECO start/stop function
Starting (engine) ................................ 117
STEER CONTROL .................................. 75
Steering
Warning lamps ............................... 186
Steering (display message) .............. 176
Steering Assist (DISTRONIC PLUS)
Display message ............................ 165
Steering assistant STEER CON-TROL
see STEER CONTROL
Steering wheel
Adjusting (electrically) ..................... 99
Button overview ............................... 35
Buttons (on-board computer) ......... 161
Important safety notes .................... 99
Paddle shifters ............................... 121 Steering wheel heating .................... 99
Storing settings (memory func-
tion) ................................................. 99
Steering wheel (cleaning instruc-
tions) ................................................. .218
Steering wheel heating
Switching on/off .............................. 99
Steering wheel paddle shifters ........121
Stowage areas ................................... 196
Stowage compartments
Armrest (under) ............................ .197
Center console .............................. 197
Center console in rear compart-
ment .............................................. 197
Cup holders ................................... 198
Door ............................................... 197
Eyeglasses compartment .............. .197
Glove box ....................................... 197
Important safety information ......... 196
Rear ............................................... 197
Rear seat backrest ......................... 197
Stowage net ................................... 197
Stowage net ....................................... 197
Stowage space
Parcel net retainers ....................... 197
Securing a load .............................. 197
Stowage well beneath the trunk
floor .................................................... 197
Summer tires
In winter ........................................ 242
Sun visor ............................................ 198
Suspension tuning
Active Body Control ABC .............. .140
AIRMATIC ...................................... 141
Switching air-recirculation mode
on/off ................................................. 111
T
Tachometer ........................................ 160
Tail lamps
Display message ............................ 165
see Lights
Tank content
Fuel gauge ....................................... 33
Technical data
Capacities ...................................... 275
Information ................................... .274
Index17
Page 31 of 286
QR codes for the rescue card
The QR code is secured in the fuel filler flap
and on the opposite side on the B-pillar. In the
event of an accident, rescue services can use the QR code to quickly find the appropriate
rescue card for your vehicle. The current res-
cue card contains the most important infor-
mation about your vehicle in a compact form, e.g. the routing of the electric cables.
You can find more information at https://
portal.aftersales.i.daimler.com.
Data stored in the vehicle
Data recording
This vehicle is capable of recording diagnostic information relating to vehicle operation, mal-
functions, and user settings. This may include information about the performance or status
of various systems, including but not limited
to, engine, throttle, steering or brake sys-
tems, that is stored and can be read out with
suitable devices, particularly when the vehi-
cle is serviced. The data obtained is used to
properly diagnose and service your vehicle or to further optimize and develop vehicle func-
tions.
COMAND/mbrace
If the vehicle is equipped with COMAND or
mbrace, additional data about the vehicle’s
operation, the use of the vehicle in certain
situations, and the location of the vehicle maybe compiled through COMAND or the mbrace
system.
For additional information please refer to the
COMAND User Manual and/or the mbrace
Terms and Conditions.
Event data recorders
This vehicle is equipped with an event data
recorder (EDR). The main purpose of an EDR is to record data that will assist in under-
standing how a vehicle’s systems performed
in certain crash or near crash-like situations,
such as during air bag deployment or when
hitting a road obstacle. The EDR is designed
to record data related to vehicle dynamics
and safety systems for a short period of time,
typically 30 seconds or less.
The EDR in this vehicle is designed to record
such data as:
R how various systems in your vehicle areoperating
R whether or not the driver and passenger
seat belts are fastened
R how far (if at all) the driver is depressing the
accelerator and/or brake pedal and
R how fast the vehicle is traveling
This data can help provide a better under-
standing of the circumstances in which
crashes and injuries occur. NOTE: EDR data is recorded by your vehicle only if a non-trivial
crash situation occurs; no data is recorded by
the EDR under normal driving conditions and no personal data (e.g., name, gender, age,
and crash location) are recorded. However,
other parties, such as law enforcement, can
combine the EDR data with the type of per-
sonal identification data routinely acquired
during a crash investigation.
To read data recorded by an EDR, special
equipment is required, and access to the vehi- cle or the EDR is needed. In addition to the
vehicle manufacturer, other parties that have
the special equipment, such as law enforce-
ment, can read the information by accessing
the vehicle or the EDR.
EDR data may be used in civil and criminal
matters as a tool in accident reconstruction,
accident claims, and vehicle safety. Since the Crash Data Retrieval CDR tool that is used to
extract data from the EDR is commercially
available, Mercedes-Benz USA, LLC
("MBUSA") expressly disclaims any and all lia- bility arising from the extraction of this infor-
mation by unauthorized Mercedes-Benz per-
sonnel.
Introduction29
Z
Page 35 of 286
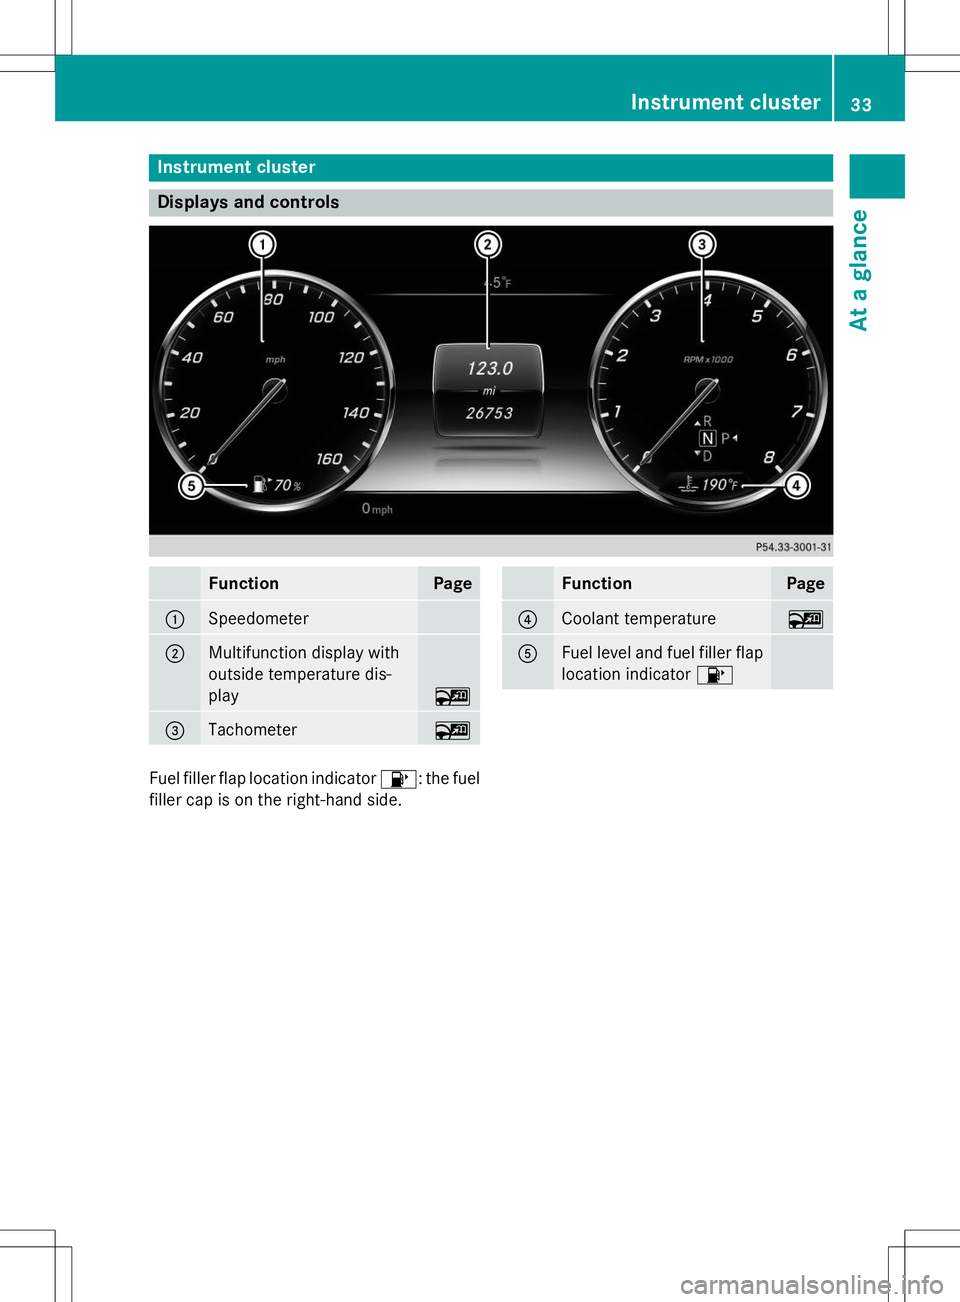
Instrument cluster
Displays and controls
FunctionPage
:Speedometer
;Multifunction display with
outside temperature dis-play
~
=Tachometer~
FunctionPage
?Coolant temperature~
AFuel level and fuel filler flaplocation indicator 8
Fuel filler flap location indicator 8: the fuel
filler cap is on the right-hand side.
Instrument cluster33
At a glance
Page 86 of 286
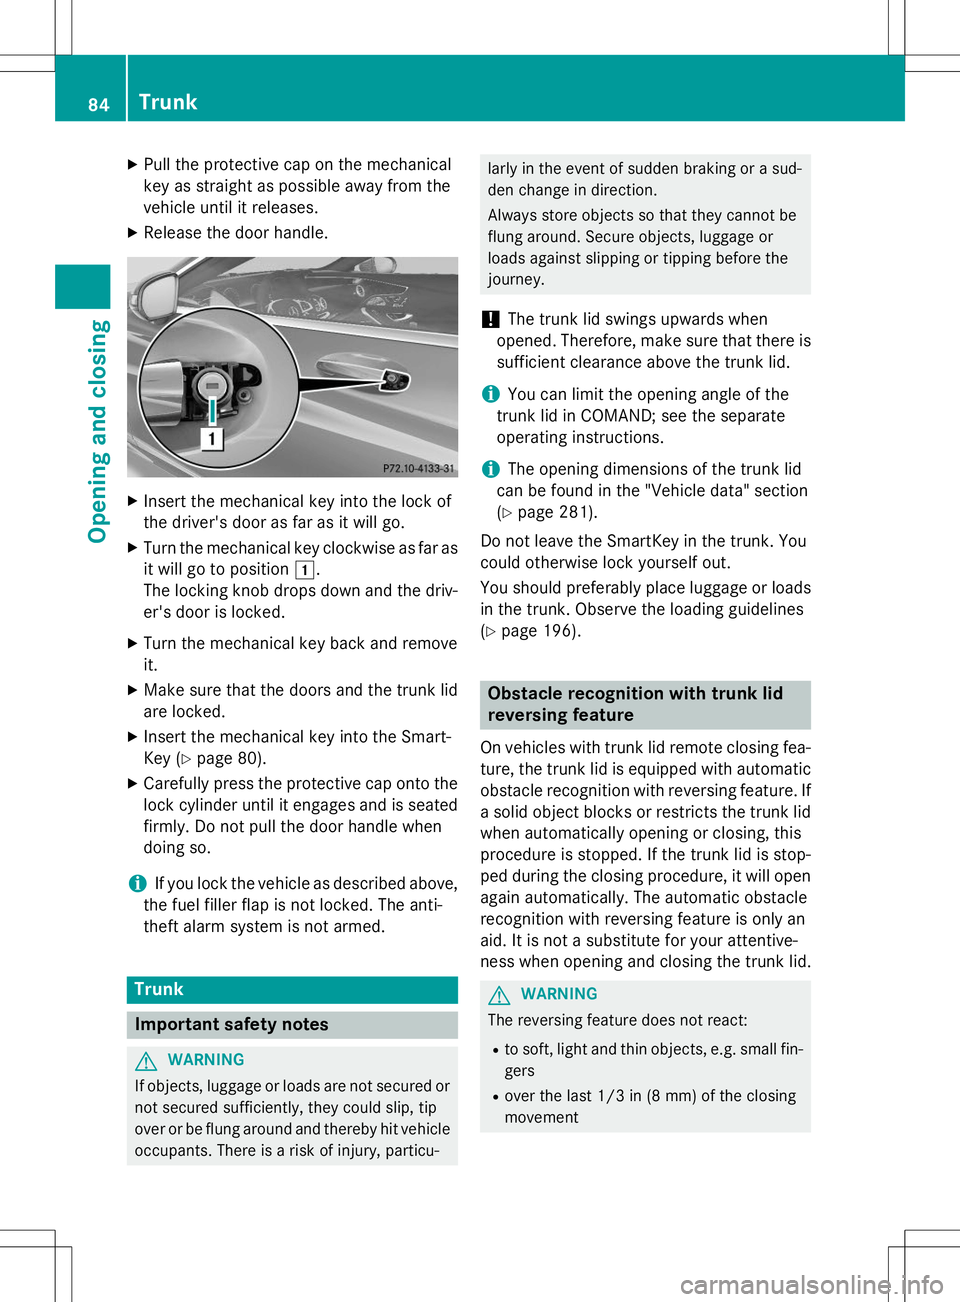
XPull the protective cap on the mechanical
key as straight as possible away from the
vehicle until it releases.
X Release the door handle.
XInsert the mechanical key into the lock of
the driver's door as far as it will go.
X Turn the mechanical key clockwise as far as
it will go to position 1.
The locking knob drops down and the driv- er's door is locked.
X Turn the mechanical key back and removeit.
X Make sure that the doors and the trunk lid
are locked.
X Insert the mechanical key into the Smart-
Key ( Ypage 80).
X Carefully press the protective cap onto the
lock cylinder until it engages and is seated
firmly. Do not pull the door handle when
doing so.
iIf you lock the vehicle as described above,
the fuel filler flap is not locked. The anti-
theft alarm system is not armed.
Trunk
Important safety notes
GWARNING
If objects, luggage or loads are not secured or not secured sufficiently, they could slip, tip
over or be flung around and thereby hit vehicle
occupants. There is a risk of injury, particu-
larly in the event of sudden braking or a sud-
den change in direction.
Always store objects so that they cannot be
flung around. Secure objects, luggage or
loads against slipping or tipping before the
journey.
!The trunk lid swings upwards when
opened. Therefore, make sure that there is
sufficient clearance above the trunk lid.
iYou can limit the opening angle of the
trunk lid in COMAND; see the separate
operating instructions.
iThe opening dimensions of the trunk lid
can be found in the "Vehicle data" section ( Y page 281).
Do not leave the SmartKey in the trunk. You
could otherwise lock yourself out.
You should preferably place luggage or loads
in the trunk. Observe the loading guidelines ( Y page 196).
Obstacle recognition with trunk lid
reversing feature
On vehicles with trunk lid remote closing fea-
ture, the trunk lid is equipped with automatic obstacle recognition with reversing feature. If a solid object blocks or restricts the trunk lid
when automatically opening or closing, this
procedure is stopped. If the trunk lid is stop-
ped during the closing procedure, it will open
again automatically. The automatic obstacle
recognition with reversing feature is only an
aid. It is not a substitute for your attentive-
ness when opening and closing the trunk lid.
GWARNING
The reversing feature does not react:
R to soft, light and thin objects, e.g. small fin-
gers
R over the last 1/3 in (8 mm) of the closing
movement
84Trunk
Opening and closing
Page 125 of 286
clean water. Seek medical assistance with-out delay.
R If fuel is swallowed, seek medical assis-
tance without delay. Do not induce vomit-ing.
R Immediately change out of clothing which
has come into contact with fuel.
GWARNING
Electrostatic buildup can create sparks and
ignite fuel vapors. There is a risk of fire and
explosion.
Always touch the vehicle body before opening
the fuel filler flap or touching the fuel pump
nozzle. Any existing electrostatic buildup is
thereby discharged.
Do not get into the vehicle again during the
refueling process. Otherwise, electrostatic
charge could build up again.
!Do not use diesel to refuel vehicles with a
gasoline engine. Do not switch on the igni-
tion if you accidentally refuel with the
wrong fuel. Otherwise, the fuel will enter
the fuel system. Even small amounts of the wrong fuel could result in damage to the
fuel system and the engine. Notify a quali-
fied specialist workshop and have the fuel
tank and fuel lines drained completely.
!Overfilling the fuel tank could damage the
fuel system.
!Take care not to spill any fuel on painted
surfaces. You could otherwise damage the
paintwork.
!Use a filter when refueling from a fuel can.
Otherwise, the fuel lines and/or injection
system could be blocked by particles from
the fuel can.
If you overfill the fuel tank, fuel could spray
out when the fuel pump nozzle is removed.
For further information on fuel and fuel quality
( Y page 276).
Refueling
General information
Pay attention to the important safety notes ( Y page 122).
If you unlock/lock the vehicle from the out-
side, the fuel filler flap also unlocks/locks.
The position of the fuel filler cap is displayed 8 in the instrument cluster. The arrow
next to the filling pump indicates the side of
the vehicle.
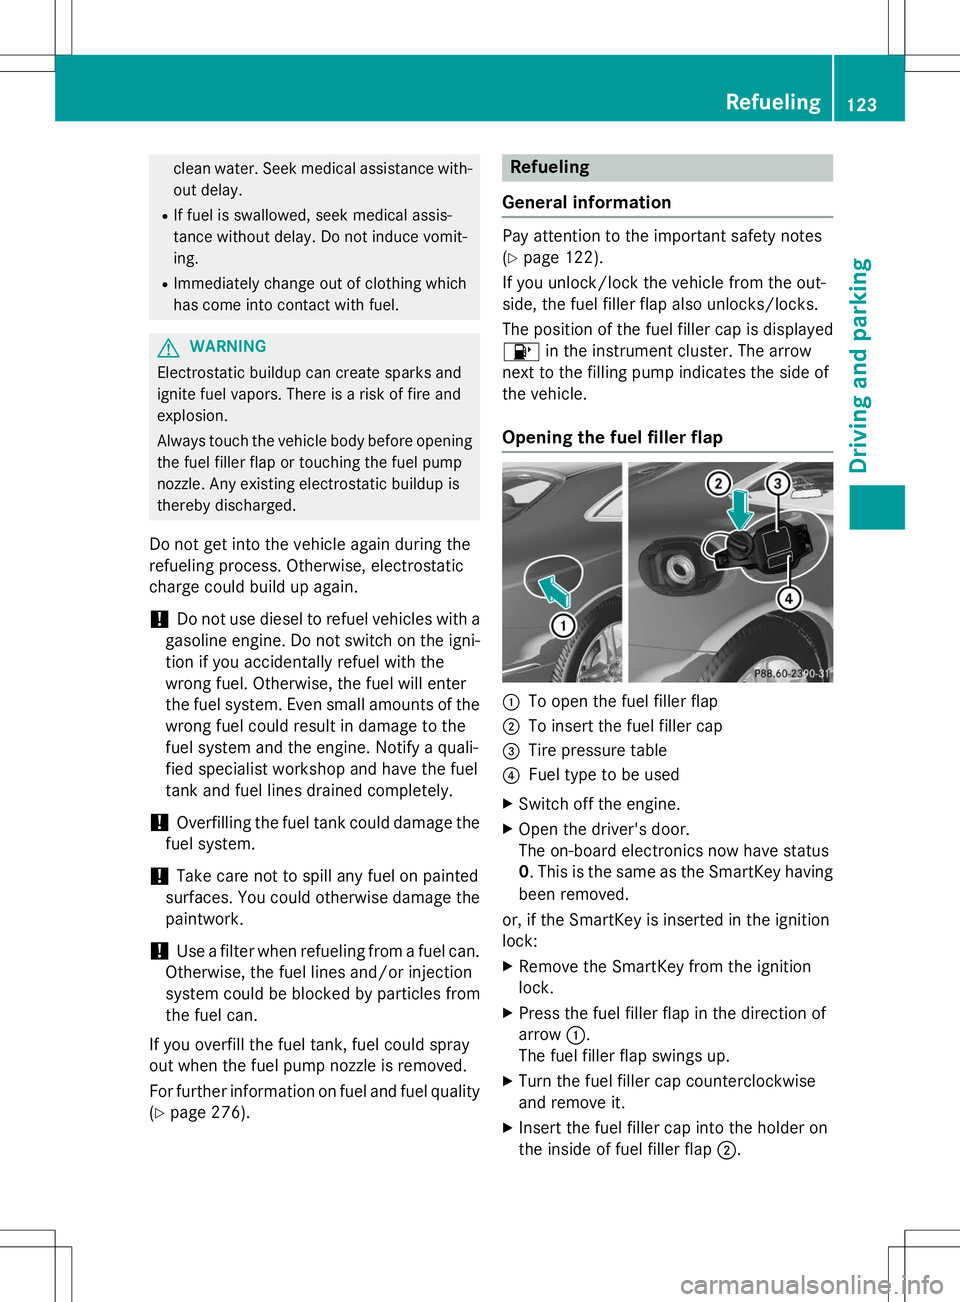
Opening the fuel filler flap
:To open the fuel filler flap
;To insert the fuel filler cap
=Tire pressure table
?Fuel type to be used
X Switch off the engine.
X Open the driver's door.
The on-board electronics now have status0. This is the same as the SmartKey having
been removed.
or, if the SmartKey is inserted in the ignitionlock:
X Remove the SmartKey from the ignitionlock.
X Press the fuel filler flap in the direction of
arrow :.
The fuel filler flap swings up.
X Turn the fuel filler cap counterclockwise
and remove it.
X Insert the fuel filler cap into the holder on
the inside of fuel filler flap ;.
Refueling123
Driving and parking
Z
Page 126 of 286
XCompletely insert the filler neck of the fuel
pump nozzle into the tank, hook in place
and refuel.
X Only fill the tank until the pump nozzle
switches off.
iDo not add any more fuel after the pump
stops filling for the first time. Otherwise,
fuel may leak out.
Closing the fuel filler flap
X Replace the cap on the filler neck and turn
clockwise until it engages audibly.
X Close the fuel filler flap.
If you drive at speeds above 2 km/h with the fuel filler flap open, the
Tankklappeoffen
(Fuel filler flap open)message is
shown in the multifunction display.
iClose the fuel filler flap before locking the
vehicle.
iIf you are driving with the fuel filler cap
open, the 8reserve fuel warning lamp
flashes. A message appears in the multi-
function display ( Ypage 165).
In addition, the ;Check Engine warning
lamp may light up ( Ypage 176).
For further information on warning and indi- cator lamps in the instrument cluster, see( Y page 176).
124Refueling
Driving and pa rking