2015 MERCEDES-BENZ S-COUPE check oil
[x] Cancel search: check oilPage 11 of 286
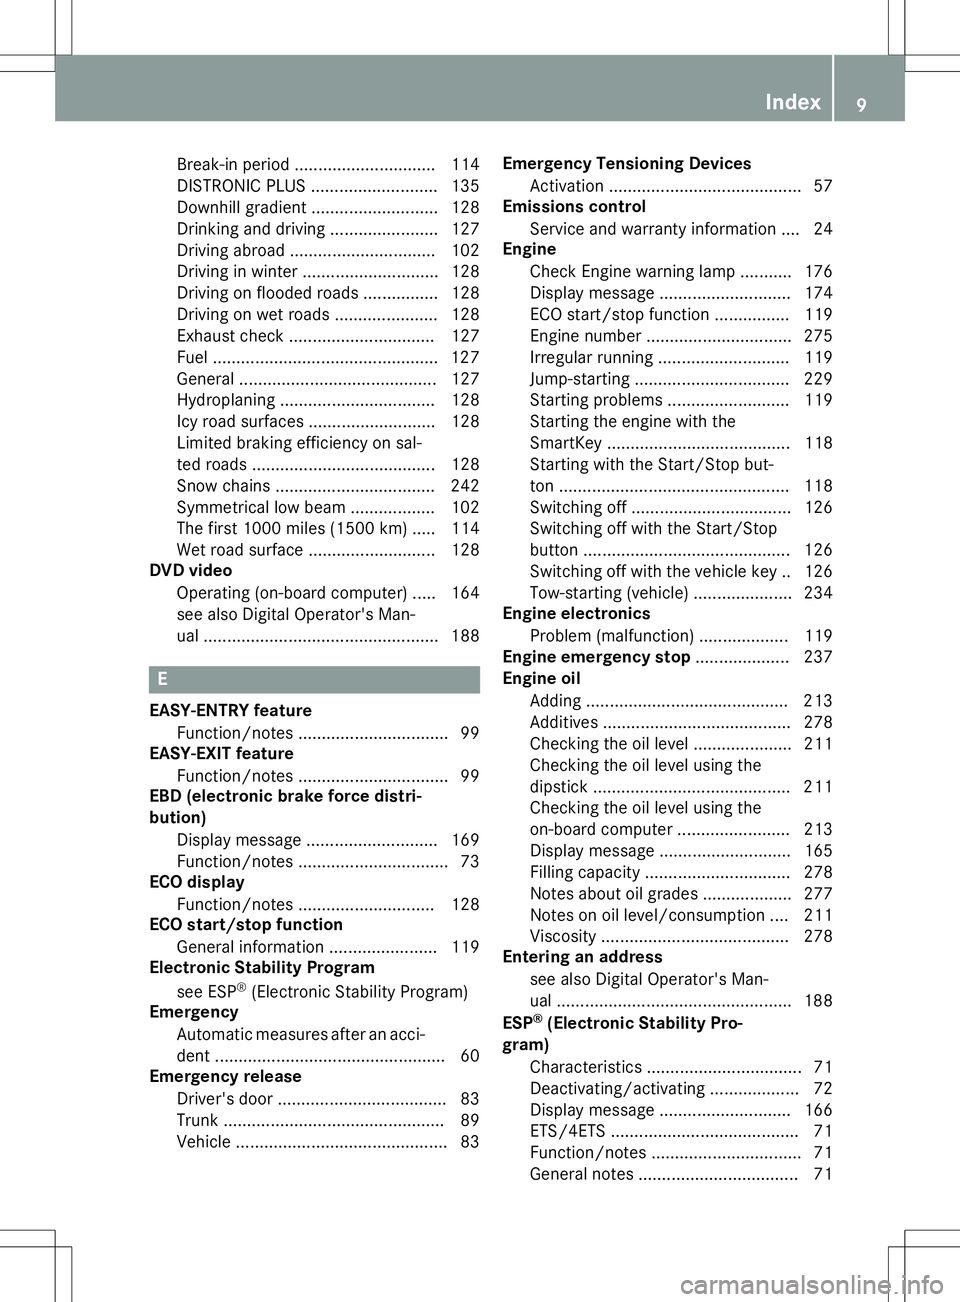
Break-in period .............................. 114
DISTRONIC PLUS ........................... 135
Downhill gradient ........................... 128
Drinking and driving ....................... 127
Driving abroad ............................... 102
Driving in winter ............................. 128
Driving on flooded roads ................ 128
Driving on wet roads ...................... 128
Exhaust check ............................... 127
Fuel ................................................ 127
General .......................................... 127
Hydroplaning ................................. 128
Icy road surfaces ........................... 128
Limited braking efficiency on sal-
ted roads ....................................... 128
Snow chains .................................. 242
Symmetrical low beam.................. 102
The first 1000 miles (1500 km) ..... 114
Wet road surface ........................... 128
DVD video
Operating (on-board computer) ..... 164
see also Digital Operator's Man-
ual .................................................. 188
E
EASY-ENTRY featureFunction/note s................................ 99
EASY-EXIT feature
Function/note s................................ 99
EBD (electronic brake force distri-
bution)
Display message ............................ 169
Function/note s................................ 73
ECO display
Function/note s............................. 128
ECO start/stop function
General information ....................... 119
Electronic Stability Program
see ESP ®
(Electronic Stability Program)
Emergency
Automatic measures after an acci-
dent ................................................. 60
Emergency release
Driver's door .................................... 83
Trunk ............................................... 89
Vehicle ............................................. 83 Emergency Tensioning Devices
Activation ......................................... 57
Emissions control
Service and warranty information .... 24
Engine
Check Engine warning lamp ........... 176
Display message ............................ 174
ECO start/stop function ................ 119
Engine number ............................... 275
Irregular running ............................ 119
Jump-starting ................................. 229
Starting problems .......................... 119
Starting the engine with the
SmartKey ....................................... 118
Starting with the Start/Stop but-
ton ................................................. 118
Switching off .................................. 126
Switching off with the Start/Stop
button ............................................ 126
Switching off with the vehicle key .. 126
Tow-starting (vehicle) ..................... 234
Engine electronics
Problem (malfunction) ................... 119
Engine emergency stop .................... 237
Engine oil
Adding ........................................... 213
Additives ........................................ 278
Checking the oil level ..................... 211
Checking the oil level using the
dipstick .......................................... 211
Checking the oil level using the
on-board computer ........................ 213
Display message ............................ 165
Filling capacity ............................... 278
Notes about oil grade s................... 277
Notes on oil level/consumption .... 211
Viscosity ........................................ 278
Entering an address
see also Digital Operator's Man-
ual .................................................. 188
ESP ®
(Electronic Stability Pro-
gram)
Characteristics ................................. 71
Deactivating/activating ................... 72
Display message ............................ 166
ETS/4ETS ........................................ 71
Function/note s................................ 71
General notes .................................. 71
Index9
Page 80 of 286
Useful information
iThis Operator's Manual describes all
models and all standard and optional equip- ment of your vehicle available at the time of
publication of the Operator's Manual.
Country-specific differences are possible.
Please note that your vehicle may not be
equipped with all features described. This
also applies to safety-related systems and
functions.
iRead the information on qualified special-
ist workshops ( Ypage 27).
SmartKey
Important safety notes
GWARNING
If children are left unsupervised in the vehicle,
they could:
R open the doors, thus endangering other
people or road users.
R get out and disrupt traffic.
R operate the vehicle's equipment.
Additionally, children could set the vehicle in
motion if, for example, they:
R release the parking brake.
R shifting the automatic transmission out of
park position P
R Start the engine.
There is a risk of an accident and injury.
When leaving the vehicle, always take the
SmartKey with you and lock the vehicle. Never
leave children or animals unattended in the
vehicle. Always keep the SmartKey out of
reach of children.
GWARNING
If you attach heavy or large objects to the
SmartKey, the SmartKey could be uninten-
tionally turned in the ignition lock. This could
cause the engine to be switched off. There is a risk of an accident.
Do not attach any heavy or large objects to the SmartKey. Remove any bulky key rings before
inserting the SmartKey into the ignition lock.
!Keep the SmartKey away from strong
magnetic fields. Otherwise, the remote
control function could be affected.
Strong magnetic fields can occur in the
vicinity of powerful electrical installations.
Do not keep the SmartKey: R with electronic devices, e.g. a mobile
phone or another SmartKey
R with metallic objects, e.g. coins or metalfoil
R inside metallic objects, e.g. a metal case
This can affect the functionality of the
SmartKey.
Vehicles with KEYLESS-GO start function: do not keep the SmartKey on the parcel shelf or in the trunk. Otherwise, the SmartKey maynot be detected, e.g. when starting the engine
using the Start/Stop button.
A check which periodically establishes a radio
connection between the vehicle and the
SmartKey determines whether a valid Smart- Key is in the vehicle. This occurs, for example:
R when starting the engine
R whilst driving
R when using HANDS-FREE ACCESS
R when the external door handles are
touched
R during convenience closing
78SmartKey
Opening and closing
Page 118 of 286
the case if you are not depressing the brake
pedal.
If you depress the brake pedal and press the
Start/Stop button, the engine starts immedi-
ately.
A check which periodically establishes a radio
connection between the vehicle and the
SmartKey determines whether a valid Smart- Key is in the vehicle. This occurs, for example, when starting the engine.
To start the vehicle without actively using the
SmartKey:
R the Start/Stop button must be inserted in
the ignition lock.
R the SmartKey must be in the vehicle.
R the vehicle must not be locked with the
SmartKey or KEYLESS-GO ( Ypage 79).
Do not keep the SmartKey:
R with electronic devices, e.g. a mobile
phone or another SmartKey
R with metallic objects, e.g. coins or metal
foil
R inside metallic objects, e.g. a metal case
This can affect the functionality of the Smart- Key.
If you lock the vehicle with the SmartKey's
remote control or with KEYLESS-GO, after a
short time:
R you will not be able to switch on the ignition
with the Start/Stop button.
R you will not be able to start the engine with
the Start/Stop button until the vehicle is
unlocked again.
If you lock the vehicle centrally using the but-
ton on the front door ( Ypage 82), you can
continue to start the engine with the Start/
Stop button.
The engine can be turned off while the vehicle
is in motion by pressing and holding the
Start/Stop button for approximately three
seconds. This function operates independ-
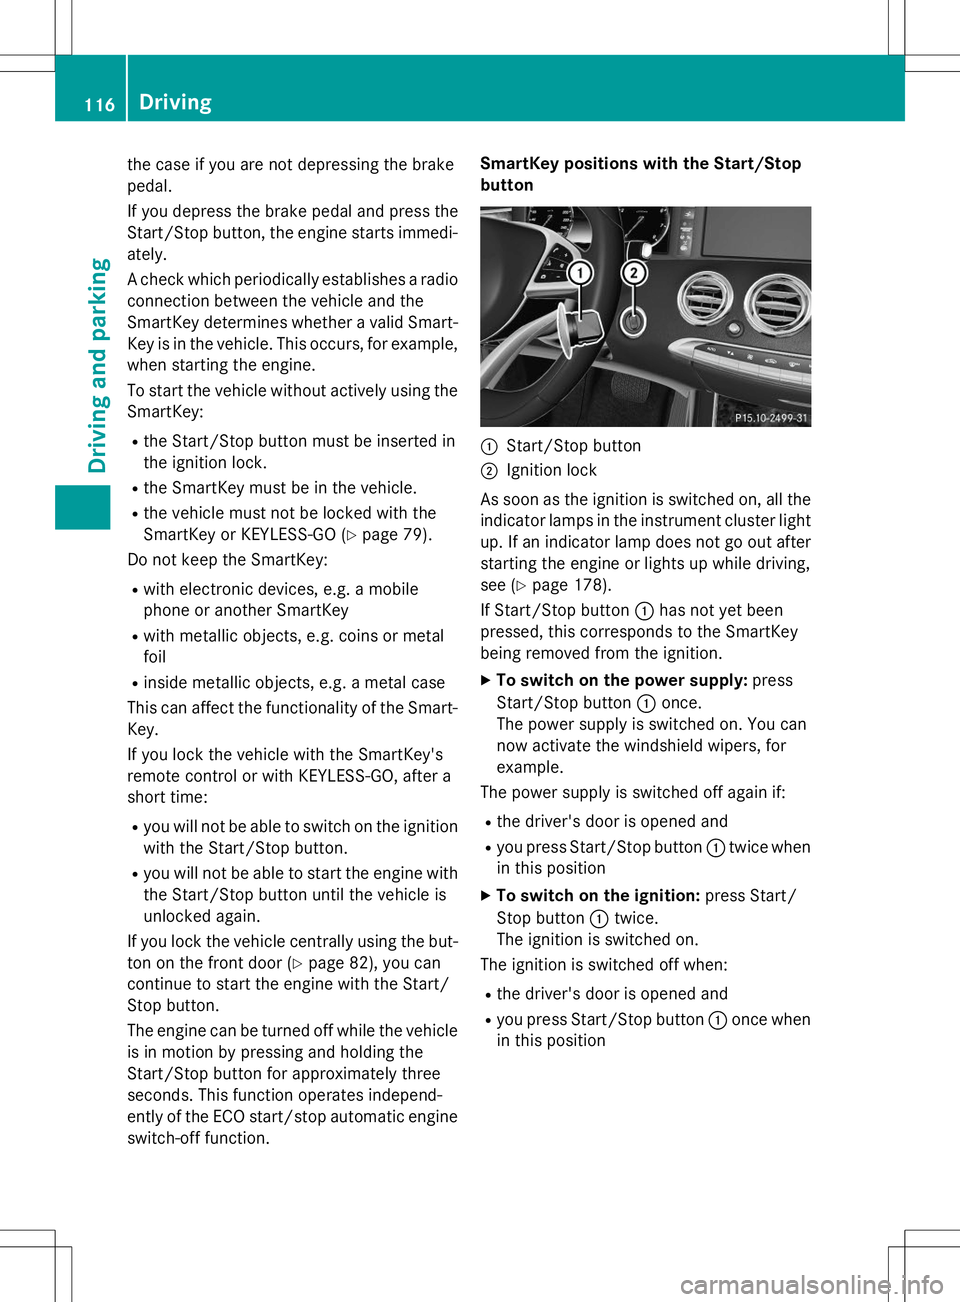
ently of the ECO start/stop automatic engine switch-off function. SmartKey positions with the Start/Stop
button
:Start/Stop button
;Ignition lock
As soon as the ignition is switched on, all the
indicator lamps in the instrument cluster light up. If an indicator lamp does not go out afterstarting the engine or lights up while driving,
see ( Ypage 178).
If Start/Stop button :has not yet been
pressed, this corresponds to the SmartKey
being removed from the ignition.
X To switch on the power supply: press
Start/Stop button :once.
The power supply is switched on. You can
now activate the windshield wipers, for
example.
The power supply is switched off again if:
R the driver's door is opened and
R you press Start/Stop button :twice when
in this position
X To switch on the ignition: press Start/
Stop button :twice.
The ignition is switched on.
The ignition is switched off when:
R the driver's door is opened and
R you press Start/Stop button :once when
in this position
116Driving
Driving an d parking
Page 213 of 286
!Make sure that the windshield wipers are
not folded away from the windshield. You
could otherwise damage the windshield
wipers or the hood.
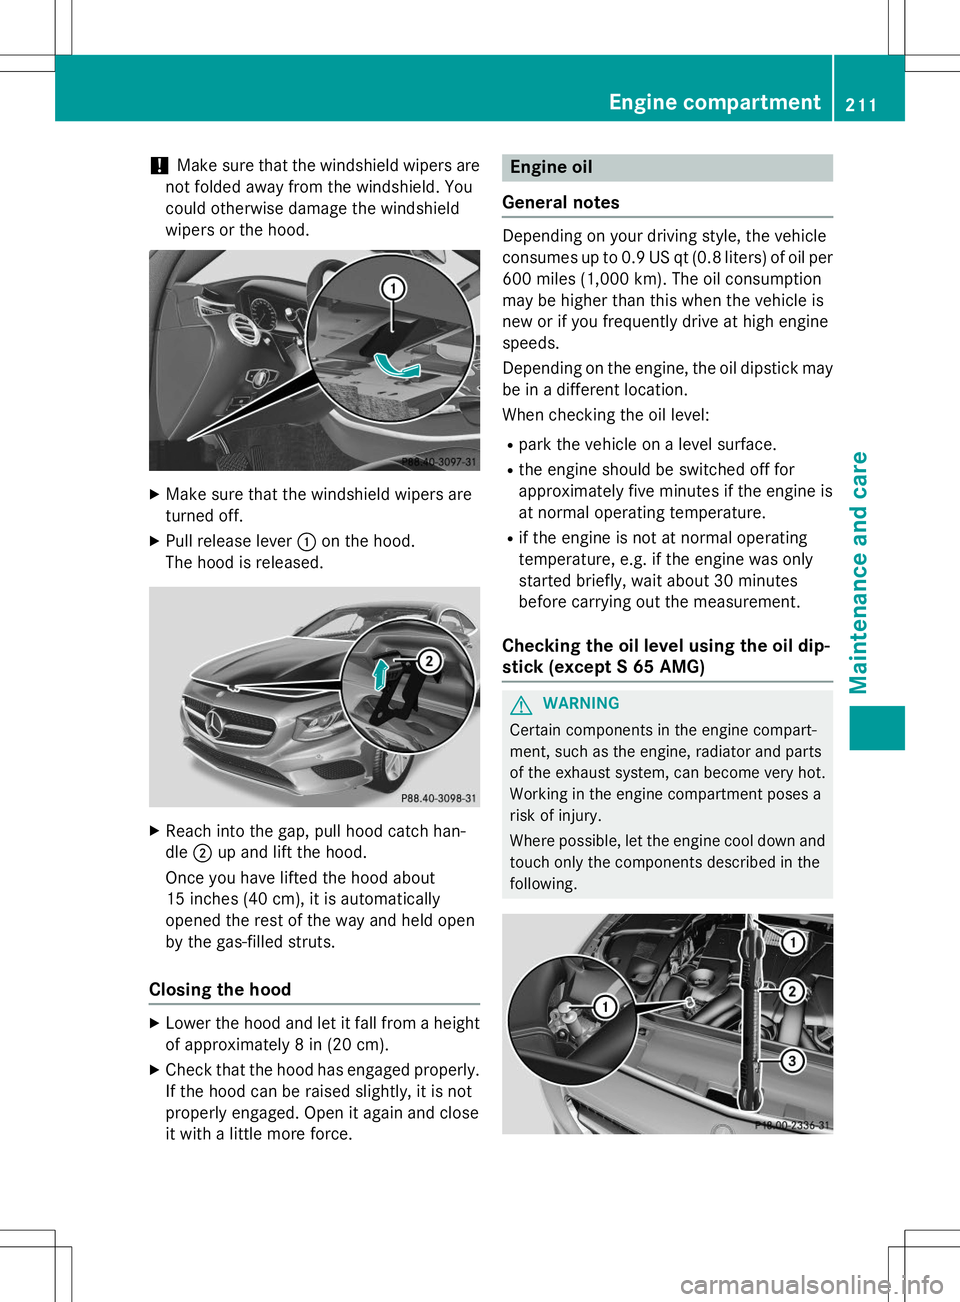
X Make sure that the windshield wipers are
turned off.
X Pull release lever :on the hood.
The hood is released.
X Reach into the gap, pull hood catch han- dle ;up and lift the hood.
Once you have lifted the hood about
15 inches (40 cm), it is automatically
opened the rest of the way and held open
by the gas-filled struts.
Closing the hood
X Lower the hood and let it fall from a height
of approximately 8 in (20 cm).
X Check that the hood has engaged properly.
If the hood can be raised slightly, it is not
properly engaged. Open it again and close
it with a little more force.
Engine oil
General notes
Depending on your driving style, the vehicle
consumes up to 0.9 US qt (0.8 liters) of oil per 600 miles (1,000 km). The oil consumption
may be higher than this when the vehicle is
new or if you frequently drive at high enginespeeds.
Depending on the engine, the oil dipstick maybe in a different location.
When checking the oil level:
R park the vehicle on a level surface.
R the engine should be switched off for
approximately five minutes if the engine is
at normal operating temperature.
R if the engine is not at normal operating
temperature, e.g. if the engine was only
started briefly, wait about 30 minutes
before carrying out the measurement.
Checking the oil level using the oil dip-
stick (except S 65 AMG)
GWARNING
Certain components in the engine compart-
ment, such as the engine, radiator and parts
of the exhaust system, can become very hot.
Working in the engine compartment poses a
risk of injury.
Where possible, let the engine cool down and
touch only the components described in the
following.
Engine compartment211
Maintenance and care
Z
Page 215 of 286
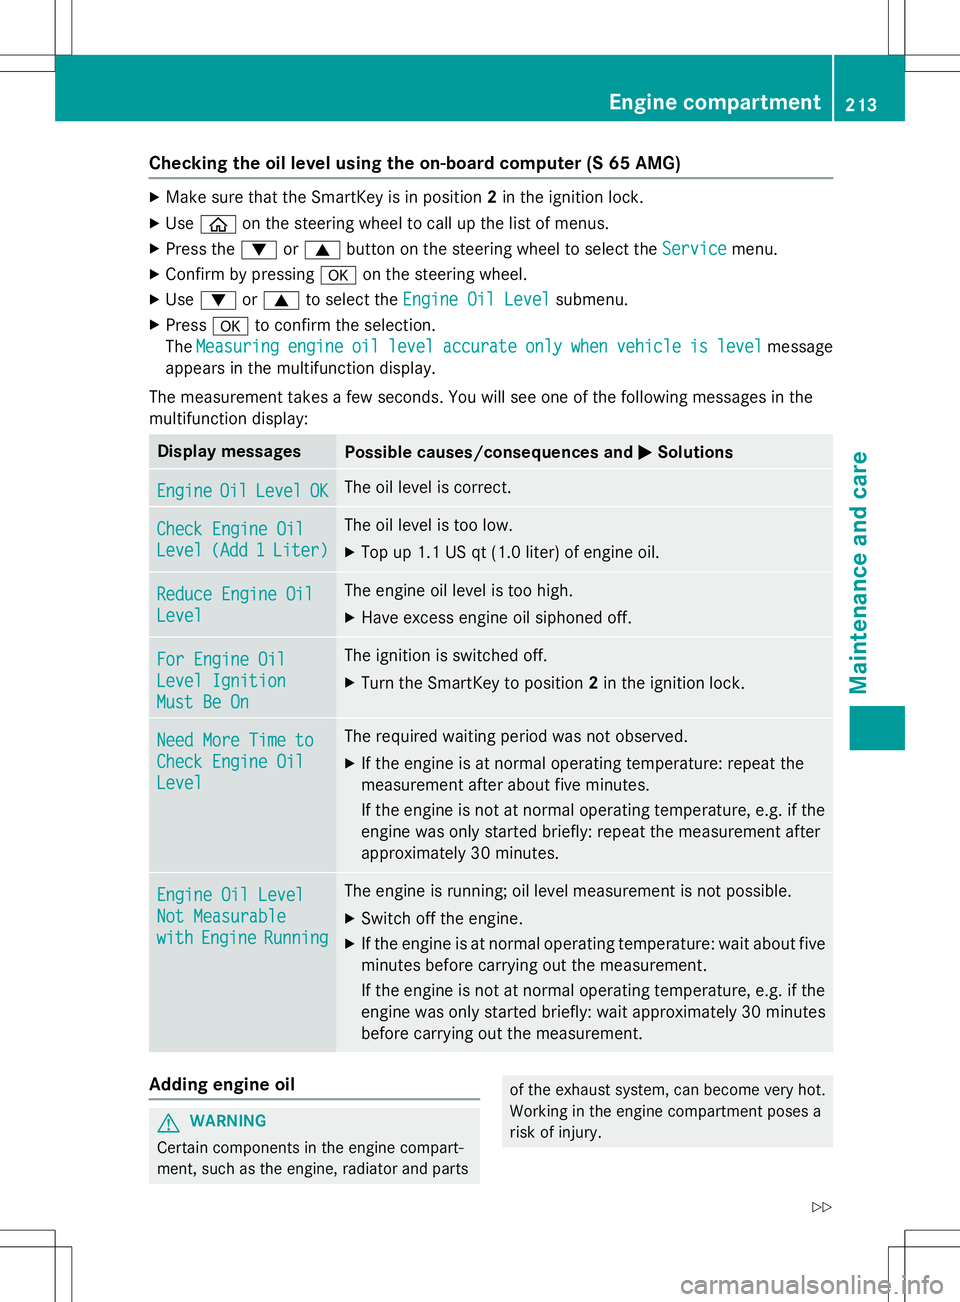
Checking the oil level using the on-board computer (S 65 AMG)
XMake sure that the SmartKey is in position 2in the ignition lock.
X Use ò on the steering wheel to call up the list of menus.
X Press the :or9 button on the steering wheel to select the
Servicemenu.
X Confirm by pressing aon the steering wheel.
X Use : or9 to select the
Engine Oil Levelsubmenu.
X Press ato confirm the selection.
The
Measuringengineoillevelaccurateonlywhenvehicleislevelmessage
appears in the multifunction display.
The measurement takes a few seconds. You will see one of the following messages in the
multifunction display:
Display messagesPossible causes/consequences and MSolutions
EngineOilLevelOKThe oil level is correct.
Check Engine Oil
Level(Add1Liter)
The oil level is too low.
X Top up 1.1 US qt (1.0 liter) of engine oil.
Reduce Engine Oil
Level
The engine oil level is too high.
X Have excess engine oil siphoned off.
For Engine Oil
Level Ignition
Must Be On
The ignition is switched off.
X Turn the SmartKey to position 2in the ignition lock.
Need More Time to
Check Engine Oil
Level
The required waiting period was not observed.
X If the engine is at normal operating temperature: repeat the
measurement after about five minutes.
If the engine is not at normal operating temperature, e.g. if the
engine was only started briefly: repeat the measurement after
approximately 30 minutes.
Engine Oil Level
Not Measurable
withEngineRunning
The engine is running; oil level measurement is not possible.
X Switch off the engine.
X If the engine is at normal operating temperature: wait about five
minutes before carrying out the measurement.
If the engine is not at normal operating temperature, e.g. if the
engine was only started briefly: wait approximately 30 minutes before carrying out the measurement.
Adding engine oil
GWARNING
Certain components in the engine compart-
ment, such as the engine, radiator and parts
of the exhaust system, can become very hot.
Working in the engine compartment poses a
risk of injury.
Engine compartment213
Maintenance and care
Z
Page 216 of 286
Where possible, let the engine cool down andtouch only the components described in the following.
GWARNING
If engine oil comes into contact with hot com- ponents in the engine compartment, it may
ignite. There is a risk of fire and injury.
Make sure that engine oil is not spilled next to
the filler neck. Let the engine cool down and
thoroughly clean the engine oil off the com-
ponents before starting the engine.
HEnvironmental note
When adding oil, take care not to spill any. If
oil enters the soil or waterways, it is harmful to the environment.
!Only use engine oils and oil filters that
have been approved for vehicles with a ser-
vice system. You can obtain a list of the
engine oils and oil filters tested and
approved in accordance with the
Mercedes-Benz Specifications for Service
Products at any Mercedes-Benz Service
center.
Damage to the engine or exhaust system is
caused by the following:
R using engine oils and oil filters that have
not been specifically approved for the
service system
R replacing engine oil and oil filters after
the interval for replacement specified by
the service system has been exceeded
R using engine oil additives.
!Do not add too much oil. adding too much
engine oil can result in damage to the
engine or to the catalytic converter. Have
excess engine oil siphoned off.
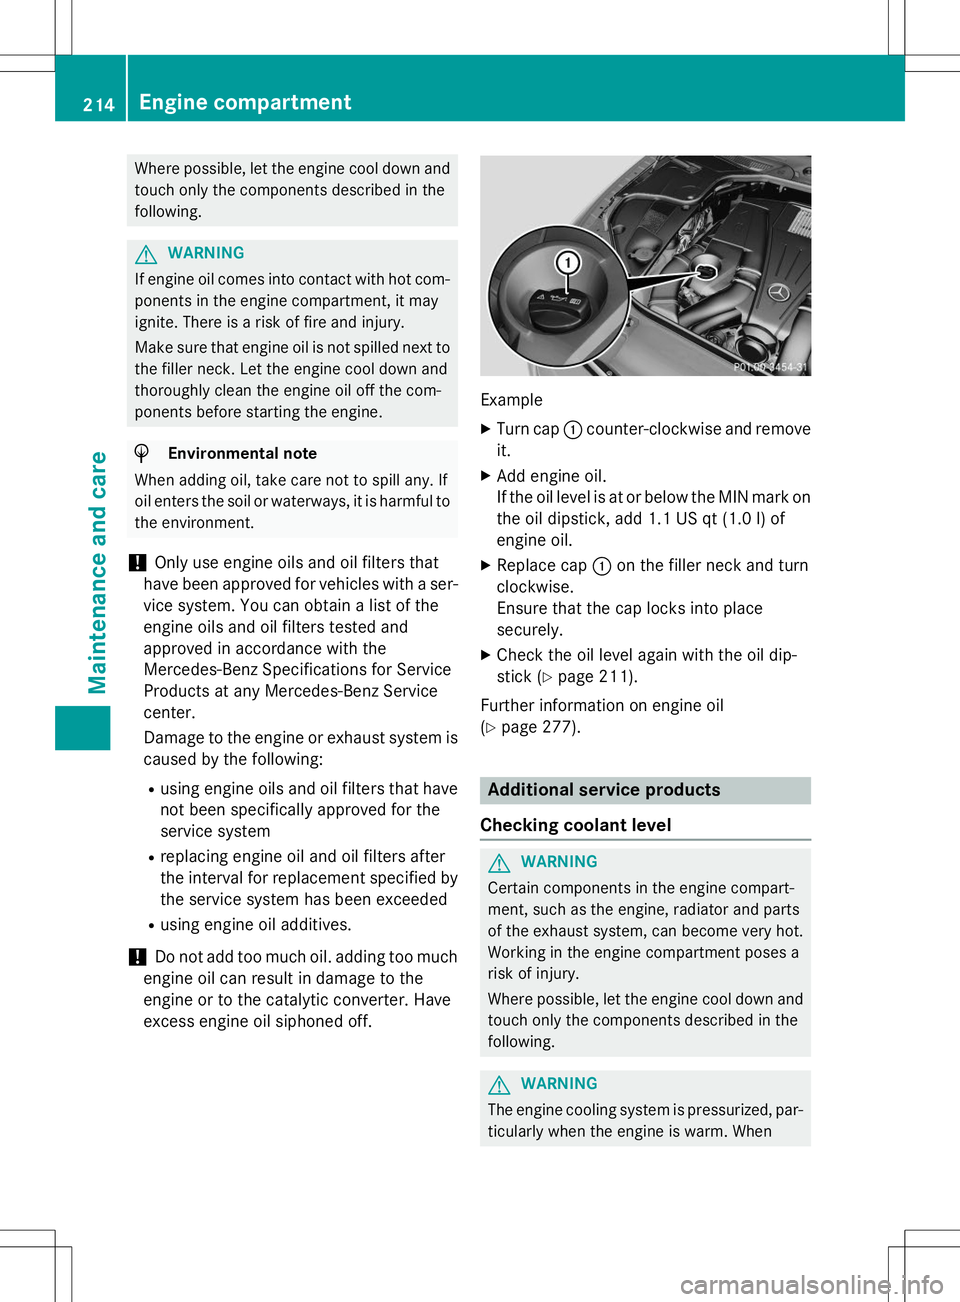
Example
X Turn cap :counter-clockwise and remove
it.
X Add engine oil.
If the oil level is at or below the MIN mark on
the oil dipstick, add 1.1 US qt (1.0 l)of
engine oil.
X Replace cap :on the filler neck and turn
clockwise.
Ensure that the cap locks into placesecurely.
X Check the oil level again with the oil dip-
stick ( Ypage 211).
Further information on engine oil( Y page 277).
Additional service products
Checking coolant level
GWARNING
Certain components in the engine compart-
ment, such as the engine, radiator and parts
of the exhaust system, can become very hot.
Working in the engine compartment poses a
risk of injury.
Where possible, let the engine cool down and touch only the components described in the following.
GWARNING
The engine cooling system is pressurized, par-ticularly when the engine is warm. When
214Engine compartment
Maintenance and care
Page 264 of 286
Rotate the wheels before a clear wear pattern
has formed on the tires. Front tires typically
wear more on the shoulders and the rear tiresin the center.
If your vehicle's tire configuration allows, you
can rotate the wheels according to the inter-
vals in the tire manufacturer's warranty book in your vehicle documents. If no warranty
book is available, the tires should be rotated
every 3,000 to 6,000 miles (5,000 to
10,000 km), or earlier if tire wear requires.
Ensure the direction of rotation is maintained.
Clean the contact surfaces of the wheel and
the brake disc thoroughly every time a wheel
is rotated. Check the tire pressure and reac-
tivate the tire pressure monitor if necessary( Y page 248).
Direction of rotation
Tires with a specified direction of rotation
have additional benefits, e.g. if there is a risk
of hydroplaning. These advantages can only
be gained if the tires are installed correspond-ing to the direction of rotation.
An arrow on the sidewall of the tire indicates
its correct direction of rotation.
Storing wheels
Store wheels that are not being used in a cool, dry and preferably dark place. Protect the
tires from oil, grease, gasoline and diesel.
Mounting a wheel
Preparing the vehicle
X Stop the vehicle on solid, non-slippery and
level ground.
X Apply the electric parking brake manually.
X Bring the front wheels into the straight-
ahead position.
X Shift the transmission to position P. X
Make sure that "normal" level is selected
for AIRMATIC ( Ypage 140).
X Switch off the engine.
X Open the driver's door.
The on-board electronics now have status0. This is the same as the SmartKey having
been removed.
X Remove Start/Stop button from ignition
lock ( Ypage 115).
or, if the SmartKey is inserted in the ignition
lock: X Remove the SmartKey from the ignition
lock.
X If included in the vehicle equipment,
remove the tire-change tool kit from the
vehicle.
X Secure the vehicle to prevent it from rolling
away.
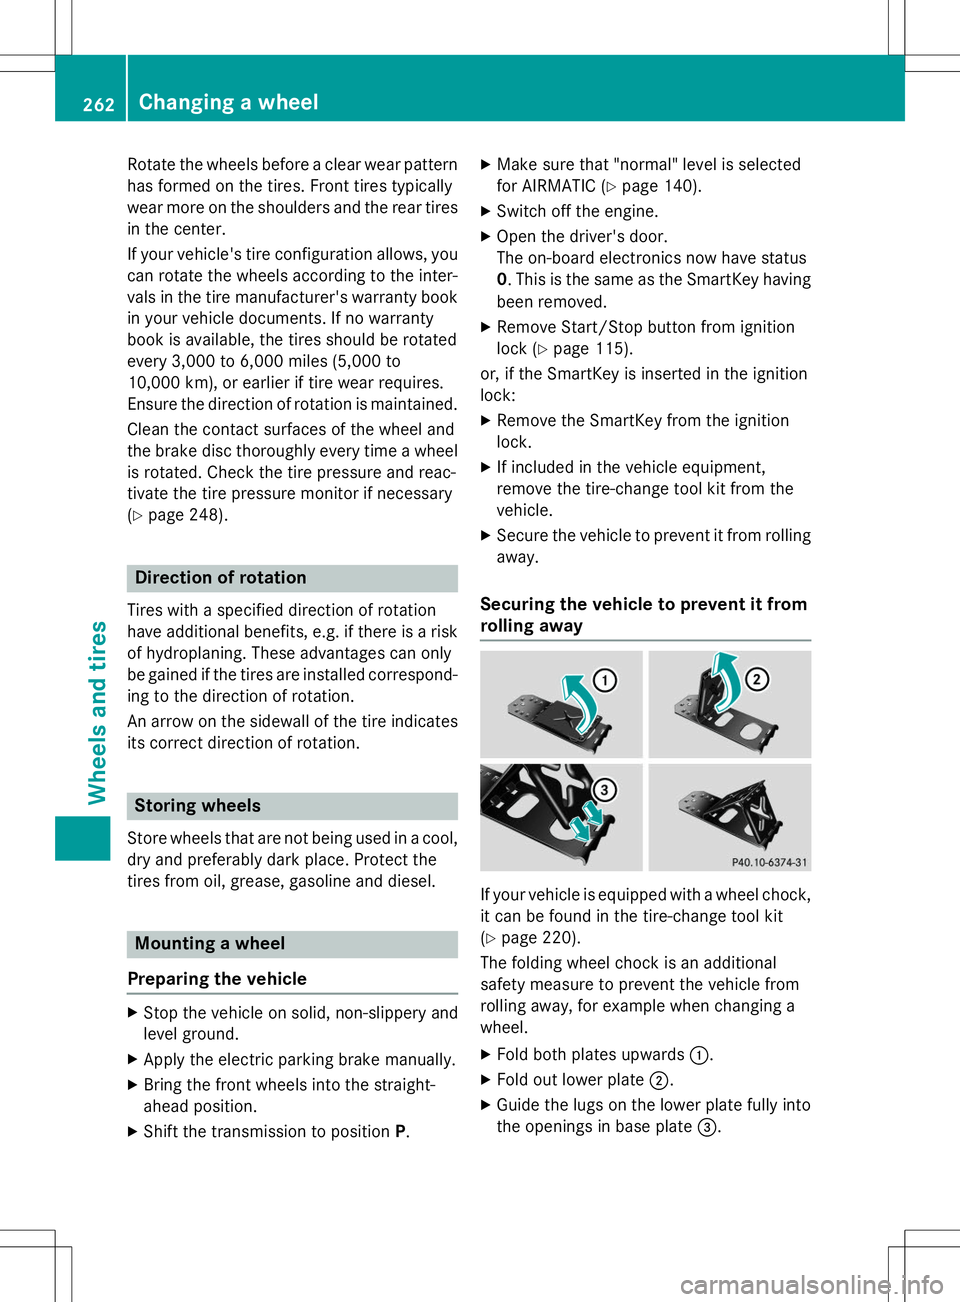
Securing the vehicle to prevent it from
rolling away
If your vehicle is equipped with a wheel chock, it can be found in the tire-change tool kit ( Y page 220).
The folding wheel chock is an additional
safety measure to prevent the vehicle from
rolling away, for example when changing a
wheel.
X Fold both plates upwards :.
X Fold out lower plate ;.
X Guide the lugs on the lower plate fully into
the openings in base plate =.
262Changing a wheel
Wheels and tires
Page 266 of 286
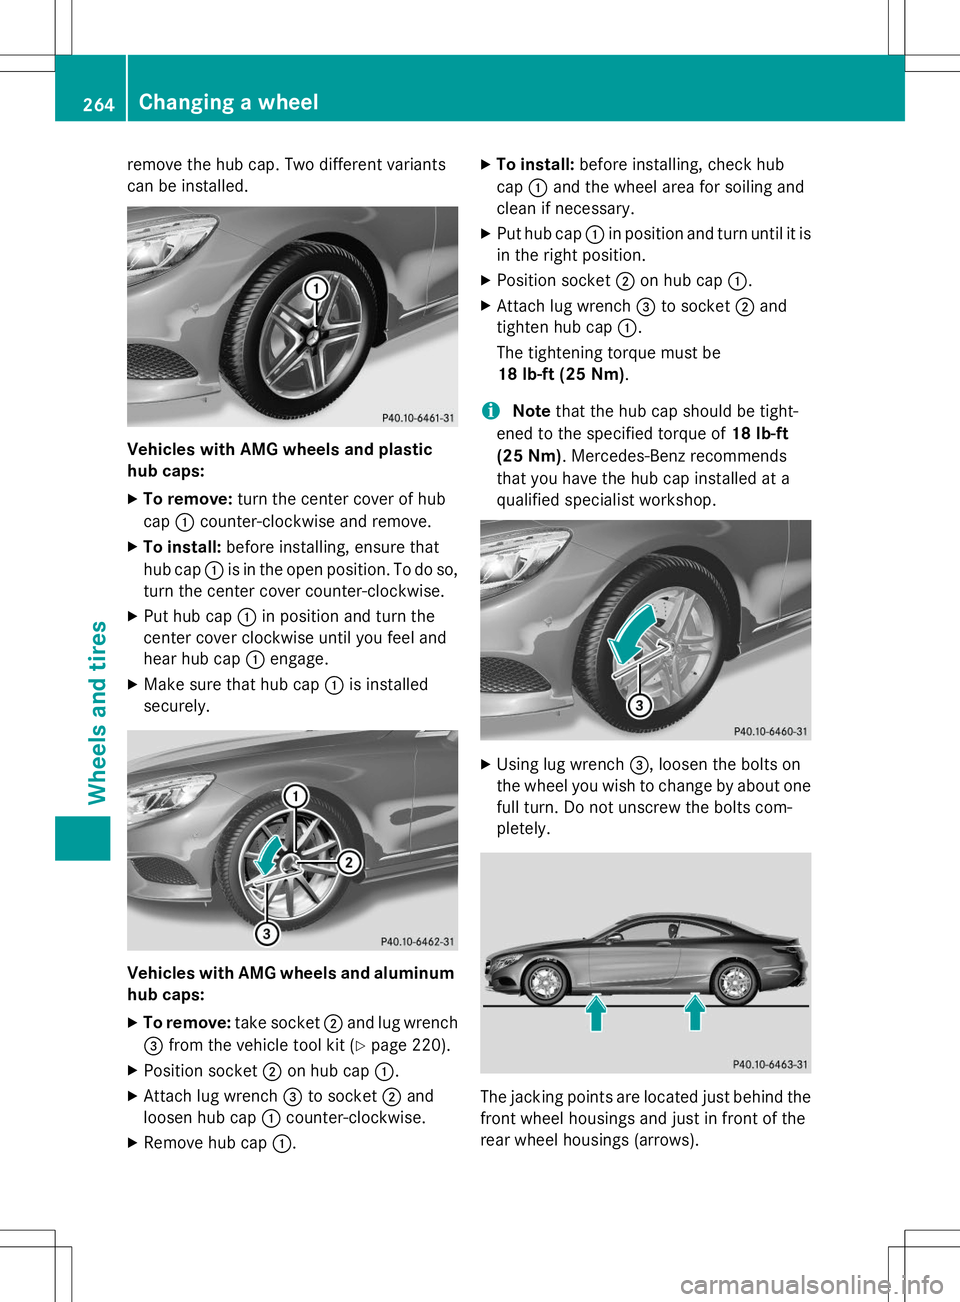
remove the hub cap. Two different variants
can be installed.
Vehicles with AMG wheels and plastic
hub caps:
X To remove: turn the center cover of hub
cap :counter-clockwise and remove.
X To install: before installing, ensure that
hub cap :is in the open position. To do so,
turn the center cover counter-clockwise.
X Put hub cap :in position and turn the
center cover clockwise until you feel and
hear hub cap :engage.
X Make sure that hub cap :is installed
securely.
Vehicles with AMG wheels and aluminum
hub caps:
X To remove: take socket;and lug wrench
= from the vehicle tool kit ( Ypage 220).
X Position socket ;on hub cap :.
X Attach lug wrench =to socket ;and
loosen hub cap :counter-clockwise.
X Remove hub cap :. X
To install: before installing, check hub
cap :and the wheel area for soiling and
clean if necessary.
X Put hub cap :in position and turn until it is
in the right position.
X Position socket ;on hub cap :.
X Attach lug wrench =to socket ;and
tighten hub cap :.
The tightening torque must be
18 lb-ft (25 Nm) .
iNotethat the hub cap should be tight-
ened to the specified torque of 18 lb-ft
(25 Nm) . Mercedes-Benz recommends
that you have the hub cap installed at a
qualified specialist workshop.
X Using lug wrench =, loosen the bolts on
the wheel you wish to change by about one full turn. Do not unscrew the bolts com-
pletely.
The jacking points are located just behind the
front wheel housings and just in front of the
rear wheel housings (arrows).
264Changing a wheel
Wheels and tires