2015 MERCEDES-BENZ S-COUPE bulb
[x] Cancel search: bulbPage 14 of 286
LightsAdaptive Highbeam Assist PLUS .... 104
Automatic headlamp mode ............ 103
Cornering light function ................ .103
Driving abroad ............................... 102
Hazard warning lamps ................... 102
High beam flasher .......................... 103
High-beam headlamps ................... 103
Light switch ................................... 102
Low-beam headlamps .................... 103
Parking lamps ................................ 103
Setting exterior lighting ................. 102
Standing lamps .............................. 103
Switching the daytime running
lamps on/off (on-board com-
puter) ............................................. 164
Switching the spotlight on/off ....... 164
Turn signals ................................... 103
see Replacing bulbs
Loading guidelines ............................ 196
Locking
see Central locking
Locking (doors)
Automatic ........................................ 82
Emergency locking ........................... 83
From inside (central locking but-
ton) ................................................. .82
Locking centrally
see Central locking
Low-beam headlamps
Display message ............................ 165
Setting for driving abroad (sym-
metrical) ........................................ 102
Switching on/off .......................... .103
Lumbar support
Adjusting the 4-way lumbar sup-
port ................................................. .98
M
M+S tires............................................ 242
Magic Body Control ........................... 140
MAGIC SKY CONTROL ......................... 93
Malfunction message
see Display messages
Matte finish (cleaning instruc-
tions) .................................................. 217 MBC
see Magic Body Control
mbrace
Call priority ................................... .203
Display message ............................ 165
Downloading destinations
(COMAND) ..................................... 199
Downloading routes ....................... 199
Emergency call .............................. 200
General notes ................................ 199
Geo fencing ................................... 199
Locating a stolen vehicle .............. .199
MB info call button ........................ 202
Remote vehicle locking .................. 199
Roadside Assistance button .......... 201
Search & Send ............................... 199
Self-test ......................................... 199
Speed alert ................................... .199
System .......................................... 199
Triggering the vehicle alarm ........... 199
Vehicle remote malfunction diag-
nosis .............................................. 199
Vehicle remote unlocking .............. 199
Mechanical key
Function/notes ................................ 80
Inserting .......................................... 80
Locking vehicle ................................ 83
Removing ......................................... 80
Unlocking the driver's door .............. 83
Memory card (audio) ......................... 164
Memory function ................................. 99
Mercedes-Benz Intelligent Drive
360°camera .................................. 146
ABS (Anti-lock Brake System) .......... 66
Active Blind Spot Assist ................. 153
Active Lane Keeping Assist ............ 155
Active Parking Assist ..................... 143
ATTENTION ASSIST ........................ 148
BAS (Brake Assist) ........................... 66
BAS PLUS (Brake Assist PLUS)
with Cross-Traffic Assist .................. 67
Crosswind Assist (vehicles with
MAGIC BODY CONTROL) .............. .140
Crosswind Assist (vehicles with-
out MAGIC BODY CONTROL) ........... 72
Cruise control ................................ 129
DISTRONIC PLUS ........................... 130
12Index
Page 17 of 286
General notes ................................ 118
Hill start assist ...............................118
Q
QR code
Rescue card ..................................... 29
Qualified specialist workshop ........... 27
R
Radio
Selecting a station ......................... 164
see separate operating instructions
Radio mode
see also Digital Operator's Man-
ual ................................................. .188
Radio-wave reception/transmis-
sion in the vehicle
Declaration of conformity ................ 27
Reading lamp ..................................... 105
Rear compartment
Stowage compartment .................. 197
Rear fog lamp
Display message ............................ 165
Rear lamps
see Lights
Rear seats
Overview .......................................... 40
Rear view camera
Cleaning instructions ..................... 217
Function/notes ............................ .144
Switching on/off ........................... 145
Rear window blind ............................ 198
Rear window defroster
Problem (malfunction) ................... 111
Switching on/off ........................... 111
Rear-view mirror
Anti-glare (manual) .......................... 99
Dipping (automatic) ......................... 99
Refrigerant (air-conditioning sys-tem)
Important safety notes .................. 280
Refueling
Fuel gauge ....................................... 33
Important safety notes .................. 122
Refueling process .......................... 123
see Fuel Remote control
Garage door opener ....................... 203
Programming (garage door
opener) .......................................... 204
Replacing bulbs
General notes ................................ 105
Reporting safety defects .................... 28
Rescue card ......................................... 29
Reserve (fuel tank)
see Fuel
Reserve fuel
Display message ............................ 165
Warning lamp ................................. 176
Residual heat (climate control) ........111
Restraint system
Display message ............................ 170
Introduction ..................................... 42
Warning lamp ................................. 182
Warning lamp (function) ................... 43
Reversing feature
Roller sunblind ................................. 91
Side windows ................................... 90
Trunk lid .......................................... .84
Reversing lamps (display mes-
sage) ................................................... 165
ROAD SURFACE SCAN ....................... 140
Roadside Assistance (breakdown) .... 25
Roller sunblind
Panorama roof ................................. 91
Rear window .................................. 198
Roller sunblind for the panorama
roof
Opening and closing ........................ 92
Operating ......................................... 91
Resetting ......................................... 92
Roof
Display message ............................ 165
Roof lining and carpets (cleaning
guidelines) ......................................... 218
Roof load (maximum) ........................ 281
Route (navigation)
see Route guidance (navigation)
Route guidance
see also Digital Operator's Man-
ual .................................................. 188
Route guidance (navigation) ............ 164
Index15
Page 103 of 286
Useful information............................102
Exterior lighting ................................ 102
Interior lighting ................................. 105
Replacing bulbs ................................. 105
Windshield wipers ............................106
101
Lights and windshield wipers
Page 107 of 286
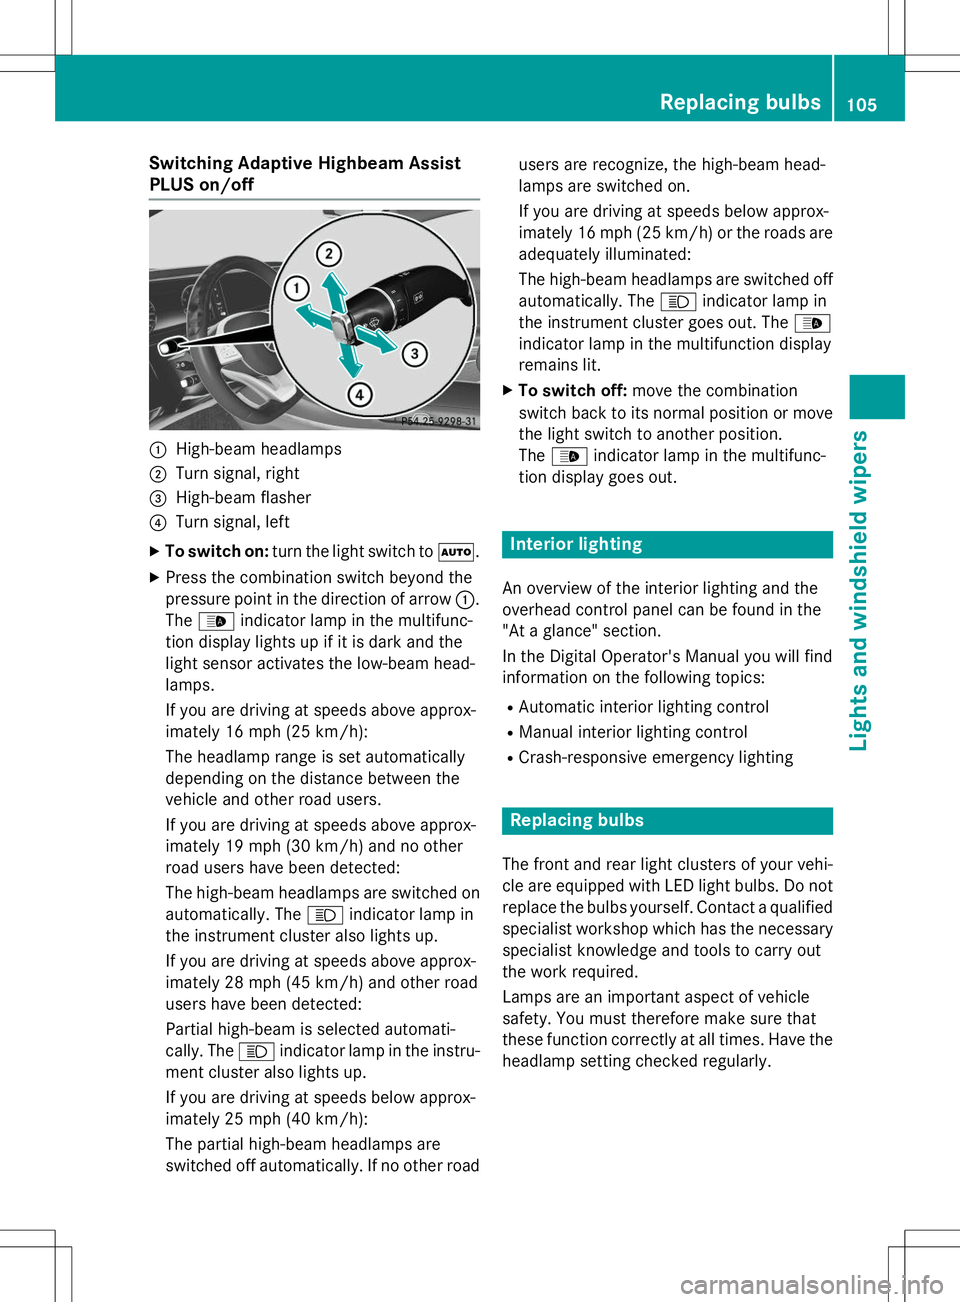
Switching Adaptive Highbeam Assist
PLUS on/off
:High-beam headlamps
;Turn signal, right
=High-beam flasher
?Turn signal, left
X To switch on: turn the light switch to Ã.
X Press the combination switch beyond the
pressure point in the direction of arrow :.
The _ indicator lamp in the multifunc-
tion display lights up if it is dark and the
light sensor activates the low-beam head-lamps.
If you are driving at speeds above approx-
imately 16 mph (25 km/h):
The headlamp range is set automatically
depending on the distance between the
vehicle and other road users.
If you are driving at speeds above approx-
imately 19 mph (30 km/h) and no other
road users have been detected:
The high-beam headlamps are switched on
automatically. The Kindicator lamp in
the instrument cluster also lights up.
If you are driving at speeds above approx-
imately 28 mph (45 km/h) and other road
users have been detected:
Partial high-beam is selected automati-
cally. The Kindicator lamp in the instru-
ment cluster also lights up.
If you are driving at speeds below approx-
imately 25 mph (40 km/h):
The partial high-beam headlamps are
switched off automatically. If no other road users are recognize, the high-beam head-
lamps are switched on.
If you are driving at speeds below approx-
imately 16 mph (25 km/h) or the roads are
adequately illuminated:
The high-beam headlamps are switched off
automatically. The Kindicator lamp in
the instrument cluster goes out. The _
indicator lamp in the multifunction display
remains lit.
X To switch off: move the combination
switch back to its normal position or move the light switch to another position.The _ indicator lamp in the multifunc-
tion display goes out.
Interior lighting
An overview of the interior lighting and the
overhead control panel can be found in the
"At a glance" section.
In the Digital Operator's Manual you will find
information on the following topics:
R Automatic interior lighting control
R Manual interior lighting control
R Crash-responsive emergency lighting
Replacing bulbs
The front and rear light clusters of your vehi-
cle are equipped with LED light bulbs. Do not
replace the bulbs yourself. Contact a qualifiedspecialist workshop which has the necessary
specialist knowledge and tools to carry out
the work required.
Lamps are an important aspect of vehicle
safety. You must therefore make sure that
these function correctly at all times. Have the
headlamp setting checked regularly.
Replacing bulbs105
Lights and windshield wipers
Z
Page 147 of 286
are no persons, animals or objects in the area
in which you are maneuvering.
Under the following circumstances, the rear
view camera will not function, or will function
in a limited manner:
R if the trunk lid is open
R in heavy rain, snow or fog
R at night or in very dark places
R if the camera is exposed to very bright light
R if the area is lit by fluorescent bulbs or LED
lighting (the display may flicker)
R if the camera lens fogs up, e.g. when driving
into a heated garage in winter, causing a
rapid change in temperature
R if the camera lens is dirty or obstructed.
Observe the notes on cleaning(Y page 217)
R if the rear of your vehicle is damaged. In this
event, have the camera position and setting checked at a qualified specialist workshop
The field of vision and other functions of the
rear view camera may be restricted due to
additional accessories on the rear of the vehi-
cle (e.g. license plate holder, bicycle rack).
The guide lines in the COMAND display show
the distances to your vehicle. The distances
only apply to road level.
iThe rear view camera is protected from
raindrops and dust by means of a flap.
When the rear view camera is activated,
this flap opens.
The flap closes again when:
R you have finished the maneuvering proc- ess
R you switch off the engine
R you open the trunk
Observe the notes on cleaning( Y page 217).
For technical reasons, the flap may remain
open briefly after the rear view camera has
been deactivated.
!Objects not at ground level may appear to
be further away than they actually are, e.g.:
R the bumper of a parked vehicle
R the drawbar of a trailer
R the ball coupling of a trailer tow hitch
R the rear section of an HGV
R a slanted post
Use the guidelines only for orientation.
Approach objects no further than the bot-
tom-most guideline.
The rear view camera may show a distorted
view of obstacles, show them incorrectly or
not at all. The rear view camera does not show objects in the following positions:
R very close to the rear bumper
R under the rear bumper
R in the area immediately above the tailgate
handle
Activating/deactivating the rear view
camera
X To activate: make sure that the SmartKey
is in position 2in the ignition lock.
X Make sure that the
Activation by R
gearfunction is selected in COMAND (see
Digital Operator's Manual).
X Engage reverse gear.
The rear view camera flap opens. The area
behind the vehicle is shown in the
COMAND display with guide lines.
The image from the rear view camera is
available throughout the maneuvering
process.
To deactivate: the rear view camera deacti-
vates if you shift the transmission to Por after
driving forwards a short distance.
Driving systems145
Driving and parking
Z
Page 148 of 286
Information in the Digital Operator's
Manual
In the Digital Operator's Manual you will find
information on the following topics: RDisplays in the COMAND display
R "Reverse parking" function
R Wide-angle function
R Object detection
360° camera (surround view)
General notes
The 360° camera is a system consisting of
four cameras.
The system analyzes images from the follow-
ing cameras:
R Rear view camera
R Front camera
R Two side cameras in the exterior mirrors
The cameras capture the immediate sur-
roundings of the vehicle. The 360° camera
assists you, for instance when parking or at
exits with reduced visibility.
The 360° camera images can be shown in full screen mode or in six different split-screen
views on the COMAND display. A split-screen
view also includes a top view of the vehicle.
This view is calculated from the data supplied
by the installed cameras (virtual camera).
The six split-screen views are:
R top view and picture from the rear view
camera (130° viewing angle)
R top view and image from the front camera
(130° viewing angle without displaying the
maximum steering wheel angle)
R top view and enlarged rear view
R top view and enlarged front view
R top view and images from the rear-facing
side cameras (rear wheel view)
R top view and images from the forward-
facing side cameras (front wheel view) When the function is active and you shift the
transmission from
Dor Rto N, the guide lines
in the COMAND display are hidden.
When you change between transmission
positions Dand R, you see the previously
selected front or rear view.
Important safety notes
The 360°camera is only an aid and may show a distorted view of obstacles, show them
incorrectly or not at all. The 360°camera is
not a substitute for attentive driving.
You are always responsible for safe maneu-
vering and parking. When maneuvering or
parking, make sure that there are no persons,animals or objects in the area in which you are
maneuvering.
You are always responsible for safety, and
must always pay attention to your surround-
ings when parking and maneuvering. This
applies to the areas behind, in front of and
beside the vehicle. You could otherwise
endanger yourself and others.
The 360° camera will not function or will
function in a limited manner:
R if the doors are open
R if the exterior mirrors are folded in
R if the trunk lid is open
R in heavy rain, snow or fog
R at night or in very dark places
R if the cameras are exposed to very bright
light
R if the area is lit by fluorescent bulbs or LED
lighting (the display may flicker)
R if the camera lenses fog up, e.g. when driv-
ing into a heated garage in winter, causing
a rapid change in temperature
R if the camera lenses are dirty or covered.
Observe the notes on cleaning(Y page 217)
R if the vehicle components in which the
cameras are installed are damaged. In this
event, have the camera position and setting
checked at a qualified specialist workshop.
146Driving systems
Driving and pa rking