2015 MERCEDES-BENZ S-COUPE dimensions
[x] Cancel search: dimensionsPage 21 of 286
Tire tread ....................................... 241
Tire tread (definition) ..................... 261
Total load limit (definition)............. 261
Traction ......................................... 254
Traction (definition) ....................... 261
Tread wear ..................................... 254
Uniform Tire Quality Grading
Standards ...................................... 254
Uniform Tire Quality Grading
Standards (definition) .................... 259
Wear indicator (definition) ............. 261
Wheel and tire combination ........... 268
Wheel rim (definition) .................... 259
see Flat tire
Top Tether ............................................ 63
Tow-starting
Emergency engine starting ............ 234
Important safety notes .................. 232
Towing away
Important safety guidelines ........... 232
Installing the towing eye ................ 233
Notes for 4MATIC vehicles ............ 234
Removing the towing eye ............... 233
With both axles on the ground ....... 233
With the rear axle raised ................ 234
Towing eye ......................................... 220
Traffic reports
see also Digital Operator's Man-
ual .................................................. 188
Traffic Sign Assist
Activating/deactivating the warn-ing function .................................... 164
Display message ............................ 165
Transfer case ..................................... 122
Transmission
see Automatic transmission
Transporting the vehicle .................. 234
Trim pieces (cleaning instruc-
tions) .................................................. 218
Trip computer (on-board com-puter) .................................................. 164
Trip odometer
Calling up ....................................... 164
Trunk
Emergency release .......................... 88
Important safety notes .................... 84
Locking separately ........................... 88 Opening/closing (automatically
from inside) ...................................... 87
Opening/closing (automatically
from outside) ................................... 85
Opening/closing (from outside,
HANDS-FREE ACCESS) .................... 86
Power closing .................................. 82
Trunk lid
Display message ............................ 165
Obstacle recognition ........................ 84
Opening dimensions ...................... 281
Opening/closing .............................. 84
Trunk load (maximum) ...................... 281
Turn signals
Display message ............................ 165
Switching on/of f........................... 103
TV
see Separate operating instructions
Two-way radio
Windshield (infrared reflective) ...... 198
Type identification plate
see Vehicle identification plate
U
Unlocking Emergency unlocking ....................... 83
From inside the vehicle (central
unlocking button) ............................. 82
V
Vanity mirror (in the sun visor) ........ 199
Vehicle
Correct use ...................................... 28
Data acquisition ............................... 29
Display message ............................ 176
Equipment ....................................... 24
Limited Warranty ............................. 28
Loading .......................................... 249
Locking (in an emergency) ............... 83
Locking (SmartKey) .......................... 79
Lowering ........................................ 266
Maintenance .................................... 25
Operating safety .............................. 26
Parking for a long period ................ 126
Pulling away ................................... 118
Raising ........................................... 263
Reporting problems ......................... 28
Index19
Page 22 of 286
Securing from rolling away ............ 262
Towing away .................................. 232
Transporting .................................. 234
Unlocking (in an emergency) ........... 83
Unlocking (SmartKey) ...................... 79
Vehicle data ................................... 281
Vehicle dimensions ........................... 281
Vehicle emergency locking ................ 83
Vehicle identification number
see VIN
Vehicle identification plate .............. 274
Vehicle level
Active Body Control ABC ............... 140
Vehicle maintenance
see ASSYST PLUS
Vehicle tool kit .................................. 220
Video
see also Digital Operator's Man-
ual .................................................. 188
Video (DVD) ........................................ 164
VIN ...................................................... 274
Voice Control System
see Separate operating instructions
W
Warning and indicator lampsABS ................................................ 179
Brakes ........................................... 178
Check Engine ................................. 176
Coolant .......................................... 183
Distance warning ........................... 184 ESP ®
.............................................. 181
ESP ®
OFF ....................................... 182
General notes ................................ 176
Overview .......................................... 34
PASSENGER AIR BAG ...................... 43
Reserve fue l................................... 176
Restraint system ............................ 182
Seat belt ........................................ 177
Steering ......................................... 186
Tire pressure monitor .................... 185
Warranty .............................................. 24
Washer fluid
Display message ............................ 165
Wheel and tire combination
see Tires
Wheel bolt tightening torque ........... 266Wheel chock
...................................... 262
Wheels
Changing a whee l.......................... 261
Checking ........................................ 241
Cleaning ......................................... 217
Important safety notes .................. 240
Interchanging/changing ................ 261
Mounting a new whee l................... 265
Mounting a whee l.......................... 262
Removing a whee l.......................... 265
Storing ........................................... 262
Tightening torque ........................... 266
Wheel size/tire size ....................... 266
Window curtain air bag
Operation ......................................... 51
Windows
see Side windows
Windshield
Defrosting ...................................... 111
Infrared reflective .......................... 198
Windshield washer fluid
see Windshield washer system
Windshield washer system
Adding washer fluid ....................... 215
Notes ............................................. 280
Windshield wipers
Problem (malfunction) ................... 107
Replacing the wiper blades ............ 106
Switching on/of f........................... 106
Winter driving
Important safety notes .................. 242
Slippery road surfaces ................... 128
Snow chains .................................. 242
Winter operation
Summer tires ................................. 242
Winter tires
M+S tires ....................................... 242
Wiper blades
Cleaning ......................................... 217
Important safety notes .................. 106
Replacing ....................................... 106
Wooden trim (cleaning instruc-
tions) .................................................. 218
Workshop
see Qualified specialist workshop
20Index
Page 86 of 286
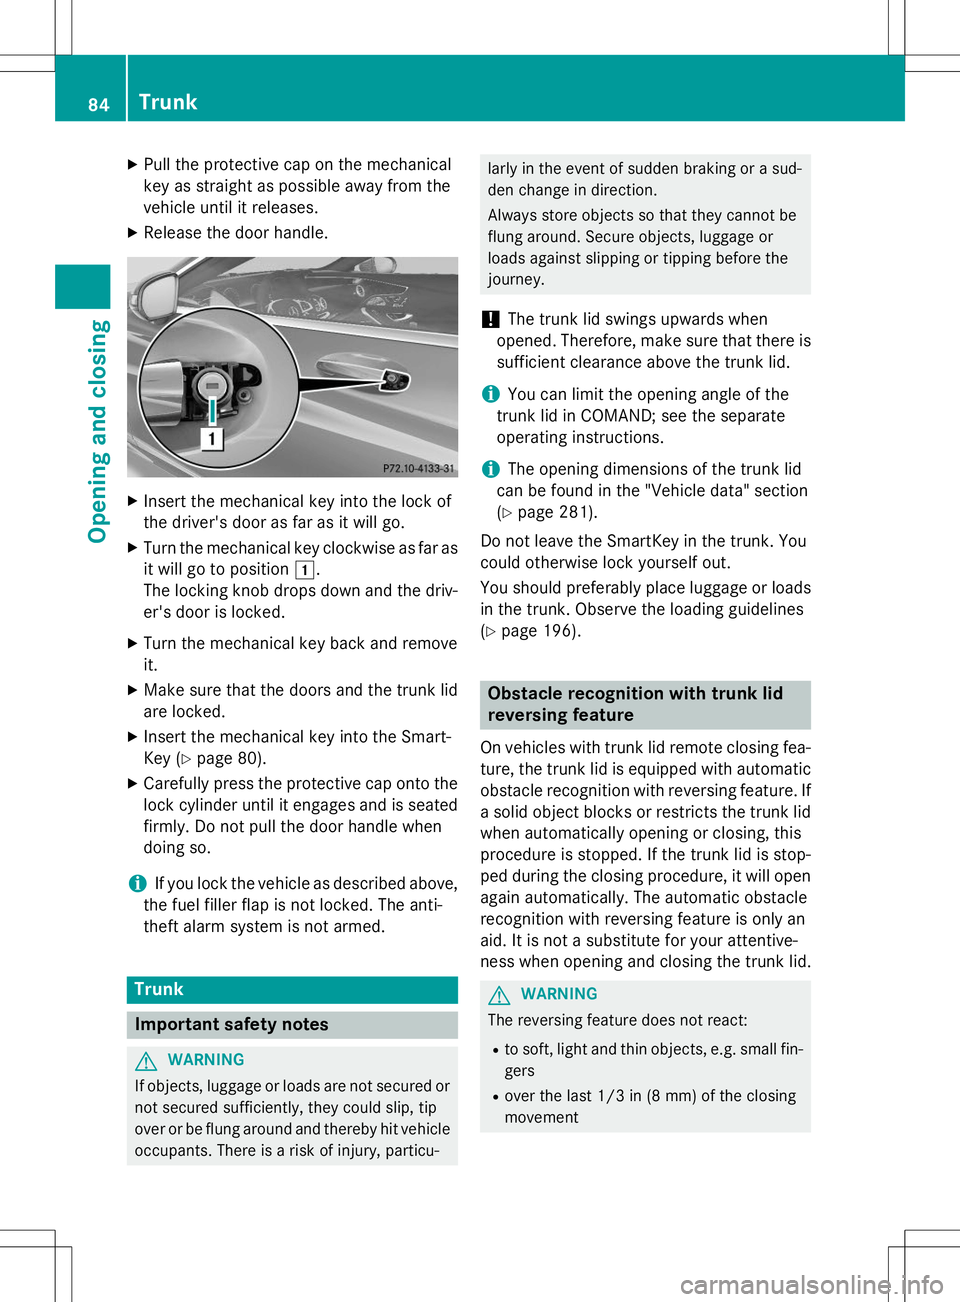
XPull the protective cap on the mechanical
key as straight as possible away from the
vehicle until it releases.
X Release the door handle.
XInsert the mechanical key into the lock of
the driver's door as far as it will go.
X Turn the mechanical key clockwise as far as
it will go to position 1.
The locking knob drops down and the driv- er's door is locked.
X Turn the mechanical key back and removeit.
X Make sure that the doors and the trunk lid
are locked.
X Insert the mechanical key into the Smart-
Key ( Ypage 80).
X Carefully press the protective cap onto the
lock cylinder until it engages and is seated
firmly. Do not pull the door handle when
doing so.
iIf you lock the vehicle as described above,
the fuel filler flap is not locked. The anti-
theft alarm system is not armed.
Trunk
Important safety notes
GWARNING
If objects, luggage or loads are not secured or not secured sufficiently, they could slip, tip
over or be flung around and thereby hit vehicle
occupants. There is a risk of injury, particu-
larly in the event of sudden braking or a sud-
den change in direction.
Always store objects so that they cannot be
flung around. Secure objects, luggage or
loads against slipping or tipping before the
journey.
!The trunk lid swings upwards when
opened. Therefore, make sure that there is
sufficient clearance above the trunk lid.
iYou can limit the opening angle of the
trunk lid in COMAND; see the separate
operating instructions.
iThe opening dimensions of the trunk lid
can be found in the "Vehicle data" section ( Y page 281).
Do not leave the SmartKey in the trunk. You
could otherwise lock yourself out.
You should preferably place luggage or loads
in the trunk. Observe the loading guidelines ( Y page 196).
Obstacle recognition with trunk lid
reversing feature
On vehicles with trunk lid remote closing fea-
ture, the trunk lid is equipped with automatic obstacle recognition with reversing feature. If a solid object blocks or restricts the trunk lid
when automatically opening or closing, this
procedure is stopped. If the trunk lid is stop-
ped during the closing procedure, it will open
again automatically. The automatic obstacle
recognition with reversing feature is only an
aid. It is not a substitute for your attentive-
ness when opening and closing the trunk lid.
GWARNING
The reversing feature does not react:
R to soft, light and thin objects, e.g. small fin-
gers
R over the last 1/3 in (8 mm) of the closing
movement
84Trunk
Opening and closing
Page 87 of 286
This means that the reversing feature cannot
prevent someone being trapped in these sit-
uations. There is a risk of injury.
Make sure that no body parts are in close
proximity during the closing procedure.
If somebody becomes trapped:R press the Fbutton on the SmartKey, or
R pull or press the remote operating switch
on the driver's door or
R press the closing or locking button on the
trunk lid
Opening/closing automatically from outside
Important safety notes
GWARNING
Parts of the body could become trapped dur-
ing automatic closing of the trunk lid. More-
over, people, e.g. children, may be standing in the closing area or may enter the closing area
during the closing process. There is a risk ofinjury.
Make sure that nobody is in the vicinity of theclosing area during the closing process.
Use one of the following options to stop the
closing process:
R press the Fbutton on the SmartKey.
R pull or press the remote operating switch
on the driver's door.
R press the closing or locking button on the
trunk lid.
GWARNING
Combustion engines emit poisonous exhaust
gases such as carbon monoxide. Exhaust
gases can enter the vehicle interior if the
trunk lid is open when the engine is running,
especially if the vehicle is in motion. There is a
risk of poisoning.
Always switch off the engine before opening
the trunk lid. Never drive with the trunk lidopen.
!The trunk lid swings upwards when
opened. Therefore, make sure that there is
sufficient clearance above the trunk lid.
iThe opening dimensions of the trunk lid
can be found in the "Vehicle data" section ( Y page 281).
Opening
You can open the trunk lid automatically
using the SmartKey. X
Press and hold the Fbutton on the
SmartKey until the trunk lid opens.
Closing
You can close the trunk lid automatically
using the SmartKey or the closing button in
the trunk lid.
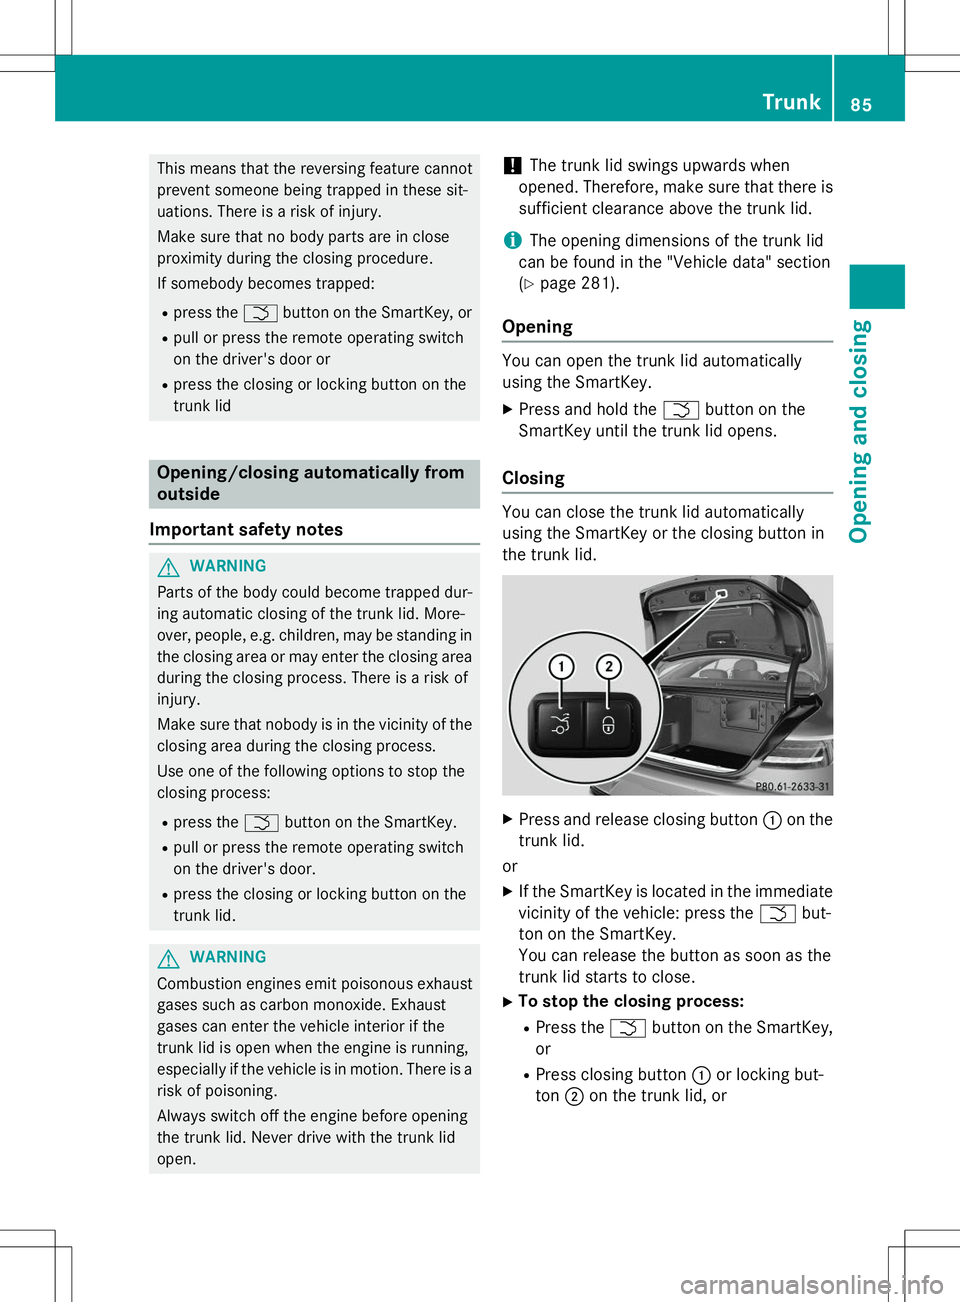
X Press and release closing button :on the
trunk lid.
or X If the SmartKey is located in the immediate
vicinity of the vehicle: press the Fbut-
ton on the SmartKey.
You can release the button as soon as the
trunk lid starts to close.
X To stop the closing process:
R Press the Fbutton on the SmartKey,
or
R Press closing button :or locking but-
ton ;on the trunk lid, or
Trunk85
Opening and closing
Z
Page 90 of 286
iThe opening dimensions of the trunk lid
can be found in the "Vehicle data" section ( Y page 281).
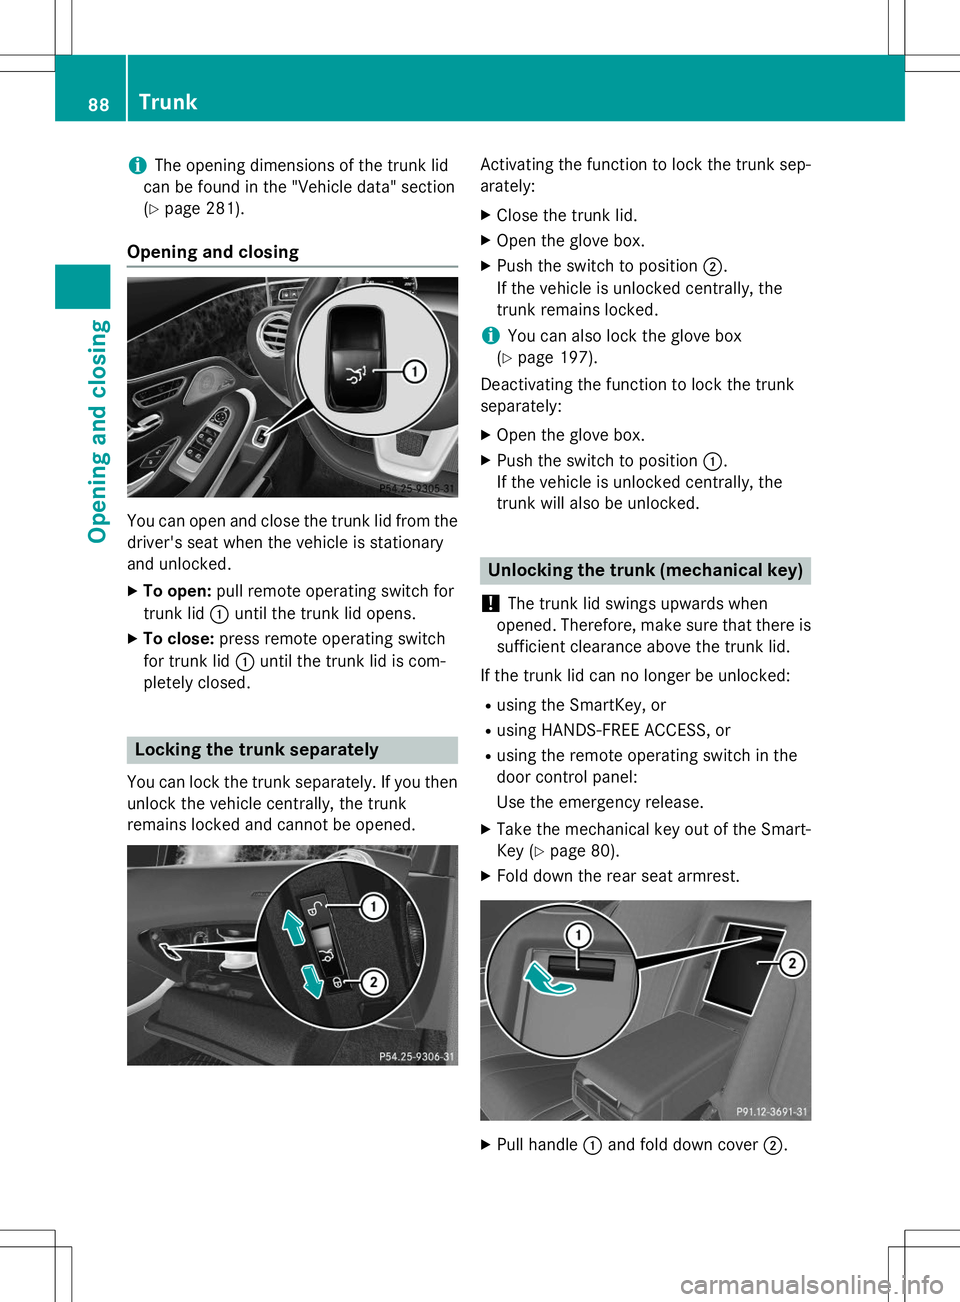
Opening and closing
You can open and close the trunk lid from the
driver's seat when the vehicle is stationary
and unlocked.
X To open: pull remote operating switch for
trunk lid :until the trunk lid opens.
X To close: press remote operating switch
for trunk lid :until the trunk lid is com-
pletely closed.
Locking the trunk separately
You can lock the trunk separately. If you then
unlock the vehicle centrally, the trunk
remains locked and cannot be opened.
Activating the function to lock the trunk sep- arately:
X Close the trunk lid.
X Open the glove box.
X Push the switch to position ;.
If the vehicle is unlocked centrally, the
trunk remains locked.
iYou can also lock the glove box
( Y page 197).
Deactivating the function to lock the trunk separately:
X Open the glove box.
X Push the switch to position :.
If the vehicle is unlocked centrally, the
trunk will also be unlocked.
Unlocking the trunk (mechanical key)
!
The trunk lid swings upwards when
opened. Therefore, make sure that there is sufficient clearance above the trunk lid.
If the trunk lid can no longer be unlocked: R using the SmartKey, or
R using HANDS-FREE ACCESS, or
R using the remote operating switch in the
door control panel:
Use the emergency release.
X Take the mechanical key out of the Smart-
Key ( Ypage 80).
X Fold down the rear seat armrest.
XPull handle :and fold down cover ;.
88Trunk
Opening and closing
Page 242 of 286
Useful information
iThis Operator's Manual describes all
models and all standard and optional equip- ment of your vehicle available at the time of
publication of the Operator's Manual.
Country-specific differences are possible.
Please note that your vehicle may not be
equipped with all features described. This
also applies to safety-related systems and
functions.
iRead the information on qualified special-
ist workshops ( Ypage 27).
Important safety notes
GWARNING
If wheels and tires of the wrong size are used,
the wheel brakes or suspension components
may be damaged. There is a risk of an acci-
dent.
Always replace wheels and tires with those
that fulfill the specifications of the originalpart.
When replacing wheels, make sure to use the
correct:
R designation
R model
When replacing tires, make sure to use the
correct:
R designation
R manufacturer
R model
GWARNING
A flat tire severely impairs the driving, steer-
ing and braking characteristics of the vehicle.
There is a risk of accident.
Tires without run-flat characteristics:
R do not drive with a flat tire.
R immediately replace the flat tire with your
emergency spare wheel or spare wheel, or
consult a qualified specialist workshop.
Tires with run-flat characteristics:
R pay attention to the information and warn-
ing notices on MOExtended tires (tires with
run-flat characteristics).
Accessories that are not approved for your
vehicle by Mercedes-Benz or that are not
being used correctly can impair operating
safety.
Before purchasing and using non-approved
accessories, visit a qualified specialist work-
shop and inquire about: R suitability
R legal stipulations
R factory recommendations
Information on the dimensions and types of
wheels and tires for your vehicle can be found in the "Wheel/tire combinations" section( Y page 266).
Information on air pressure for the tires on
your vehicle can be found:
R on the vehicle's Tire and Loading Informa-
tion placard on the B-pillar ( Ypage 249)
R on the tire pressure label on the fuel filler
flap ( Ypage 123)
R under "Tire pressure" ( Ypage 243)
Operation
Information on driving
If the vehicle is heavily loaded, check the tire
pressures and correct them if necessary.
While driving, pay attention to vibrations,
noises and unusual handling characteristics,
e.g. pulling to one side. This may indicate that the wheels or tires are damaged. If you sus-
pect that a tire is defective, reduce your
speed immediately. Stop the vehicle as soon
as possible to check the wheels and tires for
damage. Hidden tire damage could also be
causing the unusual handling characteristics.
If you find no signs of damage, have the tires and wheels checked at a qualified specialist
workshop.
240Operation
Wheels and tires
Page 246 of 286
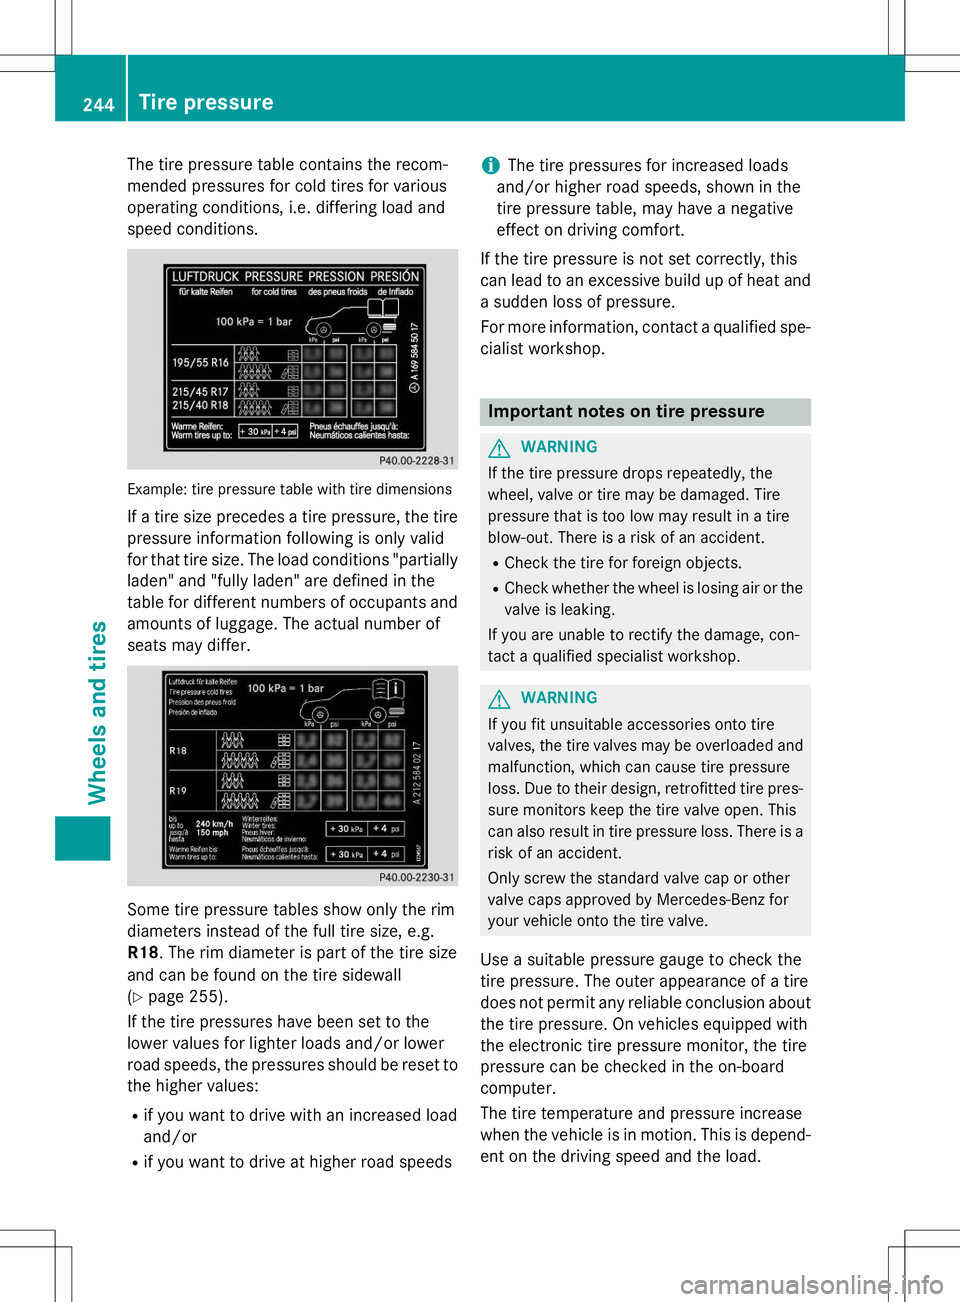
The tire pressure table contains the recom-
mended pressures for cold tires for various
operating conditions, i.e. differing load and
speed conditions.
Example: tire pressure table with tire dimensions
If a tire size precedes a tire pressure, the tirepressure information following is only valid
for that tire size. The load conditions "partially
laden" and "fully laden" are defined in the
table for different numbers of occupants and
amounts of luggage. The actual number of
seats may differ.
Some tire pressure tables show only the rim
diameters instead of the full tire size, e.g.R18 . The rim diameter is part of the tire size
and can be found on the tire sidewall( Y page 255).
If the tire pressures have been set to the
lower values for lighter loads and/or lower
road speeds, the pressures should be reset to the higher values:
R if you want to drive with an increased loadand/or
R if you want to drive at higher road speeds
iThe tire pressures for increased loads
and/or higher road speeds, shown in the
tire pressure table, may have a negative
effect on driving comfort.
If the tire pressure is not set correctly, this
can lead to an excessive build up of heat and a sudden loss of pressure.
For more information, contact a qualified spe-
cialist workshop.
Important notes on tire pressure
GWARNING
If the tire pressure drops repeatedly, the
wheel, valve or tire may be damaged. Tire
pressure that is too low may result in a tire
blow-out. There is a risk of an accident.
R Check the tire for foreign objects.
R Check whether the wheel is losing air or the
valve is leaking.
If you are unable to rectify the damage, con-
tact a qualified specialist workshop.
GWARNING
If you fit unsuitable accessories onto tire
valves, the tire valves may be overloaded and malfunction, which can cause tire pressure
loss. Due to their design, retrofitted tire pres- sure monitors keep the tire valve open. This
can also result in tire pressure loss. There is a
risk of an accident.
Only screw the standard valve cap or other
valve caps approved by Mercedes-Benz for
your vehicle onto the tire valve.
Use a suitable pressure gauge to check the
tire pressure. The outer appearance of a tire
does not permit any reliable conclusion about the tire pressure. On vehicles equipped with
the electronic tire pressure monitor, the tire
pressure can be checked in the on-board
computer.
The tire temperature and pressure increase
when the vehicle is in motion. This is depend-
ent on the driving speed and the load.
244Tire pressure
Wheels and tires
Page 263 of 286
Tread
The part of the tire that comes into contact
with the road. Bead
The tire bead ensures that the tire sits
securely on the wheel. There are several steel
wires in the bead to prevent the tire from
coming loose from the wheel rim.
Sidewall
The part of the tire between the tread and the
bead.
Weight of optional extras
The combined weight of those optional extras that weigh more than the replaced standard
parts and more than 5 lbs (2.3 kg). These
optional extras, such as high-performance
brakes, level control, a roof rack or a high-
performance battery, are not included in the
curb weight and the weight of the accesso-
ries.
TIN (Tire Identification Number)
This is a unique identifier which can be used
by a tire manufacturer to identify tires, for
example for a product recall, and thus identifythe purchasers. The TIN is made up of the
manufacturer's identity code, tire size, tire
type code and the manufacturing date.
Load bearing index
The load bearing index (also load index) is a
code that contains the maximum load bearing capacity of a tire.
Traction
Traction is the result of friction between the
tires and the road surface.
Treadwear indicators
Narrow bars (tread wear bars) that are dis-
tributed over the tire tread. If the tire tread islevel with the bars, the wear limit of áin
(1.6 mm) has been reached. Occupant distribution
The distribution of occupants in a vehicle at
their designated seating positions.
Total load limit
Nominal load and luggage load plus 68 kg
(150 lbs) multiplied by the number of seats in
the vehicle.
Changing a wheel
Flat tire
The "Breakdown assistance" section ( Y page 220 )contains information and notes
on how to deal with a flat tire. Information on
driving with MOExtended tires in the event of
a flat tire can be found under "MOExtended
tires (tires with run-flat characteristics"( Y page 221).
Rotating the wheels
GWARNING
Interchanging the front and rear wheels may
severely impair the driving characteristics if
the wheels or tires have different dimensions.
The wheel brakes or suspension components
may also be damaged. There is a risk of acci-dent.
Rotate front and rear wheels only if the wheels and tires are of the same dimensions.
!On vehicles equipped with a tire pressure
monitor, electronic components are loca-
ted in the wheel.
Tire-mounting tools should not be used
near the valve. This could damage the elec- tronic components.
Only have tires changed at a qualified spe-cialist workshop.
Always observe the instructions and safety
notes in the "Mounting a wheel" section( Y page 262).
The wear patterns on the front and rear tires
differ, depending on the operating conditions.
Changing a wheel261
Wheels and tires
Z