2015 MERCEDES-BENZ G-CLASS SUV light
[x] Cancel search: lightPage 77 of 274

Doors
Important safety notes
GWARNING
When leaving the vehicle, always remove the
SmartKey from the ignition lock. Always take
the SmartKey with you and lock the vehicle.
Do not leave children unsupervised in the
vehicle, even if they are secured in a child
restraint system, and do not give them accessto an unlocked vehicle. A child's unsupervised
access to a vehicle could result in an accident
and/or serious personal injury. They could: R injure themselves on vehicle parts
R be seriously or fatally injured by extreme
heat or cold
R injure themselves or have an accident with
vehicle equipment that may still be in oper-
ation even after the SmartKey has been
removed from the ignition, such as the seat
adjustment, steering wheel adjustment or
memory function.
If children open a door, they could cause
severe or even fatal injury to other persons; if they get out of the vehicle, they could injure
themselves when doing so or be seriously or
even fatally injured by any passing traffic.
Do not expose the child restraint system to
direct sunlight. The child restraint system's
metal parts, for example, could become very
hot, and a child could be burned on these
parts.
GWARNING
Do not carry heavy or hard objects in the
passenger compartment or cargo compart-
ment unless they are firmly secured in place.
Unsecured or improperly positioned cargo
increases a child's risk of injury in the event of
R strong braking maneuvers
R sudden changes of direction
R an accident
GWARNING
If children are left unsupervised in the vehicle,
they could:
R open the doors, thus endangering other
people or road users.
R get out and disrupt traffic.
R operate the vehicle's equipment.
Additionally, children could set the vehicle in
motion if, for example, they:
R release the parking brake.
R shift the automatic transmission out of park
position P or shift manual transmission into
neutral.
R start the engine.
There is a risk of an accident and injury.
When leaving the vehicle, always take the
SmartKey with you and lock the vehicle. Never leave children or animals unattended in the
vehicle. Always keep the SmartKey out of
reach of children.
Information in the Digital Operator's
Manual
In the Digital Operator's Manual you will find
information on the following topics: R Unlocking and opening doors from the
inside
R Centrally locking and unlocking the vehicle
from the inside
R Automatic locking feature
R Power closing
R Unlocking the driver's door (mechanical
key)
R Locking the vehicle (mechanical key)
R Opening and closing the rear door
Doors75
Opening and closing
Z
Page 78 of 274

Rear door
Important safety notes
GWARNING
When leaving the vehicle, always remove the
SmartKey from the ignition lock. Always take
the SmartKey with you and lock the vehicle.
Do not leave children unsupervised in the
vehicle, even if they are secured in a child
restraint system, and do not give them accessto an unlocked vehicle. A child's unsupervised
access to a vehicle could result in an accident
and/or serious personal injury. They could: R injure themselves on vehicle parts
R be seriously or fatally injured by extreme
heat or cold
R injure themselves or have an accident with
vehicle equipment that may still be in oper-
ation even after the SmartKey has been
removed from the ignition, such as the seat
adjustment, steering wheel adjustment or
memory function.
If children open a door, they could cause
severe or even fatal injury to other persons; if they get out of the vehicle, they could injure
themselves when doing so or be seriously or
even fatally injured by any passing traffic.
Do not expose the child restraint system to
direct sunlight. The child restraint system's
metal parts, for example, could become very
hot, and a child could be burned on these
parts.
GWARNING
Do not carry heavy or hard objects in the
passenger compartment or cargo compart-
ment unless they are firmly secured in place.
Unsecured or improperly positioned cargo
increases a child's risk of injury in the event of
R strong braking maneuvers
R sudden changes of direction
R an accident
GWARNING
Combustion engines emit poisonous exhaust
gases such as carbon monoxide. If the rear
door is open when the engine is running, par-
ticularly if the vehicle is moving, exhaust
fumes could enter the passenger compart-
ment. There is a risk of poisoning.
Turn off the engine before opening the rear
door. Never drive with the rear door open.
!The tailgate swings out to the side when
opened. Therefore, make sure that there is sufficient clearance.
iDo not leave the SmartKey in the cargo
compartment. Otherwise, you could lock
yourself out.
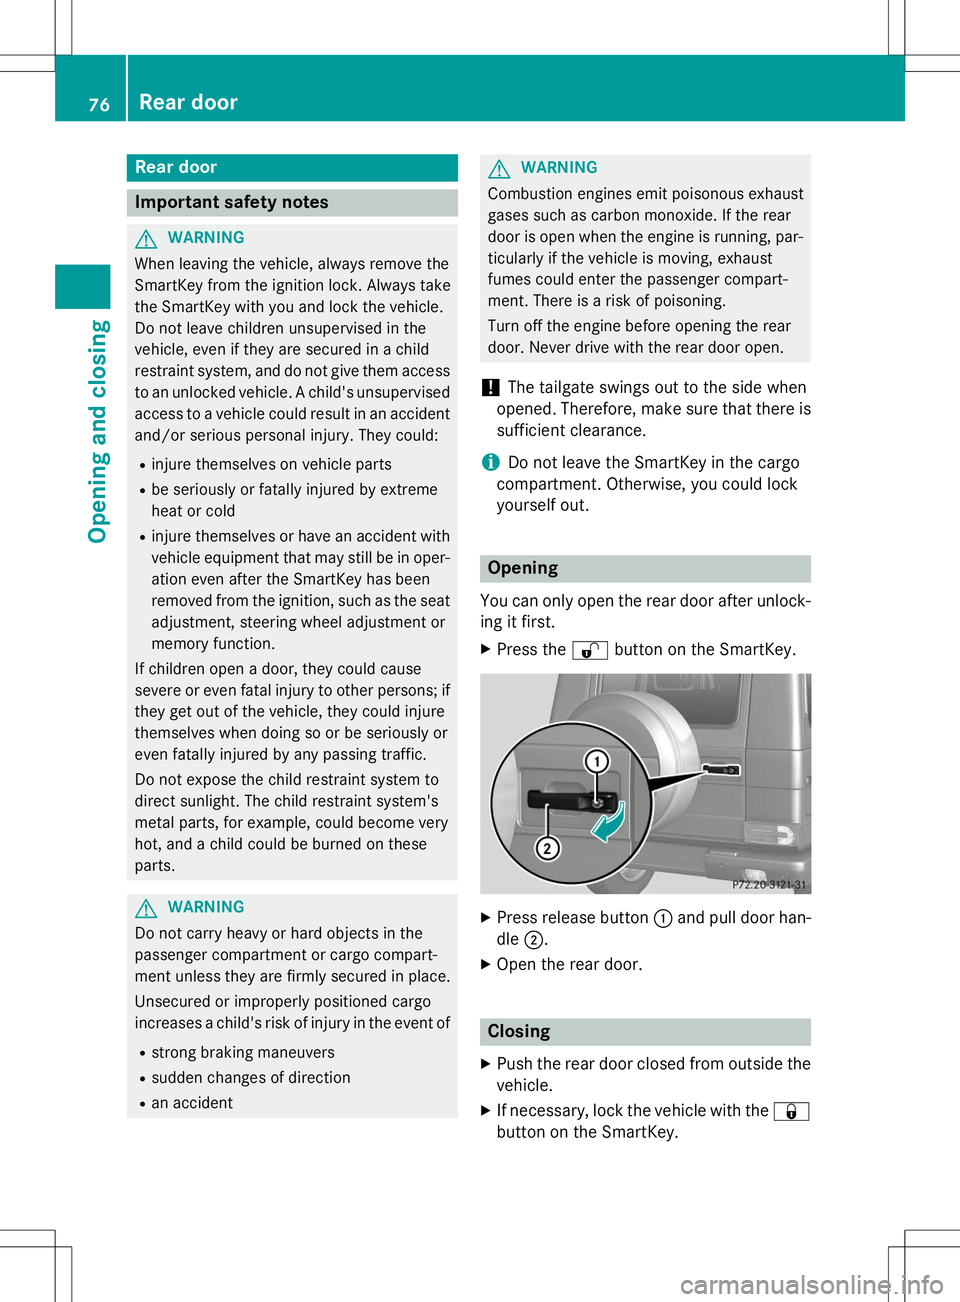
Opening
You can only open the rear door after unlock- ing it first.
X Press the %button on the SmartKey.
X
Press release button :and pull door han-
dle ;.
X Open the rear door.
Closing
X Push the rear door closed from outside the
vehicle.
X If necessary, lock the vehicle with the &
button on the SmartKey.
76Rear door
Opening and closing
Page 79 of 274

Side windows
Important safety notes
GWARNING
While closing the side windows, body parts inthe closing area could become trapped. There is a risk of injury.
When closing make sure that no parts of the
body are in the closing area. If somebody
becomes trapped, release the switch or press
the switch to open the side window again.
GWARNING
While opening the side windows, body parts
could become trapped between the side win- dow and the door frame as the side window
moves. There is a risk of injury.
Make sure that nobody touches the side win-
dow during the opening procedure. If some-
body becomes trapped, release the switch or pull the switch to close the side window again.
Information in the Digital Operator's Manual
In the Digital Operator's Manual you will find
information on the following topics:
R Opening and closing the side windows
R Opening and closing all side windows
Problems with the side windows
GWARNING
Closing the side windows with increased force
or without the anti-entrapment feature could
lead to serious or even fatal injury. Make sure
that nobody can become trapped when clos-
ing the side windows.
Problem: a side window cannot be closed because objects are trapped between the
side window and the door frame.
X Remove the objects.
X Close the side window. Problem: a side window cannot be closed
and you cannot see the cause.
If a side window is obstructed during closing
and reopens again slightly:
X Immediately after the window blocks, pull
the corresponding switch again until the
side window has closed.
If a side window is obstructed again during
closing and reopens again slightly: X Immediately after the window blocks, pull
the corresponding switch again until the
side window has closed.
iIf a side window no longer opens or closes
due to a malfunction, contact a qualified
specialist workshop.
Sliding sunroof
Important safety notes
!
Only open the sliding sunroof if it is free of
snow and ice. Otherwise, malfunctions may
occur.
Do not allow anything to protrude from the sliding sunroof. Otherwise, the seals could
be damaged.
!If the sliding sunroof still cannot be
opened or closed as a result of a malfunc-
tion, contact a qualified specialist work-shop.
!The weather can change abruptly. It could
start to rain or snow. Make sure that the
sliding sunroof is closed when you leave the
vehicle. The vehicle electronics can be
damaged if water enters the vehicle inte-rior.
iResonance noises can occur in addition to
the usual airflow noises when the sliding
sunroof is open. They are caused by minor
pressure fluctuations in the vehicle interior.
Change the position of the sliding sunroof
or open a side window slightly to reduce or
eliminate these noises.
Sliding sunroof77
Opening and closing
Z
Page 91 of 274

Useful information..............................90
Exterior lighting .................................. 90
Interior lighting ................................... 92
Replacing bulbs ................................... 92
Windshield wipers .............................. 95
89
Lights and windshield wipers
Page 92 of 274

Useful information
iThis Operator's Manual describes all
models and all standard and optional equip- ment of your vehicle available at the time of
publication of the Operator's Manual.
Country-specific differences are possible.
Please note that your vehicle may not be
equipped with all features described. This
also applies to safety-related systems and
functions.
iRead the information on qualified special-
ist workshops: ( Ypage 28).
Exterior lighting
Important safety notes
For reasons of safety, Mercedes-Benz recom-
mends that you drive with the lights switched
on even during the daytime. In some coun-
tries, operation of the headlamps varies due
to legal requirements and self-imposed obli-
gations.
Driving abroad
Conversion to symmetrical low beam
Switch the headlamps to symmetrical low
beam in countries in which traffic drives on
the opposite side of the road from the country where the vehicle is registered. This prevents
glare to oncoming traffic. When using sym-
metrical lights, the edge of the road is not lit
as widely and as far ahead as normal.
Have the headlamps converted at a qualified
specialist workshop as close to the border as
possible before driving in these countries.
Conversion to asymmetrical low beam
after returning
Have the headlamps converted back to asym- metrical low-beam headlamps at a qualified
specialist workshop as soon as possible after
crossing the border again.
Information in the Digital Operator's
Manual
In the Digital Operator's Manual you will find
information on the following topics: R Hazard warning lamps
R Headlamp cleaning system
R Headlamps fogged up on the inside
Light switch
Operation
!Switch off the parking lamps and low-
beam headlamps when you leave the vehi-
cle. This prevents the battery from dis-
charging.
!If the battery has been excessively dis-
charged, the parking lamps or standing
lamps are automatically switched off to
enable the next engine start. Always park
your vehicle safely and sufficiently lit
according to legal standards. Avoid the
continuous use of the Tparking lamps
for several hours. If possible, switch on theX right or the Wleft standing lamp.
1WLeft-hand standing lamps
2XRight-hand standing lamps
3 TParking lamps, side marker lamps,
license plate and instrument cluster
lighting
4 ÃAutomatic headlamp mode/
daytime running lamps
5LLow-beam/high-beam headlamps
90Exterior lighting
Lights and windshield wipers
Page 93 of 274

If you hear a warning tone when you leave the
vehicle, the lights may still be switched on.X Turn the light switch to Ã.
The turn signals, high-beam headlamps and
the high-beam flasher are operated using the combination switch ( Ypage 92).
The exterior lighting (except the parking/
standing lamps) switches off automatically if
you:
R remove the SmartKey from the ignition lock
R open the driver's door with the SmartKey in
position 0
Low-beam headlamps
X
To switch on the low-beam headlamps:
turn the SmartKey in the ignition lock to
position 2or start the engine.
X Turn the light switch to L.
The L indicator lamp in the instrument
cluster lights up.
Fog lamps (except AMG vehicles)
GWARNING
When the light switch is set to Ã, the low-
beam headlamps may not be switched on
automatically if there is fog, snow or other
causes of poor visibility due to the weather
conditions such as spray. There is a risk of anaccident.
In such situations, turn the light switch to L .
The automatic headlamp feature is only an
aid. The driver is responsible for the vehicle's lighting at all times. X To switch on the fog lamps: turn the
SmartKey in the ignition lock to position 2
or start the engine.
X Turn the light switch to T,L or
à . X
Press the Nbutton.
The green Nindicator lamp in the instru-
ment cluster lights up.
X To switch off the fog lamps: press the
N button.
The green Nindicator lamp in the instru-
ment cluster goes out.
Only vehicles with front fog lamps have the
fog lamps function.
Rear fog lamp
X To switch on the rear fog lamp: turn the
SmartKey in the ignition lock to position 2
or start the engine.
X Turn the light switch to Lorà .
X Press the Rbutton.
The yellow Rindicator lamp in the
instrument cluster lights up.
X To switch off the rear fog lamp: press the
R button.
The yellow Rindicator lamp in the
instrument cluster goes out.
Parking lamps
X To switch on: turn the light switch to T.
Standing lamps
Switching on the standing lamps ensures the
corresponding side of the vehicle is illumina- ted.
X To switch on the standing lamps: the
SmartKey is not inserted in the ignition lock
or it is in position 0(Y page 103).
X Turn the light switch to W(left-hand side
of the vehicle) or X(right-hand side of
the vehicle).
Exterior lighting91
Lights and windshield wipers
Z
Page 94 of 274

Combination switch
:High-beam headlamps
;Turn signal, right
=High-beam flasher
?Turn signal, left
In the Digital Operator's Manual you will find
information on the following topics: R Turn signals
R High-beam headlamps
R High-beam flasher
Cornering light function
The cornering light function improves the illu-
mination of the road over a wide angle in the direction you are turning, enabling better vis-
ibility in tight bends, for example. The corner- ing light function can only be activated if the
low-beam headlamps are switched on and the
fog lamps are switched off.
Active: if you are driving at speeds below
25 mph (40 km/ h)and switch on the turn
signal or turn the steering wheel. Not active:
if you are driving at speeds above
25 mph (40 km/h) or switch off the turn sig-
nal or turn the steering wheel to the straight-
ahead position.
The cornering lamp may remain lit for a short
time, but is automatically switched off after
no more than three minutes.
Interior lighting
An overview of the interior lighting and the
overhead control panel can be found in the
"At a glance" section.
In the Digital Operator's Manual you will find
information on the following topics: R Automatic interior lighting control
R Manual interior lighting control
R Courtesy lighting in the front doors
Replacing bulbs
Important safety notes
GDANGER
Xenon bulbs carry a high voltage. You can get
an electric shock if you remove the cover of
the Xenon bulb and touch the electrical con-
tacts. There is a risk of fatal injury.
Never touch the parts or the electrical con-
tacts of the Xenon bulb. Always have work on
the Xenon bulbs carried out at a qualified spe-
cialist workshop.
GWARNING
Bulbs, lamps and connectors can get very hot when operating. If you change a bulb, you
could burn yourself on these components.
There is a risk of injury.
Allow these components to cool down beforechanging a bulb.
Do not use a bulb that has been dropped or if
its glass tube has been scratched.
92Replacing bulbs
Lights and windshield wipers
Page 95 of 274

The bulb may explode if:
R you touch it
R it is hot
R you drop it
R you scratch it
Only operate bulbs in enclosed lamps
designed for that purpose. Only install spare
bulbs of the same type and the specified volt- age.
Marks on the glass tube reduce the service
life of the bulbs. Do not touch the glass tube
with your bare hands. If necessary, clean the
glass tube when cold with alcohol or spirit and
rub it off with a lint-free cloth.
Protect bulbs from moisture during opera-
tion. Do not allow bulbs to come into contact
with liquids.
Xenon bulbs
If your vehicle is equipped with Xenon bulbs,
you can recognize this by the following: the
cone of light from the Xenon bulbs moves
from the top to the bottom and back again
when you start the engine. For this to be
observed, the lights must be switched on
before starting the engine.
Bulbs and lamps are an important aspect of
vehicle safety. You must therefore make sure that these function correctly at all times.
Have the headlamp setting checked regularly.
LED lamps
You can replace neither Xenon bulbs nor LED
bulbs. Have LED bulbs changed at a qualified specialist workshop.
Bulbs and lamps are an important aspect of
vehicle safety. You must therefore make sure
that these function correctly at all times.
Have the headlamp setting checked regularly.
Before changing bulbs
Have the following bulbs replaced at a quali-
fied specialist workshop:
R Additional turn signals in the exterior mir-rors
R High-mounted brake lamp R
High-beam/low-beam headlamps (Xenonbulbs)
R Daytime running lamps
R Parking lamps/standing lamps
R License plate lamp
iIndividual segments of the license plate
lamp LEDs may fail without a display mes-
sage appearing in the multifunction dis-
play. Regularly check the license plate
lamp. If necessary, visit a qualified special-
ist workshop.
You can replace the following bulbs:
R Fog lamp/cornering light with fog lamp
function
R Turn signal lamp (front)
R Brake/tail lamp
R Turn signal lamp (rear)
R Tail lamps/standing lamps
R Backup lamp
R Rear Fog Lamp
R Side marker lamps
Other bulbs
There are bulbs other than the Xenon bulbs
that you cannot replace yourself. Only replace the bulbs listed ( Ypage 94). Have the bulbs
that you cannot replace yourself replaced at a
qualified specialist workshop.
If you require assistance replacing bulbs, con-
sult a qualified specialist workshop.
Do not touch the glass tube of new bulbs with your bare hands. Even minor contamination
can burn into the glass surface and reduce
the service life of the bulbs. Always use a lint-
free cloth or only touch the base of the bulb
when installing.
Only use bulbs of the correct type.
If the new bulb still does not light up, consult a qualified specialist workshop.
Bulbs and lamps are an important aspect of
vehicle safety. You must therefore make surethat these function correctly at all times.
Have the headlamp setting checked regularly.
Replacing bulbs93
Lights and windshield wipers
Z