2015 MERCEDES-BENZ G-CLASS SUV battery
[x] Cancel search: batteryPage 7 of 274

Engaging reverse gear ................... 106
Engaging the park position ............ 106
Important safety notes.................. 105
Manual drive progra m.................... 107
Neutral (ECO start/stop func-
tion) ............................................... 106
Overview ........................................ 105
Program selector button ................ 107
Pulling away ................................... 104
Selector lever ................................ 106
Shift ranges ................................... 107
Steering wheel paddle shifters ...... 107
Transmission position dis-
play ........................................ 106, 107
Auxiliary ventilation
Activating/deactivating ................. 100
Activating/deactivating (on the
center console ).............................. 100
Problem (display message) ............ 100
Axle load, permissible (trailer tow-
ing) ...................................................... 269
B
BabySmart™
Air bag deactivation system ............. 59
Back button ....................................... 180
Backup lamp
Display message ............................ 148
Ball coupling
Installing ........................................ 140
BAS (Brake Assist System) ................. 65
Battery
Checking (SmartKey) ....................... 74
Important safety guidelines
(SmartKey) ....................................... 73
Replacing (SmartKey) ...................... 74
Battery (vehicle)
Charging ........................................ 219
Display message ............................ 148
Important safety notes .................. 216
Jump starting ................................. 220
Overview ........................................ 216
Blind Spot Assist
Activating/deactivating ................. 147
Display message ............................ 148
Notes/function .............................. 124 Bluetooth
®
see also Digital Operator's Man-
ual .................................................. 172
Brake fluid
Display message .................... 148, 152
Notes ............................................. 264
Warning lamp ................................. 162
Brake fluid level ................................ 209
Brake lamps
Adaptive ........................................... 66
Display message ............................ 148
Brakes
ABS .................................................. 65
BAS .................................................. 65
Brake fluid (notes) ......................... 264
Display message .................... 148, 149
High-performance brake system .... 112
Important safety notes .................. 112
Maintenance .................................. 112
Parking brake ................................ 111
Riding tips ...................................... 112
Warning lamp ................................. 162
Breakdown
see Flat tire
see Towing away
Brightness control (instrument
cluster lighting) ................................... 33
Brush guard ....................................... 201
Bulbs
see Replacing bulbs
Buttons on the COMAND control-
ler ........................................................ 180
C
Calling up a malfunction
see Display messages
Care
Car wash ........................................ 211
Carpets .......................................... 212
Display ........................................... 212
Gear or selector lever .................... 212
Headlamps ..................................... 211
Interior ........................................... 212
Matte finish ................................... 211Note s............................................. 211
Paint .............................................. 211
Plastic trim .................................... 212
Index5
Page 12 of 274

Fog lampsSwitching on/off .............................. 91
Folding the seat backrest (rear)
forwards/back .................................. 194
Fording
Off-road ........................................ .112
Frequencies
Garage door opene r....................... 197
Front fog lamps
Display message ............................ 148
Switching on/of f.............................. 91
Fuel
Additives ........................................ 261
Consumption information .............. 262
Consumption statistics .................. 147
Displaying the current consump-
tion ................................................ 147
Displaying the range ...................... 147
Driving tips .................................... 112
Fuel gaug e..................................... 146
Grade (gasoline )............................ 260
Important safety notes .................. 260
Notes for AMG vehicles ................. 261
Premium-grade unleaded gaso-
line ................................................. 260
Problem (malfunction) ................... 110
Refueling ........................................ 107
Tank content/reserve fue l............. 260
Fuel filler flap
Emergency release ........................ 109
Opening/closing ............................ 108
Fuel filter (display message) ............ 148
Fuel level
Calling up the range (on-board
computer) ...................................... 147
Fuel tank
Capacity ........................................ 260
Problem (malfunction) ................... 110
Fuel/water separator
Service ........................................... 210
Fuse allocation chart ........................ 225
Fuse box
Battery case ................................... 227
Dashboard ..................................... 226
Front-passenger footwell ............... 226
Transmission tunnel ....................... 226
Fuse extractor ................................... 225 Fuses
Allocation chart ............................. 225
Before changing ............................. 225
Dashboard fuse box ....................... 226
Fuse allocation chart ..................... 225
Fuse box in the front-passenger
footwell .......................................... 226
Fuse box in the transmission tun-
nel ................................................. 226
Important safety notes .................. 225
In the battery case ......................... 227
G
Garage door openerClearing the memory ..................... 197
Frequencies ................................... 197
Notes ............................................. 197
Opening/closing the garage doo r..1 97
Programming (button in the rear-
view mirror) ................................... 197
Gasoline ............................................. 260
Gear indicator (on-board com- puter) ................................................. .147
Gear or selector lever (cleaning
guidelines) ......................................... 212
Genuine parts ...................................... 26
Glove box .......................................... .193
Google™ Local Search
see also Digital Operator's Man-
ual ................................................. .172
GTW (Gross Trailer Weight) (defini-
tion) .................................................... 248
H
Hazard warning lamps ........................ 90
Head bags
Display message ............................ 148
Head restraints
Adjusting ......................................... 84
Adjusting (rear) ................................ 85
Installing/removing (rear) .......... 84, 85
Luxury .............................................. 84
Resetting (front) ............................... 84
see NECK-PRO head restraints
see NECK-PRO luxury head restraints
10Index
Page 18 of 274

Cleaning the cover .........................212
Correct driver's seat position ........... 82
Important safety notes .................... 82
Multicontour seat ............................ 84
Storing settings (memory func-
tion) ................................................. 87
Switching seat heating on/off ......... 85
Switching seat ventilation on/off .... 84
Sensors (cleaning instructions) ....... 211
Service interval display
Displaying a service message (on-board computer) ............................ 210
Service menu (on-board com- puter) ................................................. .147
Service products
Brake fluid ..................................... 264
Coolant (engine) ............................ 264
Engine oil ....................................... 262
Fuel ................................................ 259
Important safety notes .................. 259
Notes ............................................. 259
Refrigerant (air-conditioning sys-
tem) ............................................... 263
Washer fluid ................................... 265
Setting a speed limit
see SPEEDTRONIC
Setting the air distribution ...............100
Setting the airflow ............................ 100
Setting the date/time format
see also Digital Operator's Man-
ual ................................................. .172
Setting the language
see also Digital Operator's Man-
ual ................................................. .172
Setting the time
see also Digital Operator's Man-
ual ................................................. .172
Settings
Factory (on-board computer) ......... 147
Menu overview .............................. 176
On-board computer ....................... 147
SETUP (on-board computer) ............. 147
Shift ranges ....................................... 107
Side impact air bag .............................50
Side marker lamp (display mes- sage) ................................................... 148 Side marker lamps (changingbulbs)
................................................... .94
Side windows
Cleaning ......................................... 211
Important safety informa-
tion .................................................. 77
Opening/closing .............................. 77
Opening/closing (all) ....................... 77
Opening/closing (front )................... 77
Overview .......................................... 77
Troubleshooting ............................... 77
SIRIUS services
see also Digital Operator's Man-
ual .................................................. 172
Ski rack .............................................. 197
Sliding sunroof
Important safety notes .................... 77
Opening/closing .............................. 78
Operating manually .......................... 78
SmartKey
Changing the battery ....................... 74
Changing the programming ............. 73
Checking the battery ....................... 74
Convenience opening feature .......... 77
Display message ............................ 148
Door central locking/unlocking ....... 72
Important safety notes .................... 72
Loss ................................................. 74
Malfunction ...................................... 74
Mechanical key ................................ 73
Overview .......................................... 72
Problem (malfunction) ..................... 74
Starting the engine ........................ 104
SMS
see also Digital Operator's Man-
ual .................................................. 172
Snow chains ...................................... 232
Sockets
Front-passenger footwell ............... 197
Points to observe before use ......... 197
Trunk ............................................. 197
SOS
see mbrace
Spare fuses ........................................ 225
Spare wheel
Mounting ....................................... 250
Notes/data .................................... 256
Spare wheel bracket at the rear .... 215
16Index
Page 70 of 274

iIf ESP®
is deactivated, it is reactivated
automatically if you are driving at above
37 mph (60 km/h) (on AMG vehicles above
62 mph (100 km/h)) or you exceed a cer-
tain lateral acceleration.
Trailer stabilization
GWARNING
If road and weather conditions are poor,
trailer stabilization will not be able to prevent the vehicle/trailer combination from swerv-
ing. Trailers with a high center of gravity can
tip over before ESP ®
can detect this. There is
a risk of an accident.
Always adapt your driving style to the prevail- ing road and weather conditions.
Trailer stabilization does not work if ESP ®
is
deactivated because of a malfunction.
If your vehicle with trailer (vehicle/trailer
combination) begins to lurch, you can only
stabilize the vehicle/trailer combination by
depressing the brake firmly.
In this situation, ESP ®
assists you and can
detect if the vehicle/trailer combination
begins to lurch. ESP ®
slows the vehicle down
by braking and limiting the engine output until the vehicle/trailer combination has stabi- lized.
Trailer stabilization is active above speeds of
about 37 mph (60 km/h).
EBD (electronic brake force distribu- tion)
iObserve the "Important safety notes" sec-
tion ( Ypage 64).
GWARNING
If EBD is malfunctioning, the rear wheels can
lock, e.g. under full braking. This increases the
risk of skidding and an accident.
You should therefore adapt your driving style
to the different handling characteristics. Have
the brake system checked at a qualified spe-
cialist workshop.
Observe information regarding indicator and
warning lamps ( Ypage 163) as well as dis-
play messages ( Ypage 148).
EBD monitors and controls the brake pres-
sure on the rear wheels to improve driving
stability while braking.
ADAPTIVE BRAKE
ADAPTIVE BRAKE provides increased braking
safety. In addition to the braking function,
ADAPTIVE BRAKE also has the HOLD function
( Y page 126) and hill start assist
( Y page 105).
Theft deterrent locking system
Immobilizer
X
To activate: remove the SmartKey from
the ignition lock.
X To deactivate: switch on the ignition.
The immobilizer prevents your vehicle from
being started without the correct SmartKey.
When leaving the vehicle, always take the
SmartKey with you and lock the vehicle. The
engine can be started by anyone with a valid
SmartKey that is left inside the vehicle.
iThe immobilizer is always deactivated
when you start the engine.
In the event that the engine cannot be star-
ted when the starter battery is fully
charged, the immobilizer may be faulty.
Contact an authorized Mercedes-Benz
Center or call 1-800-FOR-MERCedes (in the USA) or 1-800-387-0100 (in Canada).
68Theft deterrent locking system
Safety
Page 75 of 274

The SmartKey centrally locks/unlocks:R the doors
R the rear door
R the fuel filler flap
iThe turn signals flash once when unlock-
ing and three times when locking.
You can also set an audible signal to confirm that the vehicle has been locked. The audiblesignal can be activated and deactivated using
the on-board computer ( Ypage 147).
When it is dark, the surround lighting also
comes on if it is activated in the on-board
computer ( Ypage 147).
Changing the settings of the locking system
You can find information about this in the
Digital Operator's Manual.
Mechanical key
General notes
If the vehicle can no longer be unlocked with
the SmartKey, use the mechanical key.
If you use the mechanical key to unlock and
open the driver's door or the rear door, the
anti-theft alarm system will be triggered( Y page 69).
X To end the alarm: insert the SmartKey into
the ignition lock.
Removing the mechanical key
X Push release catch :in the direction of
the arrow and at the same time remove
mechanical key ;from the SmartKey.
SmartKey battery
Important safety notes
GWARNING
Batteries contain toxic and corrosive substan- ces. If batteries are swallowed, it can result in
severe health problems. There is a risk of fatal injury.
Keep batteries out of the reach of children. If
a battery is swallowed, seek medical attention immediately.
The SmartKey batteries contain perchlorate
material, which may require special handling
and regard for the environment. Check your
national disposal guidelines. In California, see
www.dtsc.ca.gov/HazardousWaste/
Perchlorate/index.cfm .
Mercedes-Benz recommends that you have
the batteries replaced at a qualified specialist workshop.
SmartKey73
Opening and closing
Z
Page 76 of 274

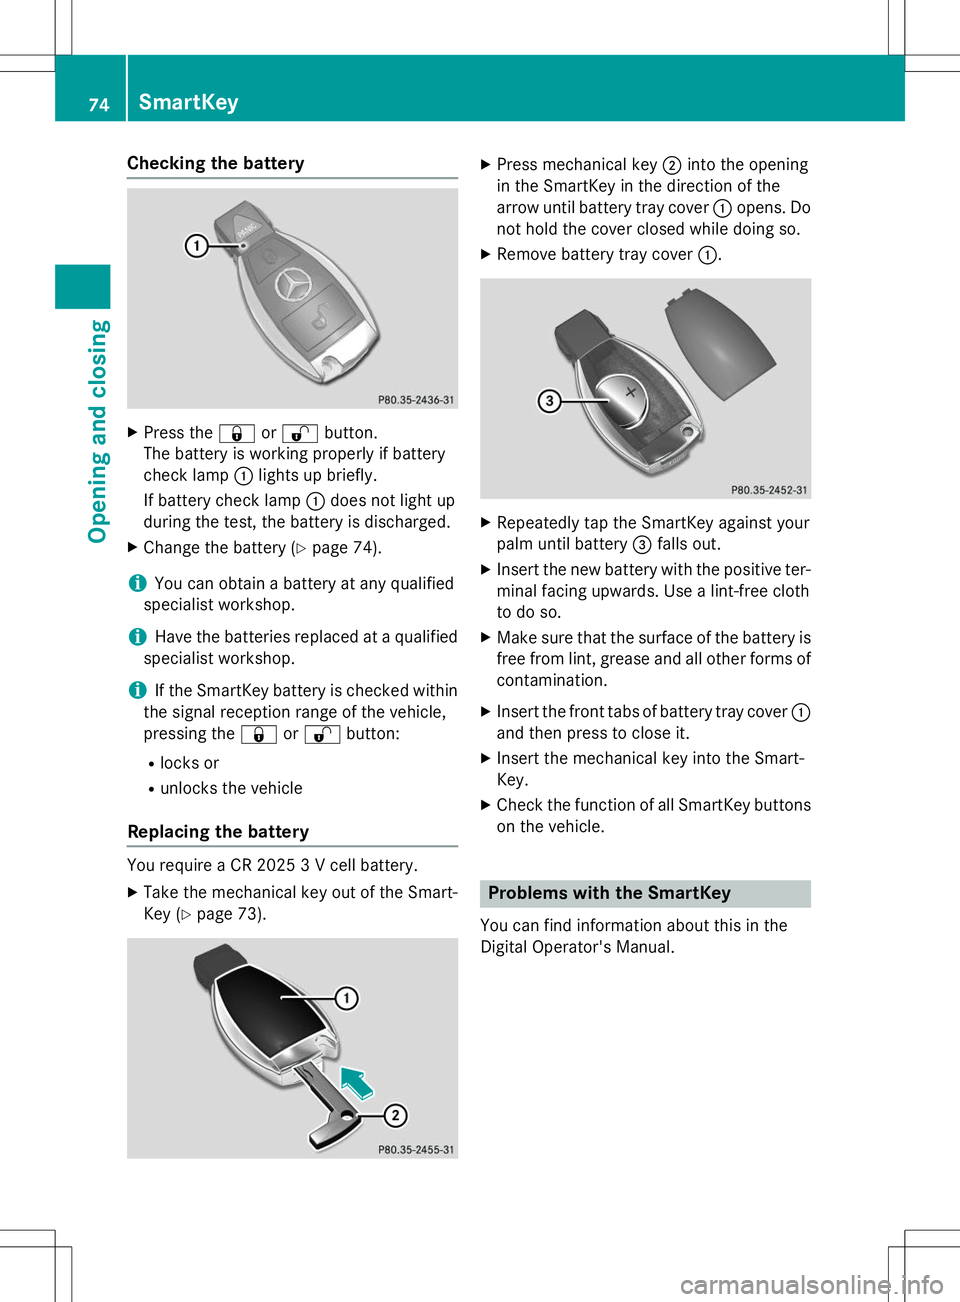
Checking the battery
XPress the &or% button.
The battery is working properly if battery
check lamp :lights up briefly.
If battery check lamp :does not light up
during the test, the battery is discharged.
X Change the battery ( Ypage 74).
iYou can obtain a battery at any qualified
specialist workshop.
iHave the batteries replaced at a qualified
specialist workshop.
iIf the SmartKey battery is checked within
the signal reception range of the vehicle,
pressing the &or% button:
R locks or
R unlocks the vehicle
Replacing the battery
You require a CR 2025 3 V cell battery.
X Take the mechanical key out of the Smart-
Key ( Ypage 73).
X
Press mechanical key ;into the opening
in the SmartKey in the direction of the
arrow until battery tray cover :opens. Do
not hold the cover closed while doing so.
X Remove battery tray cover :.
X
Repeatedly tap the SmartKey against your
palm until battery =falls out.
X Insert the new battery with the positive ter-
minal facing upwards. Use a lint-free cloth
to do so.
X Make sure that the surface of the battery is
free from lint, grease and all other forms of
contamination.
X Insert the front tabs of battery tray cover :
and then press to close it.
X Insert the mechanical key into the Smart-Key.
X Check the function of all SmartKey buttons
on the vehicle.
Problems with the SmartKey
You can find information about this in the
Digital Operator's Manual.
74SmartKey
Opening and closing
Page 87 of 274

interrupted, e.g. if the battery has been com-pletely discharged or disconnected.
X Make sure that the cup holder on the center
console is folded down ( Ypage 197).
X Move the seat as far forward as possible
and the head restraint in as far as possible.
Rear seat head restraints
Important safety notes
GWARNING
If head restraints are not installed and adjus-
ted correctly, they cannot provide protection
as intended. There is an increased risk of
injury in the head and neck area, e.g. in the
event of an accident or when braking.
Always drive with the head restraints instal-
led. Before driving off, make sure for every
vehicle occupant that the center of the head
restraint supports the back of the head at
about eye level.
Observe the following when adjusting the
head restraints: X Do not rotate the head restraints of the
front and rear seats.
Otherwise, you cannot adjust the height
and angle of the head restraints correctly.
X Adjust the head restraint so that it is as
close as possible to your head.
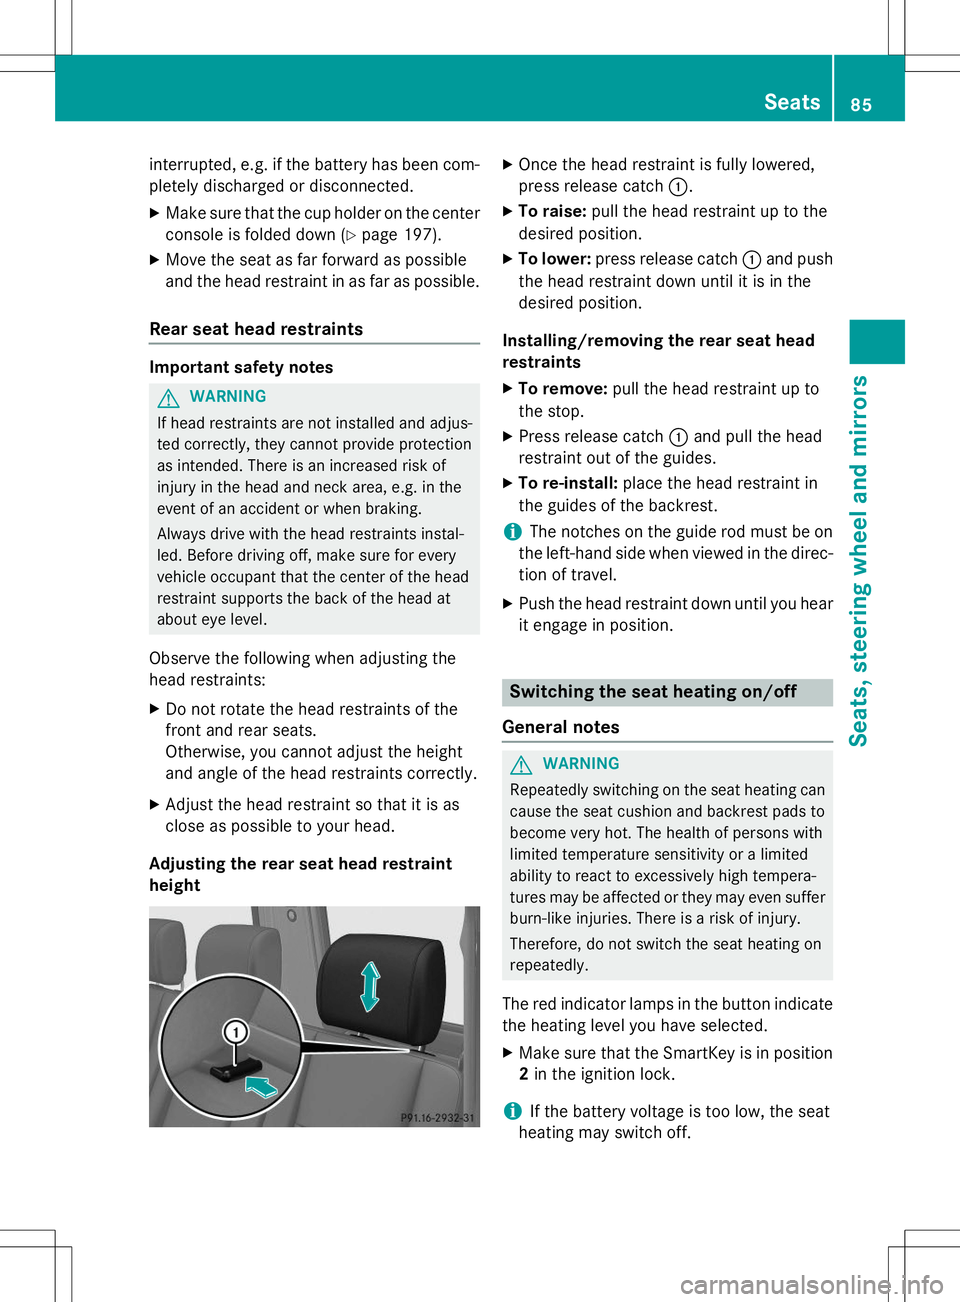
Adjusting the rear seat head restraintheight
X Once the head restraint is fully lowered,
press release catch :.
X To raise: pull the head restraint up to the
desired position.
X To lower: press release catch :and push
the head restraint down until it is in the
desired position.
Installing/removing the rear seat head
restraints
X To remove: pull the head restraint up to
the stop.
X Press release catch :and pull the head
restraint out of the guides.
X To re-install: place the head restraint in
the guides of the backrest.
iThe notches on the guide rod must be on
the left-hand side when viewed in the direc- tion of travel.
X Push the head restraint down until you hear
it engage in position.
Switching the seat heating on/off
General notes
GWARNING
Repeatedly switching on the seat heating can
cause the seat cushion and backrest pads to
become very hot. The health of persons with
limited temperature sensitivity or a limited
ability to react to excessively high tempera-
tures may be affected or they may even suffer burn-like injuries. There is a risk of injury.
Therefore, do not switch the seat heating on
repeatedly.
The red indicator lamps in the button indicate the heating level you have selected.
X Make sure that the SmartKey is in position
2 in the ignition lock.
iIf the battery voltage is too low, the seat
heating may switch off.
Seats85
Seats, steering wheel and mirrors
Z
Page 92 of 274

Useful information
iThis Operator's Manual describes all
models and all standard and optional equip- ment of your vehicle available at the time of
publication of the Operator's Manual.
Country-specific differences are possible.
Please note that your vehicle may not be
equipped with all features described. This
also applies to safety-related systems and
functions.
iRead the information on qualified special-
ist workshops: ( Ypage 28).
Exterior lighting
Important safety notes
For reasons of safety, Mercedes-Benz recom-
mends that you drive with the lights switched
on even during the daytime. In some coun-
tries, operation of the headlamps varies due
to legal requirements and self-imposed obli-
gations.
Driving abroad
Conversion to symmetrical low beam
Switch the headlamps to symmetrical low
beam in countries in which traffic drives on
the opposite side of the road from the country where the vehicle is registered. This prevents
glare to oncoming traffic. When using sym-
metrical lights, the edge of the road is not lit
as widely and as far ahead as normal.
Have the headlamps converted at a qualified
specialist workshop as close to the border as
possible before driving in these countries.
Conversion to asymmetrical low beam
after returning
Have the headlamps converted back to asym- metrical low-beam headlamps at a qualified
specialist workshop as soon as possible after
crossing the border again.
Information in the Digital Operator's
Manual
In the Digital Operator's Manual you will find
information on the following topics: R Hazard warning lamps
R Headlamp cleaning system
R Headlamps fogged up on the inside
Light switch
Operation
!Switch off the parking lamps and low-
beam headlamps when you leave the vehi-
cle. This prevents the battery from dis-
charging.
!If the battery has been excessively dis-
charged, the parking lamps or standing
lamps are automatically switched off to
enable the next engine start. Always park
your vehicle safely and sufficiently lit
according to legal standards. Avoid the
continuous use of the Tparking lamps
for several hours. If possible, switch on theX right or the Wleft standing lamp.
1WLeft-hand standing lamps
2XRight-hand standing lamps
3 TParking lamps, side marker lamps,
license plate and instrument cluster
lighting
4 ÃAutomatic headlamp mode/
daytime running lamps
5LLow-beam/high-beam headlamps
90Exterior lighting
Lights and windshield wipers