2015 MERCEDES-BENZ G-CLASS SUV light
[x] Cancel search: lightPage 96 of 274

Overview: changing bulbs/bulb types
Front bulbs
You can replace the following bulbs. The bulb
type can be found in the legend.
:Turn signal lamp: 1156 NA
;Side marker lamp: T 4 W
=Cornering light function with fog lamp
function: H11 55 W (except AMG vehicles)
Rear bulbs
You can replace the following bulbs. The bulb
type can be found in the legend.
:Tail lamp/standing lamp: W 5 W
;Brake lamp/tail lamp: P 21/5 W
=Turn signal lamp: PY 21 W
?Side marker lamp: T 4 W
ABackup lamp: P 21 W
BRear fog lamp: P 21 W
Changing the front bulbs
Side marker lamps
!Do not fasten the screws too tightly. You
could otherwise damage the lens.
Front side marker lamp (example)
The bulbs of the front and rear side marker
lamps are changed in the same way.
X Switch off the lights.
X Unscrew screws :.
X Remove housing ;.
X
Remove dust cover =.
X Push the catch to the side and pull the bulb
holder with the bulb out of housing ;.
94Replacing bulbs
Lights and windshield wipers
Page 97 of 274

XLightly press bulb ?, turn it counter-clock-
wise and pull it out.
X Insert the new bulb and, applying slight
pressure, turn it clockwise until it engages.
X Insert the bulb holder into housing ;.
X Attach dust cover =.
X Insert housing ;.
X Replace and tighten screws :.
Windshield wipers
Switching the windshield wipers
on/off
If the wiper blades are worn, the windshield
will no longer be wiped properly. This could
prevent you from observing the traffic condi-
tions, thereby causing an accident.
Combination switch 1
$ Windshield wipers off
2ÄIntermittent wipe, low (rain sensor
set to low sensitivity)
3Å Intermittent wipe, high (rain sensor
set to high sensitivity)
4° Continuous wipe, slow
5¯Continuous wipe, fast
BíSingle wipe
CîTo wipe with washer fluid
X Switch on the ignition.
X Turn the combination switch to the corre-
sponding position.
In the ÄorÅ position, the appropriate
wiping frequency is set automatically accord-
ing to the intensity of the rain. In the Å
position, the rain sensor is more sensitive
than in the Äposition, causing the wind-
shield wipers to wipe more frequently.
Switching the rear window wiper on/ off
Combination switch :
è Switch
2bWipes with washer fluid
3ISwitches on intermittent wiping
40 Switches off intermittent wiping
5b Wipes with washer fluid
X Turn the SmartKey to position 1or 2in the
ignition lock.
X Turn switch :on the combination switch
to the corresponding position.
When the rear window wiper is switched on,
the icon appears in the instrument cluster.
iThe rear window wiper comes on auto-
matically if you shift the selector lever to R
while the windshield wiper are on.
Windshield wipers95
Lights and windshield wipers
Z
Page 98 of 274

Replacing the wiper blades
Important safety notes
GWARNING
If the windshield wipers begin to move while
you are changing the wiper blades, you could be trapped by the wiper arm. There is a risk of
injury.
Always switch off the windshield wipers and
ignition before changing the wiper blades.
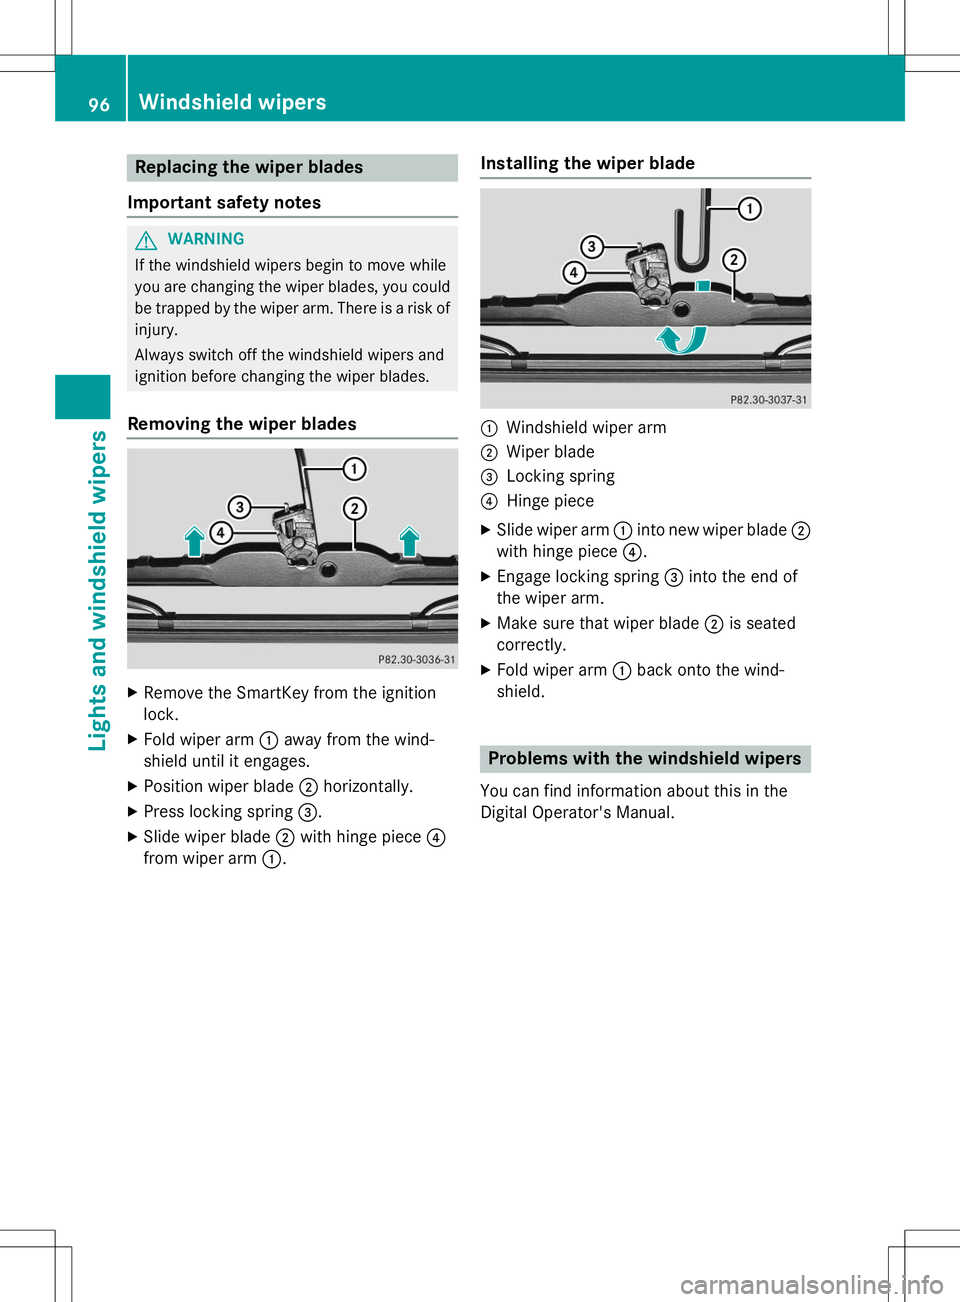
Removing the wiper blades
X Remove the SmartKey from the ignition
lock.
X Fold wiper arm :away from the wind-
shield until it engages.
X Position wiper blade ;horizontally.
X Press locking spring =.
X Slide wiper blade ;with hinge piece ?
from wiper arm :.
Installing the wiper blade
:Windshield wiper arm
;Wiper blade
=Locking spring
?Hinge piece
X Slide wiper arm :into new wiper blade ;
with hinge piece ?.
X Engage locking spring =into the end of
the wiper arm.
X Make sure that wiper blade ;is seated
correctly.
X Fold wiper arm :back onto the wind-
shield.
Problems with the windshield wipers
You can find information about this in the
Digital Operator's Manual.
96Windshield wipers
Lights and windshield wipers
Page 105 of 274

the driver's footwell. Install the floormats
securely and as specified in order to ensure
sufficient clearance for the pedals. Do not useloose floormats and do not place floormats ontop of one another.
GWARNING
Unsuitable footwear can hinder correct usage of the pedals, e.g.:
R shoes with thick soles
R shoes with high heels
R slippers
There is a risk of an accident.
Wear suitable footwear to ensure correct
usage of the pedals.
GWARNING
If you switch off the ignition while driving,
safety-relevant functions are only available
with limitations, or not at all. This could affect, for example, the power steering and the brake
boosting effect. You will require considerably
more effort to steer and brake. There is a risk
of an accident.
Do not switch off the ignition while driving.
GWARNING
If the parking brake has not been fully
released when driving, the parking brake can:
R overheat and cause a fire
R lose its hold function.
There is a risk of fire and an accident. Release
the parking brake fully before driving off.
!Warm up the engine quickly. Do not use
the engine's full performance until it has
reached operating temperature.
Only shift the automatic transmission to
the desired drive position when the vehicle
is stationary.
Where possible, avoid spinning the drive
wheels when pulling away on slippery
roads. You could otherwise damage the
drive train.
!Avoid high engine speeds when the
engine is cold. The engine's service life
could otherwise be significantly shortened.
Do not use the engine's full performance
until it has reached operating temperature.
!AMG vehicles: at low engine oil temper-
atures below 68 ‡ (+20 †), the maximum
engine speed is restricted in order to pro-
tect the engine. To protect the engine and
maintain smooth engine operation, avoid
driving at full throttle when the engine is
cold.
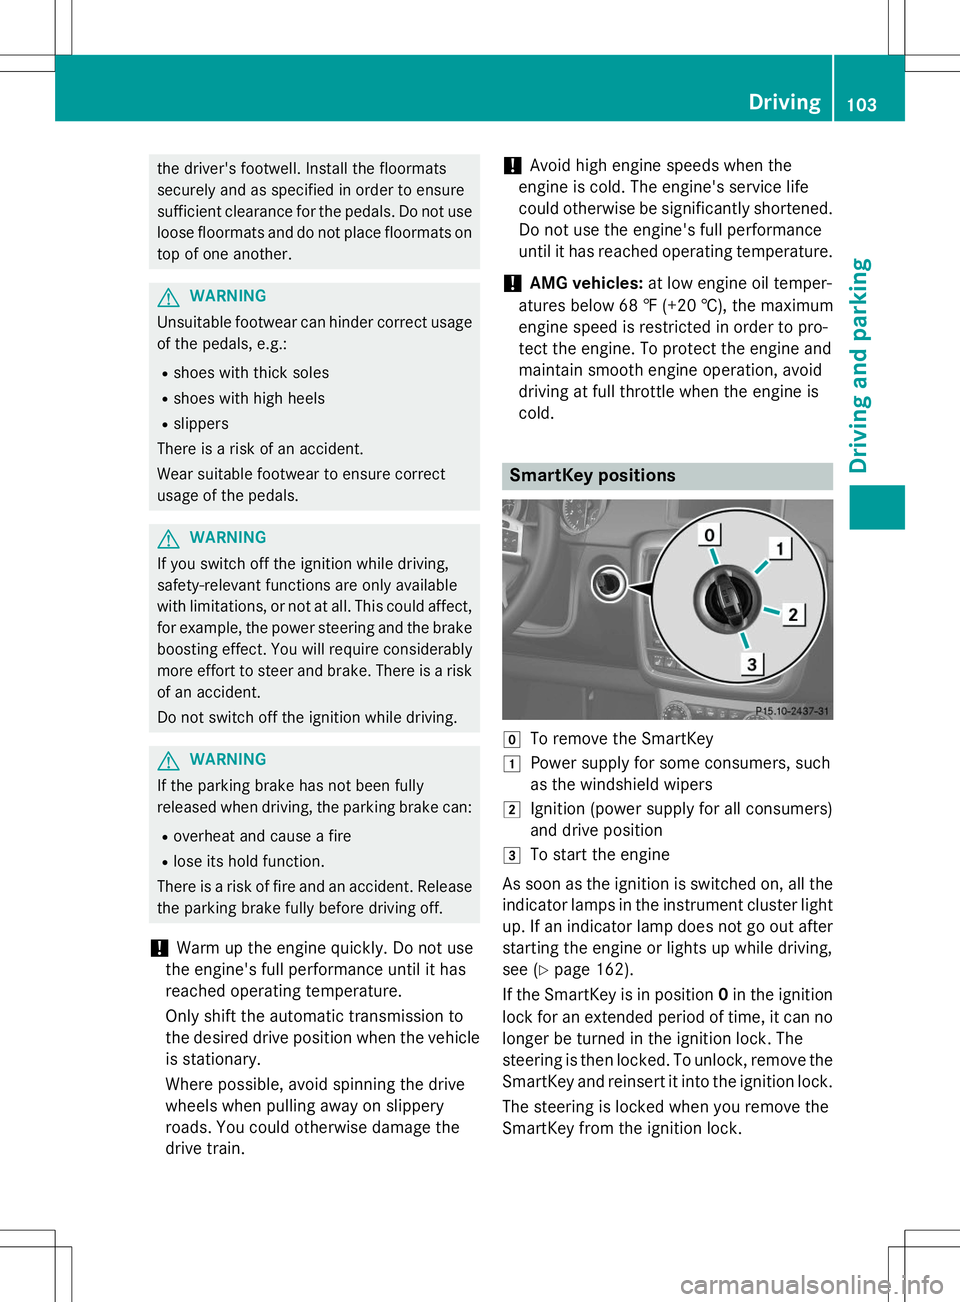
SmartKey positions
gTo remove the SmartKey
1Power supply for some consumers, such
as the windshield wipers
2Ignition (power supply for all consumers)
and drive position
3To start the engine
As soon as the ignition is switched on, all the
indicator lamps in the instrument cluster light up. If an indicator lamp does not go out after
starting the engine or lights up while driving,
see ( Ypage 162).
If the SmartKey is in position 0in the ignition
lock for an extended period of time, it can no
longer be turned in the ignition lock. The
steering is then locked. To unlock, remove the SmartKey and reinsert it into the ignition lock.
The steering is locked when you remove the
SmartKey from the ignition lock.
Driving103
Driving an d parking
Z
Page 108 of 274

The vehicle may roll away. There is a risk of anaccident.
After switching off the engine, always switch
to parking position P. Prevent the parked vehi-
cle from rolling away by applying the parkingbrake.
iBear in mind that the power transmission
between the engine and the transmission is interrupted when the engine is switched
off. For this reason, shift the automatic
transmission to Pwhen the engine is
switched off and the vehicle is at a stand-
still. Apply the parking brake to prevent the vehicle from rolling away.
Selector lever
Overview of transmission positions
!If the engine speed is too high or if the
vehicle is rolling, do not shift the transmis-
sion directly from Dto R, from Rto Dor
directly to P.
Do not open the driver's door while the
vehicle is in motion. At low speeds in trans-
mission position Dor R, park position Pis
otherwise engaged automatically.
The transmission could be damaged.
Selector lever j
Park position
kReverse gear
iNeutral
hDrive In the Digital Operator's Manual you will find
information on the following topics: R
Engaging park position P
R Engaging reverse gear R
R Engaging neutral N
R Neutral Nin the ECO start/stop function
(AMG vehicles)
R Shifting to transmission position D
R Transmission position Din the ECO start/
stop function (AMG vehicles)
Transmission position and drive pro-
gram display
!If the transmission position display in the
multifunction display is not working, you
should pull away carefully to check whether the desired transmission position is
engaged. Select transmission position D.
Do not restrict the shift range.
:Transmission position
;Drive program
Current transmission position :and current
drive program ;appear in the multifunction
display.
The current position of the selector lever is
shown by the indicators next to the selectorlever.
The indicators light up when the SmartKey is inserted into the ignition lock. The indicators go out when the SmartKey is removed from
the ignition lock.
When the selector lever is in position D, you
can influence the gearshifts made by the
automatic transmission by:
R restricting the shift range
R changing gear yourself
106Automatic transmission
Driving and parking
Page 110 of 274

GWARNING
Fuel is poisonous and hazardous to health.
There is a risk of injury.
You must make sure that fuel does not comeinto contact with your skin, eyes or clothing
and that it is not swallowed. Do not inhale fuel
vapors. Keep fuel away from children.
If you or others come into contact with fuel,
observe the following:
R Wash away fuel from skin immediately
using soap and water.
R If fuel comes into contact with your eyes,
immediately rinse them thoroughly with
clean water. Seek medical assistance with-
out delay.
R If fuel is swallowed, seek medical assis-
tance without delay. Do not induce vomit-ing.
R Immediately change out of clothing which
has come into contact with fuel.
!Do not use diesel to refuel vehicles with a
gasoline engine. Even small amounts of the wrong fuel result in damage to the fuel sys-
tem and engine.
!Do not switch on the ignition if you acci-
dentally refuel with the wrong fuel. Other-
wise, the fuel will enter the fuel lines. Notify
a qualified specialist workshop and have
the fuel tank and fuel lines drained com-
pletely.
!Overfilling the fuel tank could damage the
fuel system.
!Take care not to spill any fuel on painted
surfaces. You could otherwise damage the
paintwork.
!Use a filter when refueling from a fuel can.
Otherwise, the fuel lines and/or injection
system could be blocked by particles from
the fuel can.
If you overfill the fuel tank, pressure may build
up in the fuel tank. This could cause fuel to
spray out when the fuel pump nozzle is
removed. There is a risk of injury. The fuel tank is full when the fuel pump nozzle first
switches off. End the refueling process.
For further information on fuel and fuel quality
( Y page 259).
Refueling
Vehicles with a fuel filler flap
Example: G 550 fuel filler cap :
To open the fuel filler flap
;Tire pressure table
=Fuel type
?To insert the fuel filler cap
When you open or close the vehicle with the
SmartKey, the fuel filler flap is automatically
unlocked or locked.
The position of the fuel filler cap is displayed 8 in the instrument cluster. The arrow
next to the filling pump indicates the side of
the vehicle. The fuel filler flap is located to the rear on the right.
Opening the fuel filler cap
X Switch the engine off.
iWhen the engine is running and the fuel
filler flap is open, the yellow reserve fuel
warning lamp and the =(USA only)
or ; (Canada only) Check Engine warn-
ing lamp may light up.
Further information about warning and indi-
cator lamps in the instrument cluster can
be found in the Digital Operator's Manual.
108Refueling
Driving and parking
Page 113 of 274

GWARNING
If you switch off the ignition while driving,
safety-relevant functions are only available
with limitations, or not at all. This could affect,for example, the power steering and the brake
boosting effect. You will require considerably
more effort to steer and brake. There is a risk
of an accident.
Do not switch off the ignition while driving.
Switching off the engine
Important safety notes
GWARNING
If you switch off the ignition while driving,
safety-relevant functions are only available
with limitations, or not at all. This could affect, for example, the power steering and the brake
boosting effect. You will require considerably
more effort to steer and brake. There is a risk
of an accident.
Do not switch off the ignition while driving.
GWARNING
The automatic transmission switches to neu-
tral position Nwhen you switch off the engine.
The vehicle may roll away. There is a risk of an
accident.
After switching off the engine, always switch
to parking position P. Prevent the parked vehi-
cle from rolling away by applying the parkingbrake.
Information in the Digital Operator'sManual
A description of how to switch off the engine
can be found in the Digital Operator's Manual.
Parking brake
GWARNING
If you must brake the vehicle with the parking brake, the braking distance is considerably
longer and the wheels could lock. There is anincreased danger of skidding and accidents.
Only use the parking brake to brake the vehi-cle when the service brake is faulty. Do not
apply the parking brake too firmly. If the
wheels lock, release the parking brake until
the wheels begin turning again.
GWARNING
If you leave children unsupervised in the vehi- cle, they could set it in motion by, for example:
R release the parking brake.
R shift the automatic transmission out of the
parking position P.
R start the engine.
In addition, they may operate vehicle equip-
ment and become trapped. There is a risk of
an accident and injury.
When leaving the vehicle, always take the
SmartKey with you and lock the vehicle. Never
leave children unsupervised in the vehicle.
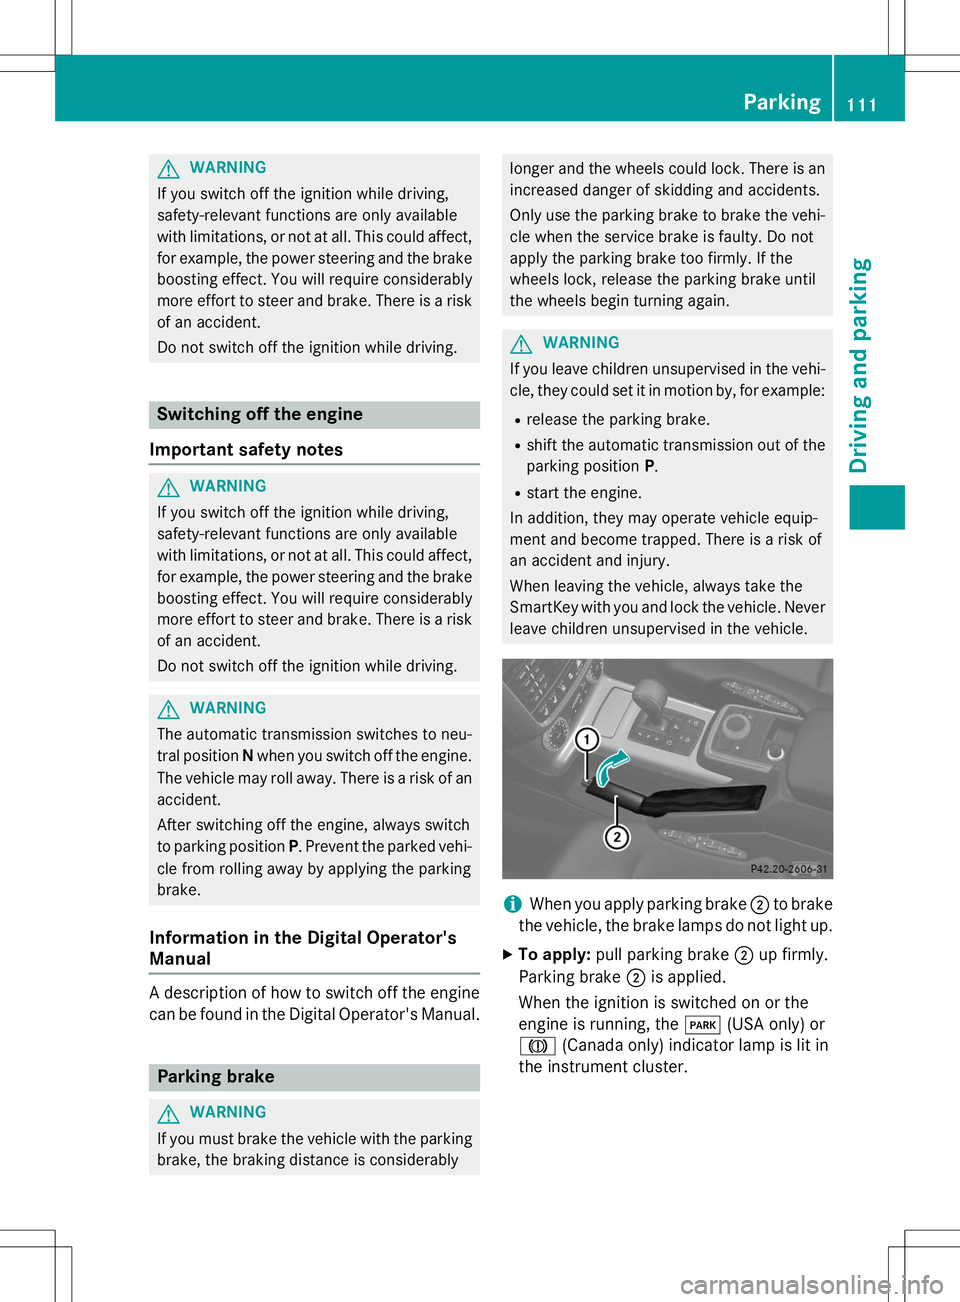
iWhen you apply parking brake ;to brake
the vehicle, the brake lamps do not light up.
X To apply: pull parking brake ;up firmly.
Parking brake ;is applied.
When the ignition is switched on or the
engine is running, the F(USA only) or
J (Canada only) indicator lamp is lit in
the instrument cluster.
Parking111
Driving and parking
Z
Page 114 of 274

XTo release: depress the brake pedal and
keep it depressed.
The selector lever lock is released.
X Pull parking brake ;up firmly.
X Press release button :on parking
brake ;and move parking brake ;down
to the stop.
When the ignition is switched on or the
engine is running, the F(USA only)
or ! (Canada only) indicator lamp goes
out in the instrument cluster.
iIf you pull away with parking brake ;
applied, a warning tone sounds.
Parking the vehicle for a long period
If you leave the vehicle parked for longer than
four weeks, the battery may be damaged by
exhaustive discharge.
X Connect a trickle charger.
iYou can obtain information about trickle
chargers from a qualified specialist work-
shop.
If you leave the vehicle parked for longer than
six weeks, the vehicle may suffer damage as a result of lack of use.
X Visit a qualified specialist workshop and
seek advice.
Driving tips
Information in the Digital Operator's
Manual
In the Digital Operator's Manual you will find
information on the following topics: R
General driving tips
R Engine oil R
Braking
- Important safety notes
- Downhill gradients
- Heavy and light loads
- Wet roads
- Limited braking performance on salt-
treated roads
- New brake pads/linings
- Servicing the brakes
- AMG high-performance and ceramic
brakes
R Driving on wet roads
R Winter driving
- General notes
- Driving with summer tires
- Slippery road surfaces
R Off-road driving
- General notes
- Driving on sand
- Tire ruts and gravel roads
- Driving over obstacles
R Traveling uphill
- Approach/departure angle
- Maximum gradient-climbing capability
- Hilltops
- Driving downhill
Driving systems
Cruise control
Important safety notes
GWARNING
The brake pedal moves when cruise control
brakes the vehicle. A foot in the area under
the brake pedal could become trapped. The
movement of the pedal, and therefore the
vehicle's ability to brake, may be restricted by objects in the area under the brake. There is a
risk of an accident and injury.
112Driving systems
Driving an d parking