2015 MERCEDES-BENZ G-CLASS SUV fuse
[x] Cancel search: fusePage 11 of 274

see also Digital Operator's Man-
ual .................................................. 172
E
EASY-ENTRY featureActivating/deactivating ................. 147
Function/notes ................................ 87
EASY-EXIT feature
Function/notes ................................ 87
Switching on/off ........................... 147
EBD (electronic brake force distri-bution)
Display message .................... 148, 151
Function/notes ................................ 68
ECO start/stop function
Deactivating/activating ................. 105
General information ....................... 105
Electrical fuses
Fuse box in the cargo compart-
ment ............................................. .227
Electronic Stability Program
see ESP ®
(Electronic Stability Program)
Electronic Traction System
see 4ETS (Electronic Traction System)
Emergency
Automatic measures after an acci-
dent ................................................. 55
Emergency call
see mbrace
Emergency release
Driver's door ................................... .75
Vehicle ............................................ .75
Emergency Tensioning Devices
Activation ........................................ .51
Engine
Display message .................... 148, 155
ECO start/stop function ................ 105
Engine number .............................. .259
Jump-starting ................................. 220
Starting the engine with the
SmartKey ....................................... 104
Switching off .................................. 111
Tow-starting (vehicle) ..................... 225
Engine oil
Adding .......................................... .207
Additives ........................................ 262
Checking the oil level ..................... 205 Checking the oil level using the
dipstick .......................................... 205
Display message ............................ 148
Filling capacity ............................... 262
Notes about oil grades ................... 262
Temperature (on-board com-
puter) ............................................. 147
Viscosity ........................................ 263
Entering an address
see also Digital Operator's Man-
ual ................................................. .172
Environmental protection
Note ................................................. 26
ESP ®
(Electronic Stability Pro-
gram)
AMG menu (on-board computer) ... 147
Deactivating/activating ................... 67
Display message .................... 148, 149
Function/notes ................................ 66
Important safety information ........... 66
Trailer stabilization ........................... 68
Warning lamp ................................. 165
Exhaust check ................................... 112
Exhaust tail pipe (cleaning instruc-
tions) ................................................. .211
Exterior lighting
see Lights
Exterior mirrors
Adjusting ......................................... 87
Dipping (automatic) ......................... 87
Folding in when locking (on-boardcomputer) ...................................... 147
Folding in/out (automatically )......... 87
Folding in/out (electrically) ............. 87
Out of position (troubleshooting) ..... 87
Setting ............................................. 87
Storing settings (memory func-
tion) ................................................. 87
Storing the parking position ............. 87
F
Filler cap
see Fuel filler flap
First-aid kit ......................................... 214
Flat tire
Preparing the vehicle ..................... 216
Floormats ........................................... 201
Index9
Page 12 of 274

Fog lampsSwitching on/off .............................. 91
Folding the seat backrest (rear)
forwards/back .................................. 194
Fording
Off-road ........................................ .112
Frequencies
Garage door opene r....................... 197
Front fog lamps
Display message ............................ 148
Switching on/of f.............................. 91
Fuel
Additives ........................................ 261
Consumption information .............. 262
Consumption statistics .................. 147
Displaying the current consump-
tion ................................................ 147
Displaying the range ...................... 147
Driving tips .................................... 112
Fuel gaug e..................................... 146
Grade (gasoline )............................ 260
Important safety notes .................. 260
Notes for AMG vehicles ................. 261
Premium-grade unleaded gaso-
line ................................................. 260
Problem (malfunction) ................... 110
Refueling ........................................ 107
Tank content/reserve fue l............. 260
Fuel filler flap
Emergency release ........................ 109
Opening/closing ............................ 108
Fuel filter (display message) ............ 148
Fuel level
Calling up the range (on-board
computer) ...................................... 147
Fuel tank
Capacity ........................................ 260
Problem (malfunction) ................... 110
Fuel/water separator
Service ........................................... 210
Fuse allocation chart ........................ 225
Fuse box
Battery case ................................... 227
Dashboard ..................................... 226
Front-passenger footwell ............... 226
Transmission tunnel ....................... 226
Fuse extractor ................................... 225 Fuses
Allocation chart ............................. 225
Before changing ............................. 225
Dashboard fuse box ....................... 226
Fuse allocation chart ..................... 225
Fuse box in the front-passenger
footwell .......................................... 226
Fuse box in the transmission tun-
nel ................................................. 226
Important safety notes .................. 225
In the battery case ......................... 227
G
Garage door openerClearing the memory ..................... 197
Frequencies ................................... 197
Notes ............................................. 197
Opening/closing the garage doo r..1 97
Programming (button in the rear-
view mirror) ................................... 197
Gasoline ............................................. 260
Gear indicator (on-board com- puter) ................................................. .147
Gear or selector lever (cleaning
guidelines) ......................................... 212
Genuine parts ...................................... 26
Glove box .......................................... .193
Google™ Local Search
see also Digital Operator's Man-
ual ................................................. .172
GTW (Gross Trailer Weight) (defini-
tion) .................................................... 248
H
Hazard warning lamps ........................ 90
Head bags
Display message ............................ 148
Head restraints
Adjusting ......................................... 84
Adjusting (rear) ................................ 85
Installing/removing (rear) .......... 84, 85
Luxury .............................................. 84
Resetting (front) ............................... 84
see NECK-PRO head restraints
see NECK-PRO luxury head restraints
10Index
Page 18 of 274

Cleaning the cover .........................212
Correct driver's seat position ........... 82
Important safety notes .................... 82
Multicontour seat ............................ 84
Storing settings (memory func-
tion) ................................................. 87
Switching seat heating on/off ......... 85
Switching seat ventilation on/off .... 84
Sensors (cleaning instructions) ....... 211
Service interval display
Displaying a service message (on-board computer) ............................ 210
Service menu (on-board com- puter) ................................................. .147
Service products
Brake fluid ..................................... 264
Coolant (engine) ............................ 264
Engine oil ....................................... 262
Fuel ................................................ 259
Important safety notes .................. 259
Notes ............................................. 259
Refrigerant (air-conditioning sys-
tem) ............................................... 263
Washer fluid ................................... 265
Setting a speed limit
see SPEEDTRONIC
Setting the air distribution ...............100
Setting the airflow ............................ 100
Setting the date/time format
see also Digital Operator's Man-
ual ................................................. .172
Setting the language
see also Digital Operator's Man-
ual ................................................. .172
Setting the time
see also Digital Operator's Man-
ual ................................................. .172
Settings
Factory (on-board computer) ......... 147
Menu overview .............................. 176
On-board computer ....................... 147
SETUP (on-board computer) ............. 147
Shift ranges ....................................... 107
Side impact air bag .............................50
Side marker lamp (display mes- sage) ................................................... 148 Side marker lamps (changingbulbs)
................................................... .94
Side windows
Cleaning ......................................... 211
Important safety informa-
tion .................................................. 77
Opening/closing .............................. 77
Opening/closing (all) ....................... 77
Opening/closing (front )................... 77
Overview .......................................... 77
Troubleshooting ............................... 77
SIRIUS services
see also Digital Operator's Man-
ual .................................................. 172
Ski rack .............................................. 197
Sliding sunroof
Important safety notes .................... 77
Opening/closing .............................. 78
Operating manually .......................... 78
SmartKey
Changing the battery ....................... 74
Changing the programming ............. 73
Checking the battery ....................... 74
Convenience opening feature .......... 77
Display message ............................ 148
Door central locking/unlocking ....... 72
Important safety notes .................... 72
Loss ................................................. 74
Malfunction ...................................... 74
Mechanical key ................................ 73
Overview .......................................... 72
Problem (malfunction) ..................... 74
Starting the engine ........................ 104
SMS
see also Digital Operator's Man-
ual .................................................. 172
Snow chains ...................................... 232
Sockets
Front-passenger footwell ............... 197
Points to observe before use ......... 197
Trunk ............................................. 197
SOS
see mbrace
Spare fuses ........................................ 225
Spare wheel
Mounting ....................................... 250
Notes/data .................................... 256
Spare wheel bracket at the rear .... 215
16Index
Page 123 of 274

stored. Otherwise, it sets the vehicle cruisespeed to the previously stored value.
Driving with DISTRONIC PLUS
Pulling away and driving
X If the vehicle in front pulls away: remove
your foot from the brake pedal.
X Briefly pull the cruise control lever towards
you ?, or press it up :or down A.
or
X Accelerate briefly.
Your vehicle pulls away and adapts its
speed to that of the vehicle in front.
If there is no vehicle in front, DISTRONIC
PLUS operates in the same way as cruise
control.
If DISTRONIC PLUS detects that the vehicle in front has slowed down, it brakes your vehicle.
In this way, the distance you have selected is maintained.
If DISTRONIC PLUS detects that the vehicle infront is driving faster, it accelerates your vehi-
cle, but only up to the speed you have stored.
If you depress the brake, DISTRONIC PLUS is
deactivated unless your vehicle is stationary.
Changing lanes
If you change to the passing lane, DISTRONIC
PLUS supports you when:
R you are driving faster than 40 mph
(60 km/h)
R DISTRONIC PLUS is maintaining the dis-
tance to a vehicle in front R
you switch on the appropriate turn signal
R DISTRONIC PLUS does not detect a danger
of collision
If these conditions are fulfilled, your vehicle is
accelerated. Acceleration will be interrupted
if changing lanes takes too long or if the dis-
tance between your vehicle and the vehicle in front becomes too small.
iWhen changing lanes, DISTRONIC PLUS
monitors the left lane on left-hand drive
vehicles and the right lane on right-hand
drive vehicles.
Stopping
GWARNING
When leaving the vehicle, even if it is braked
only by DISTRONIC PLUS, it could roll away if: R there is a malfunction in the system or in
the voltage supply.
R DISTRONIC PLUS has been deactivated
with the cruise control lever, e.g. by a vehi-
cle occupant or from outside the vehicle.
R the electrical system in the engine com-
partment, the battery or the fuses have
been tampered with.
R the battery is disconnected.
R the accelerator pedal has been depressed,
e.g. by a vehicle occupant.
There is a risk of an accident.
If you wish to exit the vehicle, always turn off
DISTRONIC PLUS and secure the vehicle
against rolling away.
If DISTRONIC PLUS detects that the vehicle in front is stopping, it brakes your vehicle until it
is stationary.
Once your vehicle is stationary, it remains
stationary and you do not need to depress thebrake.
iDepending on the specified minimum dis-
tance, your vehicle will come to a standstill
at a sufficient distance behind the vehicle in front. The specified minimum distance is
set using the control on the cruise controllever.
Driving systems121
Driving and parking
Z
Page 129 of 274

Deactivating the HOLD function
GWARNING
When leaving the vehicle, it can still roll awaydespite being braked by the HOLD function if:
R there is a malfunction in the system or in
the voltage supply.
R the HOLD function has been deactivated by
pressing the accelerator pedal or the brake
pedal, e.g. by a vehicle occupant.
R the electrical system in the engine com-
partment, the battery or the fuses have
been tampered with.
R the battery is disconnected
There is a risk of an accident.
If you wish to exit the vehicle, always turn off the HOLD function and secure the vehicle
against rolling away.
The HOLD function is deactivated automati-
cally if: R you accelerate and the transmission is in
position Dor R.
R you shift the transmission to position P.
R you depress the brake pedal again with a
certain amount of pressure until ëdis-
appears from the multifunction display.
R you activate DISTRONIC PLUS.
On steep uphill or downhill gradients or if
there is a malfunction, the transmission may
also be automatically shifted into position P.
Permanent all-wheel drive
!
Never tow the vehicle with one axle
raised. This may damage the transfer case. Damage of this sort is not covered by the
Mercedes-Benz Limited Warranty. All
wheels must remain either on the ground or
be fully raised. Observe the instructions for
towing the vehicle with all wheels in full
contact with the ground.
!When testing the parking brake, operate
the vehicle only briefly (for a maximum of ten seconds) on a brake test dynamometer.
When doing this, turn the SmartKey to posi-
tion 0or 1in the ignition. Failure to do this
can cause damage to the drive train or the brake system.
!A function or performance test should
only be carried out on a two-axle dyna-
mometer. Before you operate the vehicle
on such a dynamometer, please consult a
qualified workshop. You could otherwise
damage the drive train or the brake system.
The all-wheel drive system ensures that all
four wheels are permanently driven. The all-
wheel drive system improves vehicle traction together with ESP ®
and 4ETS if a drive wheel
spins due to insufficient grip.
If a drive wheel spins due to insufficient grip: R Only depress the accelerator pedal as far as
necessary when pulling away.
R Take your foot off the accelerator, slowly,
while the vehicle is in motion.
The permanent all-wheel drive system can
neither reduce the risk of accident nor over-
ride the laws of physics if you fail to adapt
your driving style or if you are inattentive. The
all-wheel drive system cannot take into
account road, weather or traffic conditions.
The all-wheel drive system is only an aid. You
are responsible for maintaining a safe dis-
tance to the vehicle in front, for vehicle speed, for braking in good time and for staying in
lane.
In wintry driving conditions, always use winter
tires (M+S tires) and if necessary, snow
chains ( Ypage 232). Only in this way can the
maximum effect of all-wheel drive be ach-
ieved.
For information on driving off-road, see the
Digital Operator's Manual.
Driving syste ms127
Driving and parking
Z
Page 212 of 274

Maintaining the time-dependent service schedule:X Before disconnecting the battery, note
down the service due date displayed.
or X After reconnecting the battery, subtract
the battery disconnection periods from the
service date shown on the display.
iThe service interval display should not be
confused with the 4engine oil level dis-
play.
The symbol and the letter indicate which type
of service is due: ¯ Minor service
A
±Major serviceB
The ASSYST service interval display does not
take into account any periods of time during
which the battery is disconnected.
Hiding a service message
X To hide the service message, press the % back button on the multifunction
steering wheel ( Ypage 35).
Displaying service messages
Use the buttons on the multifunction steering
wheel.
X Switch on the ignition.
X Press =or; to select the standard
display menu on the steering wheel
( Y page 147).
X Press 9or: to select the service
interval display. The ¯ or± service symbol and the
service due date are displayed.
Points to remember
The specified maintenance interval takes only the normal operation of the vehicle into
account. Under arduous operating conditions
or increased load on the vehicle, mainte-
nance work must be carried out more fre-
quently, for example: R regular city driving with frequent intermedi-
ate stops
R if the vehicle is primarily used to travel
short distances
R use in mountainous terrain or on poor road
surfaces
R if the engine is often left idling for long peri-
ods
Under these or similar conditions, have, for
example, the air filter, engine oil and oil filter
replaced or changed more frequently. Under
arduous operating conditions, the tires must
be checked more often. Further information
can be obtained at a qualified specialist work- shop, e.g. an authorized Mercedes-Benz Cen-
ter.
Fuel/water separator
HEnvironmental note
Dispose of service products in an environ-
mentally responsible manner.
!If you continue driving without having the
fuel/water separator serviced, this could
cause damage to the engine. Any resulting
damage is not covered by the warranty.
If the fuel/water separator needs servicing,
the following message appears in the multi-
function display:
You will also hear a brief warning tone.
210Maintenance
Maintenance and care
Page 215 of 274

Useful information............................214
Where will I find...? ...........................214
Flat tire .............................................. 216
Battery (vehicle) ................................ 216
Jump-starting .................................... 220
Towing and tow-starting ..................222
Fuses .................................................. 225
213
Roadside Assistance
Page 216 of 274

Useful information
iThis Operator's Manual describes all
models and all standard and optional equip- ment of your vehicle available at the time of
publication of the Operator's Manual.
Country-specific differences are possible.
Please note that your vehicle may not be
equipped with all features described. This
also applies to safety-related systems and
functions.
iRead the information on qualified special-
ist workshops: ( Ypage 28).
Where will I find...?
Warning triangle
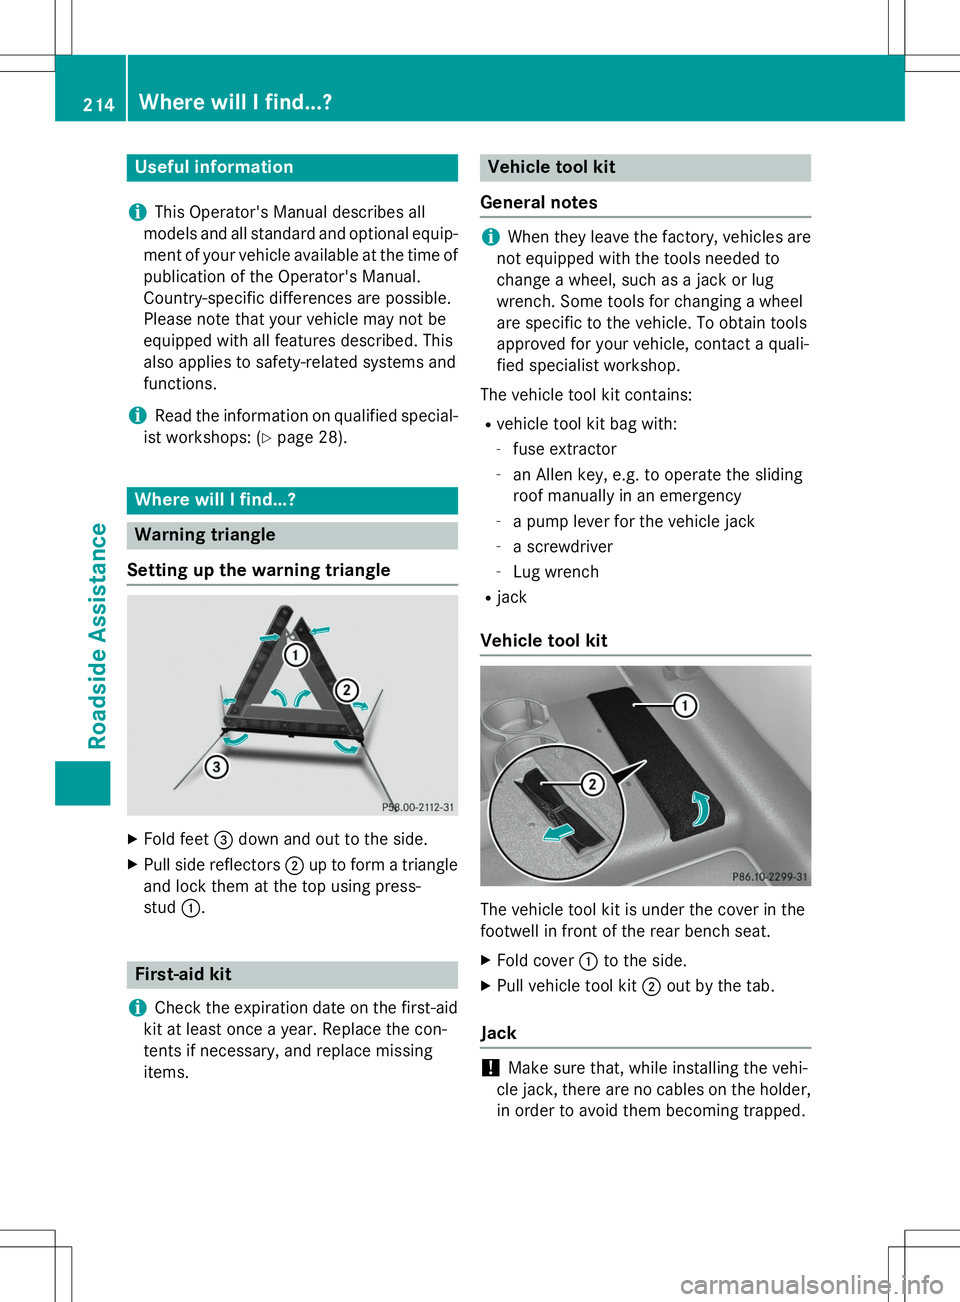
Setting up the warning triangle
X Fold feet =down and out to the side.
X Pull side reflectors ;up to form a triangle
and lock them at the top using press- stud :.
First-aid kit
iCheck the expiration date on the first-aid
kit at least once a year. Replace the con-
tents if necessary, and replace missing
items.
Vehicle tool kit
General notes
iWhen they leave the factory, vehicles are
not equipped with the tools needed to
change a wheel, such as a jack or lug
wrench. Some tools for changing a wheel
are specific to the vehicle. To obtain tools
approved for your vehicle, contact a quali-
fied specialist workshop.
The vehicle tool kit contains: R vehicle tool kit bag with:
- fuse extractor
- an Allen key, e.g. to operate the sliding
roof manually in an emergency
- a pump lever for the vehicle jack
- a screwdriver
- Lug wrench
R jack
Vehicle tool kit
The vehicle tool kit is under the cover in the
footwell in front of the rear bench seat.
X Fold cover :to the side.
X Pull vehicle tool kit ;out by the tab.
Jack
!Make sure that, while installing the vehi-
cle jack, there are no cables on the holder, in order to avoid them becoming trapped.
214Where will I find...?
Roadside Assistance