2015 MERCEDES-BENZ G-CLASS SUV service indicator
[x] Cancel search: service indicatorPage 12 of 274

Fog lampsSwitching on/off .............................. 91
Folding the seat backrest (rear)
forwards/back .................................. 194
Fording
Off-road ........................................ .112
Frequencies
Garage door opene r....................... 197
Front fog lamps
Display message ............................ 148
Switching on/of f.............................. 91
Fuel
Additives ........................................ 261
Consumption information .............. 262
Consumption statistics .................. 147
Displaying the current consump-
tion ................................................ 147
Displaying the range ...................... 147
Driving tips .................................... 112
Fuel gaug e..................................... 146
Grade (gasoline )............................ 260
Important safety notes .................. 260
Notes for AMG vehicles ................. 261
Premium-grade unleaded gaso-
line ................................................. 260
Problem (malfunction) ................... 110
Refueling ........................................ 107
Tank content/reserve fue l............. 260
Fuel filler flap
Emergency release ........................ 109
Opening/closing ............................ 108
Fuel filter (display message) ............ 148
Fuel level
Calling up the range (on-board
computer) ...................................... 147
Fuel tank
Capacity ........................................ 260
Problem (malfunction) ................... 110
Fuel/water separator
Service ........................................... 210
Fuse allocation chart ........................ 225
Fuse box
Battery case ................................... 227
Dashboard ..................................... 226
Front-passenger footwell ............... 226
Transmission tunnel ....................... 226
Fuse extractor ................................... 225 Fuses
Allocation chart ............................. 225
Before changing ............................. 225
Dashboard fuse box ....................... 226
Fuse allocation chart ..................... 225
Fuse box in the front-passenger
footwell .......................................... 226
Fuse box in the transmission tun-
nel ................................................. 226
Important safety notes .................. 225
In the battery case ......................... 227
G
Garage door openerClearing the memory ..................... 197
Frequencies ................................... 197
Notes ............................................. 197
Opening/closing the garage doo r..1 97
Programming (button in the rear-
view mirror) ................................... 197
Gasoline ............................................. 260
Gear indicator (on-board com- puter) ................................................. .147
Gear or selector lever (cleaning
guidelines) ......................................... 212
Genuine parts ...................................... 26
Glove box .......................................... .193
Google™ Local Search
see also Digital Operator's Man-
ual ................................................. .172
GTW (Gross Trailer Weight) (defini-
tion) .................................................... 248
H
Hazard warning lamps ........................ 90
Head bags
Display message ............................ 148
Head restraints
Adjusting ......................................... 84
Adjusting (rear) ................................ 85
Installing/removing (rear) .......... 84, 85
Luxury .............................................. 84
Resetting (front) ............................... 84
see NECK-PRO head restraints
see NECK-PRO luxury head restraints
10Index
Page 15 of 274

Removing .........................................73
Unlocking the driver's door .............. 75
Memory card (audio) .........................147
Memory function ................................. 87
Message memory (on-board com- puter) ................................................. .148
Messages
see Display messages
Mirrors
see Exterior mirrors
see Rear-view mirror
Mobile phone network providers
Calling up ....................................... 183
Mounting wheels
Mounting a new wheel ................... 253
Raising the vehicle ......................... 251
Removing a wheel .......................... 253
Securing the vehicle against roll-
ing away ........................................ 251
MP3
Operation ....................................... 147
see also Digital Operator's Man-
ual ................................................. .172
see separate operating instructions
Multicontour seat ................................ 84
Multifunction display
Function/notes ............................ .146
Permanent display ......................... 147
Multifunction steering wheel
Back button ................................... 147
Operating the on-board computer .. 146
Overview .......................................... 35
Music files
see also Digital Operator's Man-
ual ................................................. .172
N
Navigation
Menu (on-board computer) ............ 147
see also Digital Operator's Man-
ual ................................................. .172
see separate operating instructions
NECK-PRO head restraints
Operation ......................................... 53
Resetting triggered .......................... 54
NECK-PRO luxury head restraints
Important safety notes .................... 53 Operation ......................................... 53
Resetting when triggered ................. 54
Notes on breaking-in a new vehi-
cle ....................................................... 102
O
Occupant safety
Automatic measures after an acci-
dent ................................................. 55
BabySmart™ air bag deactivation
system ............................................. 59
Children in the vehicle ..................... 55
Important safety notes .................... 42
Introduction to the restraint sys-
tem ................................................. .42
PASSENGER AIR BAG indicator
lamps ............................................... 43
Pets in the vehicle ........................... 64
Restraint system warning lamp ........ 42
Odometer .......................................... .147
Off-road
Differential locks ............................ 134
Off-road ABS ................................... .65
Off-road driving
General information ....................... 112
Off-road system
Permanent all-wheel drive ............ .127
Oil
see Engine oil
On-board computer
AMG menu ..................................... 147
Assistance menu ........................... 147
Display messages .......................... 148
DISTRONIC PLUS ........................... 119
Factory settings submenu ............. 147
Important safety notes .................. 146
Lighting submenu .......................... 147
Menu overview .............................. 147
Message memory .......................... 148
Message memory menu ................. 148
Navigation menu ............................ 147
Operation ....................................... 146
RACETIMER ................................... 147
Service menu ................................. 147
Standard displa y............................ 147
Video DVD operation ..................... 147
Index13
Page 20 of 274

Tire pressureCalling up (on-board computer) ..... 235
Checking manuall y........................ 235
Display message .................... 148, 158
Maximum ....................................... 235
Notes ............................................. 233
Recommended ............................... 232
Table (single tires) ......................... 233
Tire pressure monitor
Checking the tire pressure elec-
tronically ........................................ 237
Function/note s............................. 235
Restarting ...................................... 238
Warning lamp ................................. 170
Warning message .......................... 237
Tires
Aspect ratio (definition) ................. 249
Average weight of the vehicle
occupants (definition) .................... 248
Bar (definition) ............................... 248
Changing a whee l.......................... 250
Characteristics .............................. 247
Checking ........................................ 231
Curb weight (definition) ................. 249
Definition of terms ......................... 247
Direction of rotation ...................... 251
Display message .................... 148, 158
Distribution of the vehicle occu-
pants (definition) ............................ 250
DOT (Department of Transporta-
tion) (definition) ............................. 248
DOT, Tire Identification Number
(TIN) ............................................... 247
GAWR (Gross Axle Weight Rating)
(definition) ..................................... 248
GTW (Gross Trailer Weight) (defi-
nition) ............................................ 248
GVW (Gross Vehicle Weight) (def-
inition) ........................................... 248
GVWR (Gross Vehicle Weight Rat-
ing) (definition) .............................. 248
Important safety notes .................. 230
Increased vehicle weight due to
optional equipment (definition) ...... 248
Kilopascal (kPa) (definition) ........... 249
Labeling (overview) ........................ 244
Load bearing index (definition) ...... 250
Load index ..................................... 246 Load index (definition) ................... 249
M+S tire
s....................................... 232
Maximum load on a tire (defini-
tion) ............................................... 249
Maximum loaded vehicle weight
(definition) ..................................... 249
Maximum permissible tire pres-
sure (definition) ............................. 249
Maximum tire load ......................... 246
Maximum tire load (definition) ....... 249
Optional equipment weight (defi-
nition) ............................................ 249
PSI (pounds per square inch) (def-
inition) ........................................... 249
Replacing ....................................... 250
Service life ..................................... 232
Sidewall (definition) ....................... 249
Speed rating (definition) ................ 248
Storing ........................................... 251
Structure and characteristics
(definition) ..................................... 247
Technical data ............................... 254
Temperature .................................. 243
TIN (Tire Identification Number)
(definition) ..................................... 250
Tire bead (definition) ...................... 249
Tire pressure (definition) ................ 249
Tire pressures (recommended) ...... 248
Tire size (data) ............................... 254
Tire size designation, load-bearing capacity, speed rating .................... 244
Tire tread ....................................... 231
Tire tread (definition) ..................... 249
Total load limit (definition) ............. 250
Traction ......................................... 243
Traction (definition) ....................... 250
Tread wear ..................................... 243
TWR (permissible trailer drawbar
noseweight) (definition) ................. 250
Uniform Tire Quality Grading
Standards ...................................... 242
Uniform Tire Quality Grading
Standards (definition) .................... 248
Wear indicator (definition) ............. 250
Wheel rim (definition) .................... 248
see Flat tire
Top Tether ............................................ 58
18Index
Page 71 of 274
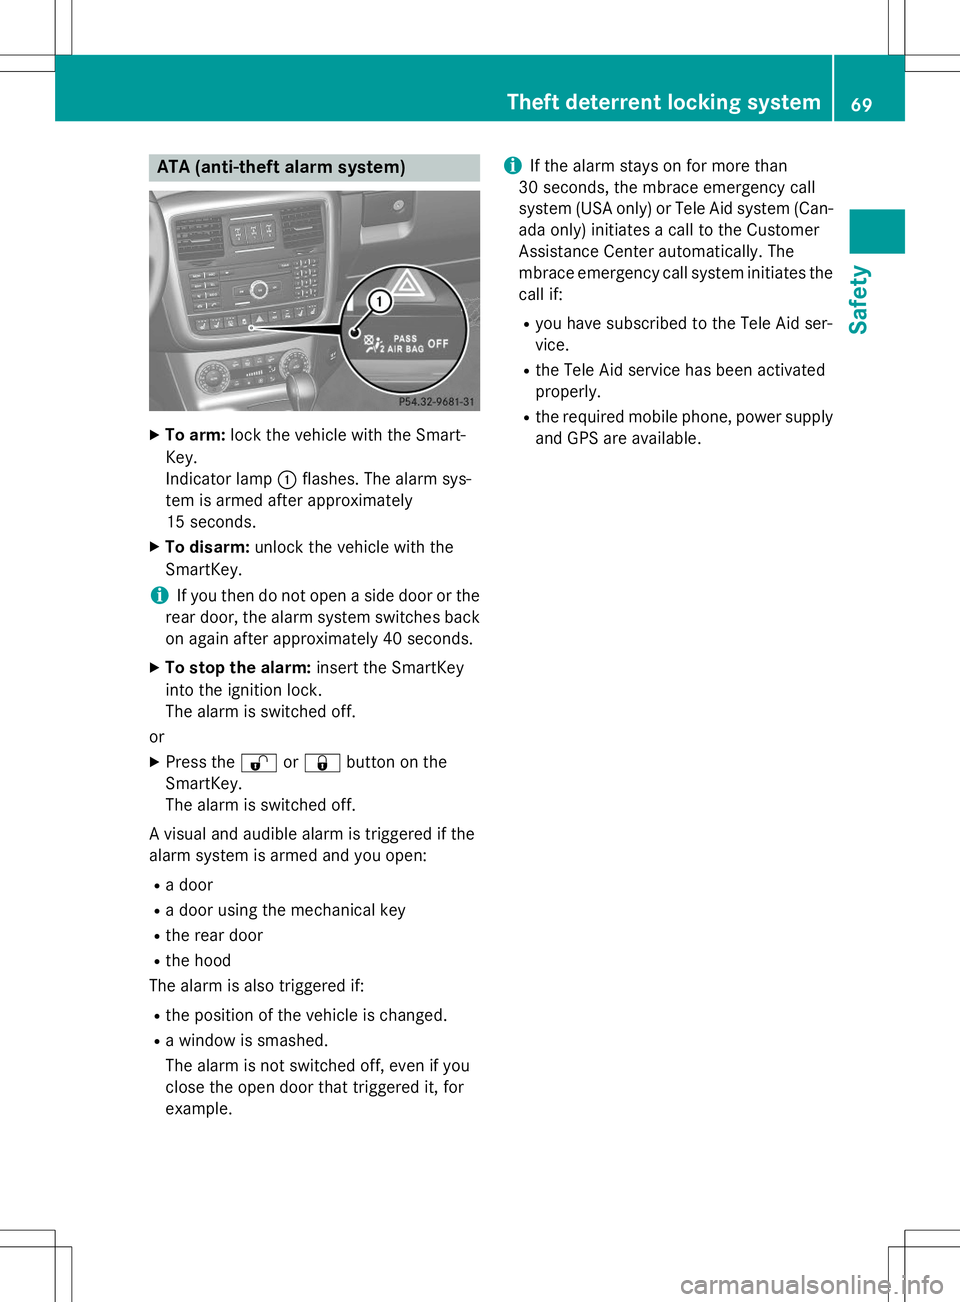
ATA (anti-theft alarm system)
XTo arm: lock the vehicle with the Smart-
Key.
Indicator lamp :flashes. The alarm sys-
tem is armed after approximately
15 seconds.
X To disarm: unlock the vehicle with the
SmartKey.
iIf you then do not open a side door or the
rear door, the alarm system switches back
on again after approximately 40 seconds.
X To stop the alarm: insert the SmartKey
into the ignition lock.
The alarm is switched off.
or X Press the %or& button on the
SmartKey.
The alarm is switched off.
A visual and audible alarm is triggered if the
alarm system is armed and you open: R a door
R a door using the mechanical key
R the rear door
R the hood
The alarm is also triggered if:
R the position of the vehicle is changed.
R a window is smashed.
The alarm is not switched off, even if you
close the open door that triggered it, for
example.
iIf the alarm stays on for more than
30 seconds, the mbrace emergency call
system (USA only) or Tele Aid system (Can- ada only) initiates a call to the Customer
Assistance Center automatically. The
mbrace emergency call system initiates the
call if:
R you have subscribed to the Tele Aid ser-
vice.
R the Tele Aid service has been activated
properly.
R the required mobile phone, power supply
and GPS are available.
Theft deterrent locking system69
Safety
Z
Page 105 of 274
the driver's footwell. Install the floormats
securely and as specified in order to ensure
sufficient clearance for the pedals. Do not useloose floormats and do not place floormats ontop of one another.
GWARNING
Unsuitable footwear can hinder correct usage of the pedals, e.g.:
R shoes with thick soles
R shoes with high heels
R slippers
There is a risk of an accident.
Wear suitable footwear to ensure correct
usage of the pedals.
GWARNING
If you switch off the ignition while driving,
safety-relevant functions are only available
with limitations, or not at all. This could affect, for example, the power steering and the brake
boosting effect. You will require considerably
more effort to steer and brake. There is a risk
of an accident.
Do not switch off the ignition while driving.
GWARNING
If the parking brake has not been fully
released when driving, the parking brake can:
R overheat and cause a fire
R lose its hold function.
There is a risk of fire and an accident. Release
the parking brake fully before driving off.
!Warm up the engine quickly. Do not use
the engine's full performance until it has
reached operating temperature.
Only shift the automatic transmission to
the desired drive position when the vehicle
is stationary.
Where possible, avoid spinning the drive
wheels when pulling away on slippery
roads. You could otherwise damage the
drive train.
!Avoid high engine speeds when the
engine is cold. The engine's service life
could otherwise be significantly shortened.
Do not use the engine's full performance
until it has reached operating temperature.
!AMG vehicles: at low engine oil temper-
atures below 68 ‡ (+20 †), the maximum
engine speed is restricted in order to pro-
tect the engine. To protect the engine and
maintain smooth engine operation, avoid
driving at full throttle when the engine is
cold.
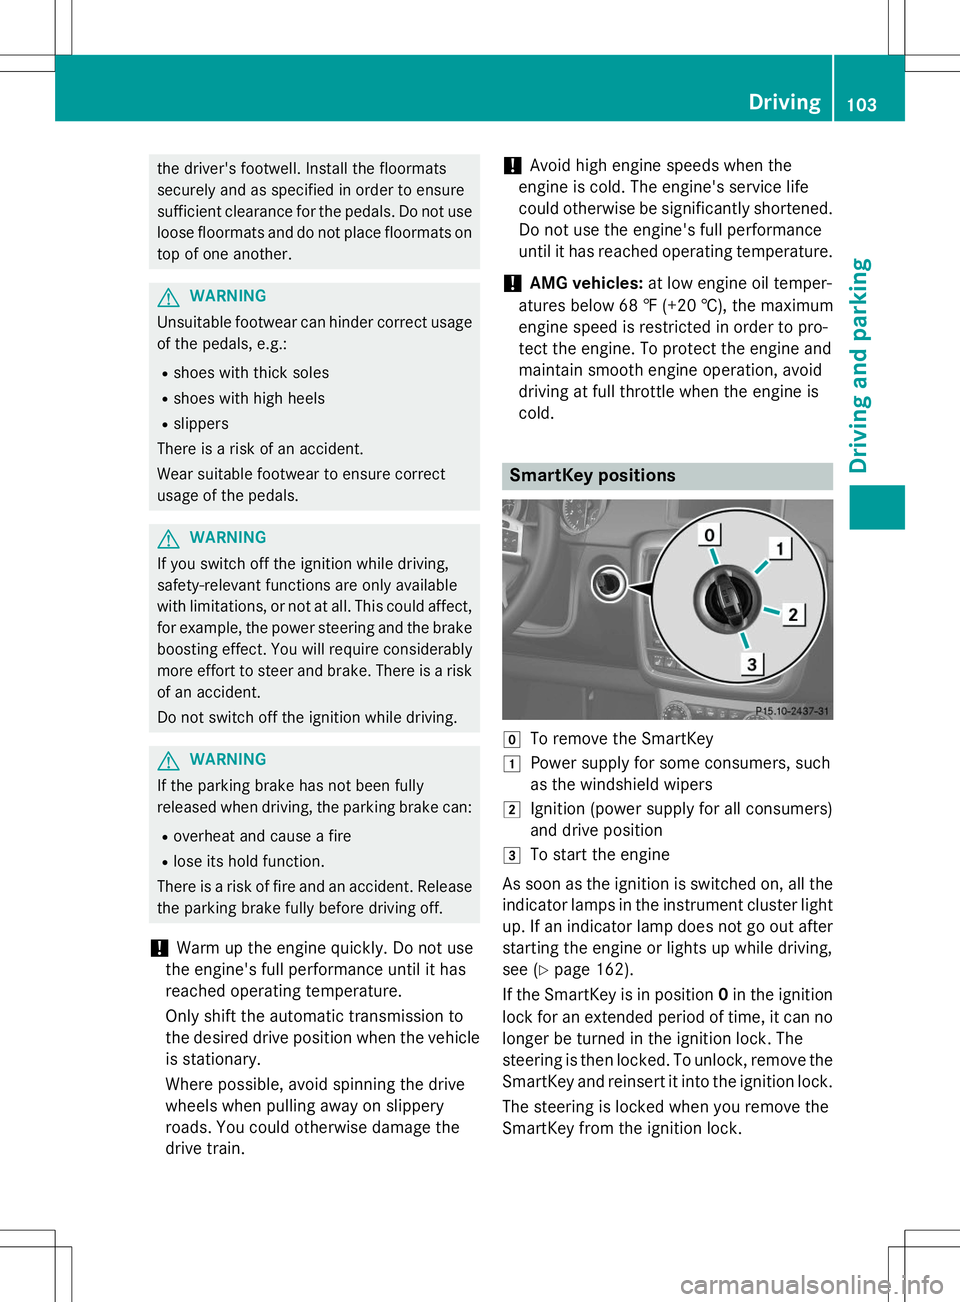
SmartKey positions
gTo remove the SmartKey
1Power supply for some consumers, such
as the windshield wipers
2Ignition (power supply for all consumers)
and drive position
3To start the engine
As soon as the ignition is switched on, all the
indicator lamps in the instrument cluster light up. If an indicator lamp does not go out after
starting the engine or lights up while driving,
see ( Ypage 162).
If the SmartKey is in position 0in the ignition
lock for an extended period of time, it can no
longer be turned in the ignition lock. The
steering is then locked. To unlock, remove the SmartKey and reinsert it into the ignition lock.
The steering is locked when you remove the
SmartKey from the ignition lock.
Driving103
Driving an d parking
Z
Page 113 of 274
GWARNING
If you switch off the ignition while driving,
safety-relevant functions are only available
with limitations, or not at all. This could affect,for example, the power steering and the brake
boosting effect. You will require considerably
more effort to steer and brake. There is a risk
of an accident.
Do not switch off the ignition while driving.
Switching off the engine
Important safety notes
GWARNING
If you switch off the ignition while driving,
safety-relevant functions are only available
with limitations, or not at all. This could affect, for example, the power steering and the brake
boosting effect. You will require considerably
more effort to steer and brake. There is a risk
of an accident.
Do not switch off the ignition while driving.
GWARNING
The automatic transmission switches to neu-
tral position Nwhen you switch off the engine.
The vehicle may roll away. There is a risk of an
accident.
After switching off the engine, always switch
to parking position P. Prevent the parked vehi-
cle from rolling away by applying the parkingbrake.
Information in the Digital Operator'sManual
A description of how to switch off the engine
can be found in the Digital Operator's Manual.
Parking brake
GWARNING
If you must brake the vehicle with the parking brake, the braking distance is considerably
longer and the wheels could lock. There is anincreased danger of skidding and accidents.
Only use the parking brake to brake the vehi-cle when the service brake is faulty. Do not
apply the parking brake too firmly. If the
wheels lock, release the parking brake until
the wheels begin turning again.
GWARNING
If you leave children unsupervised in the vehi- cle, they could set it in motion by, for example:
R release the parking brake.
R shift the automatic transmission out of the
parking position P.
R start the engine.
In addition, they may operate vehicle equip-
ment and become trapped. There is a risk of
an accident and injury.
When leaving the vehicle, always take the
SmartKey with you and lock the vehicle. Never
leave children unsupervised in the vehicle.
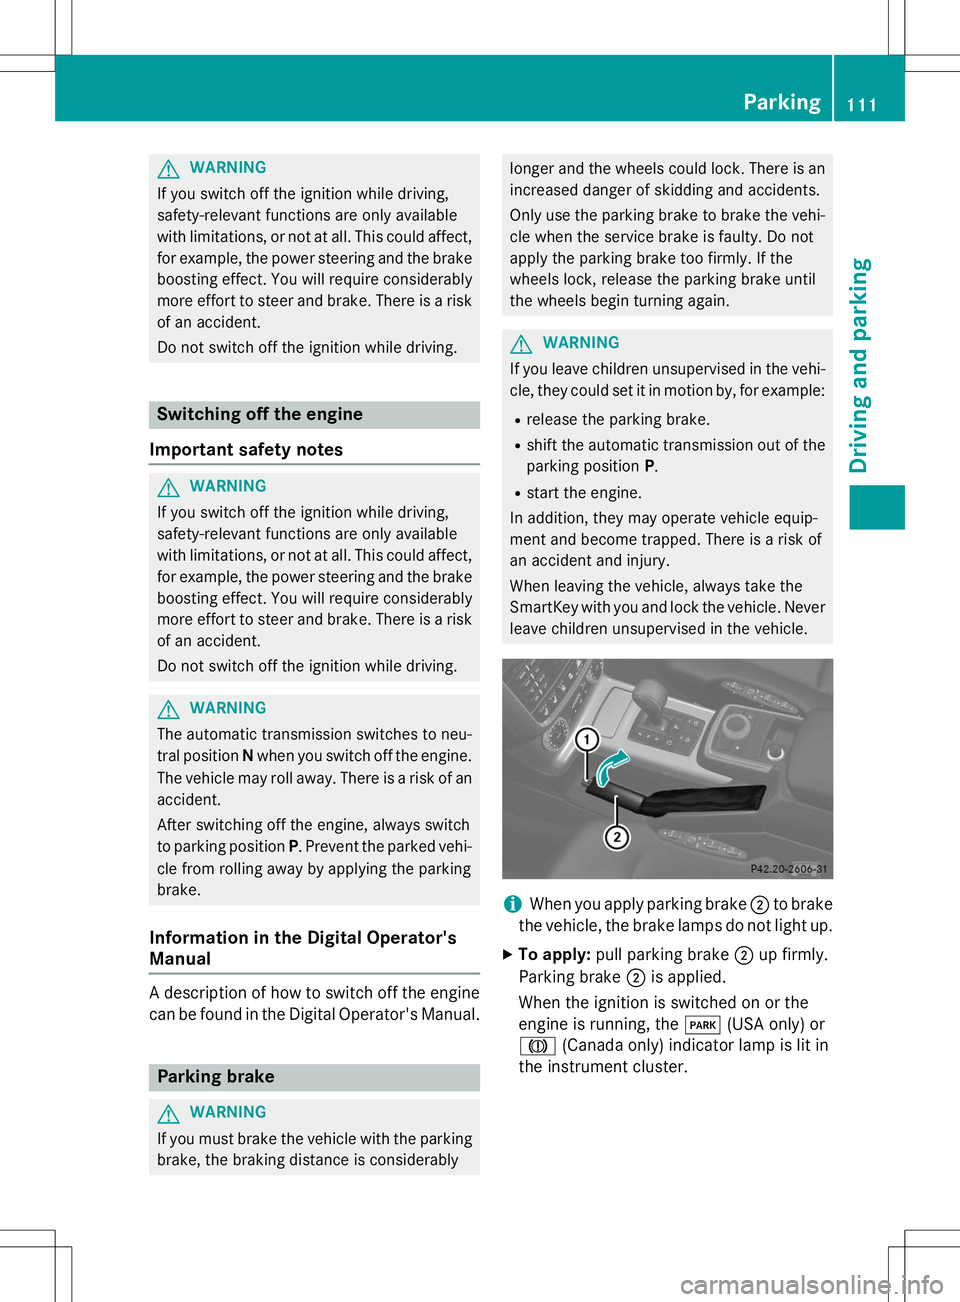
iWhen you apply parking brake ;to brake
the vehicle, the brake lamps do not light up.
X To apply: pull parking brake ;up firmly.
Parking brake ;is applied.
When the ignition is switched on or the
engine is running, the F(USA only) or
J (Canada only) indicator lamp is lit in
the instrument cluster.
Parking111
Driving and parking
Z
Page 200 of 274
phone network, a valid SIM card and a sub-scription to a security service.
R the battery is sufficiently charged.
R the corresponding mobile phone network is
available for transmitting data to the Cus-
tomer Center.
iDetermining the location of the vehicle on
a map is only possible if there is sufficient
GPS reception and the vehicle position can
be forwarded to the Customer Center.
The mbrace system
To adjust the volume during an mbrace call,
proceed as follows:
X Press the WorX button on the mul-
tifunction steering wheel.
or
X Use the COMAND volume control.
The mbrace system provides three different
services:
R Automatic and manual emergency call
R Roadside Assistance call
R MB Info call
USA only: you can find more information and
a description of all available features under
"Owners Online" at http://
www.mbusa.com .
System self-test
GWARNING
A malfunction in the system has been detec-
ted if one of the following conditions occurs:
R the indicator lamp in the SOS button does
not light up during the system self-diagno-sis.
R the indicator lamp in the ºRoadside
Assistance button does not light up during
the system self-diagnosis.
R the indicator lamp in the Einformation
button does not light up during the system
self-diagnosis.
R the indicator lamp in the SOS button, º
Roadside Assistance button or Einfor-
mation button continues to be lit red after
the system self-diagnosis.
R the
TeleAidinoperativeorTeleAid
not activatedmessage appears on the
multifunction display after the system self-
diagnosis.
If a malfunction is indicated as outlined above,
the system may not operate as expected. In
the event of an emergency, assistance must
be summoned by other means.
Have the system checked at the nearest
authorized Mercedes-Benz Center or contact
the following service hotlines:
R USA: Response Center at
1-888-990-9007
R Canada: Customer Service at
1-888-923-8367
After you have switched on the ignition, the
system carries out a self-diagnosis.
Emergency call
Important safety notes
GWARNING
If the indicator lamp in the SOS button is
flashing continuously and there was no voice
connection to the Response Center estab-
lished, then the mbrace system could not ini- tiate an emergency call (e.g. the relevant cel-
lular phone network is not available).
The message
Call Failedappears in the
multifunction display for approximately
10 seconds.
Should this occur, assistance must be sum-
moned by other means.
!You must have a license agreement to
activate the mbrace service. Ensure that
your system is activated and ready for use, and press the EMB Info call button to
register. If one of these steps is not carried
out, it may not be possible to activate thesystem.
198Features
Stowage and features
Page 201 of 274
If you have questions about the activation,
contact one of the following telephone hot-lines:
R USA: Response Center at
1-888-990-9007
R Canada: Customer Service at
1-888-923-8367
An emergency call is dialed automatically if an
air bag or Emergency Tensioning Device is
triggered.
iAn automatically dialed mbrace emer-
gency call cannot be canceled.
An emergency call can also be initiated man- ually.
As soon as the emergency call has been ini-
tiated, the indicator lamp in the SOS button
flashes. The
Connecting Callmessage
appears on the multifunction display.
COMAND is muted.
Once the connection has been made, the
Call Connectedmessage appears in the
multifunction display.
All important information on the emergency is
provided, for example: R current location of the vehicle (as deter-
mined by the GPS system)
R vehicle model
R vehicle color
R vehicle identification number
A short time after the emergency call is initi-
ated, a voice connection is automatically
established between the Response Center
and the vehicle occupants. If the vehicle
occupants are able to respond, the Response Center will attempt to obtain more detailed
information on the emergency.
iIf there is no response from the vehicle
occupants, an ambulance is immediately
sent to the vehicle. Making an emergency call
GWARNING
If you feel at any way in jeopardy when in the
vehicle (e.g. smoke or fire in the vehicle, vehi-
cle in a dangerous road location), please do
not wait for voice contact after you have
pressed the SOS button. Carefully leave the
vehicle and move to a safe location. The
Response Center will automatically contact
local emergency officials with the vehicle's
approximate location if they receive an auto-
matic SOS signal and cannot make voice con- tact with the vehicle occupants.
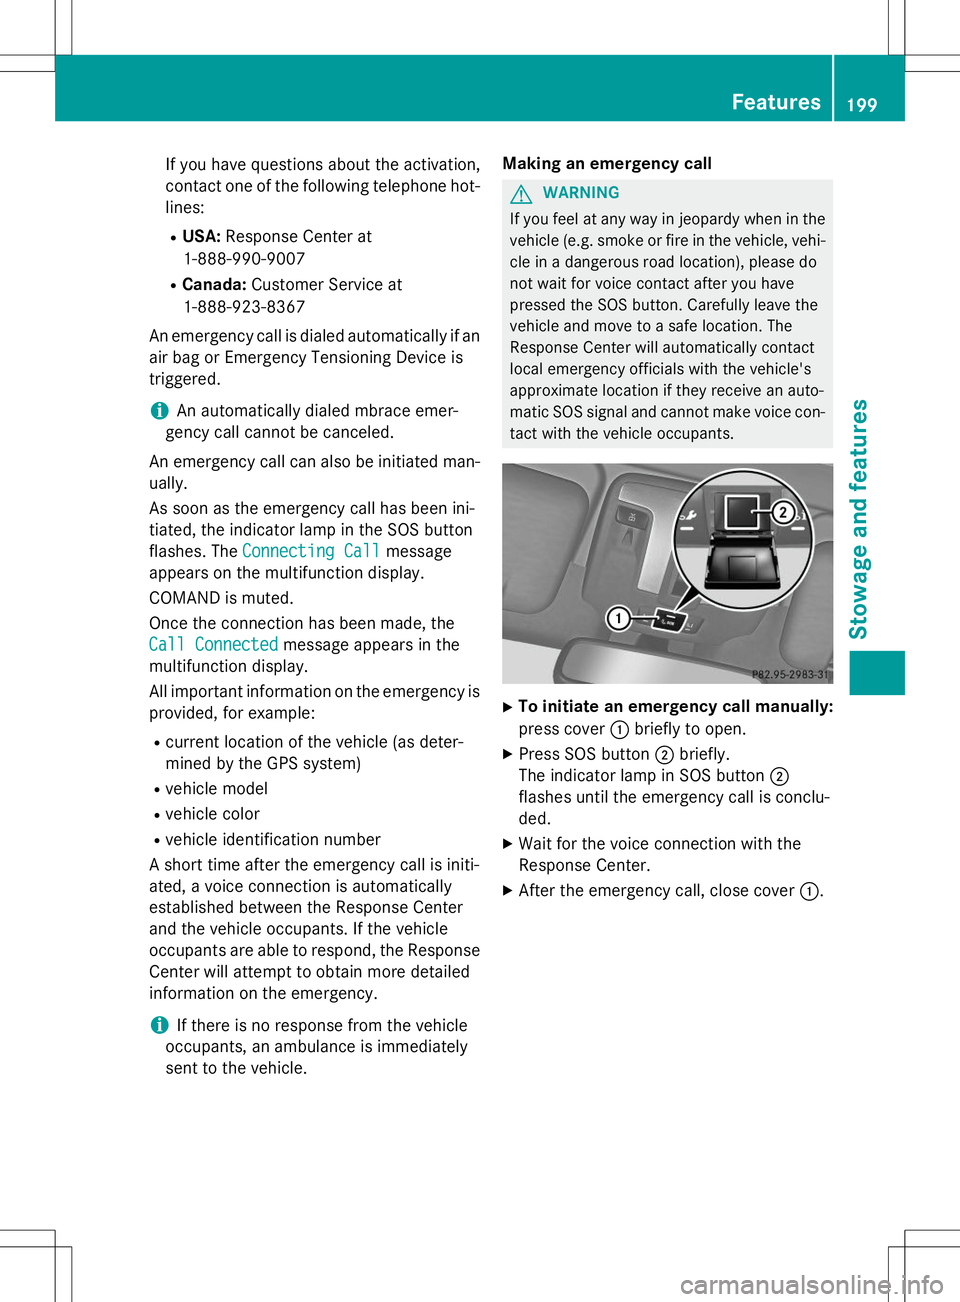
X To initiate an emergency call manually:
press cover :briefly to open.
X Press SOS button ;briefly.
The indicator lamp in SOS button ;
flashes until the emergency call is conclu- ded.
X Wait for the voice connection with the
Response Center.
X After the emergency call, close cover :.
Features199
Stowage and features
Z