2015 MERCEDES-BENZ B-Class ELECTRIC audio
[x] Cancel search: audioPage 37 of 338
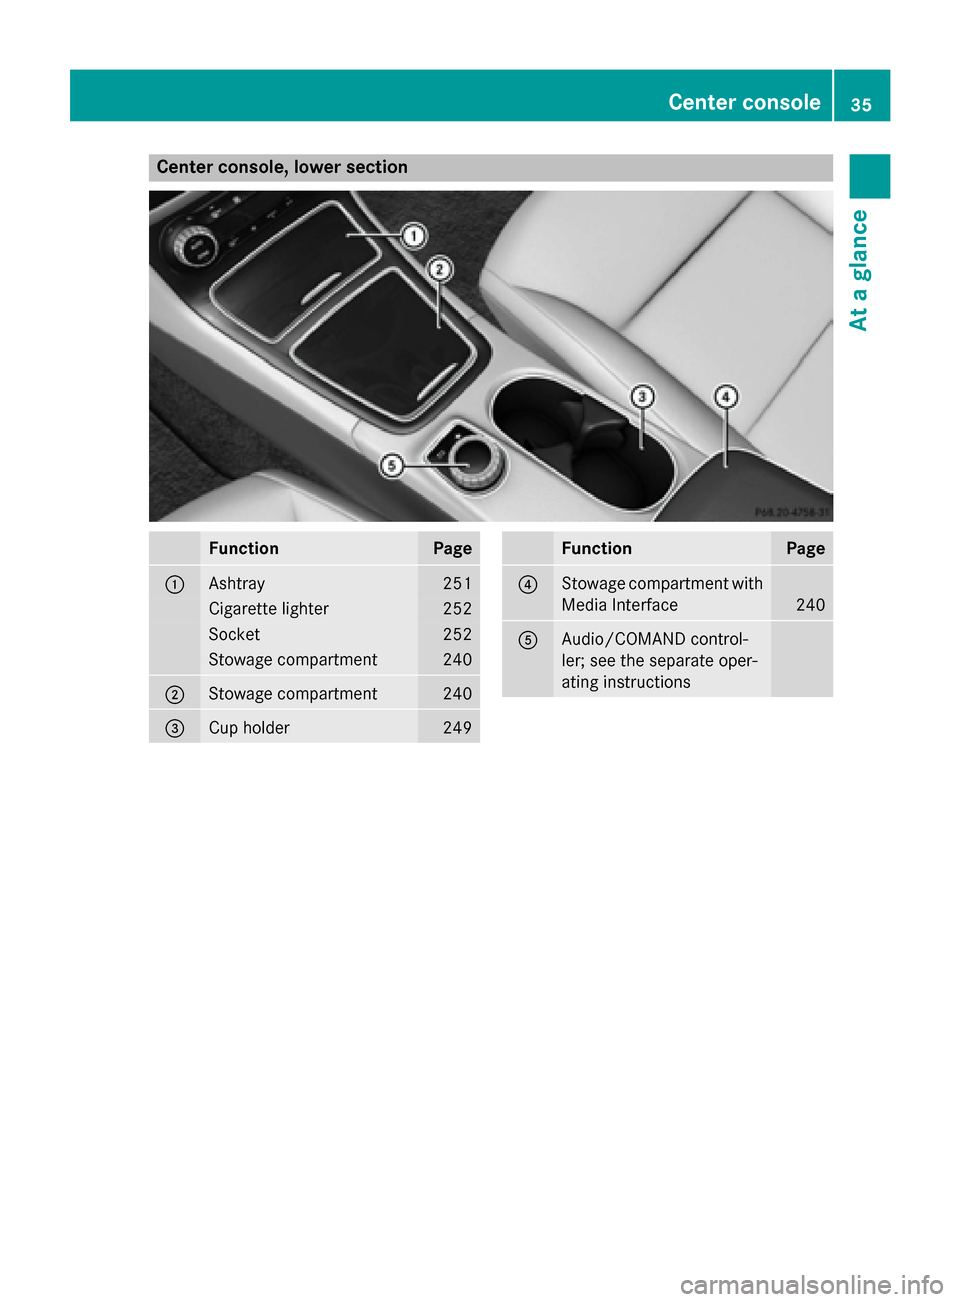
Center console, lower section
Function Page
:
Ashtray 251
Cigarette lighter 252
Socket 252
Stowage compartment 240
;
Stowage compartment 240
=
Cup holder 249 Function Page
?
Stowage compartment with
Media Interface 240
A
Audio/COMAND control-
ler; see the separate oper-
ating instructions Center console
35At a glance
Page 107 of 338
Interior lighting
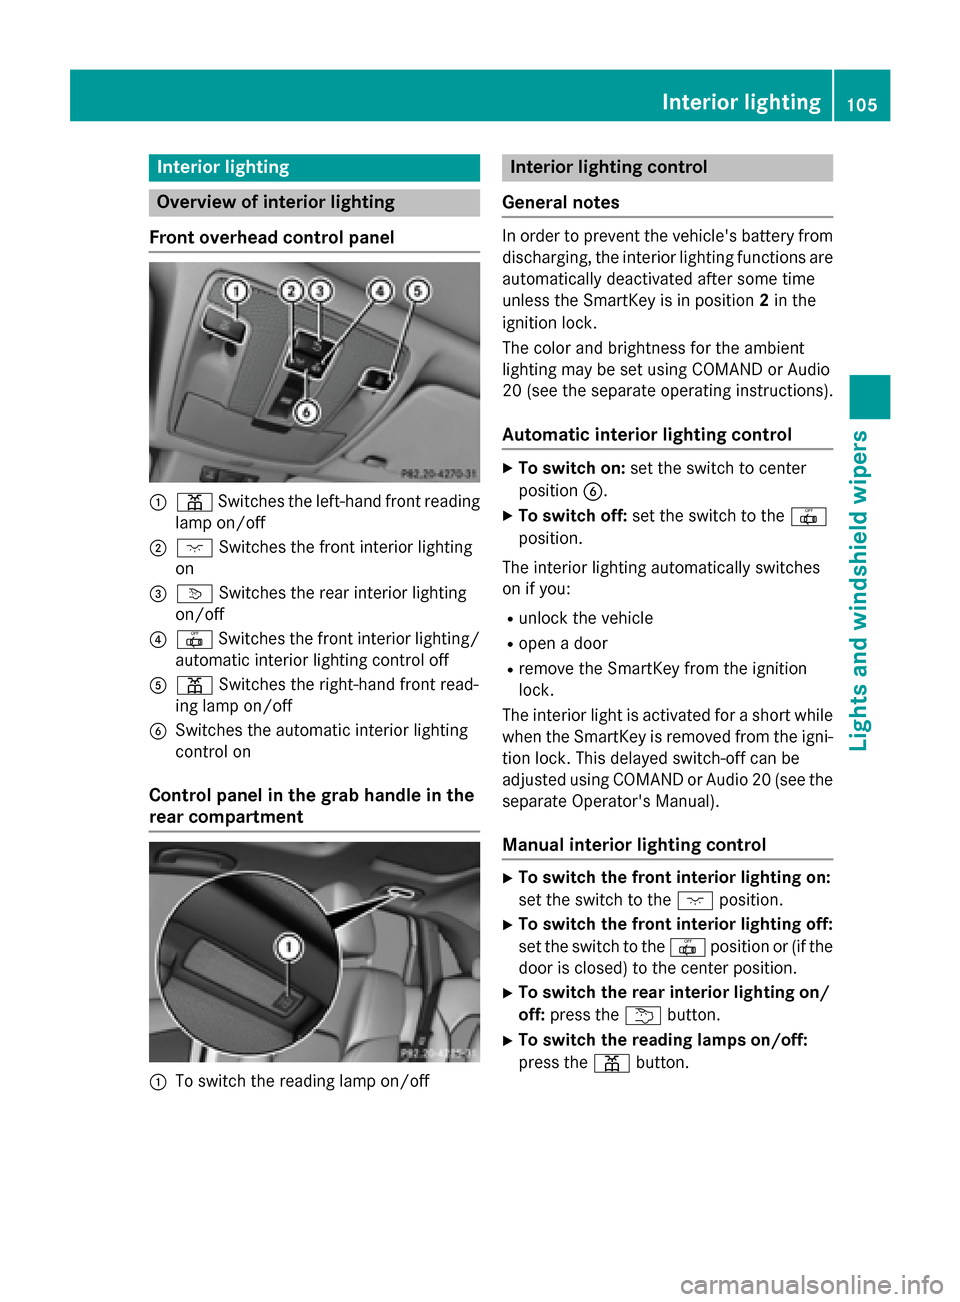
Overview of interior lighting
Front overhead control panel :
p Switches the left-hand front reading
lamp on/off
; c Switches the front interior lighting
on
= v Switches the rear interior lighting
on/off
? | Switches the front interior lighting/
automatic interior lighting control off
A p Switches the right-hand front read-
ing lamp on/off
B Switches the automatic interior lighting
control on
Control panel in the grab handle in the
rear compartment :
To switch the reading lamp on/off Interior lighting control
General notes In order to prevent the vehicle's battery from
discharging, the interior lighting functions are
automatically deactivated after some time
unless the SmartKey is in position 2in the
ignition lock.
The color and brightness for the ambient
lighting may be set using COMAND or Audio
20 (see the separate operating instructions).
Automatic interior lighting control X
To switch on: set the switch to center
position B.
X To switch off: set the switch to the |
position.
The interior lighting automatically switches
on if you:
R unlock the vehicle
R open a door
R remove the SmartKey from the ignition
lock.
The interior light is activated for a short while when the SmartKey is removed from the igni-
tion lock. This delayed switch-off can be
adjusted using COMAND or Audio 20 (see the separate Operator's Manual).
Manual interior lighting control X
To switch the front interior lighting on:
set the switch to the cposition.
X To switch the front interior lighting off:
set the switch to the |position or (if the
door is closed) to the center position.
X To switch the rear interior lighting on/
off: press the ubutton.
X To switch the reading lamps on/off:
press the pbutton. Interior lighting
105Lights and windshield wipers Z
Page 120 of 338
the front-passenger side as well. The indi-
cator lamp in the ábutton goes out.
R If you change the settings of the climate
control system, the climate status display
appears for approximately three seconds
at the bottom of the screen in the Audio/
COMAND display (see separate operating
instructions). You will see the current set-
tings of the various climate control func-
tions.
You can choose between various drive pro-
grams with the program selector button
(Y page 137). If you have selected drive pro-
gram E+, the climate control switches to Eco
mode and thermal comfort is impaired.
In Eco mode:
R the cooling output is reduced when cooling
R heat output is reduced when heating
R the time for which the rear window
defroster will run is reduced
If you have selected drive program Eor Sthe
climate control switches to Comfort mode.
The current climate control settings are main- tained in Comfort mode. Operating the climate control sys-
tems Switching climate control on/off
General notes When the climate control is switched off, the
air supply and air circulation are also
switched off. The windows could fog up.
Therefore, switch off climate control only
briefly Dual-zone automatic climate control X
Turn the SmartKey to position 2in the igni-
tion lock (Y page 131).
X To activate: press theÃbutton.
The indicator lamp in the Ãbutton lights
up. Airflow and air distribution are set to
automatic mode.
or
X Press the ^button.
The indicator lamp in the ^button goes
out. The previously selected settings are
restored.
X To deactivate: press the^button.
The indicator lamp in the ^button lights
up.
i Activate climate control primarily using
the à button. Activating/deactivating cooling with
air dehumidification
General notes If you deactivate the "Cooling with air-dehu-
midification" function, the air inside the vehi-
cle will not be cooled. The air inside the vehi-cle will also not be dehumidified. The win-
dows can fog up more quickly. Therefore, only
deactivate the "Cooling with air-dehumidifi-
cation" function briefly.
The "Cooling with air-dehumidification" func-
tion is operational when the vehicle is ready
to drive. The air inside the vehicle is cooled
and dehumidified according to the tempera-
ture selected.
Condensation may drip from the underside of the vehicle when it is in cooling mode. This is
normal and not a sign that there is a malfunc- tion. 118
Operating the climate control systemsClimate control
Page 144 of 338
charge immediately
charge immediately
message. This pro-
tects the battery from exhaustive discharge.
It is not possible to restart the drive system
until after charging.
Do not leave the vehicle parked for longer
than 14 days with a high-voltage battery con-
dition of charge below 20%.
You can check the condition of charge in the charge level display (Y page 184).
Further information on the "Energy flow dis-
play" can be found in the "Trip" menu
(Y page 187).
High and low outside temperatures Low outside temperatures
The efficiency of the high-voltage battery is
significantly reduced at very low outside tem-
peratures. The high-voltage battery is then no longer able to provide the normal electrical
power output.
High outside temperatures
To prevent damage to the high-voltage bat-
tery due to very high outside temperatures,
the maximum power output of the high-volt-
age battery is reduced automatically.
The E-CELL display indicates the maximum
amount of power available (Y page 183).
Energy consumption and range This range is reduced by:
R high and low outside temperatures
R a non-anticipatory driving style
R switching on consumers, e.g. air-condition-
ing system or heating.
The battery's physical characteristics are
such that leaving the vehicle parked for an
extended period at low outdoor temperatures
without charging it can lead to:
R a reduction in battery performance
R longer charge times
In extreme cases, this could mean that the
vehicle cannot be started. For this reason,
connect the charging cable when leaving the vehicle parked for long periods at low outdoor
temperatures.
As a result of its basic characteristics, the
amount of energy available from the high-
voltage battery decreases over the course of its life.
This reduces:
R the maximum range that can be achieved
by the vehicle
R the maximum output (acceleration) of the
vehicle
You can actively reduce the energy consump- tion of your vehicle in a number of ways, for
example, by:
R an anticipatory driving style
R reducing the use of electrical consumers
R having the vehicle regularly maintained
The charging time of the high-voltage battery may change over the course of its life.
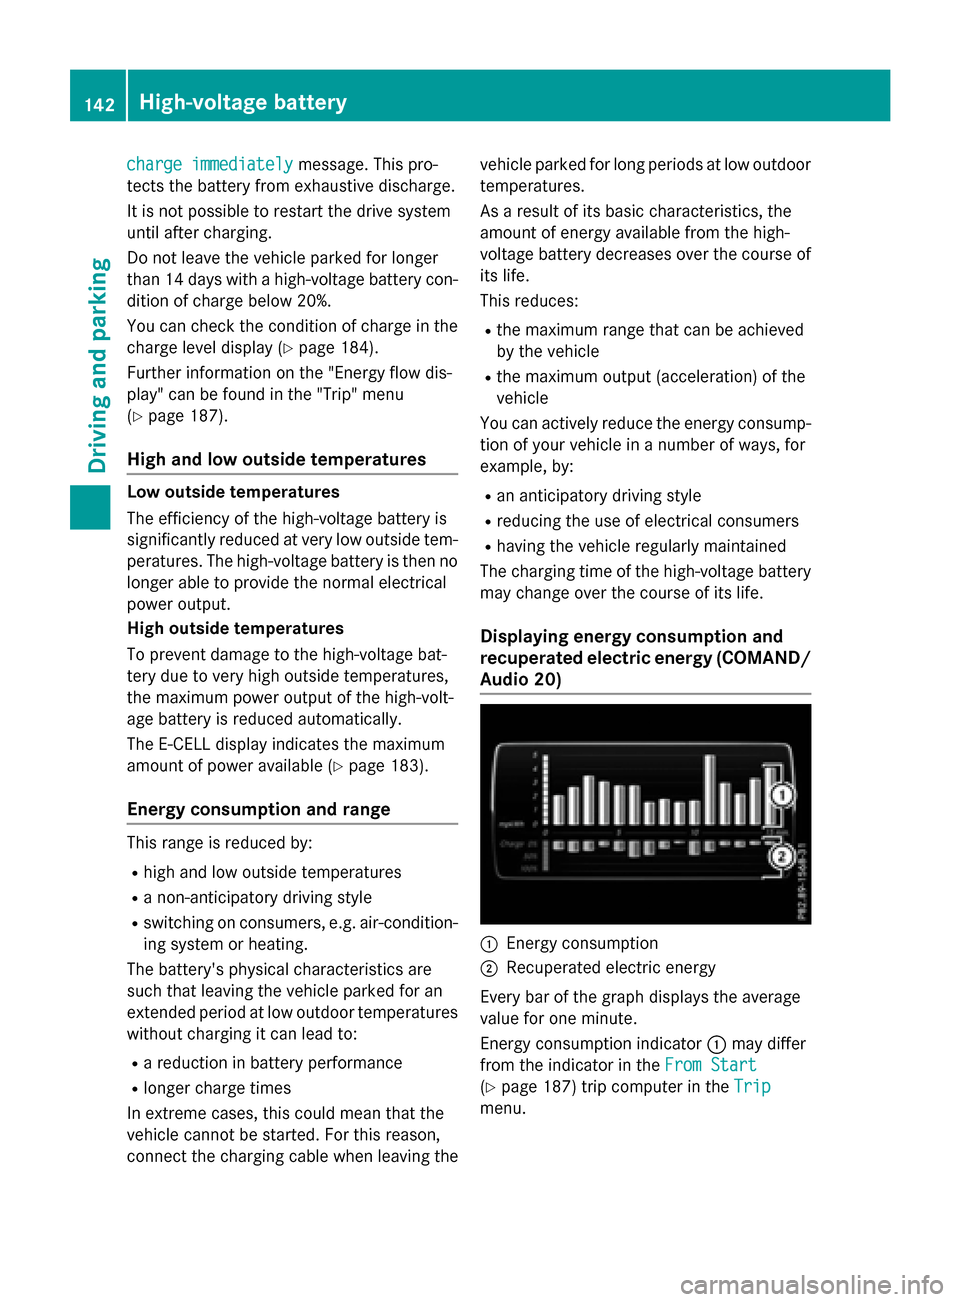
Displaying energy consumption and
recuperated electric energy (COMAND/ Audio 20) :
Energy consumption
; Recuperated electric energy
Every bar of the graph displays the average
value for one minute.
Energy consumption indicator :may differ
from the indicator in the From Start From Start
(Y page 187) trip computer in the Trip
Trip
menu. 142
High-voltage batteryDriving and parking
Page 145 of 338
Displaying energy consumption and recu-
perated electric energy:
X Switch on Audio 20/COMAND Online (see
the separate operating instructions).
X To select Vehicle Vehiclefrom the main function
bar: turn and press the controller.
The vehicle menu is displayed.
X To select Consumption
Consumption: turn and press the
controller.
Energy consumption :and recuperated
electric energy ;for the last 15 minutes of
the journey are shown.
Exiting the vehicle settings:
X Press the %button on the controller.
or
X To select %: slide 6and press the
controller.
To reset values: the values are reset along
with the From Start
From Start trip computer
(Y page 189).
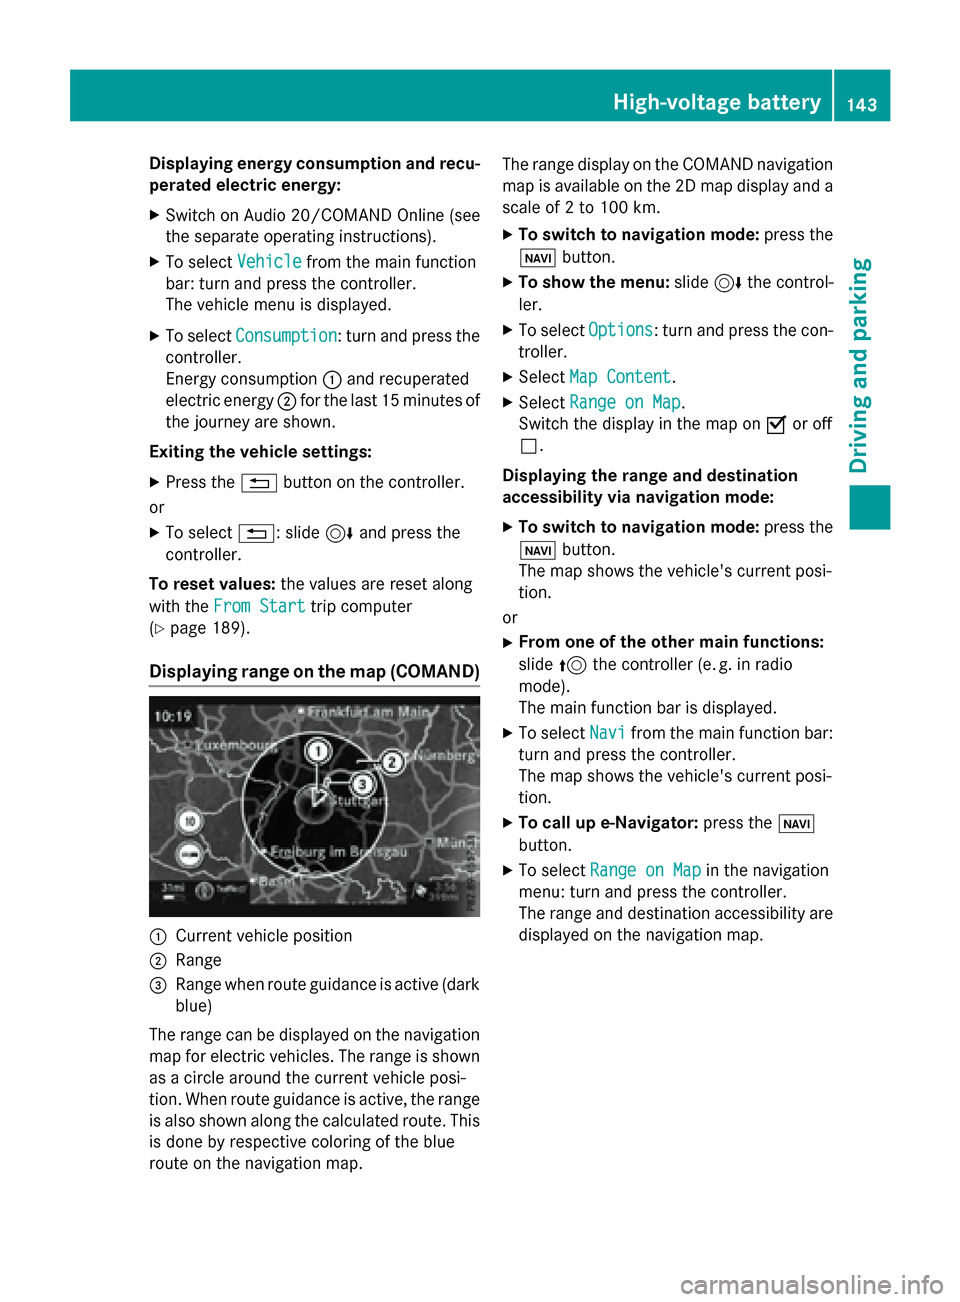
Displaying range on the map (COMAND) :
Current vehicle position
; Range
= Range when route guidance is active (dark
blue)
The range can be displayed on the navigation
map for electric vehicles. The range is shown as a circle around the current vehicle posi-
tion. When route guidance is active, the range
is also shown along the calculated route. This is done by respective coloring of the blue
route on the navigation map. The range display on the COMAND navigation
map is available on the 2D map display and a
scale of 2 to 100 km.
X To switch to navigation mode: press the
ß button.
X To show the menu: slide6the control-
ler.
X To select Options Options: turn and press the con-
troller.
X Select Map Content
Map Content.
X Select Range on Map
Range on Map .
Switch the display in the map on Oor off
ª.
Displaying the range and destination
accessibility via navigation mode:
X To switch to navigation mode: press the
ß button.
The map shows the vehicle's current posi-
tion.
or
X From one of the other main functions:
slide 5the controller (e. g. in radio
mode).
The main function bar is displayed.
X To select Navi
Navi from the main function bar:
turn and press the controller.
The map shows the vehicle's current posi-
tion.
X To call up e-Navigator: press theß
button.
X To select Range on Map Range on Map in the navigation
menu: turn and press the controller.
The range and destination accessibility are
displayed on the navigation map. High-voltage batte
ry
143Driving an d parking Z
Page 174 of 338
X
Drive forwards and back up as prompted by
the PARKTRONIC warning displays, several
times if necessary.
X Stop when PARKTRONIC sounds the con-
tinuous warning tone, if not before.
Once you have exited the parking space com-
pletely, the steering wheel is moved to the
straight-ahead position. You hear a tone and
the Park Assist Finished
Park Assist Finished message
appears in the multifunction display. You will
then have to steer and merge into traffic on
your own. PARKTRONIC is still available. You
can take over the steering, before the vehicle has exited the parking space completely. Thisis useful, for example when you recognize
that it is already possible to pull out of the
parking space.
Canceling Active Parking Assist X
Stop the movement of the multifunction
steering wheel or steer yourself.
Active Parking Assist will be canceled at
once. The Park Assist Canceled Park Assist Canceled mes-
sage appears in the multifunction display.
or
X Press the PARKTRONIC button
(Y page 167).
PARKTRONIC is switched off and Active
Parking Assist is immediately canceled.
The Park Assist Canceled
Park Assist Canceled message
appears in the multifunction display.
Active Parking Assist is canceled automati-
cally if:
R the electric parking brake is engaged
R transmission position Pis selected
R parking using Active Parking Assist is no
longer possible
R you are driving faster than 6 mph (10 km/h)
R a wheel spins, ESP ®
intervenes or fails. The
÷ warning lamp lights up in the instru-
ment cluster
A warning tone sounds. The parking symbol
disappears and the multifunction display shows the
Park Assist Canceled
Park Assist Canceled mes-
sage.
When Active Parking Assist is canceled, you
must steer and brake again yourself.
If a system malfunction occurs, the vehicle is braked to a standstill. To drive on, depress the
accelerator again. Rear view camera
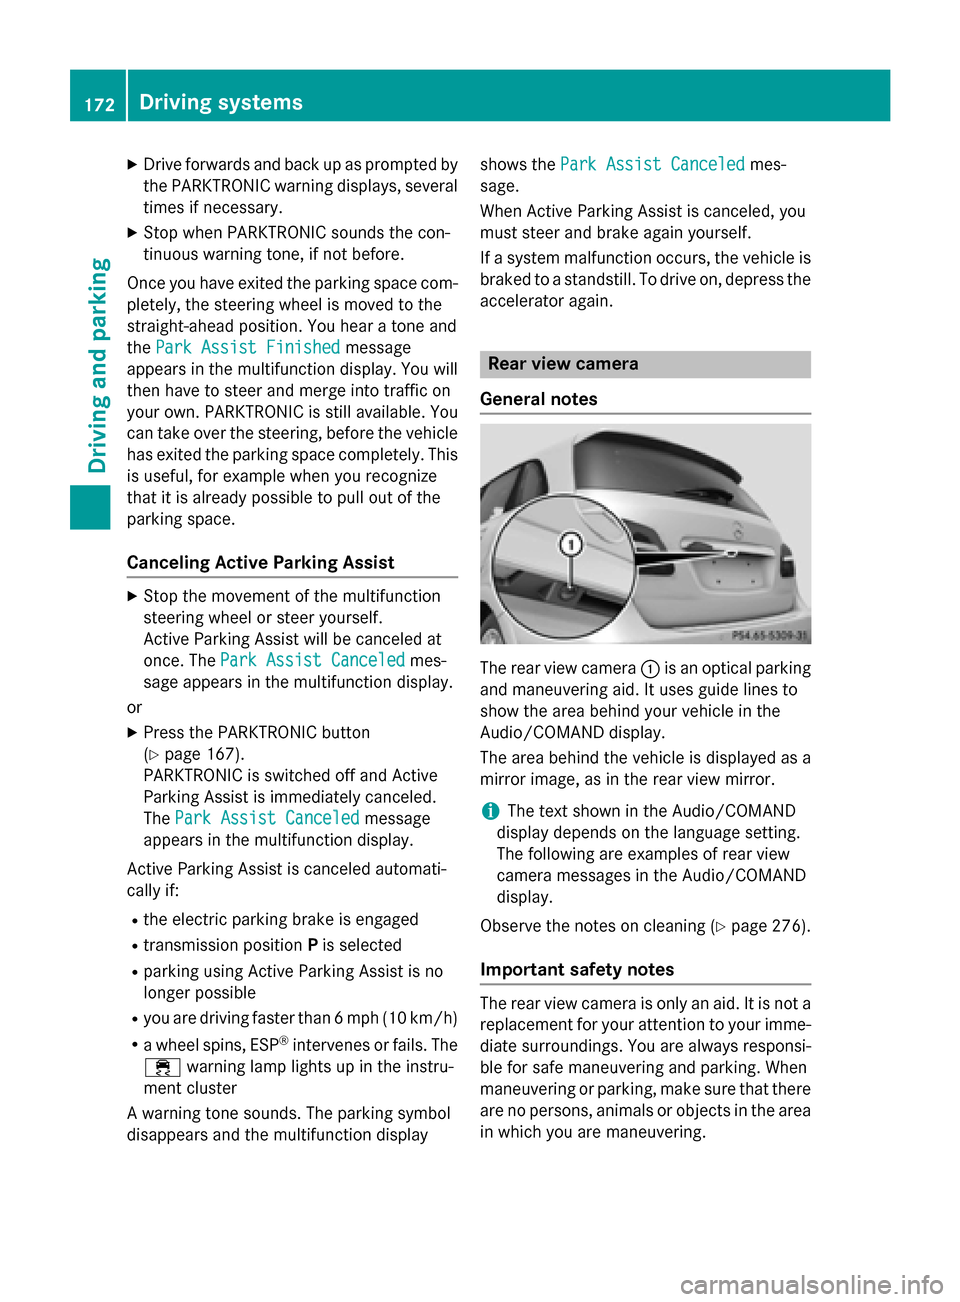
General notes The rear view camera
:is an optical parking
and maneuvering aid. It uses guide lines to
show the area behind your vehicle in the
Audio/COMAND display.
The area behind the vehicle is displayed as a
mirror image, as in the rear view mirror.
i The text shown in the Audio/COMAND
display depends on the language setting.
The following are examples of rear view
camera messages in the Audio/COMAND
display.
Observe the notes on cleaning (Y page 276).
Important safety notes The rear view camera is only an aid. It is not a
replacement for your attention to your imme-
diate surroundings. You are always responsi-
ble for safe maneuvering and parking. When
maneuvering or parking, make sure that there are no persons, animals or objects in the area in which you are maneuvering. 172
Driving systemsDriving an
d parking
Page 175 of 338
Under the following circumstances, the rear
view camera will not function, or will function
in a limited manner:
R if the trunk lid is open
R in heavy rain, snow or fog
R at night or in very dark places
R if the camera is exposed to very bright light
R if the area is lit by fluorescent bulbs or LED
lighting (the display may flicker)
R if there is a sudden change in temperature,
e.g. when driving into a heated garage in
winter
R if the camera lens is dirty or obstructed.
Observe the notes on cleaning
(Y page 276)
R if the rear of your vehicle is damaged. In this
event, have the camera position and setting checked at a qualified specialist workshop
The field of vision and other functions of the
rear view camera may be restricted due to
additional accessories on the rear of the vehi-
cle (e.g. license plate holder, bicycle rack).
Activating/deactivating the rear view
camera X
To activate: make sure that the key is in
position 2in the ignition lock.
X Make sure that the Activation by R Activation by R
gear
gear function is selected in Audio 20/
COMAND; see the Digital Operator's Man-
ual.
X Engage reverse gear.
The area behind the vehicle is shown with
guide lines in the Audio 20/COMAND dis-
play.
The image from the rear view camera is
available throughout the maneuvering
process.
To deactivate: the rear view camera deacti-
vates if you shift the transmission to Por after
driving forwards a short distance. Displays in the Audio 20/COMAND dis-
play The rear view camera may show a distorted
view of obstacles, show them incorrectly or
not at all. The rear view camera does not show
objects in the following positions:
R very close to the rear bumper
R under the rear bumper
R in the area immediately above the tailgate
handle
! Objects not at ground level may appear to
be further away than they actually are, e.g.:
R the bumper of a parked vehicle
R the drawbar of a trailer
R the ball coupling of a trailer tow hitch
R the rear section of an HGV
R a slanted post
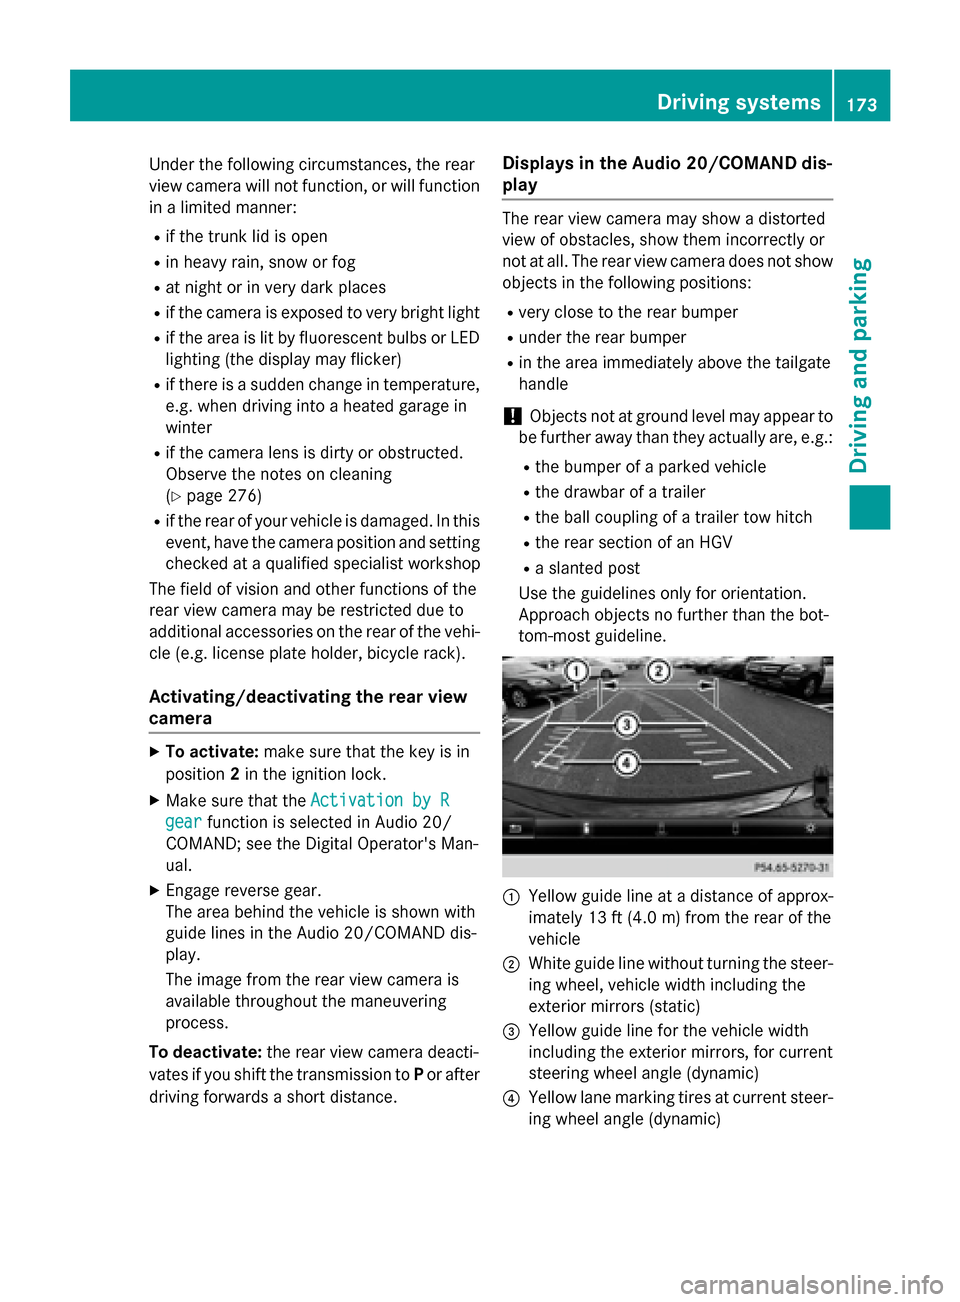
Use the guidelines only for orientation.
Approach objects no further than the bot-
tom-most guideline. :
Yellow guide line at a distance of approx-
imately 13 ft (4.0 m) from the rear of the
vehicle
; White guide line without turning the steer-
ing wheel, vehicle width including the
exterior mirrors (static)
= Yellow guide line for the vehicle width
including the exterior mirrors, for current
steering wheel angle (dynamic)
? Yellow lane marking tires at current steer-
ing wheel angle (dynamic) Driving systems
173Driving and parking Z
Page 176 of 338
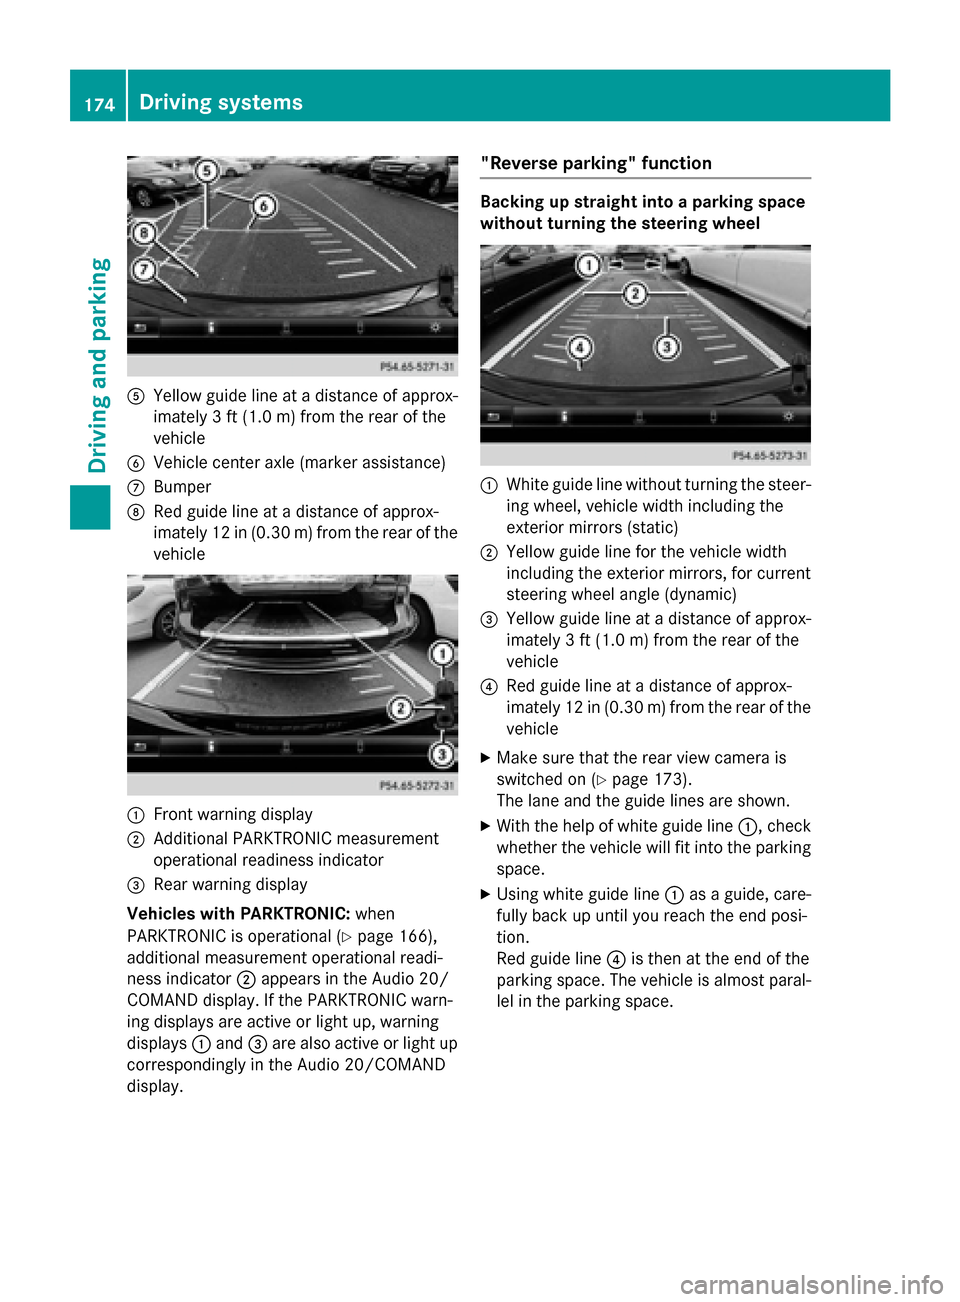
A
Yellow guide line at a distance of approx-
imately 3 ft (1.0 m) from the rear of the
vehicle
B Vehicle center axle (marker assistance)
C Bumper
D Red guide line at a distance of approx-
imately 12 in (0.30 m) from the rear of the
vehicle :
Front warning display
; Additional PARKTRONIC measurement
operational readiness indicator
= Rear warning display
Vehicles with PARKTRONIC: when
PARKTRONIC is operational (Y page 166),
additional measurement operational readi-
ness indicator ;appears in the Audio 20/
COMAND display. If the PARKTRONIC warn-
ing displays are active or light up, warning
displays :and =are also active or light up
correspondingly in the Audio 20/COMAND
display. "Reverse parking" function Backing up straight into a parking space
without turning the steering wheel
:
White guide line without turning the steer-
ing wheel, vehicle width including the
exterior mirrors (static)
; Yellow guide line for the vehicle width
including the exterior mirrors, for current
steering wheel angle (dynamic)
= Yellow guide line at a distance of approx-
imately 3 ft (1.0 m) from the rear of the
vehicle
? Red guide line at a distance of approx-
imately 12 in (0.30 m) from the rear of the
vehicle
X Make sure that the rear view camera is
switched on (Y page 173).
The lane and the guide lines are shown.
X With the help of white guide line :, check
whether the vehicle will fit into the parking space.
X Using white guide line :as a guide, care-
fully back up until you reach the end posi-
tion.
Red guide line ?is then at the end of the
parking space. The vehicle is almost paral-
lel in the parking space. 174
Driving systemsDriving and parking