2015 MERCEDES-BENZ B-Class ELECTRIC child restraint
[x] Cancel search: child restraintPage 8 of 338

Cargo tie down rings
.........................245
CD player/CD changer (on-board
computer) .......................................... 191
Center console
Lower section .................................. 35
Upper section .................................. 34
Central locking
Automatic locking (on-board com-
puter) ............................................. 198
Locking/unlocking (SmartKey) ....... .72
Changing bulbs
Cornering light function ................ .109
High-beam headlamps ................... 108
License plate lighting ..................... 110
Low-beam headlamps .................... 108
Parking lamps ................................ 108
Rear fog lamp ................................ 109
Reversing lamps ............................ 109
Standing lamps (front) ................... 108
Turn signals (front) ......................... 108
Charge level display .......................... 184
Charging
with RANGE PLUS .......................... 196
see Charging the high-voltage battery
Charging cable
Connecting ................................... .148
Controls ......................................... 146
Important safety notes .................. 146
Removing ....................................... 148
Storing .......................................... .146
Warming up ................................... 145
Charging the high-voltage battery
(important safety notes) ................... 140
Child
Restraint system .............................. 57
Child seat
Forward-facing restraint system ...... 61
LATCH-type (ISOFIX) child seat
anchors ............................................ 58
On the front-passenger sea t............ 60
Rearward-facing restraint system .... 60
Top Tether ....................................... 59
Child-proof locks
Important safety notes .................... 61
Rear doors ....................................... 62
Children
Special seat belt retractor ............... 57 Cigarette lighter
................................ 252
Cleaning
Mirror turn signal ........................... 275
Climate control
Automatic climate control (dual-
zone) .............................................. 117
Auxiliary climate control (on-
board computer) ............................ 196
Controlling automaticall y............... 120
Convenience opening/closing
(air-recirculation mode) ................. 123
Cooling with air dehumidification .. 118
Defrosting the window s................. 122
Defrosting the windshield .............. 121
General notes ................................ 116
Immediate pre-entry climate con-
trol ................................................. 125
Indicator lamp ................................ 120
Information about using auto-
matic climate control ..................... 117
Maximum cooling .......................... 122
Overview of systems ...................... 116
Pre-entry climate control at
departure time ............................... 125
Pre-entry climate control at time
of departure (on-board computer) .. 196 Pre-entry climate control via key ... 124
Pre-entry climate control via key
(on-board computer) ...................... 196
Problem with the rear window
defroster ........................................ 123
Problems with cooling with air
dehumidification ............................ 120
Refrigerant ..................................... 333
Refrigerant filling capacity ............. 334
Setting the air distribution ............. 120
Setting the air vents ...................... 126
Setting the airflow ......................... 121
Setting the temperature ................ 120
Switching air-recirculation mode
on/of f............................................ 123
Switching on/of f........................... 118
Switching the rear window
defroster on/of f............................ 122
Switching the ZONE function on/
off .................................................. 121
Cockpit
Overview .......................................... 30 6
Index
Page 14 of 338
N
Navigation Menu (on-board computer) ............ 189
Notes on breaking-in a new vehi-
cle ....................................................... 130 O
Occupant Classification System
(OCS) Conditions ....................................... 49
Faults ............................................... 53
Operation ......................................... 49
System self-test ............................... 51
Occupant safety
Automatic measures after an acci-
dent ................................................. 56
Children in the vehicle ..................... 56
Important safety note s.................... 41
Introduction to the restraint sys-
tem .................................................. 40
Occupant Classification System
(OCS) ............................................... 49
PASSENGER AIR BAG indicator
lamps ............................................... 41
Pets in the vehicle ........................... 62
Restraint system warning lamp ........ 41
Seat belt .......................................... 42
OCS
Conditions ....................................... 49
Faults ............................................... 53
Operation ......................................... 49
System self-test ............................... 51
Odometer ........................................... 186
On-board computer
Assistance graphic menu ............... 193
Assistance menu ........................... 193
Audio menu ................................... 191
Display messages .......................... 200
Displaying a service message ........ 271
E‑CELL menu ................................. 195
Factory settings ............................. 199
Important safety notes .................. 182
Instrument cluster submenu .......... 197
Lighting submenu .......................... 198
Menu overview .............................. 186
Message memory .......................... 200 Navigation menu ............................ 189
Operation ....................................... 184
Service menu ................................. 195
Settings menu ............................... 195
Standard display ............................ 186
Telephone menu ............................ 192
Trip menu ...................................... 186
Vehicle submenu ........................... 198
Video DVD operation ..................... 191
Online access .................................... 152
Operating safety
Declaration of conformity ................ 24
Important safety notes .................... 22
Operating system
see On-board computer
Operator's Manual
Vehicle equipment ........................... 20
Outside temperature display ........... 183
Overhead control panel ...................... 37
Override feature
Rear side window s........................... 62 P
Paint code number ............................ 330
Paintwork (cleaning instructions) ... 273
Panic alarm .......................................... 40
Parking
Important safety notes .................. 153
Parking brake ................................ 155
Position of exterior mirror, front-
passenger sid e................................. 95
Rear view camera .......................... 172
see Active Parking Assist
see PARKTRONIC
Parking aid
Active Parking Assist ..................... 168
see Exterior mirrors
see PARKTRONIC
Parking brake
Display message ............................ 205
Electric parking brake .................... 155
Warning lamp ................................. 236
Parking lamps
Switching on/of f........................... 101
Parking lamps (changing bulbs) ...... 108
PARKTRONIC
Deactivating/activating ................. 167 12
Index
Page 16 of 338
Reserve
High-voltage battery ...................... 236
Restraint system
Display messag e............................ 210
Introduction ..................................... 40
Warning lamp ................................. 236
Warning lamp (function) ................... 41
Reverse gear
Engaging ........................................ 135
Reversing feature
Side windows ................................... 83
Roadside Assistance (breakdown) .... 21
Roof carrier ........................................ 249
Roof lining and carpets (cleaning
guidelines) ......................................... 278
Roof load (maximum) ........................ 334S
Safety Children in the vehicle ..................... 56
Seat belts
Adjusting the height ......................... 44
center rear-compartment sea t......... 45
Cleaning ......................................... 278
Correct usage .................................. 44
Fastening ......................................... 44
Important safety guidelines ............. 42
Introduction ..................................... 42
Releasing ......................................... 45
Warning lamp ................................. 228
Warning lamp (function) ................... 45
Seats
Adjusting (electrically) ..................... 90
Adjusting (manually) ........................ 90
Adjusting the 4-way lumbar sup-
port .................................................. 91
Adjusting the head restraint ............ 90
Cleaning the cover ......................... 277
Correct driver's seat position ........... 88
Folding the backrest (rear com-
partment) forwards/back .............. 244
Important safety notes .................... 89
Seat heating problem ...................... 93
Storing settings (memory func-
tion) ................................................. 97
Switching seat heating on/of f......... 92
Securing cargo .................................. 245 Selector lever
Cleaning ......................................... 277
see DIRECT SELECT lever
Sensors (cleaning instructions) ....... 275
Service menu (on-board com-
puter) .................................................. 195
Service message
see ASSYST PLUS
Service products
Brake fluid ..................................... 332
Coolant (engine) ............................ 332
Important safety notes .................. 331
Refrigerant (air-conditioning sys-
tem) ............................................... 333
Washer fluid ................................... 333
Setting the air distribution ............... 120
Setting the airflow ............................ 121
Setting the maximum charge cur-
rent (Control system) ........................ 197
Settings
Factory (on-board computer) ......... 199
On-board compute r....................... 195
Side impact air bag ............................. 48
Side marker lamp (display mes-
sage) ................................................... 216
Side windows
Cleaning ......................................... 274
Convenience closing feature ............ 84
Convenience opening feature .......... 84
Important safety information ........... 83
Opening/closing .............................. 84
Problem (malfunction) ..................... 86
Resetting ......................................... 85
Reversing feature ............................. 83
SmartKey
Changing the battery ....................... 75
Changing the programming ............. 74
Checking the battery ....................... 75
Convenience closing feature ............ 84
Convenience opening feature .......... 84
Display message ............................ 226
Door central locking/unlocking ....... 72
Important safety notes .................... 72
KEYLESS-GO start function .............. 74
Loss ................................................. 77
Mechanical key ................................ 74
Positions (ignition lock) ................. 131 14
Index
Page 42 of 338
Useful information
i This Operator's Manual describes all
models and all standard and optional equip- ment of your vehicle available at the time of
publication of the Operator's Manual.
Country-specific differences are possible.
Please note that your vehicle may not be
equipped with all features described. This
also applies to safety-related systems and
functions.
i Read the information on qualified special-
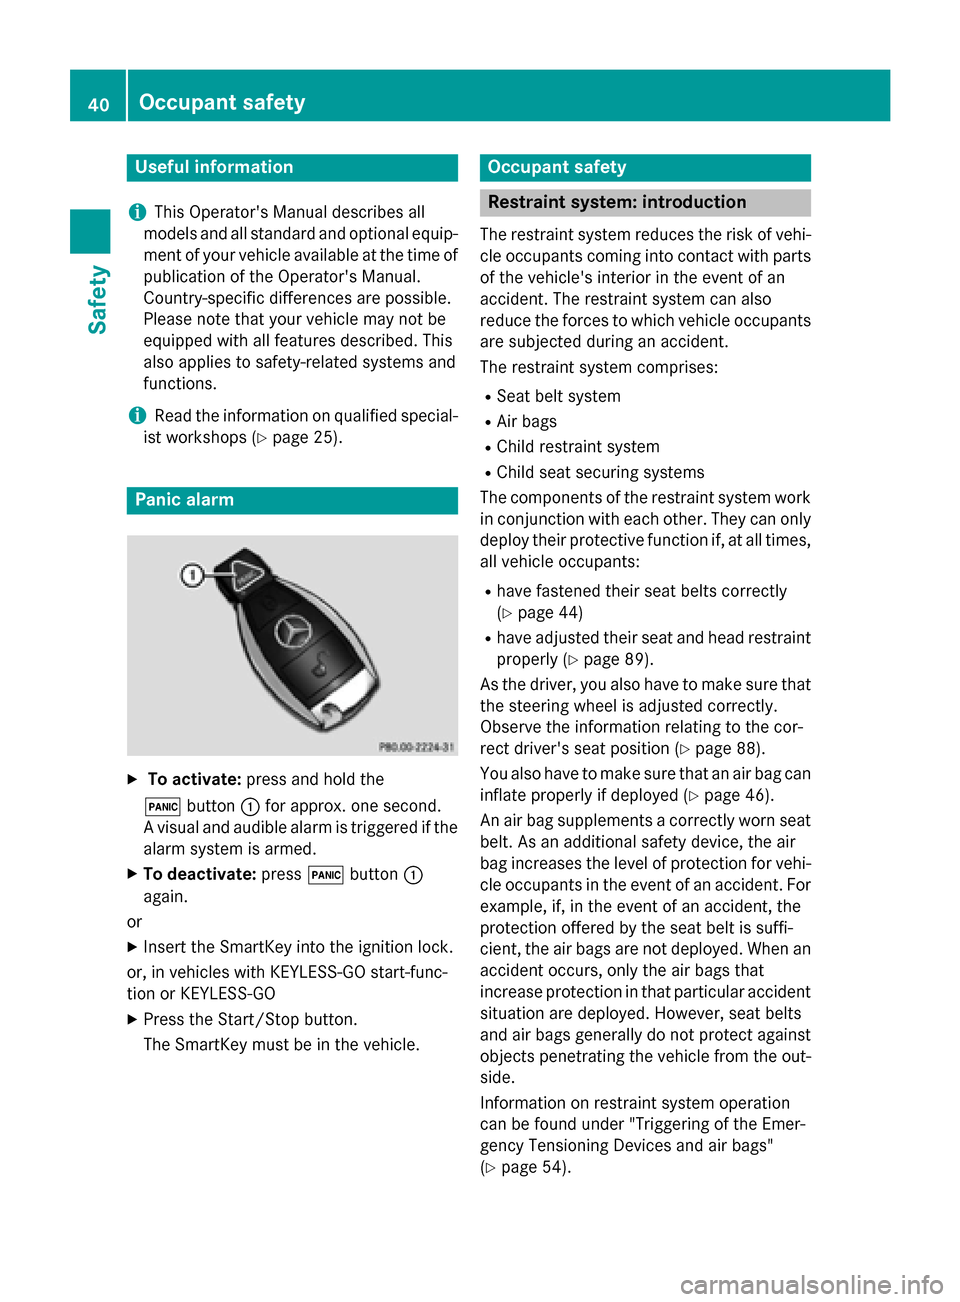
ist workshops (Y page 25). Panic alarm
X
To activate: press and hold the
! button :for approx. one second.
A visual and audible alarm is triggered if the alarm system is armed.
X To deactivate: press!button :
again.
or
X Insert the SmartKey into the ignition lock.
or, in vehicles with KEYLESS-GO start-func-
tion or KEYLESS ‑GO
X Press the Start/Stop button.
The SmartKey must be in the vehicle. Occupant safety
Restraint system: introduction
The restraint system reduces the risk of vehi-
cle occupants coming into contact with parts of the vehicle's interior in the event of an
accident. The restraint system can also
reduce the forces to which vehicle occupants
are subjected during an accident.
The restraint system comprises:
R Seat belt system
R Air bags
R Child restraint system
R Child seat securing systems
The components of the restraint system work
in conjunction with each other. They can only deploy their protective function if, at all times,
all vehicle occupants:
R have fastened their seat belts correctly
(Y page 44)
R have adjusted their seat and head restraint
properly (Y page 89).
As the driver, you also have to make sure that
the steering wheel is adjusted correctly.
Observe the information relating to the cor-
rect driver's seat position (Y page 88).
You also have to make sure that an air bag can inflate properly if deployed (Y page 46).
An air bag supplements a correctly worn seat
belt. As an additional safety device, the air
bag increases the level of protection for vehi-
cle occupants in the event of an accident. For example, if, in the event of an accident, the
protection offered by the seat belt is suffi-
cient, the air bags are not deployed. When an
accident occurs, only the air bags that
increase protection in that particular accident
situation are deployed. However, seat belts
and air bags generally do not protect against objects penetrating the vehicle from the out-
side.
Information on restraint system operation
can be found under "Triggering of the Emer-
gency Tensioning Devices and air bags"
(Y page 54). 40
Occupant safetySafety
Page 43 of 338
For more information about children traveling
with you in the vehicle and on child restraint
systems, see "Children in the vehicle"
(Y page 56). Important safety notes
G
WARNING
Modifications to the restraint system may
cause it to no longer work as intended. The
restraint system may then not perform its
intended protective function and may fail in an accident or trigger unexpectedly, for example.
This poses an increased risk of injury or even fatal injury.
Never modify parts of the restraint system.
Never tamper with the wiring, the electronic
components or their software.
If it is necessary to modify an air bag system to
accommodate a person with disabilities, con- tact an authorized Mercedes-Benz Center for
details. USA only: for further information con- tact our Customer Assistance Center at
1-800-FOR-MERCede s (1‑800‑367 ‑6372). Restraint system warning lamp
The functions of the restraint system are
checked after the ignition is switched on and
at regular intervals while the drive system is
running. Therefore, malfunctions can be
detected in good time.
The 6 restraint system warning lamp in
the instrument cluster lights up when the igni- tion is switched on. It goes out no later than afew seconds after the vehicle is started. The
components of the restraint system are in
operational readiness. A malfunction has occurred if the
6
restraint system warning lamp:
R does not light up after the ignition is
switched on
R does not go out after a few seconds with
the drive system running
R lights up again while the drive system is
running G
DANGER
If the restraint system is malfunctioning, indi- vidual restraint system components may be
triggered unintentionally or might not be trig-
gered at all in the event of an accident with a high rate of vehicle deceleration. This could
affect Emergency Tensioning Devices or air
bags, for example. The vehicle's high-voltage
electrical system may also not be deactivated
as intended in the event of an accident. You
could suffer an electric shock if you touch the damaged components of the vehicle's high-
voltage electrical system. This poses an
increased risk of injury or even fatal injury.
Have the restraint system checked and
repaired immediately at a qualified specialist
workshop. Immediately switch off the ignition
and remove the SmartKey from the ignition
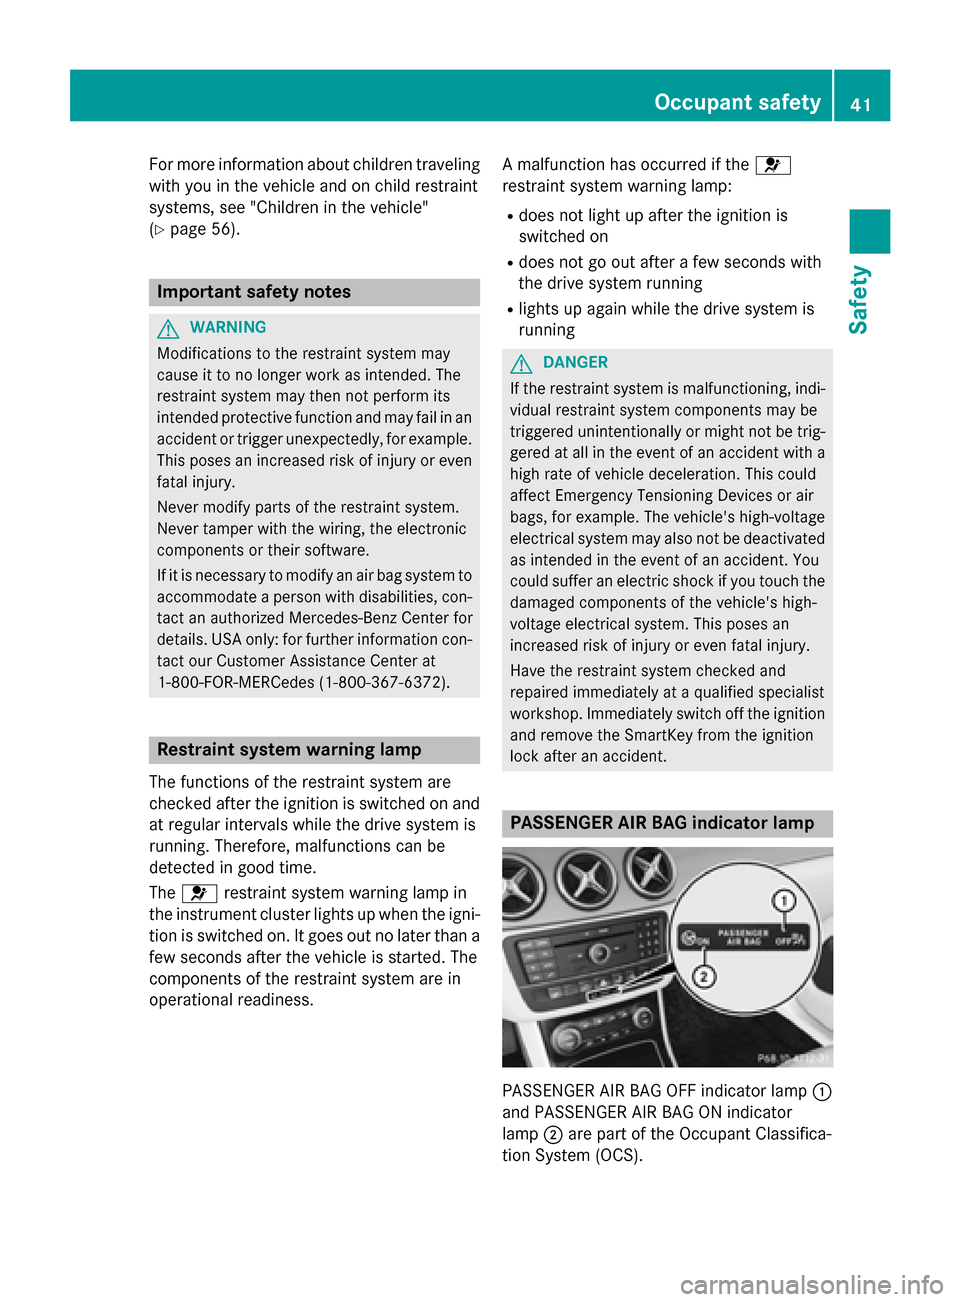
lock after an accident. PASSENGER AIR BAG indicator lamp
PASSENGER AIR BAG OFF indicator lamp
:
and PASSENGER AIR BAG ON indicator
lamp ;are part of the Occupant Classifica-
tion System (OCS). Occupant safety
41Safety Z
Page 44 of 338
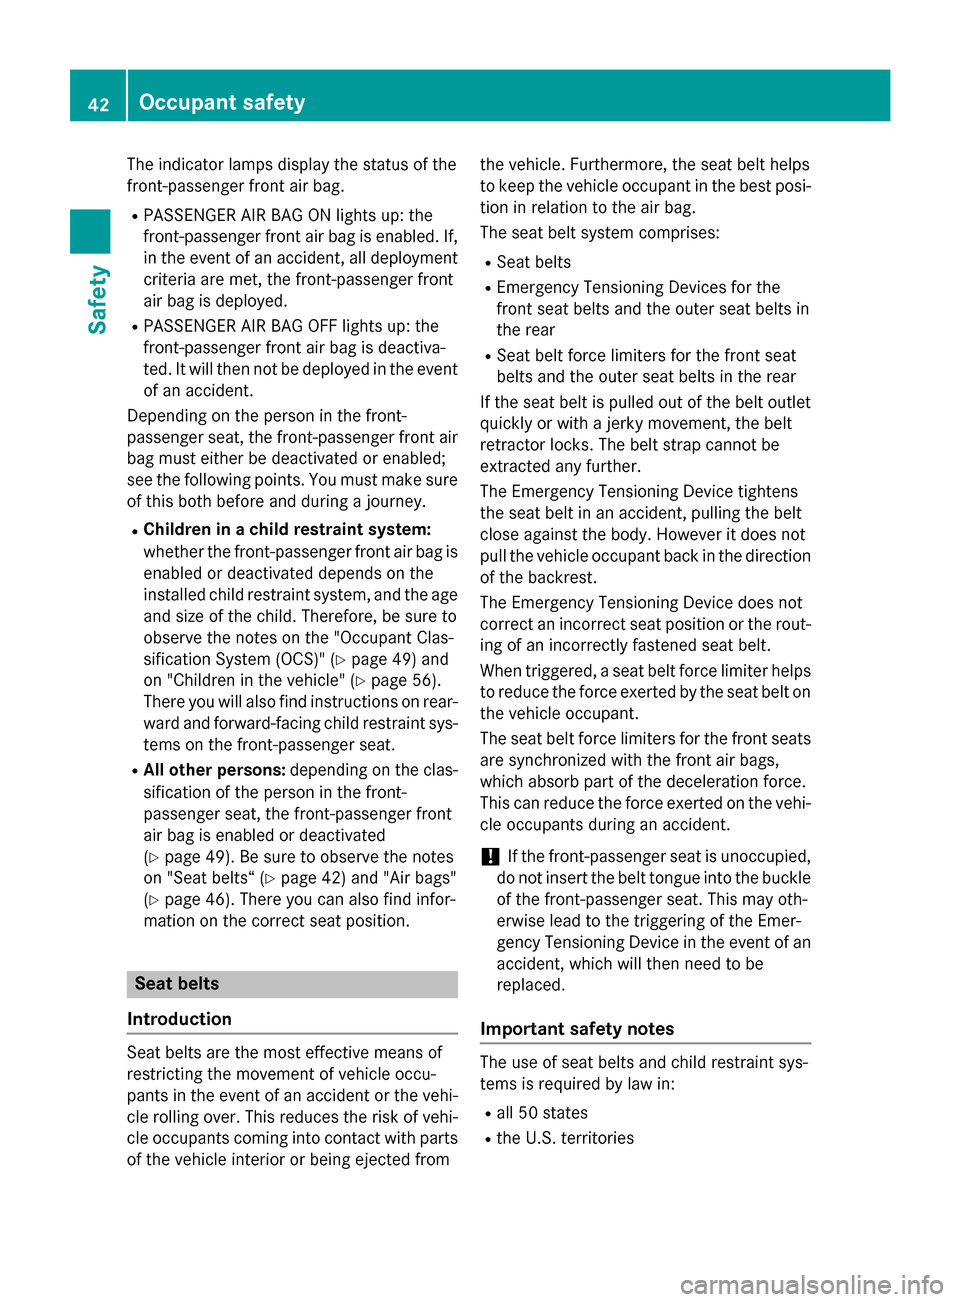
The indicator lamps display the status of the
front-passenger front air bag.
R PASSENGER AIR BAG ON lights up: the
front-passenger front air bag is enabled. If,
in the event of an accident, all deployment
criteria are met, the front-passenger front
air bag is deployed.
R PASSENGER AIR BAG OFF lights up: the
front-passenger front air bag is deactiva-
ted. It will then not be deployed in the event of an accident.
Depending on the person in the front-
passenger seat, the front-passenger front air
bag must either be deactivated or enabled;
see the following points. You must make sure
of this both before and during a journey.
R Children in a child restraint system:
whether the front-passenger front air bag is
enabled or deactivated depends on the
installed child restraint system, and the age and size of the child. Therefore, be sure to
observe the notes on the "Occupant Clas-
sification System (OCS)" (Y page 49) and
on "Children in the vehicle" (Y page 56).
There you will also find instructions on rear-
ward and forward-facing child restraint sys- tems on the front-passenger seat.
R All other persons: depending on the clas-
sification of the person in the front-
passenger seat, the front-passenger front
air bag is enabled or deactivated
(Y page 49). Be sure to observe the notes
on "Seat belts“ (Y page 42) and "Air bags"
(Y page 46). There you can also find infor-
mation on the correct seat position. Seat belts
Introduction Seat belts are the most effective means of
restricting the movement of vehicle occu-
pants in the event of an accident or the vehi-
cle rolling over. This reduces the risk of vehi- cle occupants coming into contact with parts
of the vehicle interior or being ejected from the vehicle. Furthermore, the seat belt helps
to keep the vehicle occupant in the best posi-
tion in relation to the air bag.
The seat belt system comprises:
R Seat belts
R Emergency Tensioning Devices for the
front seat belts and the outer seat belts in
the rear
R Seat belt force limiters for the front seat
belts and the outer seat belts in the rear
If the seat belt is pulled out of the belt outlet quickly or with a jerky movement, the belt
retractor locks. The belt strap cannot be
extracted any further.
The Emergency Tensioning Device tightens
the seat belt in an accident, pulling the belt
close against the body. However it does not
pull the vehicle occupant back in the direction
of the backrest.
The Emergency Tensioning Device does not
correct an incorrect seat position or the rout- ing of an incorrectly fastened seat belt.
When triggered, a seat belt force limiter helps
to reduce the force exerted by the seat belt on
the vehicle occupant.
The seat belt force limiters for the front seats
are synchronized with the front air bags,
which absorb part of the deceleration force.
This can reduce the force exerted on the vehi- cle occupants during an accident.
! If the front-passenger seat is unoccupied,
do not insert the belt tongue into the buckle of the front-passenger seat. This may oth-
erwise lead to the triggering of the Emer-
gency Tensioning Device in the event of anaccident, which will then need to be
replaced.
Important safety notes The use of seat belts and child restraint sys-
tems is required by law in:
R all 50 states
R the U.S. territories 42
Occupant safetySafety
Page 45 of 338
R
the District of Columbia
R all Canadian provinces
Even where this is not required by law, all
vehicle occupants should correctly fasten
their seat belts before starting the journey. G
WARNING
If the seat belt is incorrectly fastened, it can-
not protect as intended. Furthermore, an
incorrectly fastened seat belt can cause addi- tional injury, for example, in an accident, dur-
ing braking or when abruptly changing direc-
tion. This poses an increased risk of injury or
even fatal injury.
Make sure that all vehicle occupants are
seated properly with a correctly fastened seat belt. G
WARNING
The seat belt does not offer the intended level of protection if you have not moved the back-
rest to an almost vertical position. When brak-
ing or in the event of an accident, you could
slide underneath the seat belt and sustain
abdomen or neck injuries, for example. This
poses an increased risk of injury or even fatal injury.
Adjust the seat properly before beginning
your journey. Always ensure that the backrest
is in an almost vertical position and that the
shoulder section of your seat belt is routed
across the center of your shoulder. G
WARNING
Persons under 5 ft (1.50 m) in heightcannot
fasten the seat belt correctly without an addi- tional suitable restraint system. If the seat
belt is incorrectly fastened, it cannot protect
as intended. Furthermore, an incorrectly fas-
tened seat belt can cause additional injury, for
example, in an accident, during braking or an
abrupt change of direction. This poses an
increased risk of injury or even fatal injury.
For this reason, always secure persons under
5 ft (1.50 m) in height in suitable restraint
systems. If a
child younger than 12 years and under 5 ft
(1.50 m) in height is traveling in the vehicle:
R always secure the child in a child restraint
system suitable for this Mercedes-Benz
vehicle. The child restraint system must be
appropriate to the age, weight and size of
the child
R always observe the instructions and safety
notes in the "Children in the vehicle" sec-
tion of this Operator's Manual
(Y page 56) in addition to the child
restraint system manufacturer's installa-
tion instructions
R be sure to observe the instructions and
safety notes on the "Occupant classifica-
tion system (OCS)" (Y page 49) G
WARNING
The seat belts may not perform their intended protective function if:
R they are damaged, modified, extremely
dirty, bleach or dyed
R the seat belt buckle is damaged or
extremely dirty
R the Emergency Tensioning Devices, belt
anchorages or inertia reels have been modi-
fied
Seat belts may sustain non-visible damage in an accident, e.g. due to glass splinters. Modi-
fied or damaged seat belts may tear or fail,
e.g. in an accident. Modified Emergency Ten-
sioning Devices could accidentally trigger or
fail to deploy when necessary. This poses an
increased risk of injury or even fatal injury.
Never modify the seat belts, Emergency Ten-
sioning Devices, belt anchorages or inertia
reels. Make sure that the seat belts are
undamaged, not worn out and clean. Follow-
ing an accident, have the seat belts checked
immediately at a qualified specialist work-
shop.
Only use seat belts that have been approved
for your vehicle by Mercedes-Benz. Any such
modifications could invalidate the vehicle's
general operating permit. Occupant safety
43Safety Z
Page 47 of 338
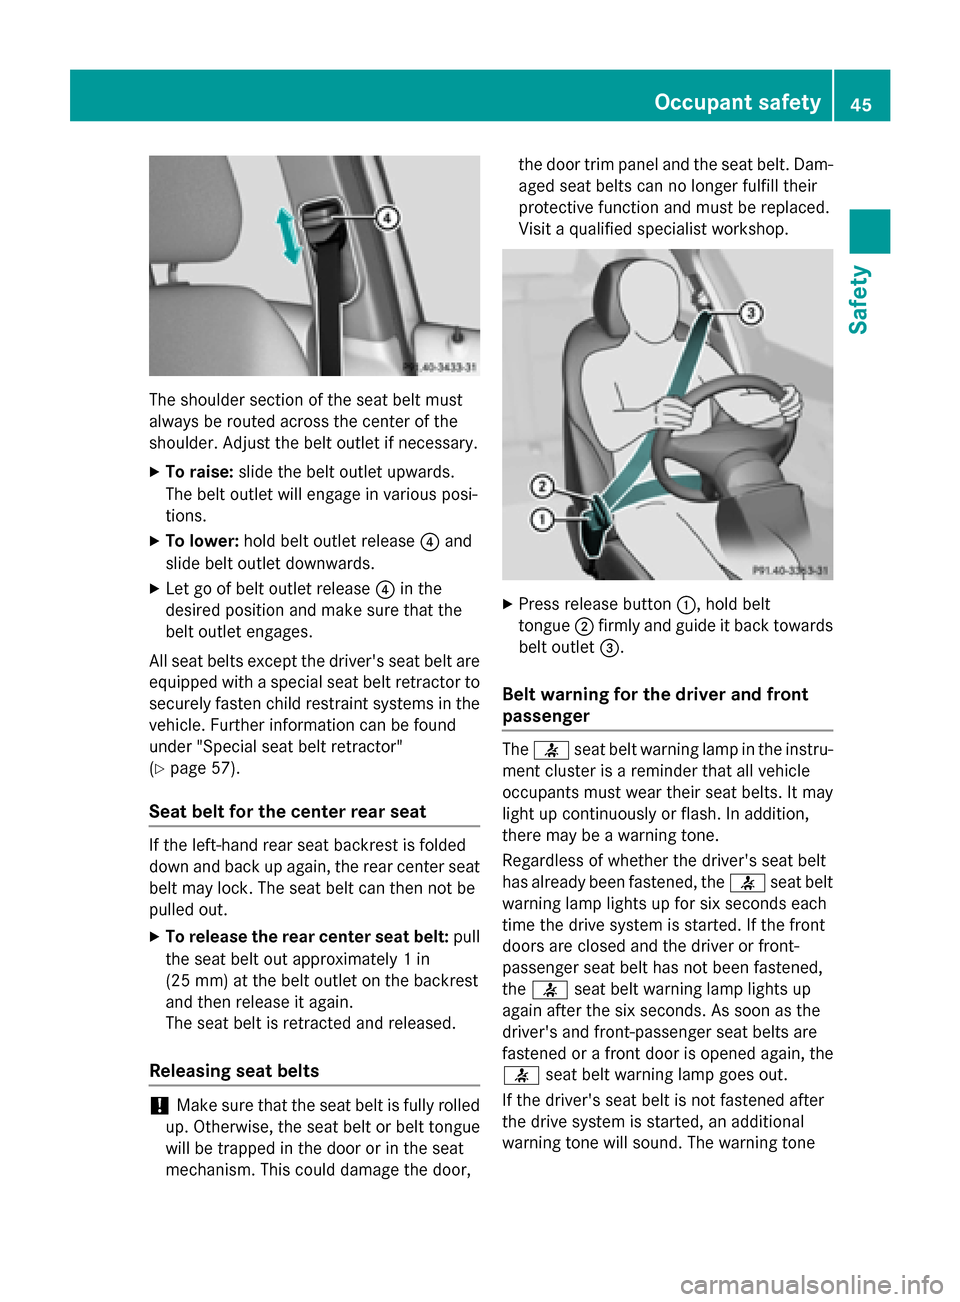
The shoulder section of the seat belt must
always be routed across the center of the
shoulder. Adjust the belt outlet if necessary.
X To raise: slide the belt outlet upwards.
The belt outlet will engage in various posi-
tions.
X To lower: hold belt outlet release ?and
slide belt outlet downwards.
X Let go of belt outlet release ?in the
desired position and make sure that the
belt outlet engages.
All seat belts except the driver's seat belt are equipped with a special seat belt retractor tosecurely fasten child restraint systems in the
vehicle. Further information can be found
under "Special seat belt retractor"
(Y page 57).
Seat belt for the center rear seat If the left-hand rear seat backrest is folded
down and back up again, the rear center seat
belt may lock. The seat belt can then not be
pulled out.
X To release the rear center seat belt: pull
the seat belt out approximately 1 in
(25 mm) at the belt outlet on the backrest
and then release it again.
The seat belt is retracted and released.
Releasing seat belts !
Make sure that the seat belt is fully rolled
up. Otherwise, the seat belt or belt tongue
will be trapped in the door or in the seat
mechanism. This could damage the door, the door trim panel and the seat belt. Dam-
aged seat belts can no longer fulfill their
protective function and must be replaced.
Visit a qualified specialist workshop. X
Press release button :, hold belt
tongue ;firmly and guide it back towards
belt outlet =.
Belt warning for the driver and front
passenger The
7 seat belt warning lamp in the instru-
ment cluster is a reminder that all vehicle
occupants must wear their seat belts. It may
light up continuously or flash. In addition,
there may be a warning tone.
Regardless of whether the driver's seat belt
has already been fastened, the 7seat belt
warning lamp lights up for six seconds each
time the drive system is started. If the front
doors are closed and the driver or front-
passenger seat belt has not been fastened,
the 7 seat belt warning lamp lights up
again after the six seconds. As soon as the
driver's and front-passenger seat belts are
fastened or a front door is opened again, the
7 seat belt warning lamp goes out.
If the driver's seat belt is not fastened after
the drive system is started, an additional
warning tone will sound. The warning tone Occupant safety
45Safety Z