Page 41 of 164

ENGINE BREAK-IN RECOMMENDATIONS
Alongbreak-inperiodisnotrequiredfortheengineanddrivetrain(transmissionandaxle)
in your vehicle.
Drive moderately during the first 300 miles (500 km). After the initial 60 miles (100 km),
speeds up to 50 or 55 mph (80 or 90 km/h) are desirable.
While cruising, brief full-throttle acceleration within the limits of local traffic laws
contributes to a good break-in. Wide-open throttle acceleration in low gear can be
detrimental and should be avoided.
The engine oil installed in the engine at the factory is a high-quality energy conserving type
lubricant. Oil changes should be consistent with anticipated climate conditions under
which vehicle operations will occur. For the recommended viscosity and quality grades,
refer to “Maintaining Your Vehicle.”
NOTE:
Anewenginemayconsumesomeoilduringitsfirstfewthousandmiles(kilometers)of
operation. This should be considered a normal part of the break-in and not interpreted
as an indication of an engine problem or malfunction.
CAUTION!
Never use Non-Detergent Oil or Straight Mineral Oil in the engine or damage may
result.
OPERATING YOUR VEHICLE
39
Page 42 of 164

TURN SIGNAL/WIPER/WASHER/HIGH BEAM LEVER
Turn Signal/Lane Change Assist
•Taptheleverupordownonceandtheturnsignal(rightorleft)willflashthreetimesand
automatically turn off.
NOTE:
Vehicles equipped with Blind Spot Monitoring will produce a visual alert and may be
programmed to produce an audible alert when signaling a lane change; refer to your
Owner’s Manual on the DVD for operation.
Front Wipers
Intermittent, Low And High Operation
•Rotatetheendofthelevertothefirstdetentpositionforoneoffiveintermittent
settings, the second detent for low wiper operation and the third detent for high wiper
operation.
Rain Sensing Wipers
This feature senses moisture on the vehicle’s windshield and automatically activates the
wipers for the driver when the switch is in the intermittent positions. Refer to “Program-
mable Features” in “Electronics” for further details.
Multifunction Lever
1—Mist(PushToFirstDetent)2—RearWiper/Washer3—PushLeverForHighBeams4—FrontWipers5—FrontWasher(PushToSecondDetent)
OPERATING YOUR VEHICLE
40
Page 43 of 164
Mist
•Pushtheendoftheleverinwardtothefirstdetentwhenasinglewipeisdesired.
NOTE:
The mist feature does not activate the washer pump; therefore, no washer fluid will be
sprayed on the windshield. The wash function must be activated in order to spray the
windshield with washer fluid.
Washer Operation
•Pushtheendoftheleverinwardtotheseconddetentandholdforaslongassprayis
desired.
Rear Wiper
•Rotatethecenterportionoftheleverforwardtothefirstdetentforrearwiperoperation.
Rear Washer
•Rotatethecenterportionoftheleverpastthefirstdetenttoactivatetherearwasher.
High Beams
•Pushtheleverawayfromyoutoactivatethehighbeams.
Ahighbeamsymbolwillilluminateintheclustertoindicatethehighbeamsareon.
NOTE:
For safe driving, turn off the high beams when oncoming traffic is present to prevent
headlight glare and as a courtesy to other motorists.
Flash To Pass
•Pullthelevertowardyoutoactivatethehighbeams.Thehighbeamswillremainon
until the lever is released.
OPERATING YOUR VEHICLE
41
Page 44 of 164

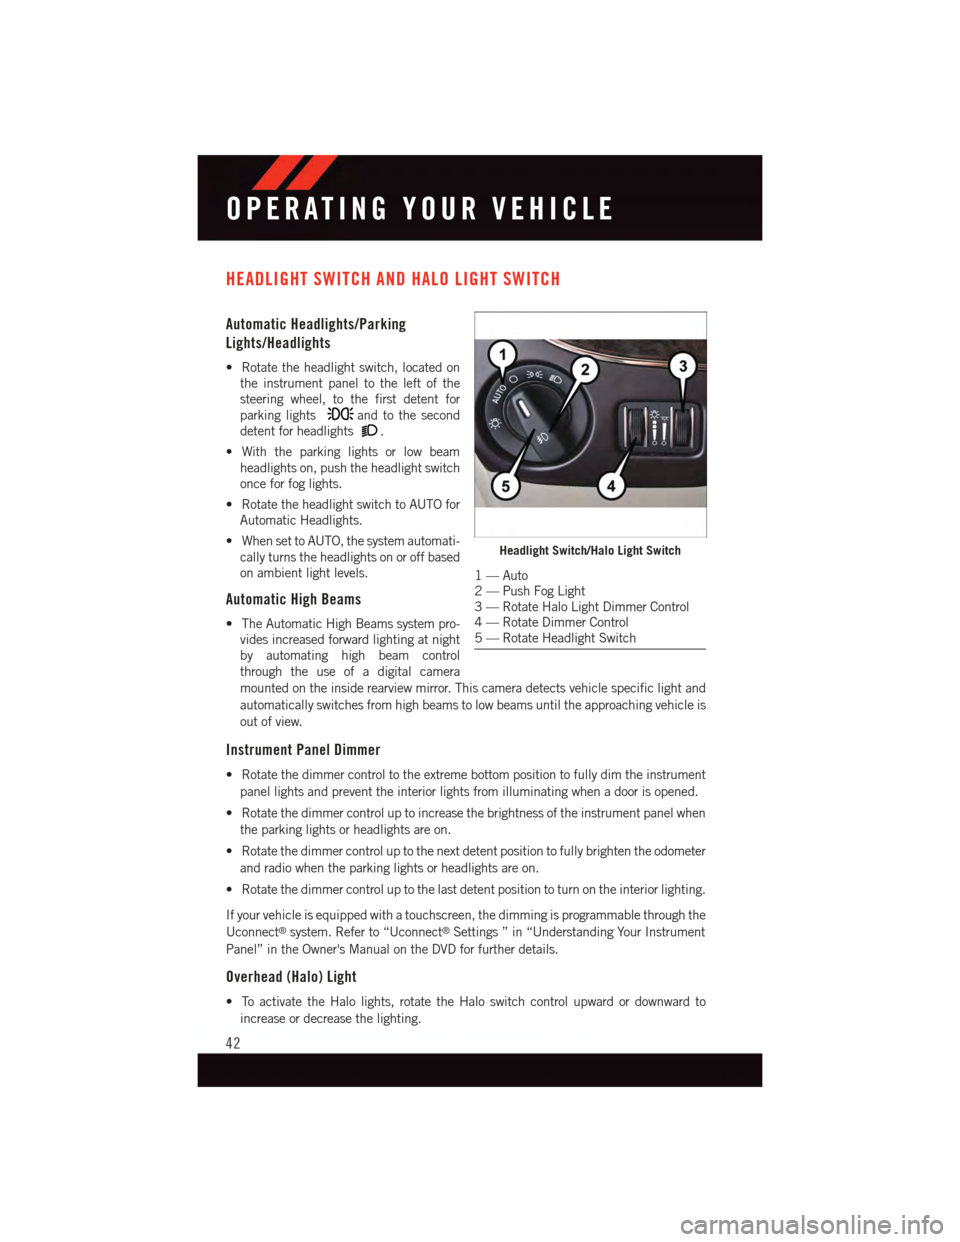
HEADLIGHT SWITCH AND HALO LIGHT SWITCH
Automatic Headlights/Parking
Lights/Headlights
•Rotatetheheadlightswitch,locatedon
the instrument panel to the left of the
steering wheel, to the first detent for
parking lightsand to the second
detent for headlights.
•Withtheparkinglightsorlowbeam
headlights on, push the headlight switch
once for fog lights.
•RotatetheheadlightswitchtoAUTOfor
Automatic Headlights.
•WhensettoAUTO,thesystemautomati-
cally turns the headlights on or off based
on ambient light levels.
Automatic High Beams
•TheAutomaticHighBeamssystempro-
vides increased forward lighting at night
by automating high beam control
through the use of a digital camera
mounted on the inside rearview mirror. This camera detects vehicle specific light and
automatically switches from high beams to low beams until the approaching vehicle is
out of view.
Instrument Panel Dimmer
•Rotatethedimmercontroltotheextremebottompositiontofullydimtheinstrument
panel lights and prevent the interior lights from illuminating when a door is opened.
•Rotatethedimmercontroluptoincreasethebrightnessoftheinstrumentpanelwhen
the parking lights or headlights are on.
•Rotatethedimmercontroluptothenextdetentpositiontofullybrightentheodometer
and radio when the parking lights or headlights are on.
•Rotatethedimmercontroluptothelastdetentpositiontoturnontheinteriorlighting.
If your vehicle is equipped with a touchscreen, the dimming is programmable through the
Uconnect®system. Refer to “Uconnect®Settings ” in “Understanding Your Instrument
Panel” in the Owner's Manual on the DVD for further details.
Overhead (Halo) Light
•ToactivatetheHalolights,rotatetheHaloswitchcontrolupwardordownwardto
increase or decrease the lighting.
Headlight Switch/Halo Light Switch
1—Auto2—PushFogLight3—RotateHaloLightDimmerControl4—RotateDimmerControl5—RotateHeadlightSwitch
OPERATING YOUR VEHICLE
42
Page 45 of 164

ELECTRONIC SPEED CONTROL
The Electronic Speed Control switches are located on the steering wheel.
Cruise ON/OFF
•PushtheON/OFFbuttontoactivatethe
Speed Control.
NOTE:
CRUISEwill appear on the instrument
cluster to indicate the Speed Control is on.
•PushtheON/OFFbuttonasecondtime
to turn the system off.
SET
With the Speed Control on, push and re-
lease the SET – button to set a desired
speed.
Accel/Decel
To Increase Speed
When the Electronic Speed Control is set,
you can increase speed by pushing the RES
+button.
The speed increment shown is dependant on the chosen speed unit of U.S. (MPH) or
Metric (km/h):
U.S. Speed (MPH)
•PushingtheRES+button once will result in a 1 MPH increase in set speed. Each
subsequent tap of the button results in an increase of 1 MPH.
•Ifthebuttoniscontinuallypushed,thesetspeedwillcontinuetoincreaseuntilthe
button is released, then the new set speed will be established.
Metric Speed (km/h)
•PushingtheRES+button once will result in a 2 km/h increase in set speed. Each
subsequent tap of the button results in an increase of 2 km/h.
•Ifthebuttoniscontinuallypushed,thesetspeedwillcontinuetoincreaseuntilthe
button is released, then the new set speed will be established.
Electronic Speed Control Switches
1—PushOn/Off2—PushResume/Accel3—PushSet/Decel4—PushCancel
OPERATING YOUR VEHICLE
43
Page 46 of 164

To Decrease Speed
When the Electronic Speed Control is set, you can decrease speed by pushing the SET-
button.
The speed decrement shown is dependant on the chosen speed unit of U.S. (MPH) or
Metric (km/h):
U.S. Speed (MPH)
•PushingtheSET-button once will result in a 1 MPH decrease in set speed. Each
subsequent tap of the button results in a decrease of 1 MPH.
•Ifthebuttoniscontinuallypushed,thesetspeedwillcontinuetodecreaseuntilthe
button is released, then the new set speed will be established.
Metric Speed (km/h)
•PushingtheSET-button once will result in a 2 km/h decrease in set speed. Each
subsequent tap of the button results in a decrease of 2 km/h.
•Ifthebuttoniscontinuallypushed,thesetspeedwillcontinuetodecreaseuntilthe
button is released, then the new set speed will be established.
Resume
To r e s u m e a p r e v i o u s l y s e l e c t e d s e t s p e e d i n m e m o r y, p u s h t h e R E S + b u t t o n a n d r e l e a s e .
Cancel
Push the CANCEL button, or apply the brakes to cancel the set speed and maintain the set
speed memory.
Push the ON/OFF button to turn the system off and erase the set speed memory.
WARNING!
•LeavingtheElectronicSpeedControlsystemonwhennotinuseisdangerous.You
could accidentally set the system or cause it to go faster than you want. You could
lose control and have a collision. Always leave the Electronic Speed Control system
off when you are not using it.
•ElectronicSpeedControlcanbedangerouswherethesystemcannotmaintaina
constant speed. Your vehicle could go too fast for the conditions, and you could lose
control. A collision could be the result. Do not use Electronic Speed Control in heavy
traffic or on roads that are winding, icy, snow-covered or slippery.
OPERATING YOUR VEHICLE
44
Page 47 of 164
ELECTRONIC RANGE SELECTION (ERS)
Electronic Range Select (ERS) allows you to limit the highest available transmission gear,
and can be activated during any driving condition. When towing a trailer or operating the
vehicle in off-road conditions, using ERS shift control will help you maximize both
performance and engine braking.
•ToshiftfromDRIVEmodetoERSmode,
move the shift lever to the left (-) once.
The current gear will be maintained as
the top gear. To disable ERS, simply
press and hold the shift lever to the right
(+) until “D” is displayed in the instru-
ment cluster odometer.
Switching between ERS and DRIVE mode
can be done at any vehicle speed.
Refer to your Owner's Manual on the DVD
for further details.
Electronic Range Select
OPERATING YOUR VEHICLE
45
Page 48 of 164
FUEL ECONOMY (ECON) MODE
The Fuel Economy (ECON) mode can improve the vehicle’s overall fuel economy during
normal driving conditions.
•PresstheECONswitchinthecenter
stack of the instrument panel and a
green light will indicate the ECON mode
is engaged.
When the ECON Mode is engaged, the ve-
hicle control systems will be able to change
the following:
•Thetransmissionwillupshiftsoonerand
downshift later.
•Thetransmissionwillskipselectgears
during shifts to allow the engine to oper-
ate at lower speeds.
•Thetorqueconverterclutchmayengage
sooner (lower engine rpm’s) and remain
on longer.
•Theengineidlespeedwillbelower.
•Theoveralldrivingperformancewillbemoreconservative.
ECON Switch Location
OPERATING YOUR VEHICLE
46