Page 25 of 164

Installing The Child Restraint Using The LATCH Lower Anchors
NOTE:
Never“share” a LATCH anchorage with two or more child restraints.
1. Loosen the adjusters on the lower straps and on the tether strap of the child seat so that
you can more easily attach the hooks or connectors to the vehicle anchorages.
2. Attach the lower hooks or connectors of the child restraint to the lower anchorages in
the selected seating position.
3. If the child restraint has a tether strap, connect it to the top tether anchorage. See
below for directions to attach a tether anchor.
4. Tighten all of the straps as you push the child restraint rearward and downward into the
seat. Remove slack in the straps according to the child restraint manufacturer’s
instructions.
5. Test that the child restraint is installed tightly by pulling back and forth on the child
seat at the belt path. It should not move more than 1 inch (25.4 mm) in any direction.
Installing The Child Restraint Using The Vehicle Seat Belts
Except for the center position in the third row, all of the seat belts in the passenger seating
positions are equipped with a Switchable Automatic Locking Retractor (ALR). The third
row center position is equipped with a cinching latch plate. Both types of seat belts are
designed to keep the lap portion of the seat belt tight around the child restraint. Any seat
belt system will loosen with time, so check the belt occasionally, and pull it tight if
necessary.
Tether Weight Limit
Always use the tether anchor when using the seat belt to install a forward facing child
restraint, up to the recommended weight limit of the child restraint.
To Install A Child Seat Using An ALR:
1. Pull enough of the seat belt webbing from the retractor to pass it through the belt path
of the child restraint. Do not twist the belt webbing in the belt path.
2. Slide the latch plate into the buckle until you hear a “click.”
3. Pull on the webbing to make the lap portion tight against the child seat.
4. To lock the seat belt, pull down on the shoulder part of the belt until you have pulled
all the seat belt webbing out of the retractor. Then, allow the webbing to retract back
into the retractor. As the webbing retracts, you will hear a clicking sound. This means
the seat belt is now in the Automatic Locking mode.
GETTING STARTED
23
Page 26 of 164

5. Try to pull the webbing out of the retractor. If it is locked, you should not be able to pull
out any webbing. If the retractor is not locked, repeat the last step.
6. Finally, pull up on any extra webbing to tighten the lap portion around the child
restraint while you push the child restraint rearward and downward into the vehicle
seat.
7. If the child restraint has a top tether strap and the seating position has a top tether
anchorage, connect the tether strap to the anchorage and tighten the tether strap. See
below for directions to attach a tether anchor.
8. Test that the child restraint is installed tightly by pulling back and forth on the child
seat at the belt path. It should not move more than 1 inch (25.4 mm) in any direction.
To Install A Child Seat Using A Cinching Latch Plate:
1. Place the child seat in the center of the seating position.
2. Next, pull enough of the seat belt webbing from the retractor to pass it through the belt
path of the child restraint. Do not twist the belt webbing in the belt path.
3. Slide the latch plate into the buckle until you hear a “click.”
4. Finally, pull up on any excess webbing to tighten the lap portion around the child
restraint while you push the child restraint rearward and downward into the vehicle
seat.
5. If the child restraint has a top tether strap and the seating position has a top tether
anchorage, connect the tether strap to the anchorage and tighten the tether strap. See
below for directions to attach a tether anchor.
6. Test that the child restraint is installed tightly by pulling back and forth on the child
seat at the belt path. It should not move more than 1 inch (25.4 mm) in any direction.
Installing The Top Tether Strap (With Either Lower Anchors Or Vehicle Seat Belt):
When installing a forward-facing child restraint, always secure the top tether strap, up to
the tether anchor weight limit, whether the child restraint is installed with the lower
anchors or the vehicle seat belt.
Tether Anchorage Installation
1. Route the tether strap to provide the most direct path for the strap between the anchor
and the child seat.
2. If your vehicle is equipped with adjustable rear head restraints, raise the head
restraint, and where possible, route the tether strap under the head restraint and
between the two posts. If not possible, lower the head restraint and pass the tether
strap around the outboard side of the head restraint.
GETTING STARTED
24
Page 27 of 164

3. Attach the tether strap hook of the child restraint to the top tether anchorage and
remove slack in the tether strap according to the child restraint manufacturer’s
instructions.
WARNING!
•Inacollision,anunrestrainedchild,evenatinybaby,canbecomeaprojectile
inside the vehicle. The force required to hold even an infant on your lap could
become so great that you could not hold the child, no matter how strong you are.
The child and others could be severely injured or killed. Any child riding in your
vehicle should be in a proper restraint for the child's size.
•Rearward-facingchildseatsmustneverbeusedinthefrontseatofavehiclewith
afrontpassengerairbag.Anairbagdeploymentcouldcausesevereinjuryordeath
to infants in this position.
•Onlyusearearward-facingchildrestraintinavehiclewitharearseat.
•ImproperinstallationofachildrestrainttotheLATCHanchoragescanleadto
failure of an infant or child restraint. The child could be severely injured or killed.
Follow the manufacturer’s directions exactly when installing an infant or child
restraint.
•Anincorrectlyanchoredtetherstrapcouldleadtoincreasedheadmotionand
possible injury to the child. Use only the anchor positions directly behind the child
seat to secure a child restraint top tether strap.
•Ifyourvehicleisequippedwithasplitrearseat,makesurethetetherstrapdoesnot
slip into the opening between the seatbacks as you remove slack in the strap.
Rear Seat Tether Strap Mounting (SecondRow Anchorage Shown)
LATCH Anchorages (Third Row 60/40 An-chorage Shown)
GETTING STARTED
25
Page 28 of 164

HEAD RESTRAINTS
Head restraints are designed to reduce the risk of injury by restricting head movement in
the event of a rear impact. Head restraints should be adjusted so that the top of the head
restraint is located above the top of your ear.
WARNING!
The head restraints for all occupants must be properly adjusted prior to operating the
vehicle or occupying a seat. Head restraints should never be adjusted while the vehicle
is in motion. Driving a vehicle with the head restraints improperly adjusted or removed
could cause serious injury or death in the event of a collision.
Active Head Restraints — Front Seats
Active Head Restraints are passive, deployable components, and vehicles with this
equipment cannot be readily identified by any markings, only through visual inspection of
the head restraint. The Active Head Restraints (AHR) will be split in two halves, with the
front half being soft foam and trim, the back half being decorative plastic.
When AHRs deploy during a rear impact, the front half of the head restraint extends
forward to minimize the gap between the back of the occupant’s head and the AHR. This
system is designed to help prevent or reduce the extent of injuries to the driver and front
passenger in certain types of rear impacts. Refer to “Occupant Restraints” in your Owner’s
Manual on the DVD for further information.
To r a i s e t h e h e a d r e s t r a i n t , p u l l u p w a r d o n t h e h e a d r e s t r a i n t . To l o w e r t h e h e a d r e s t r a i n t ,
press the push button, located at the base of the head restraint, and push downward on
the head restraint.
For comfort the Active Head Restraints can be tilted forward and rearward. To tilt the head
restraint closer to the back of your head, pull forward on the bottom of the head restraint.
Push rearward on the bottom of the head restraint to move the head restraint away from
your head.
NOTE:
•Theheadrestraintsshouldonlyberemovedbyqualifiedtechnicians,forservice
purposes only. If either of the head restraints require removal, see your authorized
dealer.
•IntheeventofdeploymentofanActiveHeadRestraint,referto“OccupantRestraints”
in your Owner’s Manual on the DVD for further information.
GETTING STARTED
26
Page 29 of 164

WARNING!
•DonotplaceitemsoverthetopoftheActiveHeadRestraint,suchascoats,seat
covers or portable DVD players. These items may interfere with the operation of the
Active Head Restraint in the event of a collision and could result in serious injury or
death.
•ActiveHeadRestraintsmaybedeployediftheyarestruckbyanobjectsuchasa
hand, foot or loose cargo. To avoid accidental deployment of the Active Head
Restraint ensure that all cargo is secured, as loose cargo could contact the Active
Head Restraint during sudden stops. Failure to follow this warning could cause
personal injury if the Active Head Restraint is deployed.
Head Restraints — Second Row Quad Seats
To r a i s e t h e h e a d r e s t r a i n t , p u l l u p w a r d o n t h e h e a d r e s t r a i n t . To l o w e r t h e h e a d r e s t r a i n t ,
press the push button, located at the base of the head restraint, and push downward on
the head restraint.
Head Restraints — Second Row Bench
If your vehicle is equipped with a second row bench seat, the head restraints are not
adjustable.
Head Restraints — Third Row
The head restraint in the center position can be raised and lowered for tether routing.
Refer to “Occupant Restraints” in your Owner’s Manual on the DVD for further informa-
tion.
GETTING STARTED
27
Page 30 of 164
FRONT SEATS
Power Seat
The power seat switch controls forward/back, up/down, and tilt adjustment.
The recline switch, located on the outboard side of the seat, controls seatback adjust-
ment.
Power Lumbar
•Pushtheswitchforwardtoincreasethe
lumbar support. Push the switch rear-
ward to decrease the lumbar support.
Power Seat Switches
1—LowerSeatSwitch2—ReclineSwitch3—PowerLumbarSwitch
GETTING STARTED
28
Page 31 of 164
Manual Seat Adjustment
Forward/Rearward
•Lift up on the adjusting bar located at the
front of the seat near the floor and release
it when the seat is at the desired position.
Then, using body pressure, move forward
and backward on the seat to be sure that
the seat adjusters have latched.
Recliner
•Liftthereclinerleverlocatedonthe
outboard side of the seat, lean back and
release at the desired position.
Seat Adjustment Locations
1—ReclinerLever2—Forward/RearwardAdjustingBar
GETTING STARTED
29
Page 32 of 164

Memory Seat
The memory seat feature allows you to save
two different driver seating positions, driv-
er's outside mirror, adjustable brake and
accelerator pedals, and radio station preset
settings. The memory seat buttons are lo-
cated on the driver's door panel.
To s e t a m e m o r y p o s i t i o n :
1. Cycle the vehicles ignition to the ON
position.
2. Adjust all memory profile settings.
3. Press and release the S (SET) button.
4. Press and release the 1 or 2 button within five seconds.
NOTE:
Before programming your RKE transmitters you must select the select “RKE Linked to
Memory” in the Electronic Vehicle Information Center (EVIC). Refer to “Programmable
Features” in “Electronics” for further information.
To p r o g r a m a K e y F o b t o t h e m e m o r y p o s i t i o n :
1. Cycle the vehicles ignition to the OFF position.
2. Select the desired memory profile 1 or 2.
3. Press and release the S (SET) button on the memory switch, then within five seconds
press and release the 1 or 2 button accordingly.
4. Press and release the LOCK button on the RKE transmitter within 10 seconds.
•Torecallthesavedpositions,press1or2onthememoryswitchorpressUNLOCKon
the programmed RKE transmitter.
CAUTION!
Do not place any article under a power seat or impede its ability to move as it may cause
damage to the seat controls. Seat travel may become limited if movement is stopped
by an obstruction in the seat’s path.
WARNING!
•Adjusting a seat while the vehicle is moving is dangerous. The sudden movement of the
seat could cause you to lose control. The seat belt might not be properly adjusted, and
you could be severely injured or killed. Only adjust a seat while the vehicle is parked.
•Donotridewiththeseatbackreclinedsothattheseatbeltisnolongerresting
against your chest. In a collision, you could slide under the seat belt and be severely
injured or killed. Use the recliner only when the vehicle is parked.
Memory Seat Button Location
GETTING STARTED
30
 1
1 2
2 3
3 4
4 5
5 6
6 7
7 8
8 9
9 10
10 11
11 12
12 13
13 14
14 15
15 16
16 17
17 18
18 19
19 20
20 21
21 22
22 23
23 24
24 25
25 26
26 27
27 28
28 29
29 30
30 31
31 32
32 33
33 34
34 35
35 36
36 37
37 38
38 39
39 40
40 41
41 42
42 43
43 44
44 45
45 46
46 47
47 48
48 49
49 50
50 51
51 52
52 53
53 54
54 55
55 56
56 57
57 58
58 59
59 60
60 61
61 62
62 63
63 64
64 65
65 66
66 67
67 68
68 69
69 70
70 71
71 72
72 73
73 74
74 75
75 76
76 77
77 78
78 79
79 80
80 81
81 82
82 83
83 84
84 85
85 86
86 87
87 88
88 89
89 90
90 91
91 92
92 93
93 94
94 95
95 96
96 97
97 98
98 99
99 100
100 101
101 102
102 103
103 104
104 105
105 106
106 107
107 108
108 109
109 110
110 111
111 112
112 113
113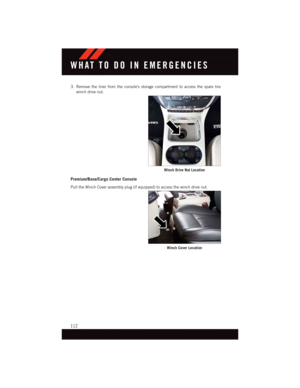 114
114 115
115 116
116 117
117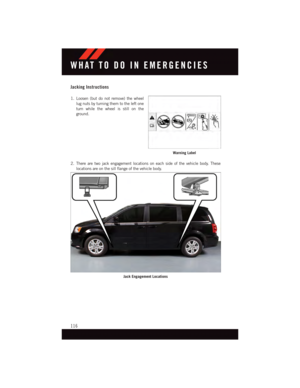 118
118 119
119 120
120 121
121 122
122 123
123 124
124 125
125 126
126 127
127 128
128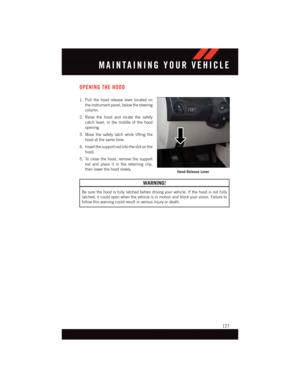 129
129 130
130 131
131 132
132 133
133 134
134 135
135 136
136 137
137 138
138 139
139 140
140 141
141 142
142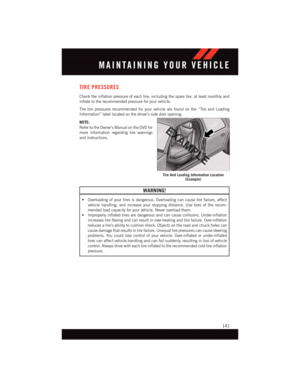 143
143 144
144 145
145 146
146 147
147 148
148 149
149 150
150 151
151 152
152 153
153 154
154 155
155 156
156 157
157 158
158 159
159 160
160 161
161 162
162 163
163
