2014 TESLA MODEL S Owner's manual (Europe)
-
 1
1 -
 2
2 -
 3
3 -
 4
4 -
 5
5 -
 6
6 -
 7
7 -
 8
8 -
 9
9 -
 10
10 -
 11
11 -
 12
12 -
 13
13 -
 14
14 -
 15
15 -
 16
16 -
 17
17 -
 18
18 -
 19
19 -
 20
20 -
 21
21 -
 22
22 -
 23
23 -
 24
24 -
 25
25 -
 26
26 -
 27
27 -
 28
28 -
 29
29 -
 30
30 -
 31
31 -
 32
32 -
 33
33 -
 34
34 -
 35
35 -
 36
36 -
 37
37 -
 38
38 -
 39
39 -
 40
40 -
 41
41 -
 42
42 -
 43
43 -
 44
44 -
 45
45 -
 46
46 -
 47
47 -
 48
48 -
 49
49 -
 50
50 -
 51
51 -
 52
52 -
 53
53 -
 54
54 -
 55
55 -
 56
56 -
 57
57 -
 58
58 -
 59
59 -
 60
60 -
 61
61 -
 62
62 -
 63
63 -
 64
64 -
 65
65 -
 66
66 -
 67
67 -
 68
68 -
 69
69 -
 70
70 -
 71
71 -
 72
72 -
 73
73 -
 74
74 -
 75
75 -
 76
76 -
 77
77 -
 78
78 -
 79
79 -
 80
80 -
 81
81 -
 82
82 -
 83
83 -
 84
84 -
 85
85 -
 86
86 -
 87
87 -
 88
88 -
 89
89 -
 90
90 -
 91
91 -
 92
92 -
 93
93 -
 94
94 -
 95
95 -
 96
96 -
 97
97 -
 98
98 -
 99
99 -
 100
100 -
 101
101 -
 102
102 -
 103
103 -
 104
104 -
 105
105 -
 106
106 -
 107
107 -
 108
108 -
 109
109 -
 110
110 -
 111
111 -
 112
112 -
 113
113 -
 114
114 -
 115
115 -
 116
116 -
 117
117 -
 118
118 -
 119
119 -
 120
120 -
 121
121 -
 122
122 -
 123
123 -
 124
124 -
 125
125 -
 126
126 -
 127
127 -
 128
128 -
 129
129 -
 130
130 -
 131
131 -
 132
132 -
 133
133 -
 134
134 -
 135
135 -
 136
136 -
 137
137 -
 138
138 -
 139
139 -
 140
140 -
 141
141 -
 142
142 -
 143
143 -
 144
144 -
 145
145 -
 146
146 -
 147
147 -
 148
148 -
 149
149 -
 150
150 -
 151
151
 Rear Trunk
OPENING AND CLOSING2.9
Interior Release
To open the trunk from inside Model S, press
the interior release switch and push the liftgate
up.
If Model S is equipped with the optional tech
p")
 Front TrunkFront Trunk
2.10MODEL S OWNERS MANUAL
Front TrunkOpening
To open the front trunk:
•To u c h Controls > Front Trunk on the
touchscreen, or double-click the front trunk
button on the ke")
 Front Trunk
OPENING AND CLOSING2.11
Interior Emergency Release
An interior release button inside the front trunk
allows a person locked inside to get out. This
release button is active whenever Mode")
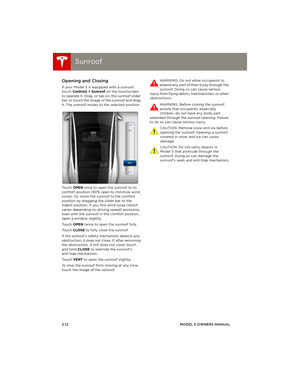
 SunroofSunroof
2.12MODEL S OWNERS MANUAL
SunroofOpening and Closing
If your Model S is equipped with a sunroof,
touch Controls > Sunroof on the touchscreen
to operate it. Drag, or tap on, the sunroo")
 Glove Box
OPENING AND CLOSING2.13
Glove BoxOpening and Closing
To open the glove box, press the switch located
to the right of the touchscreen. If you leave the
glove box open for five minutes, its")
 Cup HoldersCup Holders
2.14MODEL S OWNERS MANUAL
Cup HoldersOpening and Closing
To expose a cup holder, slide back the armrest.
book.book Page 14 Friday, July 19, 2013 12:53 PM")
 3.1
SEATING AND SAFETY RESTRAINTS
Front and Rear Seats
Correct Driving Position ................................ 3.2
Adjusting the Driver’s Seat ........................... 3.2
Folding Rear Seats...")
 Front and Rear SeatsFront and Rear Seats
3.2MODEL S OWNERS MANUAL
SEATING AND SAFETY RESTRAINTS
Front and Rear SeatsCorrect Driving Position
The seat, head support, seat belt and airbags
work togethe")