Page 57 of 152
 Park Assist
DRIVING4.17 CAUTION: Keep sensors clean from dirt,
debris, snow, and ice. Avoid using a high
pressure power washer on the sensors
and do not clean a sensor with a sharp or
abrasive obj")
Park Assist
DRIVING4.17 CAUTION: Keep sensors clean from dirt,
debris, snow, and ice. Avoid using a high
pressure power washer on the sensors
and do not clean a sensor with a sharp or
abrasive object that can scratch or
damage its surface.
CAUTION: Do not install accessories or
stickers on or near the parking sensors.
Controlling Audible Feedback
You can use Park Assist with or without audible
feedback. To turn chimes on or off, touch
Controls > Settings > Safety & Security > Park
Assist Chimes.
You can also mute the chimes temporarily by
pressing the scroll wheel on the left side of the
steering wheel. The chimes are muted until you
shift into a different gear or drive over
4.8 km/h.
Limitations and False Warnings
The parking sensors may not function correctly
in these situations:
•One or more of the parking sensors is
damaged, dirty, or covered (such as mud,
ice, or snow).
•Object is located below approximately
20 cm (such as a curb or low barrier).
•Weather conditions (heavy rain, snow, or
fog) are interfering with sensor operation.
•Object is thin (such as a sign post).
•A sensor’s operating range has been
exceeded.
•Object is sound-absorbing or soft (such as
powder snow).
•Object is sloped (such as a sloped
embankment).
•Model S has been parked in, or is being
driven in, extremely hot or cold
temperatures.
•The sensors are affected by other electrical
equipment or devices that generate
ultrasonic waves.
•Object is located too close to the bumper.
•A bumper is misaligned or damaged.
•An object that is mounted to Model S is
interfering with and/or obstructing the
sensor (such as a bike rack or a bumper
sticker).
Other Parking Aids
In addition to Park Assist, when shifted into
Reverse gear, the backup camera displays a
view of the area behind Model S. See
page 4.24.
book.book Page 17 Friday, July 19, 2013 12:53 PM
Page 58 of 152
Trip InformationTrip Information
4.18MODEL S OWNERS MANUAL
Tr i p I n f o r m a t i o nDisplaying Trip Information
Trip information displays on the touchscreen
when you touch Controls > Trips. There are two
trip meters available, A and B. To reset a
particular trip meter, touch its associated
RESET.
NOTE: You can also display range and trip
information on the instrument panel (see
page 4.3).,
book.book Page 18 Friday, July 19, 2013 12:53 PM
Page 59 of 152
 Energy Usage
DRIVING4.19
Energy UsageDisplaying Energy Usage
Touch the Energy app on the top of the
touchscreen to display a graph showing
how much energy Model S has been
using.
The graph visuall")
Energy Usage
DRIVING4.19
Energy UsageDisplaying Energy Usage
Touch the Energy app on the top of the
touchscreen to display a graph showing
how much energy Model S has been
using.
The graph visually shows energy consumption
and projected range. The projected range is
based on consumption over the last tenth of a
mile.
Heavy acceleration and high speed driving
cause peaks on the graph as Model S uses more
energy. Slowing down causes dips. Points at
which more energy was gained than used
(causing surplus energy to be regenerated and
fed back to the battery) are shown in green.
To change the graph’s scale, use standard
touchscreen finger gestures to pinch or expand
the display. You can show the energy used over
the past 10, 25, or 50 km. You can also change
the graph’s scale by touching Controls >
Settings > Apps > Energy.
NOTE: You can also display this graph on the
instrument panel by using the scroll button on
the steering wheel (see page 4.3).
Driving Tips to Maximize Range
Maximizing your driving range uses the same
driving habits that you use to conserve fuel in a
gasoline-powered vehicle.
Energy consumption depends on driving habits
and environmental conditions (such as cold
weather and hilly roads). To get the maximum
mileage from a charge, you should:
•Keep in mind that driving at high speeds
(such as on a freeway) decreases range.
•Avoid frequent and rapid acceleration.
•Instead of using the brake to slow down,
move your foot off the accelerator.
Whenever M odel S is moving and your foot
is off the accelerator, regenerative braking
slows down Model S and feeds surplus
energy back to the Battery (see page 4.21).
•Keep tires at the recommended inflation
pressures (see page 7.3).
•Lighten your load by removing any
unnecessary cargo.
•Limit the use of resources such as heating
and air conditioning. Using seat heaters to
keep warm is more efficient than heating
the cabin.
The power meter on the instrument panel and
the Energy app (see page 4.19) provide
feedback on energy usage. With this feedback,
you will soon become familiar with how driving
habits and environmental conditions impact
how much energy Model S is using.
book.book Page 19 Friday, July 19, 2013 12:53 PM
Page 60 of 152
 BrakesBrakes
4.20MODEL S OWNERS MANUAL
BrakesBraking Systems
Model S has an anti-lock braking system (ABS)
that prevents the wheels from locking when
you apply maximum brake pressure. This
improves")
BrakesBrakes
4.20MODEL S OWNERS MANUAL
BrakesBraking Systems
Model S has an anti-lock braking system (ABS)
that prevents the wheels from locking when
you apply maximum brake pressure. This
improves steering control during heavy braking
in most road conditions.
During emergency braking conditions, the ABS
constantly monitors the speed of each wheel
and varies the brake pressure according to the
grip available.
The alteration of brake pressure can be felt as a
pulsing sensation through the brake pedal. This
demonstrates that ABS is operating and is not
a cause for concern. Keep firm and steady
pressure on the brake pedal while experiencing
the pulsing.
The ABS indicator flashes briefly on the
instrument panel when you first start
Model S. If this indicator displays at any
other time, an ABS fault has occurred
and ABS is not operating. Contact Tesla.
The braking system remains fully
operational and is not affected by an
ABS failure. However, braking distances
may increase.
If the instrument panel displays this
indicator at any time other than
displaying briefly when you first start
Model S, a brake system fault is
detected or the brake fluid level is low.
Contact Tesla immediately.
Emergency Braking
In an emergency, fully press the brake pedal
and maintain firm pressure, even on low
traction surfaces. ABS varies the braking
pressure to each wheel according to the
amount of traction available. This prevents
wheels from locking and ensures that you stop
as safely as possible.
WARNING: Do not pump the brake pedal.
Doing so interrupts operation of the ABS
and can increase braking distance.
WARNING: Always maintain a safe
distance from the vehicle in front of you
and be aware of hazardous driving conditions.
While ABS can improve stopping distance, it
cannot overcome the laws of physics. It also
does not prevent the danger of hydroplaning
(where a layer of water prevents direct contact
between the tires and the road).
Brake Wear
Model S brake pads are equipped with wear
indicators. A wear indicator is a thin metal strip
attached to the brake pad that squeals as it
rubs against the rotor when the pad wears
down. This squealing sound indicates that the
brake pads have reached the end of their
service life and require replacement. To stop
the squealing, contact Tesla Service.
Brakes must be periodically inspected visually
by removing the tire and wheel. For detailed
specifications and service limits for rotors and
brake pads, see page 8.6.
WARNING: Neglecting to replace worn
brake pads will result in damage to the
braking system and can create a braking
hazard.
book.book Page 20 Friday, July 19, 2013 12:53 PM
Page 61 of 152
 Brakes
DRIVING4.21
Regenerative Braking
Whenever Model S is moving and your foot is
off the accelerator, regenerative braking slows
down Model S and feeds any surplus energy
back to the Battery.
By")
Brakes
DRIVING4.21
Regenerative Braking
Whenever Model S is moving and your foot is
off the accelerator, regenerative braking slows
down Model S and feeds any surplus energy
back to the Battery.
By anticipating your stops and simply removing
your foot from the accelerator to slow down,
you can take advantage of regenerative
braking to increase driving range. Of course,
this is no substitute for regular braking when
needed for safety.
NOTE: If regenerative braking is aggressively
slowing Model S, such as on a steep descent,
brake lights turn on to alert other road users
that you are slowing down.
The power meter on the instrument panel
displays real-time feedback on the amount of
energy being gained by regenerative braking.
The amount of energy fed back to the Battery
using regenerative braking can depend on the
current state of the Battery and the charge
level setting that you are using. If regenerative
braking is limited, a dashed yellow line displays
on the power meter. For example, regenerative
braking may be limited if the Battery is
extremely hot or cold because the surplus
energy is used to cool or heat the Battery.
Regenerative braking is also limited if the
Battery is already fully charged.
To Set the Regenerative Braking Level
You can use the touchscreen to change the
level of regenerative braking:
1.Touch Controls.
2.Choose from two levels:
•Standard - provides the maximum
amount of regenerative braking. When
you release the accelerator, Model S slows
down faster, reducing the need to use the
brakes.
•Low - limits the amount of regenerative
braking. When you release the
accelerator, Model S takes longer to slow
down and coasts further.
NOTE: Regenerative braking resets to Standard
each time you start Model S.
Parking Brake
The parking brake automatically engages
whenever you shift Model S into Park, and
releases whenever you shift into any other gear.
NOTE: The parking brake operates on the rear
wheels only, and is independent of the
foot-operated brake system.
Use the touchscreen to manually release the
parking brake (which also shifts Model S into
Neutral):
1.Touch Controls > E-Brake & Power Off.
2.Press the brake pedal, then touch Parking
Brake. If Model S was previously in Park, it
shifts into Neutral.
The parking brake indicator displays on
the instrument panel whenever you use
the touchscreen to manually apply the
parking brake.
If an electrical issue occurs with the
parking brake, an amber parking brake
fault message displays at the top center
of the touchscreen.
CAUTION: In the unlikely event that
Model S loses electrical power, you
cannot release the parking brake.
book.book Page 21 Friday, July 19, 2013 12:53 PM
Page 62 of 152
 Traction ControlTraction Control
4.22MODEL S OWNERS MANUAL
Tr a c t i o n C o n t r o lHow It Works
The traction control system constantly
monitors the difference in speed between the
front and rea")
Traction ControlTraction Control
4.22MODEL S OWNERS MANUAL
Tr a c t i o n C o n t r o lHow It Works
The traction control system constantly
monitors the difference in speed between the
front and rear wheels. If Model S experiences a
loss of traction, the traction control system
minimizes wheel spin by controlling brake
pressure and motor power.
The electronic stability control indicator
displays on the instrument panel
whenever the traction control system is
actively controlling brake pressure and
motor power.
WARNING: Traction control does not
prevent accidents caused by driving
dangerously or turning too sharply at high
speeds.
Turning Off
Under normal conditions, you should leave
traction control on. Turn it off only in
circumstances where you deliberately want the
wheels to spin, such as:
•Starting on a loose surface, such as gravel
or snow.
•Driving in deep snow, sand or mud.
•Rocking out of a hole or deep rut.
To turn traction control off, touch
Controls > Driving > Traction Control > Off.
The Traction Control Off indicator
displays at the top center of the
touchscreen whenever the traction
control system is turned off.
Although traction control turns on again
automatically the next time you start Model S,
turn it on using the touchscreen as soon as the
circumstances that required you to turn it off
have passed.
TC
book.book Page 22 Friday, July 19, 2013 12:53 PM
Page 63 of 152
 Cruise Control
DRIVING4.23
Cruise ControlOperating Cruise Control
Cruise control makes it easy for you to maintain
a consistent speed without holding your foot
on the accelerator. This is useful whe")
Cruise Control
DRIVING4.23
Cruise ControlOperating Cruise Control
Cruise control makes it easy for you to maintain
a consistent speed without holding your foot
on the accelerator. This is useful when driving at
the same speed over a long distance.
You must be driving over 32 km/h to operate
cruise control.
WARNING: Do not use cruise control on
winding or slippery road surfaces, or
when traffic conditions make it unsafe to drive
at a consistent speed.
To operate cruise control:
1.When driving over 32 km/h, touch the end
of the cruise control lever. The light on the
lever turns on.
2.Accelerate until you reach your desired
cruising speed.
3.Move the cruise control lever up or down,
then release.
The instrument panel displays the Cruise On
message above the speedometer and a white
arrow on the speedometer shows your set
speed.
You can accelerate at any time when driving at
a set speed in cruise control. But when you
release the accelerator, your speed returns to
the set speed.
WARNING: Driving downhill can increase
driving speed, causing Model S to exceed
your set speed.
Changing the Cruising Speed
Move the cruise control lever up (increase) or
down (decrease).
•Push the lever up/down to the first position
and release to increase/decrease speed by
1mph.
•Push the lever up/down to the second
position and release to increase/decrease
speed by 8 km/h.
•Hold the lever up or down to
increase/decrease the speed in 3 km/h
increments until your desired speed is
reached.
NOTE: It may take a few seconds for Model S to
reach the new cruising speed. If you decrease
the set speed to less than 32 km/h, cruise
control cancels and the set speed clears.
Canceling and Resuming
Cruise control cancels automatically if you:
•Press the brake.
•Drive below 32 km/h.
•Shift out of Drive.
To cancel cruise control manually, briefly push
the cruise control lever away from you. The
message on the instrument panel turns off, but
the set speed remains displayed until Model S
powers off.
To resume cruising at the previously set speed,
briefly pull the cruise control lever toward you.
Cruise control resumes only if driving over 32
km/h.
book.book Page 23 Friday, July 19, 2013 12:53 PM
Page 64 of 152
Rear View CameraRear View Camera
4.24MODEL S OWNERS MANUAL
Rear View CameraCamera Location
Model S is equipped with a rear view camera
located above the rear license plate.
Whenever you shift into Reverse, the
touchscreen displays the view from the camera.
NOTE: If Model S is equipped with the optional
Park Assist feature, visual feedback from the
parking sensors displays below the camera
image. See page 4.16.
WA R N I N G : T h e c a m e r a m a y n o t d e t e c t
overhanging objects or barriers that can
potentially cause damage or injury.
Cleaning the Camera
To ensure a clear picture, keep the camera lens
clean and free of obstructions. Remove any
buildup of dirt by occasionally wiping the
camera lens with a soft damp cloth.
CAUTION: Do not use chemical-based or
abrasive cleaners that can scour the
surface of the camera lens.
book.book Page 24 Friday, July 19, 2013 12:53 PM
 1
1 2
2 3
3 4
4 5
5 6
6 7
7 8
8 9
9 10
10 11
11 12
12 13
13 14
14 15
15 16
16 17
17 18
18 19
19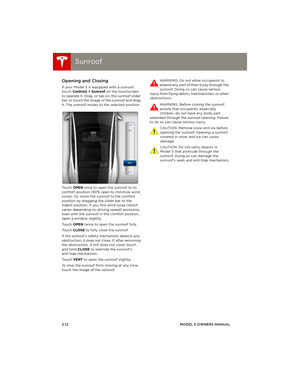 20
20 21
21 22
22 23
23 24
24 25
25 26
26 27
27 28
28 29
29 30
30 31
31 32
32 33
33 34
34 35
35 36
36 37
37 38
38 39
39 40
40 41
41 42
42 43
43 44
44 45
45 46
46 47
47 48
48 49
49 50
50 51
51 52
52 53
53 54
54 55
55 56
56 57
57 58
58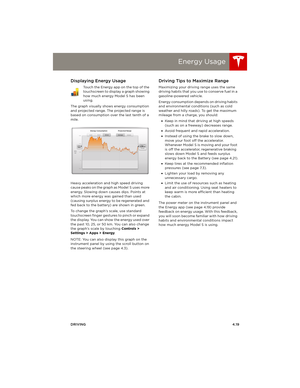 59
59 60
60 61
61 62
62 63
63 64
64 65
65 66
66 67
67 68
68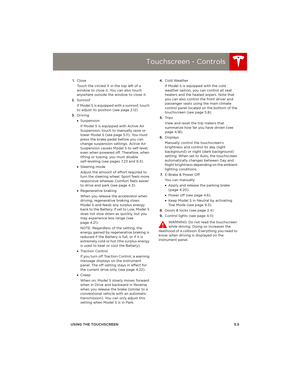 69
69 70
70 71
71 72
72 73
73 74
74 75
75 76
76 77
77 78
78 79
79 80
80 81
81 82
82 83
83 84
84 85
85 86
86 87
87 88
88 89
89 90
90 91
91 92
92 93
93 94
94 95
95 96
96 97
97 98
98 99
99 100
100 101
101 102
102 103
103 104
104 105
105 106
106 107
107 108
108 109
109 110
110 111
111 112
112 113
113 114
114 115
115 116
116 117
117 118
118 119
119 120
120 121
121 122
122 123
123 124
124 125
125 126
126 127
127 128
128 129
129 130
130 131
131 132
132 133
133 134
134 135
135 136
136 137
137 138
138 139
139 140
140 141
141 142
142 143
143 144
144 145
145 146
146 147
147 148
148 149
149 150
150 151
151 Trip InformationTrip Information
4.18MODEL S OWNERS MANUAL
Tr i p I n f o r m a t i o nDisplaying Trip Information
Trip information displays on the touchscreen
when you touch Controls > Trips. There")
 Rear View CameraRear View Camera
4.24MODEL S OWNERS MANUAL
Rear View CameraCamera Location
Model S is equipped with a rear view camera
located above the rear license plate.
Whenever you shift into Re")