2014 NISSAN TEANA fuse diagram
[x] Cancel search: fuse diagramPage 4667 of 4801

WCS
POWER SUPPLY AND GROUND CIRCUITWCS-25
< DTC/CIRCUIT DIAGNOSIS >
C
D E
F
G H
I
J
K L
M B
A
O P
DTC/CIRCUIT DIAGNOSIS
POWER SUPPLY AND GROUND CIRCUIT
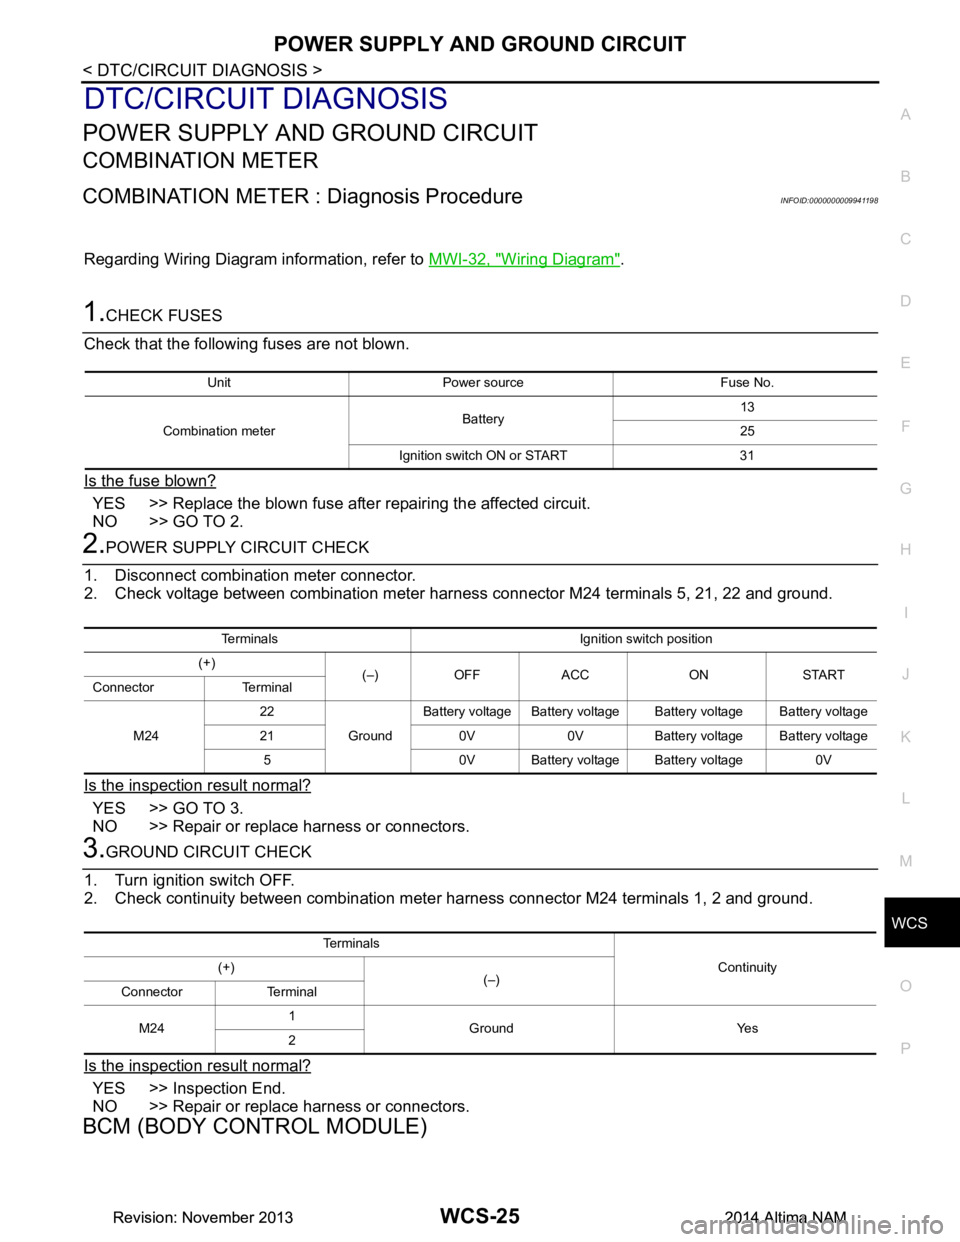
COMBINATION METER
COMBINATION METER : Diagnosis ProcedureINFOID:0000000009941198
Regarding Wiring Diagram information, refer to MWI-32, "Wiring Diagram".
1.CHECK FUSES
Check that the following fuses are not blown.
Is the fuse blown?
YES >> Replace the blown fuse after repairing the affected circuit.
NO >> GO TO 2.
2.POWER SUPPLY CIRCUIT CHECK
1. Disconnect combination meter connector.
2. Check voltage between combination meter harnes s connector M24 terminals 5, 21, 22 and ground.
Is the inspection result normal?
YES >> GO TO 3.
NO >> Repair or replace harness or connectors.
3.GROUND CIRCUIT CHECK
1. Turn ignition switch OFF.
2. Check continuity between combination mete r harness connector M24 terminals 1, 2 and ground.
Is the inspection result normal?
YES >> Inspection End.
NO >> Repair or replace harness or connectors.
BCM (BODY CONTROL MODULE)
Unit Power source Fuse No.
Combination meter Battery 13
25
Ignition switch ON or START 31
Terminals Ignition switch position
(+) (–) OFF ACC ON START
Connector Terminal
M24 22
GroundBattery voltage Battery voltage Battery voltage Battery voltage
21 0V 0V Battery voltage Battery voltage 5 0V Battery voltage Battery voltage 0V
Te r m i n a l s Continuity
(+)
(–)
Connector Terminal
M24 1
Ground Yes
2
Revision: November 20132014 Altima NAMRevision: November 20132014 Altima NAM
Page 4668 of 4801

WCS-26
< DTC/CIRCUIT DIAGNOSIS >
POWER SUPPLY AND GROUND CIRCUIT
BCM (BODY CONTROL MODULE) : Diagnosis Procedure
INFOID:0000000009941194
Regarding Wiring Diagram information, refer to BCS-55, "Wiring Diagram".
1. CHECK FUSE AND FUSIBLE LINK
Check that the following fuse and fusible link are not blown.
Is the fuse or fusible link blown?
YES >> Replace the blown fuse or fusible link after repairing the affected circuit.
NO >> GO TO 2
2. CHECK POWER SUPPLY CIRCUIT
1. Disconnect BCM connector M21.
2. Check voltage between BCM connector M21 terminals 131, 139 and ground.
Is the inspection result normal?
YES >> GO TO 3
NO >> Repair or replace harness or connectors.
3. CHECK GROUND CIRCUIT
Check continuity between BCM connector M21 terminals 134, 143 and ground.
Is the inspection result normal?
YES >> Inspection End.
NO >> Repair or replace harness or connectors.
Terminal No. Signal name Fuse and fusible link No.
139 Fusible link battery power I (40A)
131 BCM battery fuse 1 (10A)
BCM GroundVo l ta g e
(Approx.)
Connector Terminal
M21 131
— Battery voltage
139
BCM Ground Continuity
Connector Terminal
M21 134
—Yes
143
Revision: November 20132014 Altima NAMRevision: November 20132014 Altima NAM
Page 4736 of 4801

WW-1
DRIVER CONTROLS
C
D E
F
G H
I
J
K
M
SECTION WW
A
B
WW
N
O P
CONTENTS
WIPER & WASHER
PRECAUTION ................ ...............................3
PRECAUTIONS .............................................. .....3
Precaution for Supplemental Restraint System
(SRS) "AIR BAG" and "SEAT BELT PRE-TEN-
SIONER" ............................................................. ......
3
Precaution for Procedure without Cowl Top Cover ......3
SYSTEM DESCRIPTION ..............................4
FRONT WIPER AND WASHER SYSTEM ..... .....4
Component Parts Location .................................. ......4
Component Description ............................................5
SYSTEM ..............................................................6
System Diagram .................................................. ......6
System Description ...................................................6
Fail-Safe ....................................................................9
DIAGNOSIS SYSTEM (BCM) ............................10
COMMON ITEM ..................................................... ....10
COMMON ITEM : CONSULT Function (BCM -
COMMON ITEM) ................................................. ....
10
WIPER ................................................................... ....11
WIPER : CONSULT Function (BCM - WIPER) .......11
DIAGNOSIS SYSTEM (IPDM E/R) .....................12
Diagnosis Description ......................................... ....12
CONSULT Function (IPDM E/R) .............................13
ECU DIAGNOSIS INFORMATION ..............16
BCM, IPDM E/R .............................................. ....16
List of ECU Reference ........................................ ....16
WIRING DIAGRAM ......................................17
FRONT WIPER AND WASHER SYSTEM ..... ....17
Wiring Diagram - Without Rear View Camera
Washer Control System ...................................... ....
17
Wiring Diagram - With Rear View Camera Washer
Control System .................................................... ....
23
BASIC INSPECTION ...................................31
DIAGNOSIS AND REPAIR WORKFLOW ........31
Work Flow ............................................................ ....31
DTC/CIRCUIT DIAGNOSIS .........................33
WIPER AND WASHER FUSE ...........................33
Description ........................................................... ....33
Diagnosis Procedure ...............................................33
FRONT WIPER MOTOR LO CIRCUIT ..............34
Component Function Check ....................................34
Diagnosis Procedure ...............................................34
FRONT WIPER MOTOR HI CIRCUIT ...............36
Component Function Check ....................................36
Diagnosis Procedure ...............................................36
FRONT WIPER AUTO STOP SIGNAL CIR-
CUIT ..................................................................
38
Component Function Check ................................ ....38
Diagnosis Procedure ...............................................38
FRONT WIPER MOTOR GROUND CIRCUIT ...39
Diagnosis Procedure ...............................................39
WASHER MOTOR CIRCUIT .............................40
Diagnosis Procedure ...............................................40
WASHER SWITCH ............................................44
Description ...............................................................44
Component Inspection .............................................44
SYMPTOM DIAGNOSIS ..............................45
WIPER AND WASHER SYSTEM SYMPTOMS
...
45
Symptom Table ................................................... ....45
Revision: November 20132014 Altima NAMRevision: November 20132014 Altima NAM
Page 4775 of 4801

WW-40
< DTC/CIRCUIT DIAGNOSIS >
WASHER MOTOR CIRCUIT
WASHER MOTOR CIRCUIT
Diagnosis ProcedureINFOID:0000000009464621
WITHOUT REAR VIEW CAMERA WASHER CONTROL SYSTEM
Regarding Wiring Diagram information, refer to WW-17, "Wiring Diagram - Without Rear View Camera
Washer Control System".
1. CHECK FRONT WASHER MOTOR FUSE
1. Turn the ignition switch OFF.
2. Check that the following fuse is not blown.
Is the fuse blown?
YES >> Replace the blown fuse after repairing the affected circuit.
NO >> GO TO 2.
2. CHECK FRONT WASHER MOTOR POWER SUPPLY
1. Disconnect front washer motor.
2. Turn ignition switch ON.
3. Check voltage between front washer motor harness connector E226 and ground.
Is the inspection result normal?
YES >> GO TO 3.
NO >> Repair or replace the harness or connectors.
3. CHECK FRONT WASHER MOTOR CIRCUIT CONTINUITY
1. Turn the ignition switch OFF.
2. Disconnect combination switch (wiper and washer switch).
3. Check continuity between combination switch (wiper and washer switch) harness connector M28 and
front washer motor E226.
Is the inspection result normal?
YES >> GO TO 4.
NO >> Repair or replace the harness or connectors.
4. CHECK WIPER AND WASHER SWITCH GROUND CIRCUIT
Check continuity between combination switch (wiper and washer switch) harness connector M28 and ground.
Is the inspection result normal?
YES >> GO TO 5.
NO >> Repair or replace the harness or connectors.
Unit Location Fuse No. Capacity
Front washer motor IPDM E/R 50 10A
Front washer motor
GroundVo l ta g e
(Approx.)
Connector Terminal
E226 1 Battery voltage
Combination switch (wiper and washer switch) Front washer motor Continuity
Connector Terminal Connector Terminal
M281E2262 Yes
Combination switch (wiper and washer switch) GroundContinuity
Connector Terminal
M28 6 Yes
Revision: November 20132014 Altima NAMRevision: November 20132014 Altima NAM
Page 4776 of 4801

WASHER MOTOR CIRCUITWW-41
< DTC/CIRCUIT DIAGNOSIS >
C
D E
F
G H
I
J
K
M A
B
WW
N
O P
5. CHECK WIPER AND WASHER SWITCH
Check wiper and washer switch. Refer to WW-44, "Component Inspection"
.
Is the inspection result normal?
YES >> Replace front washer motor. Refer to WW-52, "Removal and Installation".
NO >> Replace wiper and washer switch. Refer to WW-65, "Removal and Installation"
.
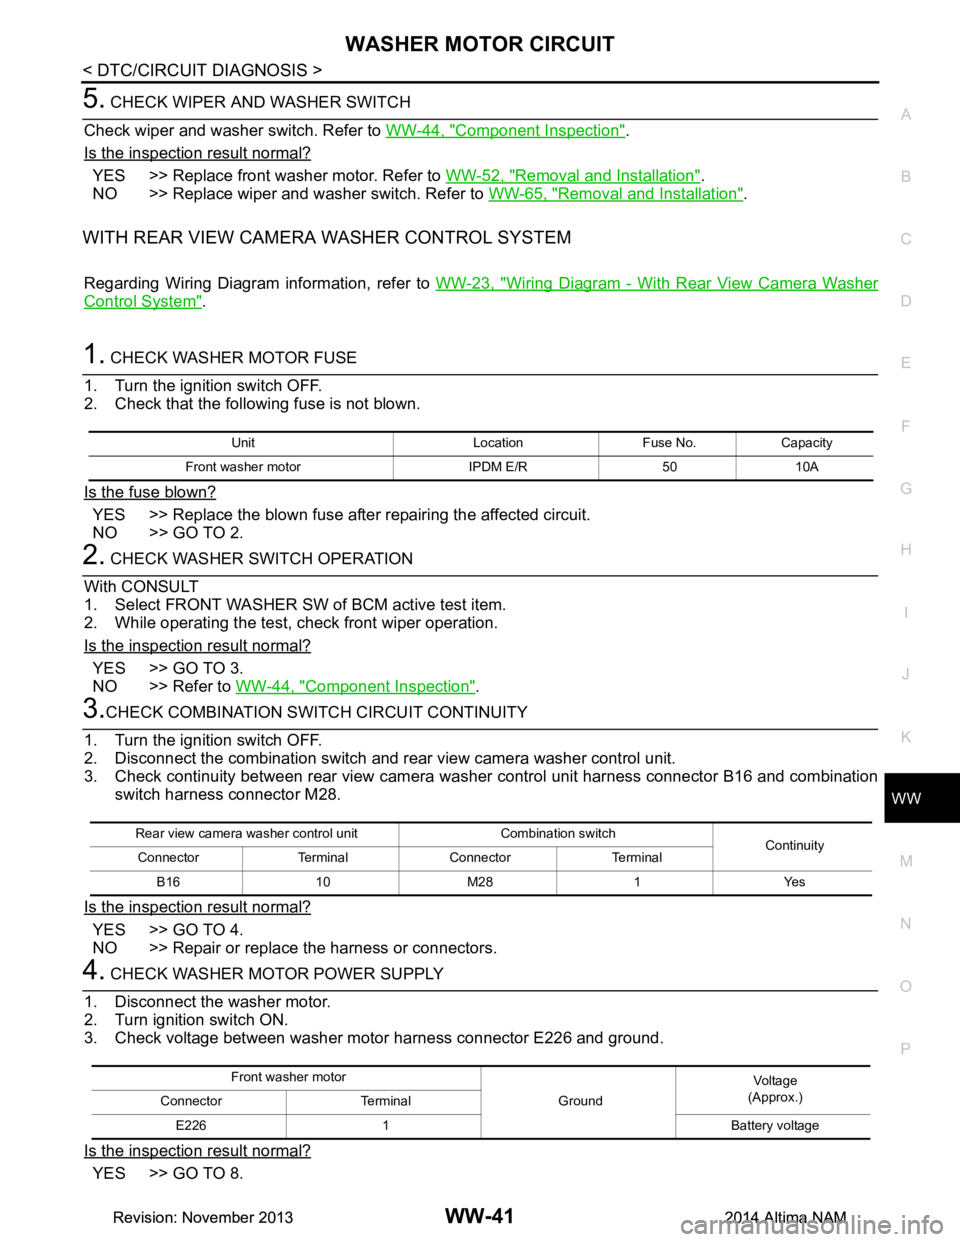
WITH REAR VIEW CAMERA WASHER CONTROL SYSTEM
Regarding Wiring Diagram information, refer to WW-23, "Wiring Diagram - With Rear View Camera Washer
Control System".
1. CHECK WASHER MOTOR FUSE
1. Turn the ignition switch OFF.
2. Check that the following fuse is not blown.
Is the fuse blown?
YES >> Replace the blown fuse after repairing the affected circuit.
NO >> GO TO 2.
2. CHECK WASHER SWITCH OPERATION
With CONSULT
1. Select FRONT WASHER SW of BCM active test item.
2. While operating the test, check front wiper operation.
Is the inspection result normal?
YES >> GO TO 3.
NO >> Refer to WW-44, "Component Inspection"
.
3.CHECK COMBINATION SWITCH CIRCUIT CONTINUITY
1. Turn the ignition switch OFF.
2. Disconnect the combination switch and rear view camera washer control unit.
3. Check continuity between rear view camera was her control unit harness connector B16 and combination
switch harness connector M28.
Is the inspection result normal?
YES >> GO TO 4.
NO >> Repair or replace the harness or connectors.
4. CHECK WASHER MOTOR POWER SUPPLY
1. Disconnect the washer motor.
2. Turn ignition switch ON.
3. Check voltage between washer motor harness connector E226 and ground.
Is the inspection result normal?
YES >> GO TO 8.
Unit Location Fuse No. Capacity
Front washer motor IPDM E/R 50 10A
Rear view camera washer control unit Combination switch Continuity
Connector Terminal Connector Terminal
B16 10 M28 1 Yes
Front washer motor GroundVoltag e
(Approx.)
Connector Terminal
E226 1 Battery voltage
Revision: November 20132014 Altima NAMRevision: November 20132014 Altima NAM
Page 4779 of 4801

WW-44
< DTC/CIRCUIT DIAGNOSIS >
WASHER SWITCH
WASHER SWITCH
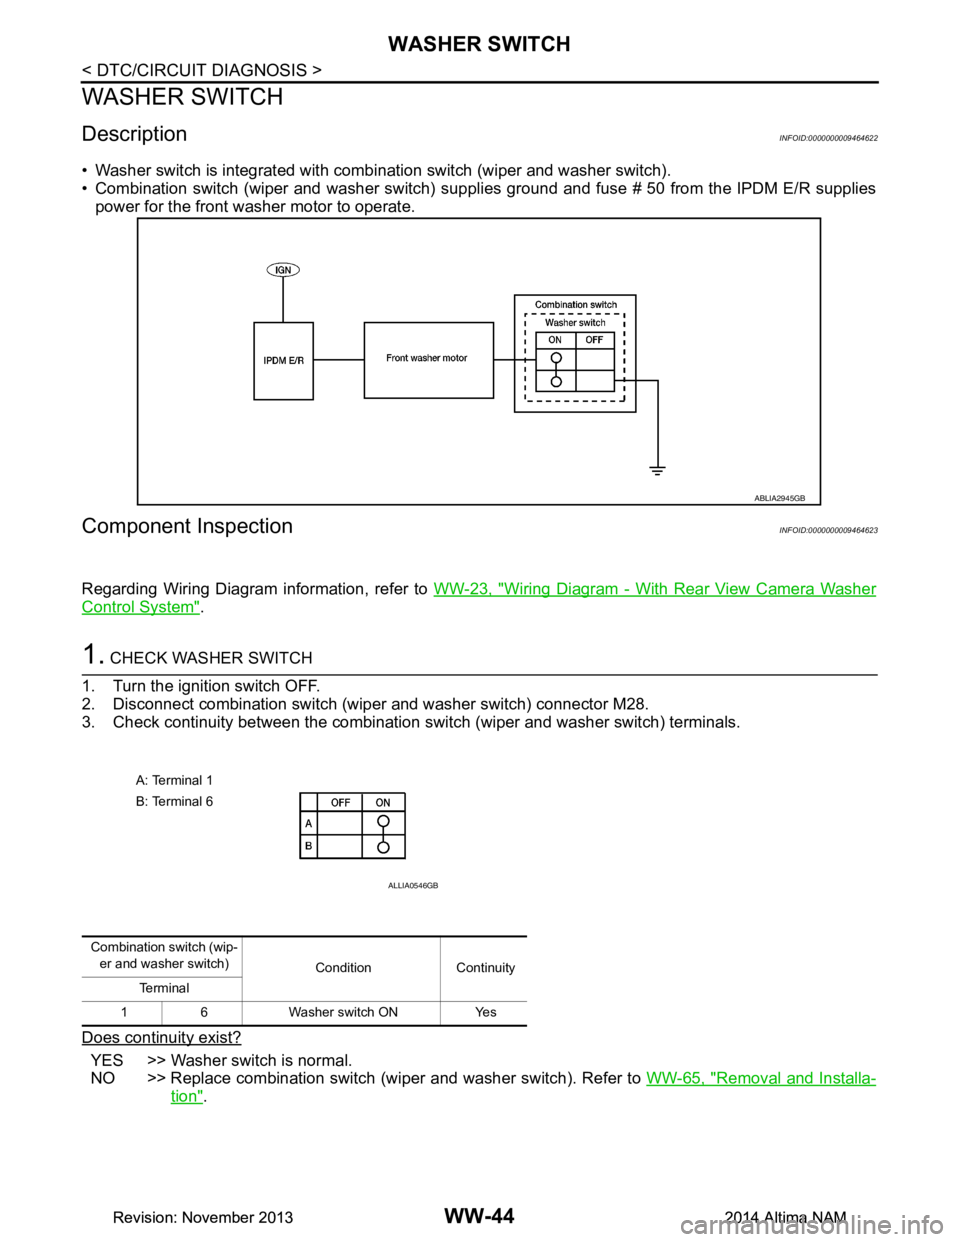
DescriptionINFOID:0000000009464622
• Washer switch is integrated with combination switch (wiper and washer switch).
• Combination switch (wiper and washer switch) supp lies ground and fuse # 50 from the IPDM E/R supplies
power for the front washer motor to operate.
Component InspectionINFOID:0000000009464623
Regarding Wiring Diagram information, refer to WW-23, "Wiring Diagram - With Rear View Camera Washer
Control System".
1. CHECK WASHER SWITCH
1. Turn the ignition switch OFF.
2. Disconnect combination switch (wiper and washer switch) connector M28.
3. Check continuity between the combination switch (wiper and washer switch) terminals.
Does continuity exist?
YES >> Washer switch is normal.
NO >> Replace combination switch (wiper and washer switch). Refer to WW-65, "Removal and Installa-
tion".
ABLIA2945GB
A: Terminal 1
B: Terminal 6
ALLIA0546GB
Combination switch (wip- er and washer switch) Condition Continuity
Te r m i n a l
1 6 Washer switch ON Yes
Revision: November 20132014 Altima NAMRevision: November 20132014 Altima NAM
Page 4783 of 4801

WW-48
< SYMPTOM DIAGNOSIS >
FRONT WIPER DOES NOT OPERATE
FRONT WIPER DOES NOT OPERATE
DescriptionINFOID:0000000009464625
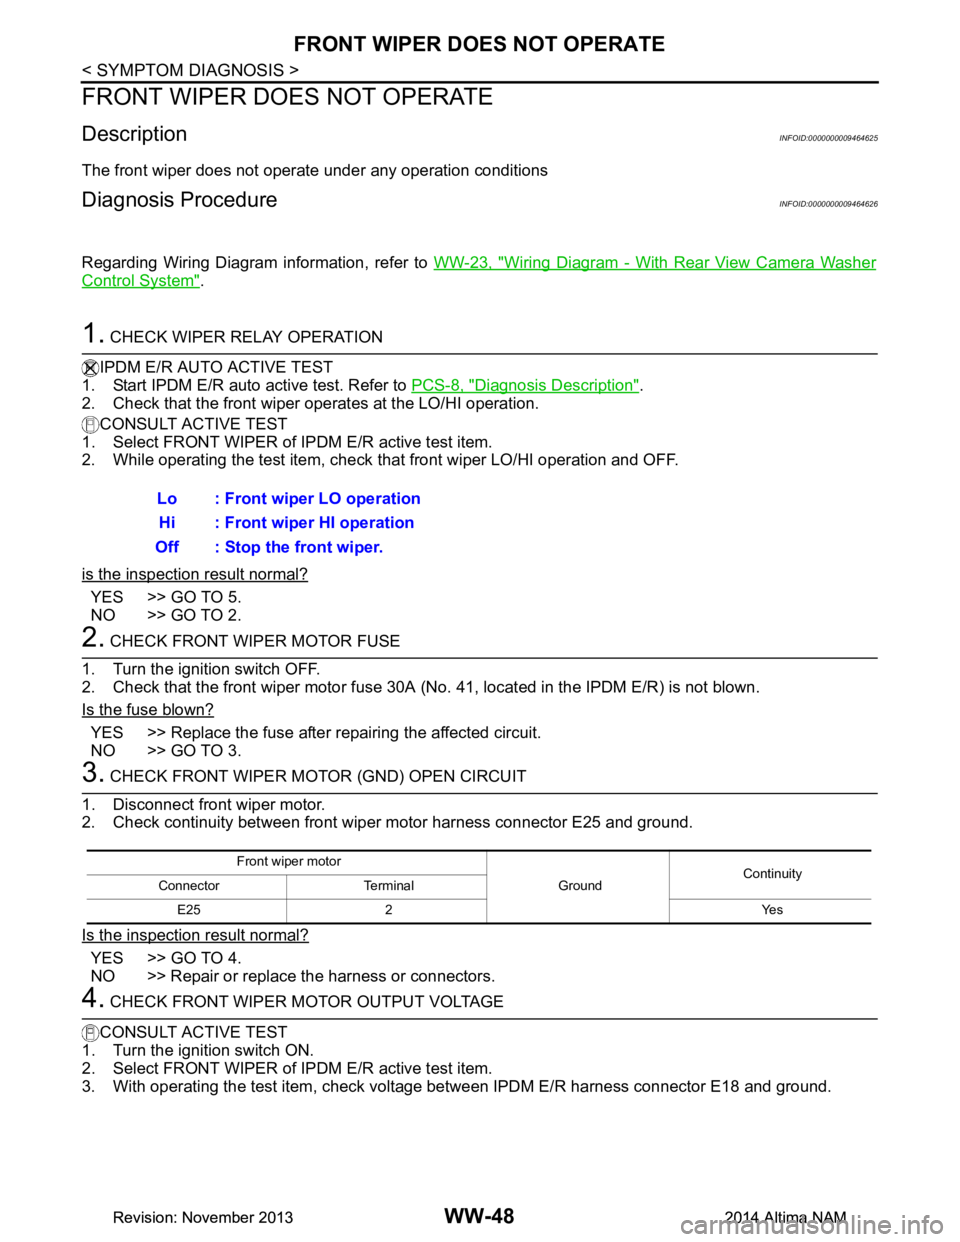
The front wiper does not operate under any operation conditions
Diagnosis ProcedureINFOID:0000000009464626
Regarding Wiring Diagram information, refer to WW-23, "Wiring Diagram - With Rear View Camera Washer
Control System".
1. CHECK WIPER RELAY OPERATION
IPDM E/R AUTO ACTIVE TEST
1. Start IPDM E/R auto active test. Refer to PCS-8, "Diagnosis Description"
.
2. Check that the front wiper operates at the LO/HI operation.
CONSULT ACTIVE TEST
1. Select FRONT WIPER of IPDM E/R active test item.
2. While operating the test item, check that front wiper LO/HI operation and OFF.
is the inspection result normal?
YES >> GO TO 5.
NO >> GO TO 2.
2. CHECK FRONT WIPER MOTOR FUSE
1. Turn the ignition switch OFF.
2. Check that the front wiper motor fuse 30A (No. 41, located in the IPDM E/R) is not blown.
Is the fuse blown?
YES >> Replace the fuse after repairing the affected circuit.
NO >> GO TO 3.
3. CHECK FRONT WIPER MOTOR (GND) OPEN CIRCUIT
1. Disconnect front wiper motor.
2. Check continuity between front wiper motor harness connector E25 and ground.
Is the inspection result normal?
YES >> GO TO 4.
NO >> Repair or replace the harness or connectors.
4. CHECK FRONT WIPER MOTOR OUTPUT VOLTAGE
CONSULT ACTIVE TEST
1. Turn the ignition switch ON.
2. Select FRONT WIPER of IPDM E/R active test item.
3. With operating the test item, check volt age between IPDM E/R harness connector E18 and ground.
Lo : Front wiper LO operation
Hi : Front wiper HI operation
Off : Stop the front wiper.
Front wiper motor
GroundContinuity
Connector Terminal
E25 2 Yes
Revision: November 20132014 Altima NAMRevision: November 20132014 Altima NAM