2014 NISSAN TEANA tire pressure
[x] Cancel search: tire pressurePage 3278 of 4801

MWI
COMBINATION METERMWI-23
< ECU DIAGNOSIS INFORMATION >
C
D E
F
G H
I
J
K L
M B
A
O P
CRUISE W/L Ignition switch ON CRUISE warning indication On
CRUISE warning indication Off
CVT IND Ignition switch ON CVT indicator ON On
CVT indicator OFF Off
SET IND Ignition switch ON SET indicator ON On
SET indicator OFF Off
FUEL LOW SIG Ignition switch ON During low fuel level indication On
Except during low fuel level indication Off
O/D OFF IND Ignition switch ON O/D OFF indicator ON On
O/D OFF indicator OFF Off
FUEL W/L Ignition switch ON During low fuel level indication On
Except during low fuel level indication Off
WASHER W/L Ignition switch ON Low washer fluid warning indication On
Except during low washer fluid warning in-
dication Off
AIR PRES W/L Tire pressure warn-
ing lamp operation When tire pressure
warning lamp is ON On
When tire pressure wa rning lamp is OFF Off
KEY G/Y W/L Ignition switch ON During Intelligent Key system malfunction
indication On
Other than the above Off
EPS W/L Ignition switch ON EPS warning lamp ON On
EPS warning lamp OFF Off
LCD Ignition switch ACC During engine start information indication B&P
ACC SET SPEED Ignition switch ON During set vehicle speed indicator not dis-
played Off
During set vehicle speed indicator dis-
played Indicates the set vehicle speed
ACC UNIT Ignition switch ON Set vehicle speed indicator unit display ON On
Set vehicle speed indicator unit display
OFF Off
SHIFT IND Ignition switch ON Position of shift selector [P, R, N, D, DS]
FUEL CAP W/L Ignition switch ON Fuel filler cap warning display ON On
Fuel filler cap warning display OFF Off
O/D OFF SW Ignition switch ON Overdrive control switch ON On
Overdrive control switch OFF Off
M RANGE SW Ignition switch ON Shift selector in manual mode position On
Other than the above Off
NM RANGE SW Ignition switch ON Shift selector in manual mode position Off
Other than the above On
AT SFT UP SW Ignition switch ON Shift selector operated in the up position On
Other than the above Off
AT SFT DWN SW Ignition switch ON Shift selector operated in the down position On
Other than the above Off
ST SFT UP SW Ignition switch ON Paddle shifter operated in up position On
Shift selector is in non manual mode up
position Off
Monitor Item Condition Value/Status
Revision: November 20132014 Altima NAMRevision: November 20132014 Altima NAM
Page 3279 of 4801
MWI-24
< ECU DIAGNOSIS INFORMATION >
COMBINATION METER
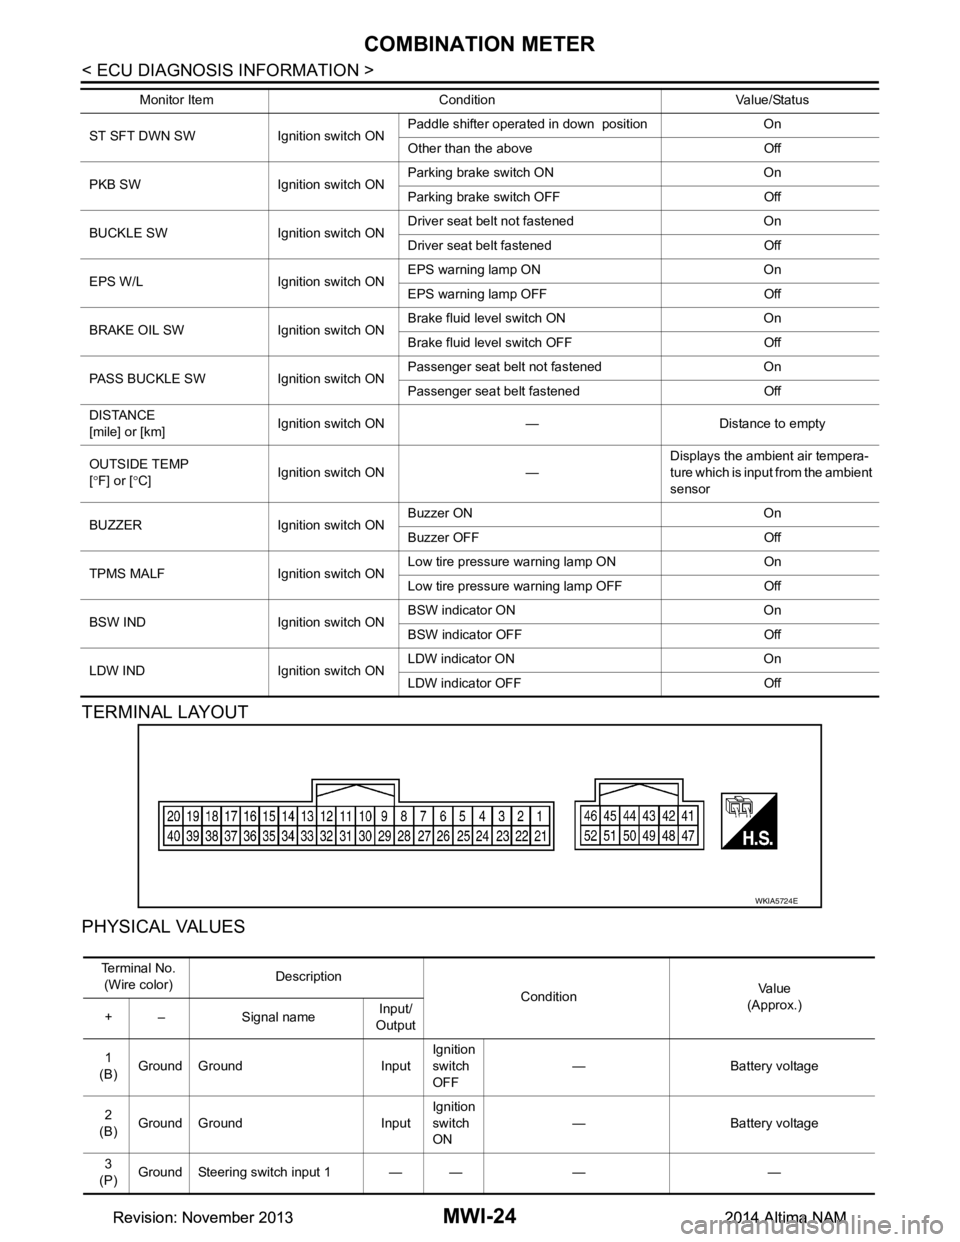
TERMINAL LAYOUT
PHYSICAL VALUES
ST SFT DWN SW Ignition switch ON Paddle shifter operated in down position On
Other than the above Off
PKB SW Ignition switch ON Parking brake switch ON On
Parking brake switch OFF Off
BUCKLE SW Ignition switch ON Driver seat belt not fastened On
Driver seat belt fastened Off
EPS W/L Ignition switch ON EPS warning lamp ON On
EPS warning lamp OFF Off
BRAKE OIL SW Ignition switch ON Brake fluid level switch ON On
Brake fluid level switch OFF Off
PASS BUCKLE SW Ignition switch ON Passenger seat belt not fastened On
Passenger seat belt fastened Off
DISTANCE
[mile] or [km] Ignition switch ON — Distance to empty
OUTSIDE TEMP
[ ° F] or [ °C] Ignition switch ON — Displays the ambient air tempera-
ture which is input from the ambient
sensor
BUZZER Ignition switch ON Buzzer ON On
Buzzer OFF Off
TPMS MALF Ignition switch ON Low tire pressure
warning lamp ON On
Low tire pressure warning lamp OFF Off
BSW IND Ignition switch ON BSW indicator ON On
BSW indicator OFF Off
LDW IND Ignition switch ON LDW indicator ON On
LDW indicator OFF Off
Monitor Item Condition Value/Status
WKIA5724E
Te r m i n a l N o .
(Wire color) Description
ConditionVa l u e
(Approx.)
+ – Signal name Input/
Output
1
(B) Ground Ground Input Ignition
switch
OFF — Battery voltage
2
(B) Ground Ground Input Ignition
switch
ON — Battery voltage
3
(P) Ground Steering switch input 1 — — — —
Revision: November 20132014 Altima NAMRevision: November 20132014 Altima NAM
Page 3282 of 4801

MWI
COMBINATION METERMWI-27
< ECU DIAGNOSIS INFORMATION >
C
D E
F
G H
I
J
K L
M B
A
O PFail-SafeINFOID:0000000009461695
FA I L - S A F E
The combination meter activates the fail-safe contro l if CAN communication with each unit is malfunctioning.
DTC IndexINFOID:0000000009461696
52
(P) Ground O/D OFF/SPORT switch Input Ignition
switch
ON O/D OFF switch pressed 0 V
Other than the above 5 V
Te r m i n a l N o .
(Wire color) Description
ConditionVa l u e
(Approx.)
+ – Signal name Input/
Output
Function Specifications
Speedometer Reset to zero by suspending communication.
Tachometer
Engine coolant temperature gauge
Illumination control When suspending communication, changes to nighttime mode.
Information display Odo/trip meter An indicated value is maintained at communications blackout.
Shift position indicator The display turns OFF by suspending communication.
Warning messages The display turns OFF by suspending communication.
Buzzer The buzzer turns OFF by suspending communication.
Warning lamp/indicator lamp ABS warning lamp
The lamp turns ON by suspending communication.
O/D OFF indicator lamp
Slip indicator lamp
Brake warning lamp
Malfunction indicator lamp
VDC OFF indicator lamp
EPS warning lamp
Low tire pressure warning lamp The lamp blinking caused by suspending communication.
High beam indicator lamp
The lamp turns OFF by suspending communication.
Turn signal indicator lamp
Master warning lamp
Front lamp indicator lamp
Lane departure warning
Tail lamp indicator lamp
Air bag warning lamp
The lamp turns off when disconnected.
Charge warning lamp
Seat belt warning lamp
Security indicator lamp
Display contents of CONSULT Diagnostic item is detected when... Refer to
CAN COMM CIRCUIT
[U1000] When combination meter is not transmitting or receiving CAN communication signal for 2
seconds or more. MWI-53
CONTROL UNIT (CAN)
[U1010] When detecting error during the initial diagnosis of the CAN controller of combination
meter. MWI-54
Revision: November 20132014 Altima NAMRevision: November 20132014 Altima NAM
Page 3968 of 4801
SR-6
< BASIC INSPECTION >
COLLISION DIAGNOSIS
FOR FRONTAL COLLISION: When SRS is not activated in a collision
CAUTION:
Due to varying models and option levels, not all part s listed in the chart below apply to all vehicles.
WORK PROCEDURE
1. Before performing any of the following steps, ensur e that all vehicle body and structural repairs have been
completed.
2. Check the SRS components using the table below:
Replace any SRS components showing visible signs of damage. (dents, cracks and deformation, etc.)
3. Perform self-diagnosis using CONSULT or air bag warning lamp. Refer to SRC-17, "Trouble Diagnosis
without CONSULT" for details.
Ensure entire SRS operates properly.
4. After the work is completed, perform self-diagnosis to check that no malfunction is detected. Refer to
SRC-15, "SRS Operation Check"
.
SRS INSPECTION (FOR FRONTAL COLLISION)
Occupant classification system
(Passenger seat) 1. Remove passenger seat assembly.
2. Check control unit case for dents, cracks of deformities.
3. Check connectors and pressure sensor tube for damage, and terminals for deformities.
4. Check seat frame and cushion pan for dents or deformities.
5. If no damage is found, reinstall seat with new fasteners.
6. If damaged— REPLACE seat cushion assembly with new fasteners.
7. Perform zero point reset function after front passenger seat is installed in the vehicle and all bolts are tightened to specification. Refer to SRC-42, "ZERO POINT RESET : Special Repair
Requirement".
Harness and connectors 1. Check connectors for poor connection, damage, and terminals for deformities. 2. Check harness for binding, chafing, cuts, or deformities.
3. If no damage is found, reinstall the harness and connectors.
4. If damaged — REPLACE the damaged harness. Do not attempt to repair, splice or modify any SRS harness.
Instrument panel assembly If the passenger front air bag has deployed: REPLACE the instrument panel assembly. (integrated type)
Part Inspection
Part Inspection
Driver air bag module If the driver air bag has NOT been activated: 1. Remove driver air bag module. Check harness cover and connectors for damage, terminals for deformities, and harness for binding.
2. Install driver air bag module into the steering wheel to check fit and alignment with the wheel.
3. If no damage is found, reinstall with new fasteners.
4. If damaged — REPLACE. Install driver air bag modules with new fasteners.
Front passenger air bag module
(if equipped) If the front passenger air bag has NOT been activated:
1. Remove front passenger air bag module. Check harness cover and connectors for damage, terminals for deformities, and harness for binding.
2. Install front passenger air bag module into the instrument panel to check fit with the instrument panel.
3. If no damage is found, reinstall with new fasteners.
4. If damaged — REPLACE. Install front passenger air bag modules with new fasteners.
Crash zone sensor If the front air bags or seat belt pre-tensioners have NOT been activated: 1. Remove the crash zone sensor. Check harness connectors for damage, terminals for defor-mities, and harness for binding.
2. Check for visible signs of damage (dents, cracks, deformation) of the crash zone sensor and bracket.
3. Install the crash zone sensor to check fit.
4. If no damage is found, reinstall with new fasteners.
5. If damaged — REPLACE the crash zone sensor and bracket with new fasteners.
Revision: November 20132014 Altima NAM
Page 4119 of 4801
ST-16
< BASIC INSPECTION >
STEERING WHEEL
STEERING WHEEL
InspectionINFOID:0000000009461252
CONDITION OF INSTALLATION
• Check installation condition of power steering gear assembly, front suspension, front drive shaft and steering
column.
• Check if movement exists when steering wheel is mo ved up and down, to the left and right and to the axial
direction.
• Verify that the power steering gear nuts are tightened to specification. Refer to ST-36, "Exploded View"
.
STEERING WHEEL PLAY
1. Turn tires straight ahead, start engine, then turn steer ing wheel to the left and right lightly. Measure steer-
ing wheel movement on the outer circumference of the steering wheel when it is turned to the point where
tires start moving.
NEUTRAL POSITION ON STEERING WHEEL
• Check neutral position on steering wheel after confirming that front wheel alignment is correct. Refer to FSU-
25, "Wheel Alignment (Unladen*1)".
1. Turn tires straight ahead, check if st eering wheel is in the neutral position.
2. If it is not in the neutral position, remo ve steering wheel and reinstall it correctly.
3. If the neutral position cannot be attained by repositi oning the steering wheel two teeth or less on steering
stem, loosen tie-rod lock nuts of power steering gear outer sockets, then adjust tie-rods by the same
amount in the opposite direction.
STEERING WHEEL TURNING FORCE
1. Park vehicle on a level, dry surface and set parking brake.
2. Start engine.
3. Bring power steering fluid up to operating temperature.
4. Verify that the tires are inflated to the specified pressure. Refer to WT-60, "Tire"
.
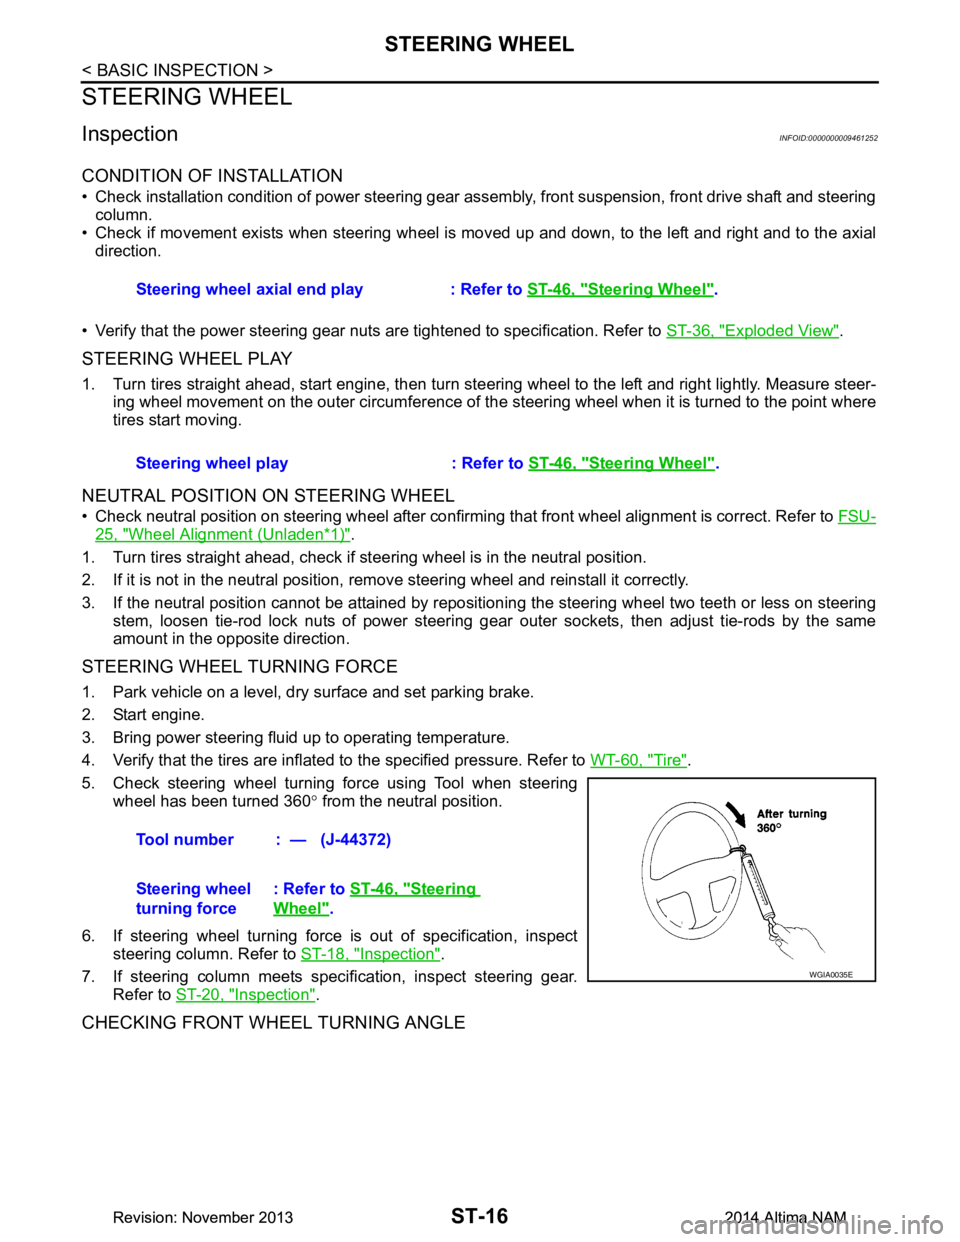
5. Check steering wheel turning force using Tool when steering wheel has been turned 360 ° from the neutral position.
6. If steering wheel turning force is out of specification, inspect steering column. Refer to ST-18, "Inspection"
.
7. If steering column meets specification, inspect steering gear. Refer to ST-20, "Inspection"
.
CHECKING FRONT WHEEL TURNING ANGLE
Steering wheel axial end play : Refer to ST-46, "Steering Wheel".
Steering wheel play : Refer to ST-46, "Steering Wheel"
.
Tool number : — (J-44372)
Steering wheel
turning force : Refer to
ST-46, "Steering
Wheel".
WGIA0035E
Revision: November 20132014 Altima NAMRevision: November 20132014 Altima NAM
Page 4140 of 4801
STEERING GEAR AND LINKAGEST-37
< REMOVAL AND INSTALLATION >
C
D E
F
H I
J
K L
M A
B
ST
N
O P
6. Remove front exhaust tube. Refer to EX-5, "Exploded View" (QR25DE), EX-10, "Exploded View"
(VQ35DE).
7. Disconnect the high and low pressure piping from the steering gear assembly.
8. Remove steering hydraulic piping bracket bolts from the steering gear assembly.
9. Remove bolts and nuts of steering gear assembly, then remove steering gear assembly from vehicle.
INSTALLATION
Installation is in the reverse order of removal.
CAUTION:
Do not reuse O-rings or copper sealing washers.
• When installing lower joint to steering gear assembly, follow the procedure listed below.
- Set rack of steering gear in the neutral position. NOTE:
To get the neutral position of rack, turn gear-sub a ssembly and measure the distance of inner socket, and
then measure the intermediat e position of the distance.
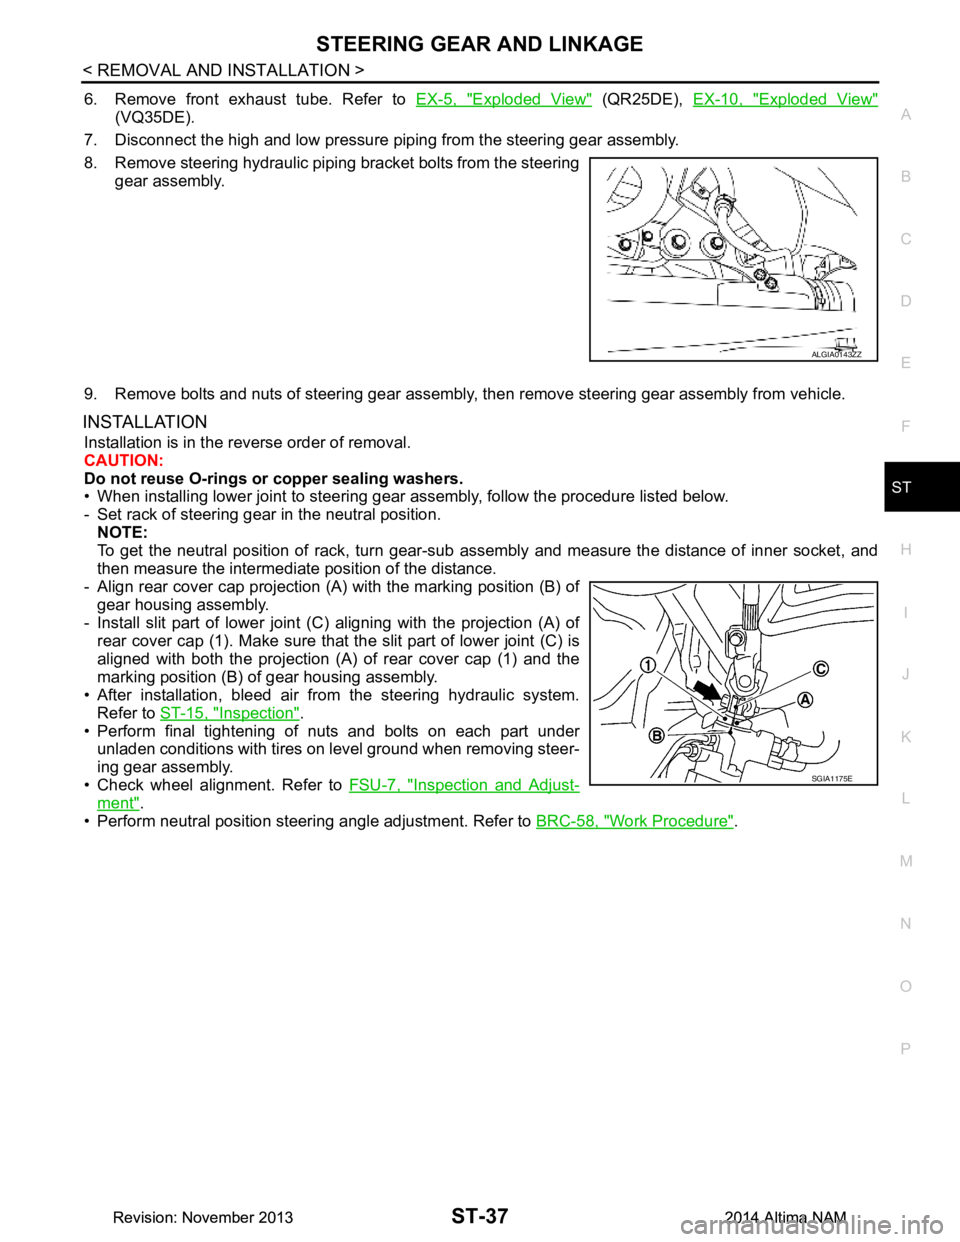
- Align rear cover cap projection (A) with the marking position (B) of
gear housing assembly.
- Install slit part of lower joint (C) aligning with the projection (A) of
rear cover cap (1). Make sure that the slit part of lower joint (C) is
aligned with both the projection (A) of rear cover cap (1) and the
marking position (B) of gear housing assembly.
• After installation, bleed air from the steering hydraulic system. Refer to ST-15, "Inspection"
.
• Perform final tightening of nuts and bolts on each part under
unladen conditions with tires on level ground when removing steer-
ing gear assembly.
• Check wheel alignment. Refer to FSU-7, "Inspection and Adjust-
ment".
• Perform neutral position steering angle adjustment. Refer to BRC-58, "Work Procedure"
.
ALGIA0143ZZ
SGIA1175E
Revision: November 20132014 Altima NAMRevision: November 20132014 Altima NAM
Page 4154 of 4801
PRECAUTIONSSTC-3
< PRECAUTION >
C
D E
F
H I
J
K L
M A
B
STC
N
O P
PRECAUTION
PRECAUTIONS
Precaution for Supplemental Restraint System (SRS) "AIR BAG" and "SEAT BELT
PRE-TENSIONER"
INFOID:0000000009951730
The Supplemental Restraint System such as “A IR BAG” and “SEAT BELT PRE-TENSIONER”, used along
with a front seat belt, helps to reduce the risk or severi ty of injury to the driver and front passenger for certain
types of collision. Information necessary to service t he system safely is included in the SR and SB section of
this Service Manual.
WARNING:
• To avoid rendering the SRS inoper ative, which could increase the risk of personal injury or death in
the event of a collision which would result in air bag inflation, all maintenance must be performed by
an authorized NISSAN/INFINITI dealer.
• Improper maintenance, including in correct removal and installation of the SRS, can lead to personal
injury caused by unintentional act ivation of the system. For removal of Spiral Cable and Air Bag
Module, see the SR section.
• Do not use electrical test equipm ent on any circuit related to the SRS unless instructed to in this
Service Manual. SRS wiring harnesses can be identi fied by yellow and/or orange harnesses or har-
ness connectors.
PRECAUTIONS WHEN USING POWER TOOLS (AIR OR ELECTRIC) AND HAMMERS
WARNING:
• When working near the Airbag Diagnosis Sensor Un it or other Airbag System sensors with the Igni-
tion ON or engine running, DO NOT use air or el ectric power tools or strike near the sensor(s) with a
hammer. Heavy vibration could activate the sensor( s) and deploy the air bag(s), possibly causing
serious injury.
• When using air or electric power tools or hammers , always switch the Ignition OFF, disconnect the
battery and wait at least three mi nutes before performing any service.
Service Notice and Precautions for Hydrau lic Pump Electric Power Steering System
INFOID:0000000009460340
• Check each tire for proper air pressure and size. Refer to WT-60, "Tire".
• Verify that the steering system components are G enuine NISSAN parts and have been installed properly.
• Check the steering column for loose mounting bolts.
• Check the steering gear assembly for loose mounting bolts. Check the inner sockets and outer sockets for
damage or wear. Inspect the boots and seals for leakage of power steering fluid.
• Verify proper wheel alignment. Refer to FSU-7, "Inspection and Adjustment"
.
• Check for any damage, wear, or modification to the suspension and body that would result in increased
weight or an improper wheelarch height. Refer to FSU-26, "Wheelarch Height (Unladen*
1)".
• Check for proper battery voltage.
• Verify that all power steering pump assembly connections are clean and fully seated.
• Verify that only Genuine NISSAN E-PSF is used. Use of any power steering fluid other than Genuine NIS-
SAN E-PSF will prevent the power st eering system from proper operation.
• An audible high pitch noise may be heard from the engine compartment when the steering wheel is oper-
ated, particularly at low speeds such as a parking lot maneuver. This condition is not a malfunction, rather
normal system operation. Steering at low speeds or parking lot maneuvers demands higher hydraulic assis-
tance, resulting in larger power st eering pump load and increased system noise.
• The power steering pump is electrically controlled by the power steering control module.
• Before connecting or disconnecting the power steeri ng control module harness connectors, turn ignition
switch “OFF” and disconnect battery ground cable. Batter y voltage is applied to power steering control mod-
ule even if ignition switch is turned “OFF”.
Revision: November 20132014 Altima NAMRevision: November 20132014 Altima NAM
Page 4239 of 4801
![NISSAN TEANA 2014 Service Manual
TM-24
< SYSTEM DESCRIPTION >[CVT: RE0F10D]
STRUCTURE AND OPERATION
The groove width changes according to wrapping radius of
steel belt and pulley from low status to overdrive
status continuously wit NISSAN TEANA 2014 Service Manual
TM-24
< SYSTEM DESCRIPTION >[CVT: RE0F10D]
STRUCTURE AND OPERATION
The groove width changes according to wrapping radius of
steel belt and pulley from low status to overdrive
status continuously wit](/manual-img/5/57390/w960_57390-4238.png)
TM-24
< SYSTEM DESCRIPTION >[CVT: RE0F10D]
STRUCTURE AND OPERATION
The groove width changes according to wrapping radius of
steel belt and pulley from low status to overdrive
status continuously with non-step. It is controlled wit h the oil pressures of primary pulley and secondary pulley.
Steel Belt
It is composed of multiple steel plates (A) and two steel rings (B)
stacked to a several number. The feature of this steel belt transmits
power with compression of the steel plate in contrast with transmis-
sion of power in pulling with a rubber belt. Friction force is required
with the pulley slope to transmit power from the steel plate. The force
is generated with the following mechanism:
Oil pressure applies to the secondary pulley to nip the plate. ⇒The
plate is pushed and extended outward. ⇒The steel ring shows with-
stands. ⇒Pulling force is generated on the steel ring. ⇒The plate of
the primary pulley is nipped between the pulley. ⇒Friction force is
generated between the steel belt and the pulley.
Therefore, responsibilities are divi ded by the steel plate that trans-
mits the power with compression and the steel ring that main tains necessary friction force. In this way, the
tension of the steel ring is distributed on the entire su rface and stress variation is limited, resulting in good
durability.
Pulley
The primary pulley (input shaft side) and the secondary pulley (output shaft side) have the shaft with slope
(fixed cone surface), movable sheave (movable cone surface that can move in the axial direction) and oil pres-
sure chamber at the back of the movable sheave.
JSDIA2428GB
JSDIA2431ZZ
Revision: November 20132014 Altima NAMRevision: November 20132014 Altima NAM