Page 126 of 4801

BR-30
< REMOVAL AND INSTALLATION >
BRAKE BOOSTER
2. Disconnect the battery negative cable. Refer to PG-73, "Removal and Installation (Battery)".
3. Remove the instrument lower panel LH. Refer to IP-21, "Removal and Installation"
.
4. Remove accelerator pedal assembly. Refer to ACC-3, "Removal and Installation"
.
5. Remove the brake pedal. Refer to BR-18, "Removal and Installation"
.
6. Loosen the clevis lock nut (A) and remove the clevis bracket (B) from the input rod (C).
7. Remove the brake master cylinder. Refer to BR-26, "Removal and Installation"
.
8. Remove the vacuum hose. Refer to BR-31, "Exploded View"
.
9. Disconnect the fuel line main connections. Refer to FL-5, "Quick Connector"
.
10. Remove the cowl top. Refer to EXT-24, "Removal and Installation"
.
11. Remove the strut tower bar. Refer to FSU-19, "Exploded View"
.
12. Remove the wiper drive assembly. Refer to WW-64, "Removal and Installation"
.
13. Remove the cowl top extension.
14. Disconnect the active boost sensor harness connector.
15. Remove the brake booster.
16. Remove and discard the brake booster gasket. CAUTION:
Do not reuse brake booster gasket.
INSTALLATION
Installation is in the reverse order of removal.
• Prior to installation, loosen clevis lock nut (1) and adjust input rod (2) to the specified value (B).
• After input rod adjustment (B), temporarily tighten clevis lock nut for installation of brake booster.
• Connect the battery negative terminal. Refer to PG-7, "ADDITIONAL SERVICE WHEN REMOVING BAT-
TERY NEGATIVE TERMINAL : Special Repair Requirement".
:Front
ALFIA0319ZZ
Length (B) : Refer to BR-49, "Brake Booster".
ALFIA0299ZZ
Revision: November 20132014 Altima NAM
Page 127 of 4801
VACUUM LINESBR-31
< REMOVAL AND INSTALLATION >
C
D E
G H
I
J
K L
M A
B
BR
N
O P
VACUUM LINES
Exploded ViewINFOID:0000000009463709
QR25DE
AWFIA0939ZZ
1. Clamp 2. Check valve direction stamp 3. Vacuum hose
4. Vacuum piping Front
Revision: November 20132014 Altima NAM
Page 128 of 4801
BR-32
< REMOVAL AND INSTALLATION >
VACUUM LINES
VQ35DE
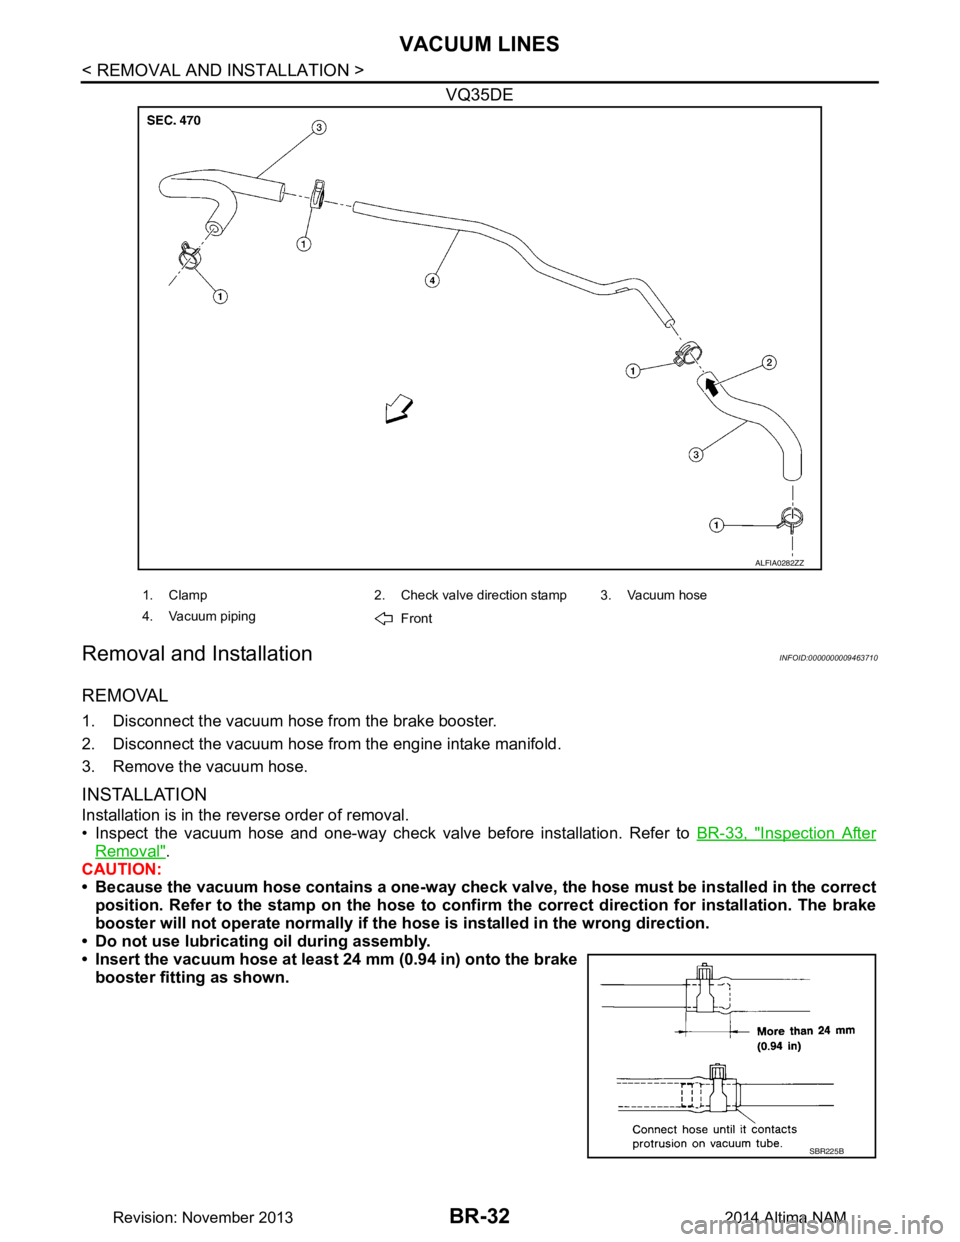
Removal and InstallationINFOID:0000000009463710
REMOVAL
1. Disconnect the vacuum hose from the brake booster.
2. Disconnect the vacuum hose from the engine intake manifold.
3. Remove the vacuum hose.
INSTALLATION
Installation is in the reverse order of removal.
• Inspect the vacuum hose and one-way check valve before installation. Refer to BR-33, "Inspection After
Removal".
CAUTION:
• Because the vacuum hose contains a one-way check val ve, the hose must be installed in the correct
position. Refer to the stamp on the hose to confi rm the correct direction for installation. The brake
booster will not operate normally if the ho se is installed in the wrong direction.
• Do not use lubricating oil during assembly.
• Insert the vacuum hose at least 24 mm (0.94 in) onto the brake booster fitting as shown.
ALFIA0282ZZ
1. Clamp 2. Check valve direction stamp 3. Vacuum hose
4. Vacuum piping Front
SBR225B
Revision: November 20132014 Altima NAM
Page 129 of 4801
VACUUM LINESBR-33
< REMOVAL AND INSTALLATION >
C
D E
G H
I
J
K L
M A
B
BR
N
O P
Inspection After RemovalINFOID:0000000009463711
VISUAL
Check for correct assembly, damage and deterioration.
CHECK VALVE AIRTIGHTNESS
• Use a suitable tool (A) to check the one-way valve from each end of the hose.
• Replace the vacuum hose assembly if the vacuum hose and check valve are malfunctioning. When connected to the
booster side (B) : Refer to
BR-49, "Check
Valve"
When connected to the
engine side (C) : Refer to
BR-49, "Check
Valve"
JPFIA0024ZZ
Revision: November 20132014 Altima NAM
Page 130 of 4801

BR-34
< REMOVAL AND INSTALLATION >
FRONT DISC BRAKE
FRONT DISC BRAKE
BRAKE PAD
BRAKE PAD : Exploded ViewINFOID:0000000009463712
BRAKE PAD : Removal and InstallationINFOID:0000000009463713
WARNING:
Clean dust on brake calipers and brake pads with a vacuum dust collector to minimize the hazard of
airborne particles or other materials.
CAUTION:
• While removing brake caliper, do not depr ess brake pedal because piston will pop out.
• It is not necessary to remove bolts from torque member and brake hose except for disassembly or
replacement of brake caliper assembly. In this case, hang brake caliper with a wire so as not to
stretch brake hose.
• Do not damage piston boot.
• Keep brake rotor and brake pads free from brake fluid and grease.
• Burnish the brake pads and disc brake rotor mutual ly contacting surfaces after refinishing or replac-
ing disc brake rotors, after replacing brake pads, or if a soft pedal occurs at very low mileage. Refer
to BR-16, "Brake Burnishing"
.
REMOVAL
1. Partially drain brake fluid from the master cylinder. Refer to BR-14, "Drain and Refill".
2. Remove the front wheel and tire using power tool. Refer to WT-55, "Adjustment"
.
1. Inner shim cover 2. Inner shim 3. Inner pad
4. Outer pad 5. Pad retainer upper 6. Outer shim
7. Outer shim cover 8. Pad retainer lower A. Molykote AS-880N grease
B. Molykote 7439 grease
NOTE:
LH shown, RH similar
AWFIA1012ZZ
Revision: November 20132014 Altima NAM
Page 131 of 4801

FRONT DISC BRAKEBR-35
< REMOVAL AND INSTALLATION >
C
D E
G H
I
J
K L
M A
B
BR
N
O P
3. Remove upper and lower sliding pin bolts. Refer to BR-36,
"BRAKE CALIPER ASSEMBLY : Exploded View".
NOTE:
Note the pin orientation during removal. The lower sliding pin
contains a bushing.
4. Remove the brake caliper from the torque member. Leaving the brake hose attached, reposition the brake
caliper aside with wire.
CAUTION:
Do not twist or stretch brake hose.
5. Remove the brake pads, shims, and shim covers from the torque member.
6. Remove the brake pad retainers from the torque member. CAUTION:
When removing the brake pad retainers from the torque
member, lift it in the direct ion indicated by the arrow as
shown so that it does not deform.
INSTALLATION
Installation is in the reverse order of removal.
• Apply Molykote AS-880N grease or equivalent betw een the outer brake pad, outer shim cover and outer
shim and between the inner shim and inner brake pad. Inst all outer shim and outer shim cover to outer brake
pad. Install inner shim and inner shim cover to inner brake pad.
CAUTION:
• The inner shim cover (LH) (1) is different than the inner shim
cover (RH) (2). Install the i nner shim covers in the correct
position.
• Replace brake pad shims and covers as a set if any corro-
sion or damage exists.
• Apply Molykote 7439 grease or equivalent between brake pad retainers and brake pad ends. Install brake pad retainers and
brake pads to torque member.
CAUTION:
• Make sure the brake pad retainers are fastened properly to
the torque member.
• Replace brake pad retainers if damage exists.
• Press the piston into the cylinder bore of the caliper using a suitable tool.
• Check brake fluid level and refill as necessary. Refer to BR-8, "Inspection"
.
• Burnish contact surface between brake pads and disc brake rotors. Refer to BR-16, "Brake Burnishing"
.
BRAKE CALIPER ASSEMBLY
ALFIA0300ZZ
SBR556E
ALFIA0359ZZ
Revision: November 20132014 Altima NAM
Page 132 of 4801

BR-36
< REMOVAL AND INSTALLATION >
FRONT DISC BRAKE
BRAKE CALIPER ASSEMBLY : Exploded View
INFOID:0000000009463714
BRAKE CALIPER ASSEMBLY : Removal and InstallationINFOID:0000000009463715
WARNING:
Clean dust on brake calipers and brake pads with a vacuum dust collector to minimize the hazard of
airborne particles or other materials.
CAUTION:
• While removing brake caliper, do not depress th e brake pedal because the piston will pop out.
• Do not damage piston boot.
• Keep disc brake rotor free from brake fluid.
• Refill the brake reservoir with new brake fluid “DOT 3”.
• Do not reuse drained brake fluid.
NOTE:
When removing components such as hoses, tubes/lines, etc. , cap or plug openings to prevent fluid from spill-
ing.
REMOVAL
1. Remove front wheel and tire using power tool. Refer to WT-55, "Adjustment".
2. Remove reservoir cap.
1. Union bolt 2. Copper sealing washer 3. Brake hose
4. Cap 5. Bleeder valve 6. Sliding pin bolt
7. Piston seal 8. Piston 9. Piston boot
10. Brake caliper 11. Upper sliding pin 12. Lower sliding pin
13. Washer (without flange bolt) 14. Sliding pin boot 15. Lower sliding pin bushing
16. Torque member A. Refer to Installation R. Rubber grease
NOTE:
RH side caliper shown, LH side caliper similar.
AWFIA1045ZZ
Revision: November 20132014 Altima NAM
Page 133 of 4801
FRONT DISC BRAKEBR-37
< REMOVAL AND INSTALLATION >
C
D E
G H
I
J
K L
M A
B
BR
N
O P
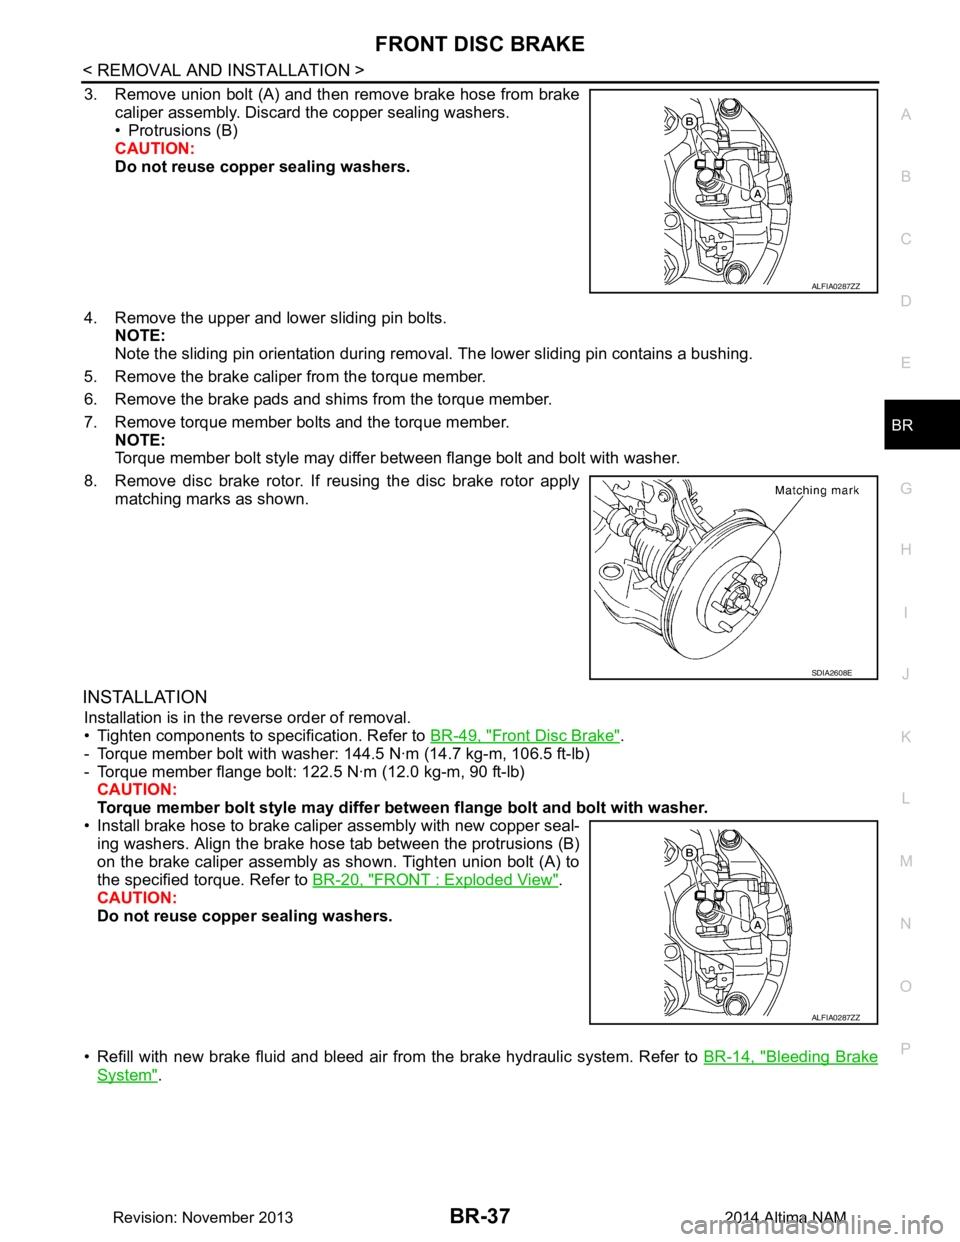
3. Remove union bolt (A) and then remove brake hose from brake caliper assembly. Discard the copper sealing washers.
• Protrusions (B)
CAUTION:
Do not reuse copper sealing washers.
4. Remove the upper and lower sliding pin bolts. NOTE:
Note the sliding pin orientation during removal. The lower sliding pin contains a bushing.
5. Remove the brake caliper from the torque member.
6. Remove the brake pads and shims from the torque member.
7. Remove torque member bolts and the torque member. NOTE:
Torque member bolt style may differ between flange bolt and bolt with washer.
8. Remove disc brake rotor. If reusing the disc brake rotor apply matching marks as shown.
INSTALLATION
Installation is in the reverse order of removal.
• Tighten components to specification. Refer to BR-49, "Front Disc Brake"
.
- Torque member bolt with washer: 144.5 N·m (14.7 kg-m, 106.5 ft-lb)
- Torque member flange bolt: 122.5 N·m (12.0 kg-m, 90 ft-lb) CAUTION:
Torque member bolt style may differ betw een flange bolt and bolt with washer.
• Install brake hose to brake caliper assembly with new copper seal- ing washers. Align the brake hos e tab between the protrusions (B)
on the brake caliper assembly as shown. Tighten union bolt (A) to
the specified torque. Refer to BR-20, "FRONT : Exploded View"
.
CAUTION:
Do not reuse copper sealing washers.
• Refill with new brake fluid and bleed air fr om the brake hydraulic system. Refer to BR-14, "Bleeding Brake
System".
ALFIA0287ZZ
SDIA2608E
ALFIA0287ZZ
Revision: November 20132014 Altima NAM

