2014 NISSAN TEANA ECU
[x] Cancel search: ECUPage 2910 of 4801
REAR DOOR FINISHERINT-19
< REMOVAL AND INSTALLATION >
C
D E
F
G H
I
K L
M A
B
INT
N
O P
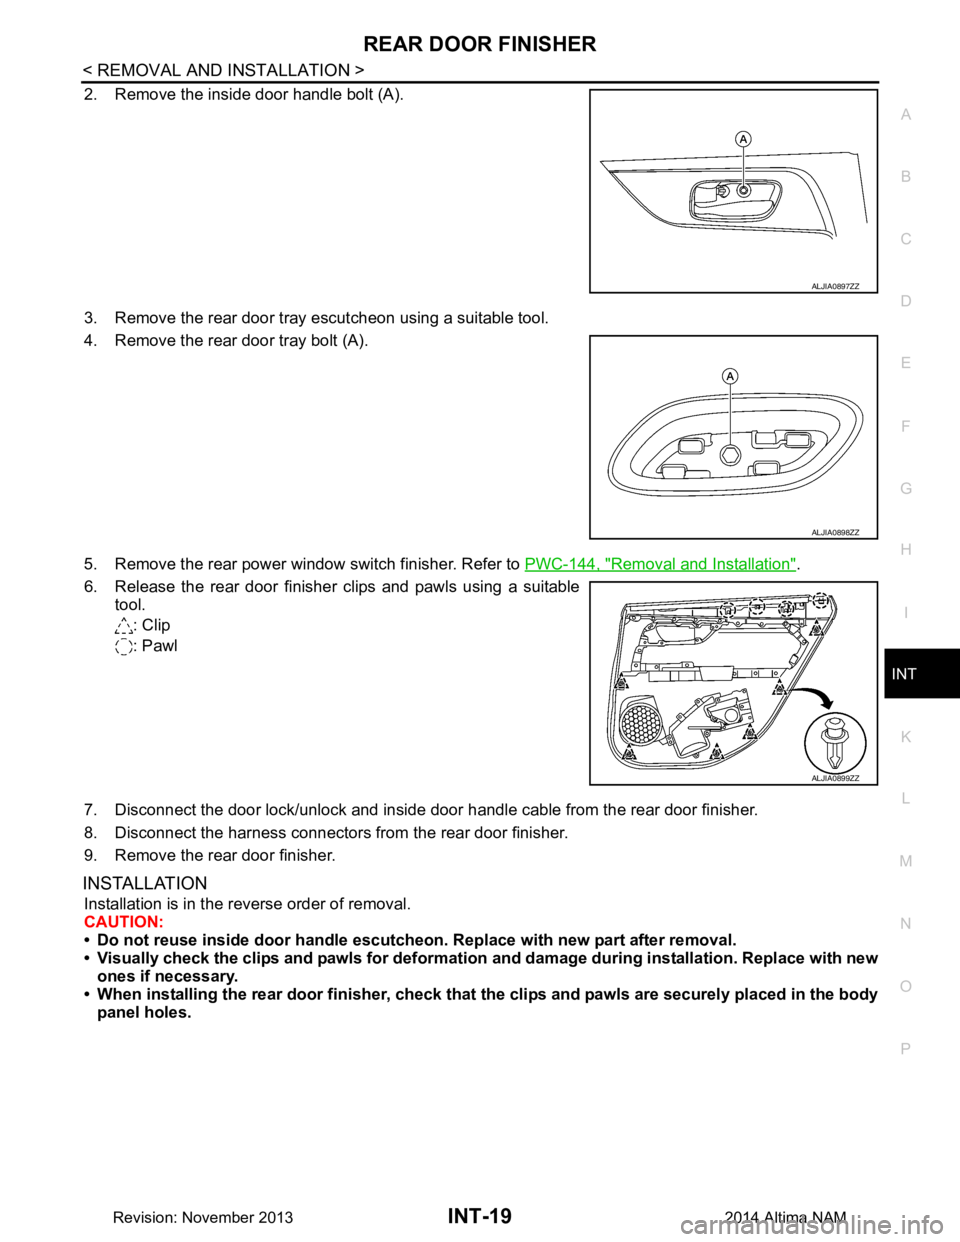
2. Remove the inside door handle bolt (A).
3. Remove the rear door tray escutcheon using a suitable tool.
4. Remove the rear door tray bolt (A).
5. Remove the rear power window switch finisher. Refer to PWC-144, "Removal and Installation"
.
6. Release the rear door finisher clips and pawls using a suitable tool.
: Clip
: Pawl
7. Disconnect the door lock/unlock and inside door handle cable from the rear door finisher.
8. Disconnect the harness connectors from the rear door finisher.
9. Remove the rear door finisher.
INSTALLATION
Installation is in the reverse order of removal.
CAUTION:
• Do not reuse inside door handle escutche on. Replace with new part after removal.
• Visually check the clips and pawls for deformation and damage during installation. Replace with new
ones if necessary.
• When installing the rear door fi nisher, check that the clips and pa wls are securely placed in the body
panel holes.
ALJIA0897ZZ
ALJIA0898ZZ
ALJIA0899ZZ
Revision: November 20132014 Altima NAM
Page 2911 of 4801
INT-20
< REMOVAL AND INSTALLATION >
BODY SIDE TRIM
BODY SIDE TRIM
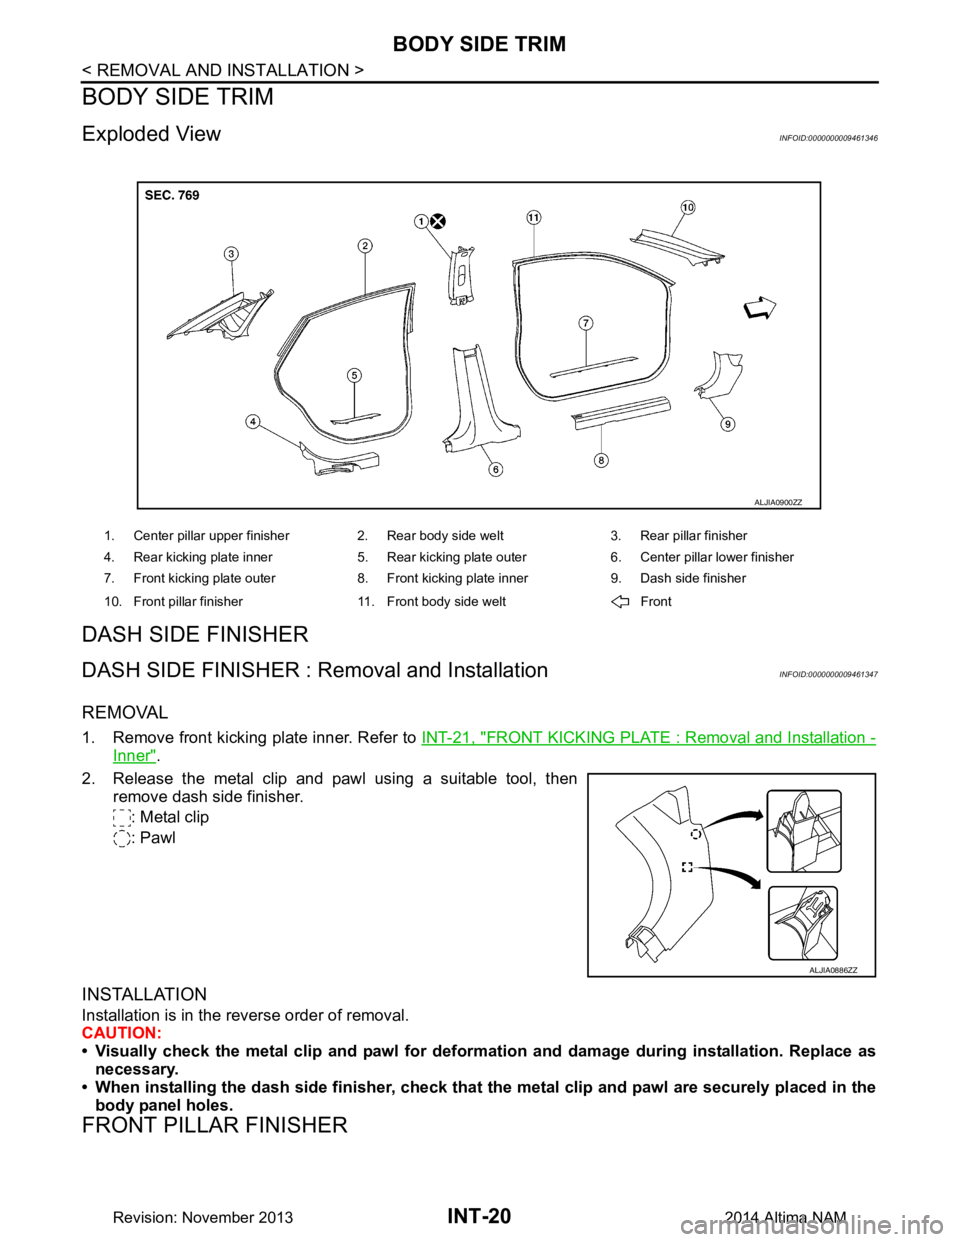
Exploded ViewINFOID:0000000009461346
DASH SIDE FINISHER
DASH SIDE FINISHER : Removal and InstallationINFOID:0000000009461347
REMOVAL
1. Remove front kicking plate inner. Refer to INT-21, "FRONT KICKING PLATE : Removal and Installation -
Inner".
2. Release the metal clip and pawl using a suitable tool, then remove dash side finisher.
: Metal clip
: Pawl
INSTALLATION
Installation is in the reverse order of removal.
CAUTION:
• Visually check the metal clip and pawl for defo rmation and damage during installation. Replace as
necessary.
• When installing the dash side fini sher, check that the metal clip and pawl are securely placed in the
body panel holes.
FRONT PILLAR FINISHER
1. Center pillar upper finisher 2. Rear body side welt 3. Rear pillar finisher
4. Rear kicking plate inner 5. Rear kicking plate outer 6. Center pillar lower finisher
7. Front kicking plate outer 8. Front kicking plate inner 9. Dash side finisher
10. Front pillar finisher 11. Front body side welt Front
ALJIA0900ZZ
ALJIA0886ZZ
Revision: November 20132014 Altima NAM
Page 2912 of 4801
BODY SIDE TRIMINT-21
< REMOVAL AND INSTALLATION >
C
D E
F
G H
I
K L
M A
B
INT
N
O P
FRONT PILLAR FINISHER : Removal and InstallationINFOID:0000000009461348
REMOVAL
1. Partially remove the front body side welt. Refer to INT-23, "BODY SIDE WELT : Removal and Installation
- Front Body Side Welt".
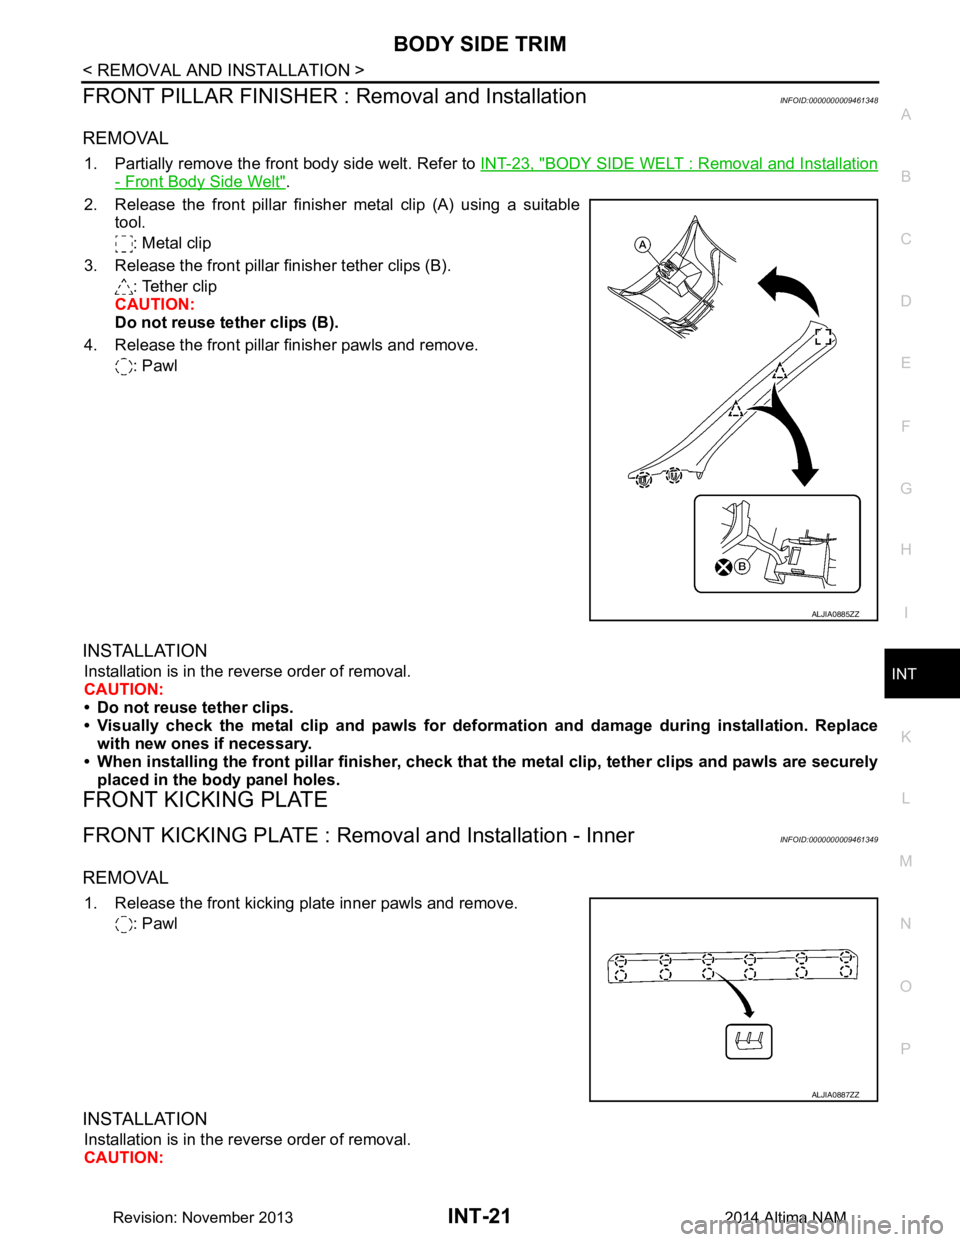
2. Release the front pillar finisher metal clip (A) using a suitable tool.
: Metal clip
3. Release the front pillar finisher tether clips (B). : Tether clip
CAUTION:
Do not reuse tether clips (B).
4. Release the front pillar finisher pawls and remove. : Pawl
INSTALLATION
Installation is in the reverse order of removal.
CAUTION:
• Do not reuse tether clips.
• Visually check the metal clip and pawls for defo rmation and damage during installation. Replace
with new ones if necessary.
• When installing the front pillar finisher, check that the metal clip, tether clips and pawls are securely
placed in the body panel holes.
FRONT KICKING PLATE
FRONT KICKING PLATE : Remova l and Installation - InnerINFOID:0000000009461349
REMOVAL
1. Release the front kicking plate inner pawls and remove.
: Pawl
INSTALLATION
Installation is in the reverse order of removal.
CAUTION:
ALJIA0885ZZ
ALJIA0887ZZ
Revision: November 20132014 Altima NAM
Page 2913 of 4801
INT-22
< REMOVAL AND INSTALLATION >
BODY SIDE TRIM
When installing the front kicking plate inner, check that the pawls are securely placed in the body
panel holes.
FRONT KICKING PLATE : Remova l and Installation - OuterINFOID:0000000009461350
REMOVAL
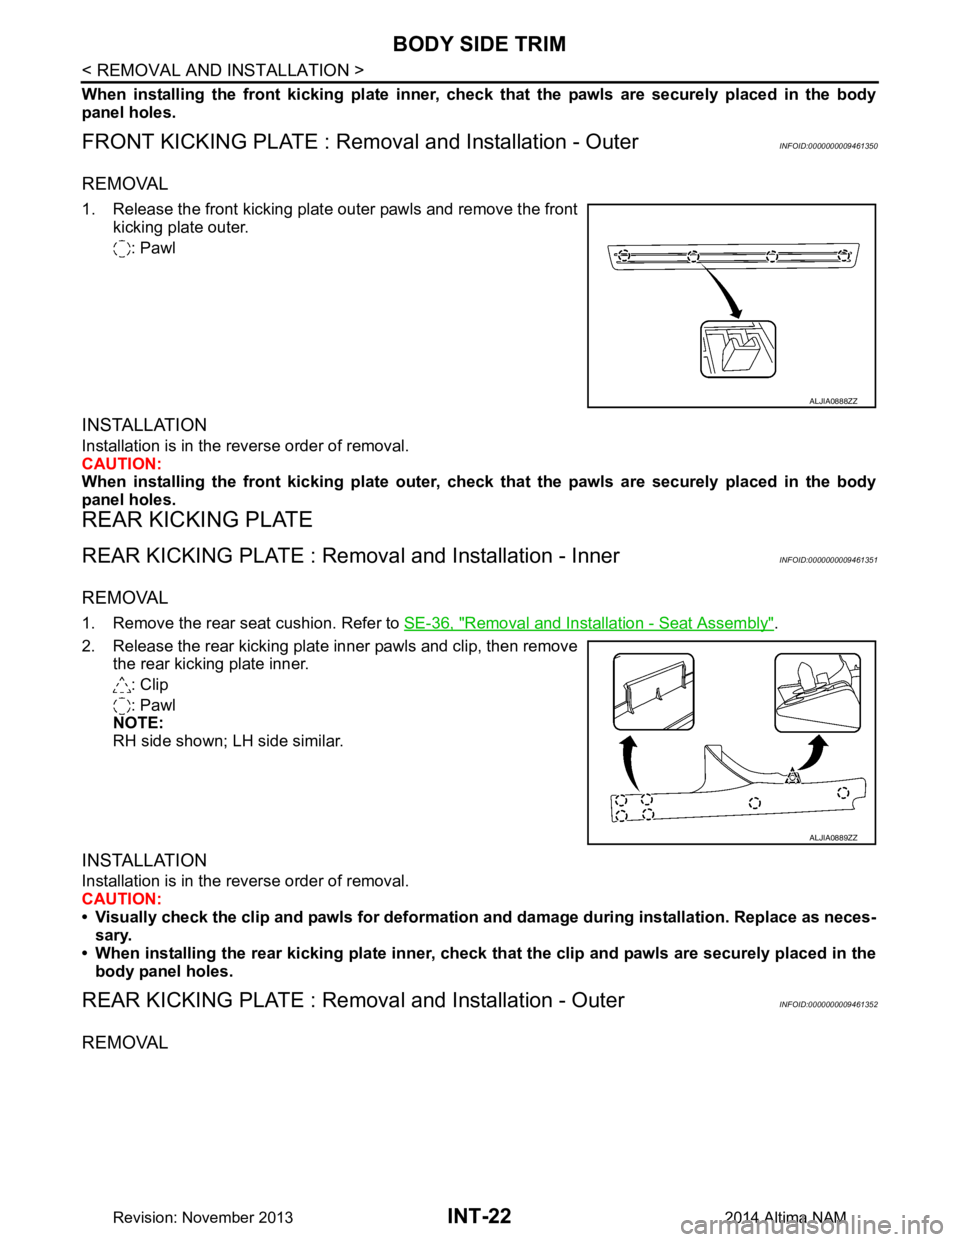
1. Release the front kicking plate outer pawls and remove the front
kicking plate outer.
: Pawl
INSTALLATION
Installation is in the reverse order of removal.
CAUTION:
When installing the front kicking plate outer, ch eck that the pawls are securely placed in the body
panel holes.
REAR KICKING PLATE
REAR KICKING PLATE : Remova l and Installation - InnerINFOID:0000000009461351
REMOVAL
1. Remove the rear seat cushion. Refer to SE-36, "Removal and Installation - Seat Assembly".
2. Release the rear kicking plate inner pawls and clip, then remove the rear kicking plate inner.
: Clip
: Pawl
NOTE:
RH side shown; LH side similar.
INSTALLATION
Installation is in the reverse order of removal.
CAUTION:
• Visually check the clip and pawls for deformation and damage during installation. Replace as neces-
sary.
• When installing the rear kicking plate inner, check that the clip and pawls are securely placed in the
body panel holes.
REAR KICKING PLATE : Remova l and Installation - OuterINFOID:0000000009461352
REMOVAL
ALJIA0888ZZ
ALJIA0889ZZ
Revision: November 20132014 Altima NAM
Page 2914 of 4801
BODY SIDE TRIMINT-23
< REMOVAL AND INSTALLATION >
C
D E
F
G H
I
K L
M A
B
INT
N
O P
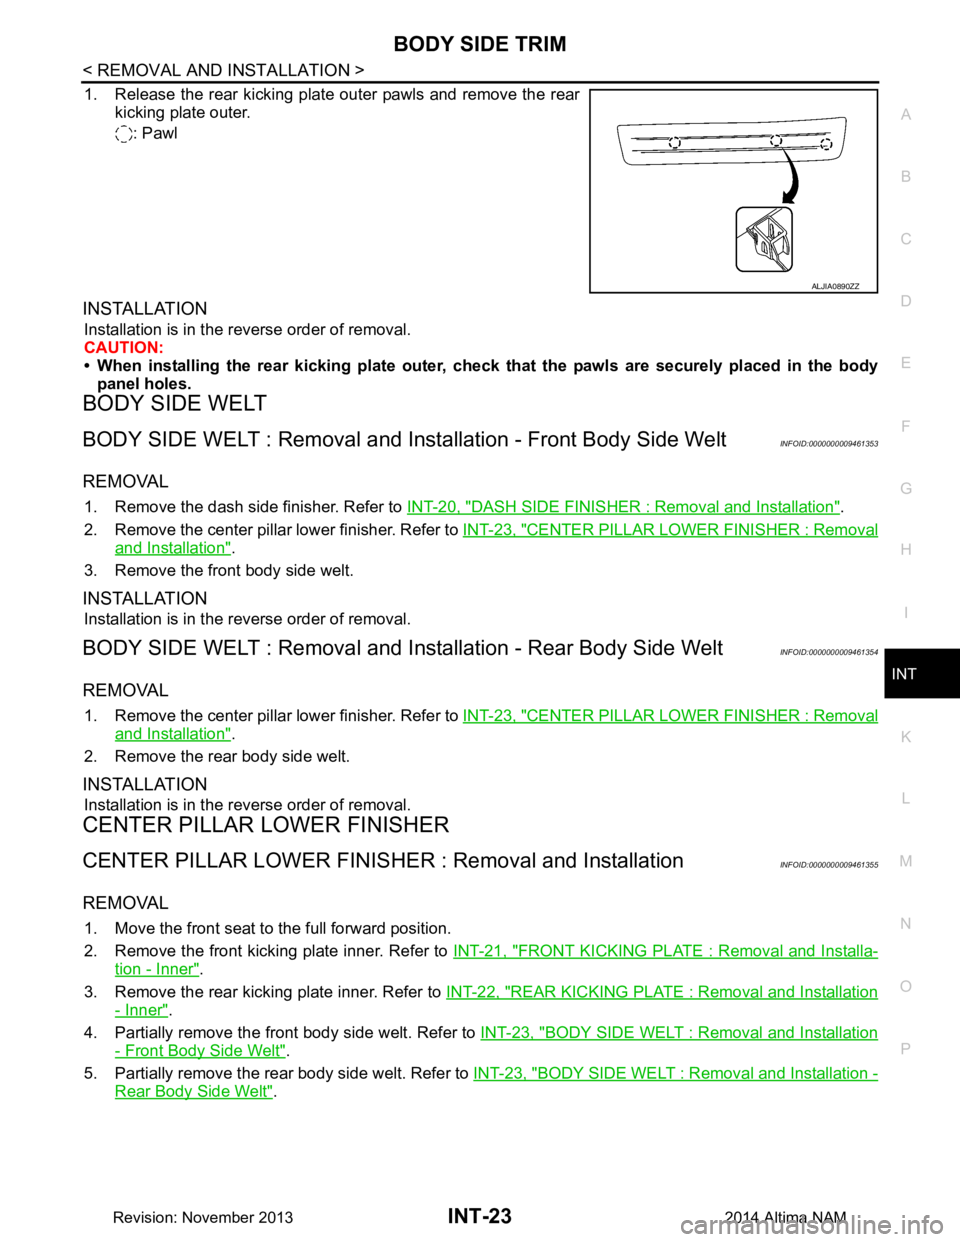
1. Release the rear kicking plate outer pawls and remove the rear kicking plate outer.
: Pawl
INSTALLATION
Installation is in the reverse order of removal.
CAUTION:
• When installing the rear kicking plate outer, ch eck that the pawls are securely placed in the body
panel holes.
BODY SIDE WELT
BODY SIDE WELT : Removal and Inst allation - Front Body Side WeltINFOID:0000000009461353
REMOVAL
1. Remove the dash side finisher. Refer to INT-20, "DASH SIDE FINISHER : Removal and Installation".
2. Remove the center pillar lower finisher. Refer to INT-23, "CENTER PILLAR LOWER FINISHER : Removal
and Installation".
3. Remove the front body side welt.
INSTALLATION
Installation is in the reverse order of removal.
BODY SIDE WELT : Removal and In stallation - Rear Body Side WeltINFOID:0000000009461354
REMOVAL
1. Remove the center pillar lower finisher. Refer to INT-23, "CENTER PILLAR LOWER FINISHER : Removal
and Installation".
2. Remove the rear body side welt.
INSTALLATION
Installation is in the reverse order of removal.
CENTER PILLAR LOWER FINISHER
CENTER PILLAR LOWER FINISHER : Removal and InstallationINFOID:0000000009461355
REMOVAL
1. Move the front seat to the full forward position.
2. Remove the front kicking plate inner. Refer to INT-21, "FRONT KICKING PLATE : Removal and Installa-
tion - Inner".
3. Remove the rear kicking plate inner. Refer to INT-22, "REAR KICKING PLATE : Removal and Installation
- Inner".
4. Partially remove the front body side welt. Refer to INT-23, "BODY SIDE WELT : Removal and Installation
- Front Body Side Welt".
5. Partially remove the rear body side welt. Refer to INT-23, "BODY SIDE WELT : Removal and Installation -
Rear Body Side Welt".
ALJIA0890ZZ
Revision: November 20132014 Altima NAM
Page 2915 of 4801
INT-24
< REMOVAL AND INSTALLATION >
BODY SIDE TRIM
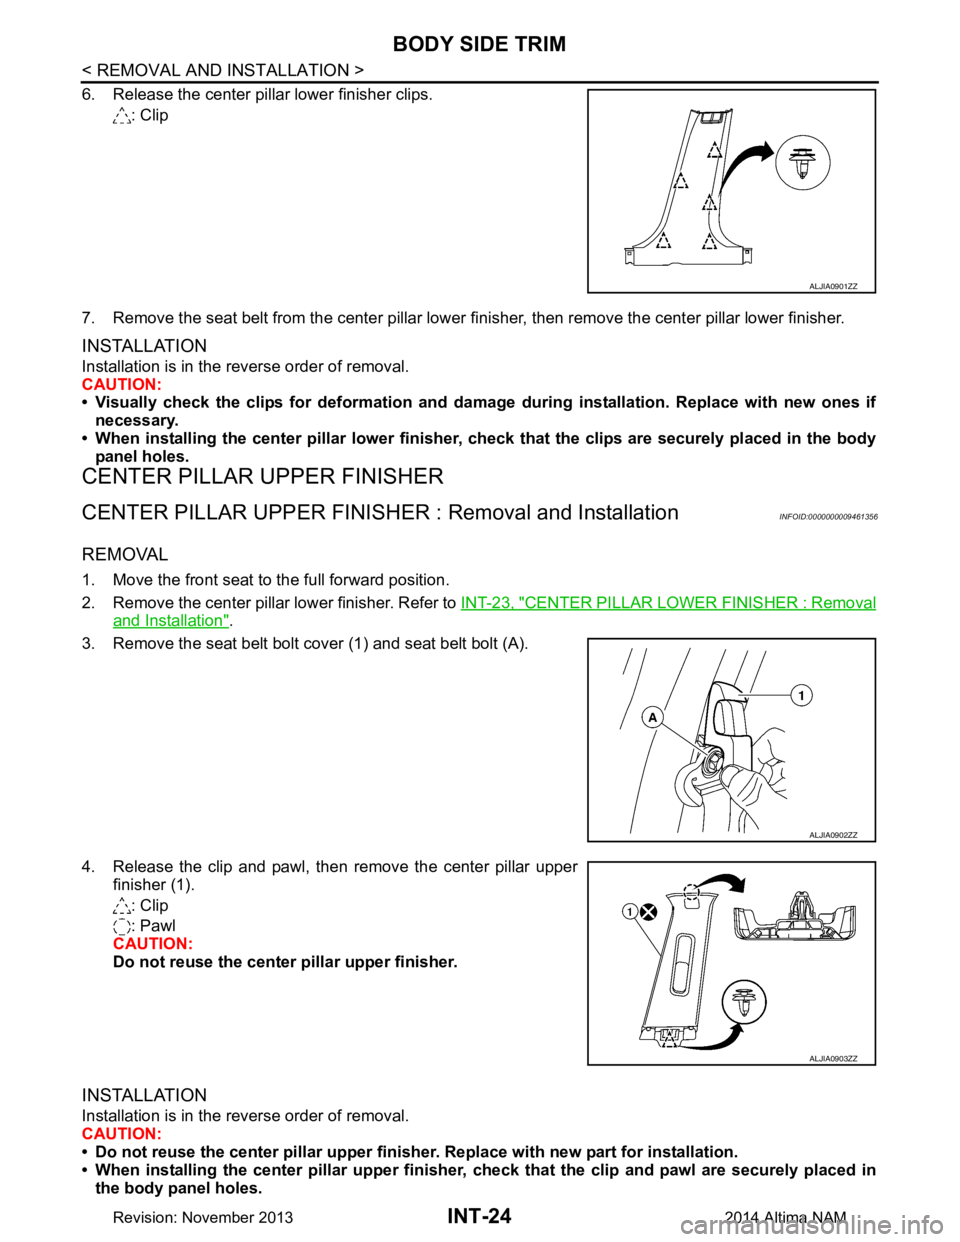
6. Release the center pillar lower finisher clips.: Clip
7. Remove the seat belt from the center pillar lower fi nisher, then remove the center pillar lower finisher.
INSTALLATION
Installation is in the reverse order of removal.
CAUTION:
• Visually check the clips for deformation and dama ge during installation. Replace with new ones if
necessary.
• When installing the center pillar lower finisher, check that the clips are securely placed in the body
panel holes.
CENTER PILLAR UPPER FINISHER
CENTER PILLAR UPPER FINISHER : Removal and InstallationINFOID:0000000009461356
REMOVAL
1. Move the front seat to the full forward position.
2. Remove the center pillar lower finisher. Refer to INT-23, "CENTER PILLAR LOWER FINISHER : Removal
and Installation".
3. Remove the seat belt bolt cover (1) and seat belt bolt (A).
4. Release the clip and pawl, then remove the center pillar upper finisher (1).
: Clip
: Pawl
CAUTION:
Do not reuse the center pillar upper finisher.
INSTALLATION
Installation is in the reverse order of removal.
CAUTION:
• Do not reuse the center pillar upper finisher. Replace with new part for installation.
• When installing the center pillar upper finisher, check that the clip and pawl are securely placed in
the body panel holes.
ALJIA0901ZZ
ALJIA0902ZZ
ALJIA0903ZZ
Revision: November 20132014 Altima NAM
Page 2916 of 4801
BODY SIDE TRIMINT-25
< REMOVAL AND INSTALLATION >
C
D E
F
G H
I
K L
M A
B
INT
N
O P
REAR PILLAR FINISHER
REAR PILLAR FINISHER : Removal and InstallationINFOID:0000000009461357
REMOVAL
1. Remove the rear seat bolster. Refer to SE-38, "Removal and Installation - Rear Seat Bolster".
2. Partially remove the rear body side welt. Refer to INT-23, "BODY SIDE WELT : Removal and Installation -
Rear Body Side Welt".
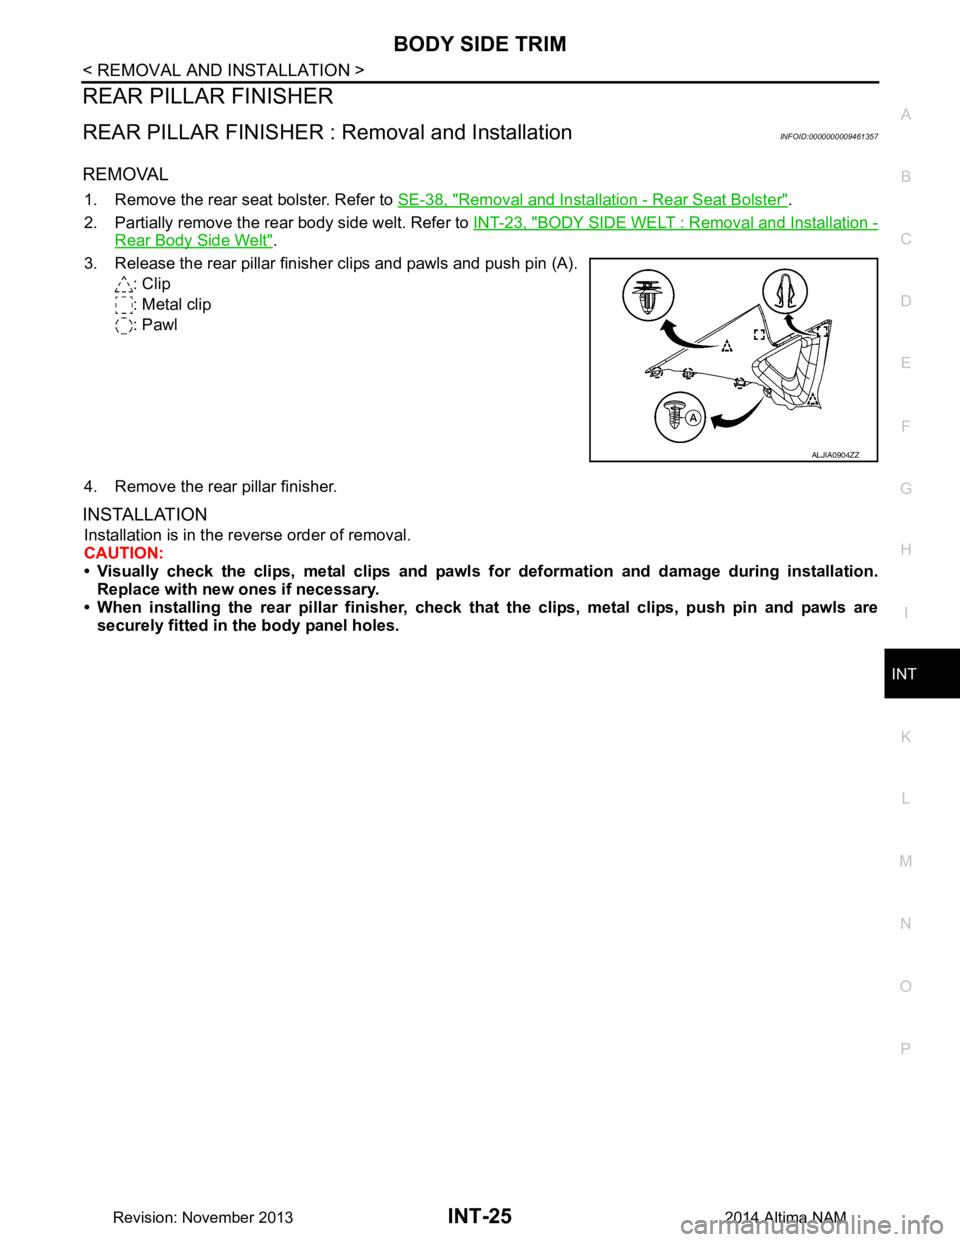
3. Release the rear pillar finisher clips and pawls and push pin (A). : Clip
: Metal clip
: Pawl
4. Remove the rear pillar finisher.
INSTALLATION
Installation is in the reverse order of removal.
CAUTION:
• Visually check the clips, metal clips and pawls for deformation and damage during installation.
Replace with new ones if necessary.
• When installing the rear pillar finisher, check that the clips, metal clips, push pin and pawls are
securely fitted in the body panel holes.
ALJIA0904ZZ
Revision: November 20132014 Altima NAM
Page 2928 of 4801
IP-2
< PRECAUTION >
PRECAUTIONS
PRECAUTION
PRECAUTIONS
Precaution for Supplemental Restraint System (SRS) "AIR BAG" and "SEAT BELT
PRE-TENSIONER"
INFOID:0000000009951558
The Supplemental Restraint System such as “A IR BAG” and “SEAT BELT PRE-TENSIONER”, used along
with a front seat belt, helps to reduce the risk or severi ty of injury to the driver and front passenger for certain
types of collision. Information necessary to service the system safely is included in the SR and SB section of
this Service Manual.
WARNING:
• To avoid rendering the SRS inopera tive, which could increase the risk of personal injury or death in
the event of a collision which would result in air bag inflation, all maintenance must be performed by
an authorized NISS AN/INFINITI dealer.
• Improper maintenance, including in correct removal and installation of the SRS, can lead to personal
injury caused by unintent ional activation of the system. For re moval of Spiral Cable and Air Bag
Module, see the SR section.
• Do not use electrical test equipmen t on any circuit related to the SRS unless instructed to in this
Service Manual. SRS wiring harn esses can be identified by yellow and/or orange harnesses or har-
ness connectors.
PRECAUTIONS WHEN USING POWER TOOLS (AIR OR ELECTRIC) AND HAMMERS
WARNING:
• When working near the Airbag Diagnosis Sensor Unit or other Airbag System sensors with the Igni-
tion ON or engine running, DO NOT use air or electri c power tools or strike near the sensor(s) with a
hammer. Heavy vibration could activate the sensor( s) and deploy the air bag(s), possibly causing
serious injury.
• When using air or electric power tools or hammers , always switch the Ignition OFF, disconnect the
battery and wait at least three minutes before performing any service.
Precaution for WorkINFOID:0000000009461371
• When removing or disassembling each component, be careful not to damage or deform it. If a component may be subject to interference, be sure to protect it with a shop cloth.
• When removing (disengaging) components with a screwdriver or similar tool, be sure to wrap the component with a shop cloth or vinyl tape to protect it.
• Protect the removed parts with a s hop cloth and prevent them from being dropped.
• Replace a deformed or damaged clip.
• If a part is specified as a non-reusable part, always replace it with a new one.
• Be sure to tighten bolts and nuts securely to the specified torque.
• After installation is complete, be sure to check that each part works properly.
• Follow the steps below to clean components:
- Water soluble dirt:
• Dip a soft cloth into lukewarm water, wring the water out of the cloth and wipe the dirty area.
• Then rub with a soft, dry cloth.
- Oily dirt:
• Dip a soft cloth into lukewarm water with mild detergent (concentration: within 2 to 3%) and wipe the dirty area.
• Then dip a cloth into fresh water, wring the water out of the cloth and wipe the detergent off.
• Then rub with a soft, dry cloth.
- Do not use organic solvent such as thinner, benzene, alcohol or gasoline.
- For genuine leather seats, use a genuine leather seat cleaner.
Revision: November 20132014 Altima NAM