2014 NISSAN TEANA washer fluid
[x] Cancel search: washer fluidPage 688 of 4801
![NISSAN TEANA 2014 Service Manual
DAS
ADDITIONAL SERVICE WHEN REPLACING REAR VIEW CAMERA
DAS-255
< BASIC INSPECTION > [MOD]
C
D E
F
G H
I
J
K L
M B
N P
A
ADDITIONAL SERVICE WHEN RE PLACING REAR VIEW CAMERA
DescriptionINFOID:0000000 NISSAN TEANA 2014 Service Manual
DAS
ADDITIONAL SERVICE WHEN REPLACING REAR VIEW CAMERA
DAS-255
< BASIC INSPECTION > [MOD]
C
D E
F
G H
I
J
K L
M B
N P
A
ADDITIONAL SERVICE WHEN RE PLACING REAR VIEW CAMERA
DescriptionINFOID:0000000](/manual-img/5/57390/w960_57390-687.png)
DAS
ADDITIONAL SERVICE WHEN REPLACING REAR VIEW CAMERA
DAS-255
< BASIC INSPECTION > [MOD]
C
D E
F
G H
I
J
K L
M B
N P
A
ADDITIONAL SERVICE WHEN RE PLACING REAR VIEW CAMERA
DescriptionINFOID:0000000009464904
Always perform the calibration after removing and installing or replacing the rear view camera.
CAUTION:
The system does not operate normally unless the rear view camera aiming adjustment is performed.
Always perform it.
Work ProcedureINFOID:0000000009464905
1.CAMERA AIMING ADJUSTMENT
Perform the camera aiming adjustment with CONSULT. Refer to DAS-256, "Description"
.
>> GO TO 2.
2.PERFORM SELF-DIAGNOSIS
Perform the self-diagnosis of rear view camera with CONSULT. Check if any DTC is detected.
Is any DTC detected?
YES >> Perform the trouble diagnosis for the detected DTC. Refer to DAS-239, "DTC Index".
NO >> GO TO 3.
3.LDW/BSW SYSTEM ACTION TEST
1. Perform the LDW/BSW syst em action test. Refer to DAS-254, "Description"
.
2. Check that the LDW/BSW system operates normally.
Is the inspection result normal?
YES >> Inspection End.
NO >> GO TO 4.
4.LDW/BSW ACTIVE TEST
1. Perform WASH ACTIVE on Active Test using CONSULT.
2. Perform air and washer tube connection check by AIR & WASH ACTIVE on Active Test:
(1) Washer fluid output count on the rear view camera is 3 to 5 times → OK
(2) Washer fluid output count on the rear view camera is 10 times → Check tube with yellow marking
(3) Washer fluid output count on the rear view camera is 1 time → Check tube with green marking
(4) No washer fluid output → Check tube with blue marking or check valve
>> Inspection End.
Revision: November 20132014 Altima NAMRevision: November 20132014 Altima NAM
Page 2556 of 4801
GI-28
< PRECAUTION >
PRECAUTIONS
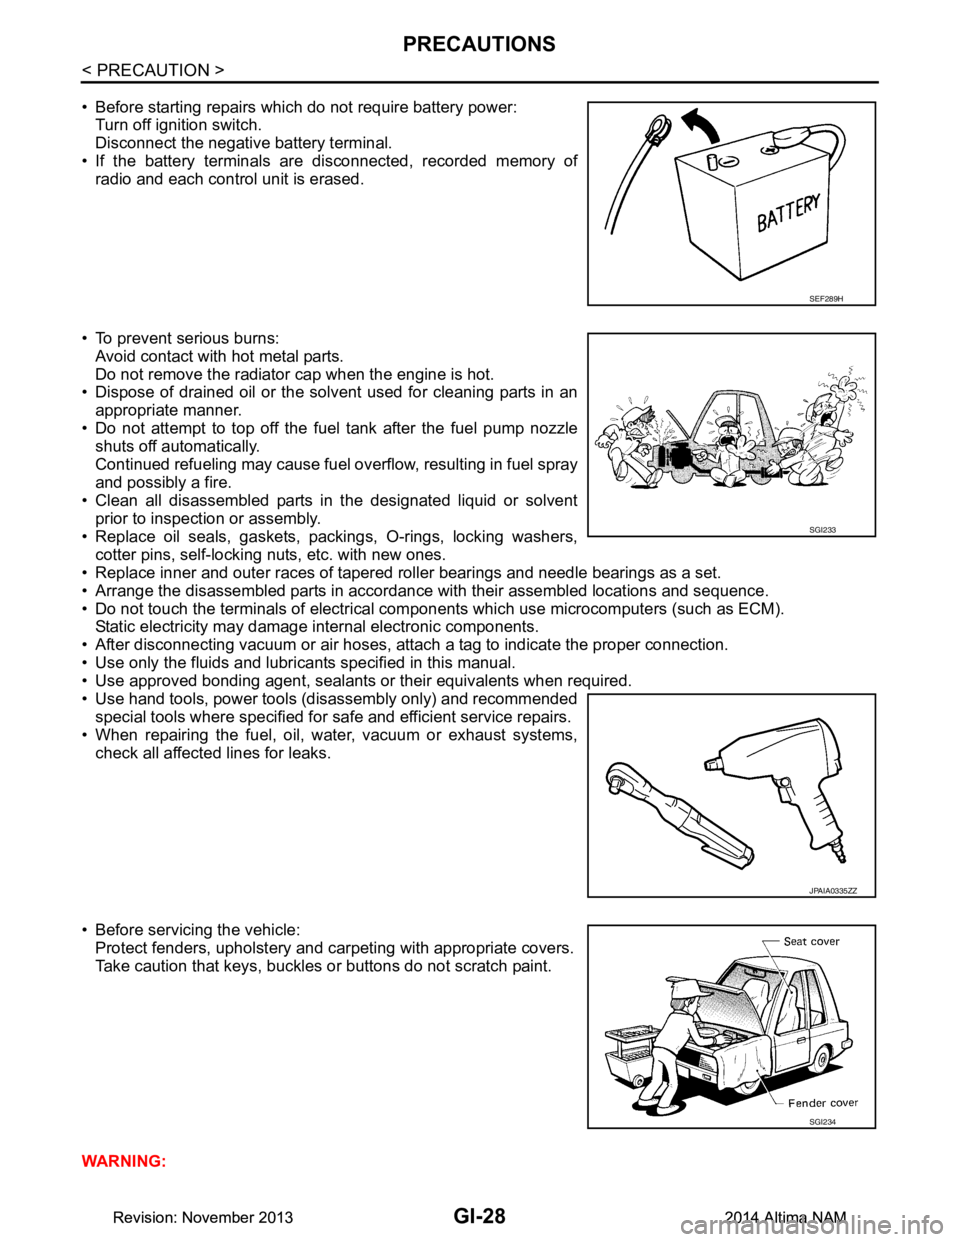
• Before starting repairs which do not require battery power:Turn off ignition switch.
Disconnect the negative battery terminal.
• If the battery terminals are disconnected, recorded memory of
radio and each control unit is erased.
• To prevent serious burns: Avoid contact with hot metal parts.
Do not remove the radiator cap when the engine is hot.
• Dispose of drained oil or the solvent used for cleaning parts in an
appropriate manner.
• Do not attempt to top off the fuel tank after the fuel pump nozzle
shuts off automatically.
Continued refueling may cause fuel overflow, resulting in fuel spray
and possibly a fire.
• Clean all disassembled parts in the designated liquid or solvent
prior to inspection or assembly.
• Replace oil seals, gaskets, packings, O-rings, locking washers, cotter pins, self-locking nuts, etc. with new ones.
• Replace inner and outer races of tapered roller bearings and needle bearings as a set.
• Arrange the disassembled parts in accordance with their assembled locations and sequence.
• Do not touch the terminals of electrical com ponents which use microcomputers (such as ECM).
Static electricity may damage internal electronic components.
• After disconnecting vacuum or air hoses, atta ch a tag to indicate the proper connection.
• Use only the fluids and lubricants specified in this manual.
• Use approved bonding agent, sealants or their equivalents when required.
• Use hand tools, power tools (disassembly only) and recommended special tools where specified for safe and efficient service repairs.
• When repairing the fuel, oil, water, vacuum or exhaust systems,
check all affected lines for leaks.
• Before servicing the vehicle: Protect fenders, upholstery and carpeting with appropriate covers.
Take caution that keys, buckles or buttons do not scratch paint.
WARNING:
SEF289H
SGI233
JPAIA0335ZZ
SGI234
Revision: November 20132014 Altima NAMRevision: November 20132014 Altima NAM
Page 3190 of 4801
MA-6
< PERIODIC MAINTENANCE >
GENERAL MAINTENANCE
UNDER THE HOOD AND VEHICLE
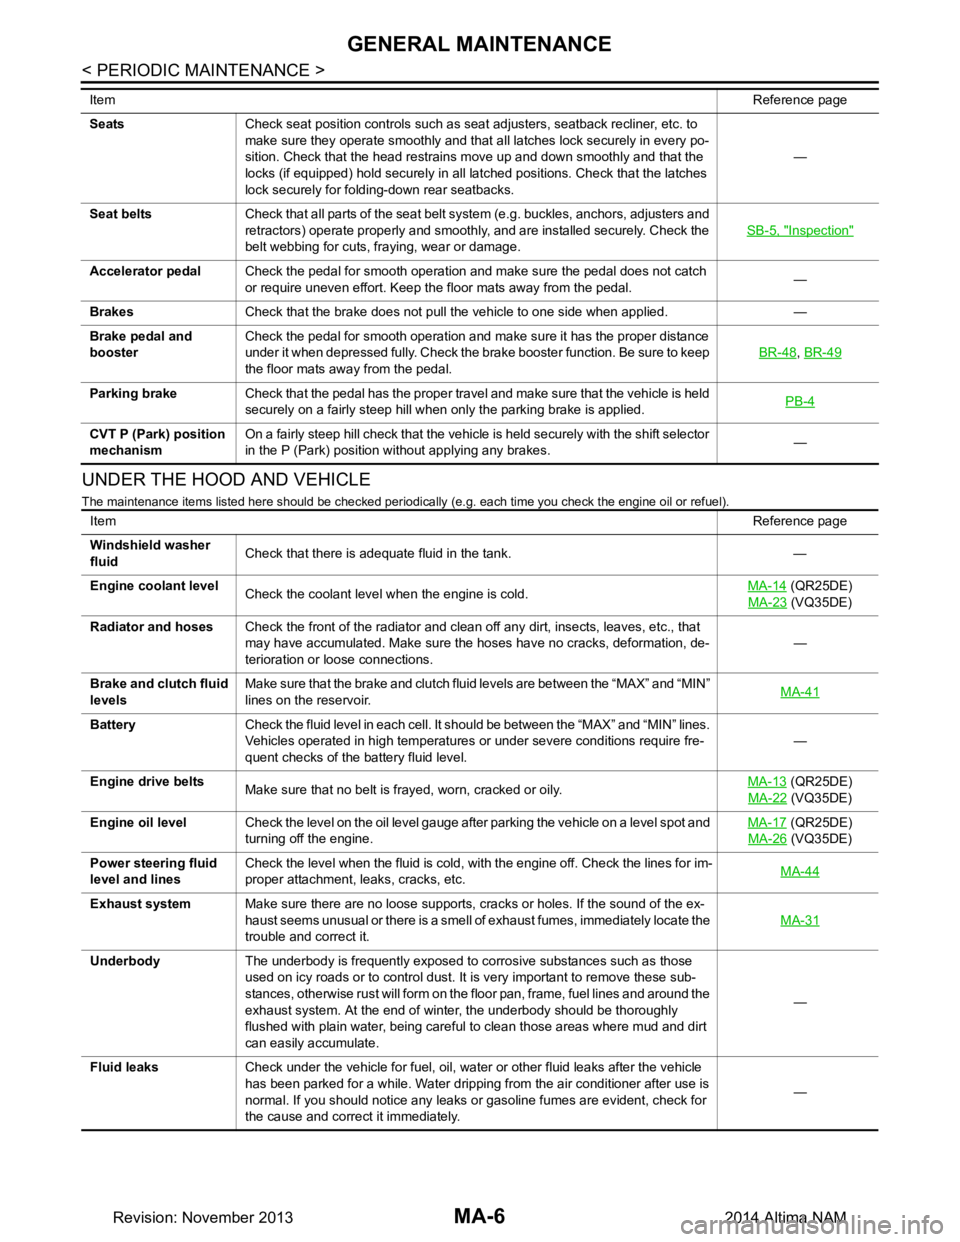
The maintenance items listed here should be checked periodically (e.g. each time you check the engine oil or refuel).
SeatsCheck seat position controls such as seat adjusters, seatback recliner, etc. to
make sure they operate smoothly and that all latches lock securely in every po-
sition. Check that the head restrains move up and down smoothly and that the
locks (if equipped) hold securely in all latched positions. Check that the latches
lock securely for folding-down rear seatbacks. —
Seat belts Check that all parts of the seat belt system (e.g. buckles, anchors, adjusters and
retractors) operate properly and smoothly, and are installed securely. Check the
belt webbing for cuts, fraying, wear or damage. SB-5, "Inspection"
Accelerator pedal
Check the pedal for smooth operation and make sure the pedal does not catch
or require uneven effort. Keep the floor mats away from the pedal. —
Brakes Check that the brake does not pull the vehicle to one side when applied. —
Brake pedal and
booster Check the pedal for smooth operation and make sure it has the proper distance
under it when depressed fully. Check the brake booster function. Be sure to keep
the floor mats away from the pedal. BR-48
,
BR-49
Parking brake Check that the pedal has the proper travel and make sure that the vehicle is held
securely on a fairly steep hill when only the parking brake is applied. PB-4
CVT P (Park) position
mechanism On a fairly steep hill check that the vehicle is held securely with the shift selector
in the P (Park) position without applying any brakes. —
Item
Reference page
ItemReference page
Windshield washer
fluid Check that there is adequate fluid in the tank. —
Engine coolant level Check the coolant level when the engine is cold. MA-14
(QR25DE)
MA-23
(VQ35DE)
Radiator and hoses Check the front of the radiator and clean off any dirt, insects, leaves, etc., that
may have accumulated. Make sure the hoses have no cracks, deformation, de-
terioration or loose connections. —
Brake and clutch fluid
levels Make sure that the brake and clutch fluid levels are between the “MAX” and “MIN”
lines on the reservoir. MA-41
Battery
Check the fluid level in each cell. It should be between the “MAX” and “MIN” lines.
Vehicles operated in high temperatures or under severe conditions require fre-
quent checks of the battery fluid level. —
Engine drive belts Make sure that no belt is frayed, worn, cracked or oily. MA-13
(QR25DE)
MA-22
(VQ35DE)
Engine oil level Check the level on the oil level gauge after parking the vehicle on a level spot and
turning off the engine. MA-17
(QR25DE)
MA-26
(VQ35DE)
Power steering fluid
level and lines Check the level when the fluid is cold, with the engine off. Check the lines for im-
proper attachment, leaks, cracks, etc. MA-44
Exhaust system
Make sure there are no loose supports, cracks or holes. If the sound of the ex-
haust seems unusual or there is a smell of exhaust fumes, immediately locate the
trouble and correct it. MA-31
Underbody
The underbody is frequently exposed to corrosive substances such as those
used on icy roads or to control dust. It is very important to remove these sub-
stances, otherwise rust will form on the floor pan, frame, fuel lines and around the
exhaust system. At the end of winter, the underbody should be thoroughly
flushed with plain water, being careful to clean those areas where mud and dirt
can easily accumulate. —
Fluid leaks Check under the vehicle for fuel, oil, water or other fluid leaks after the vehicle
has been parked for a while. Water dripping from the air conditioner after use is
normal. If you should notice any leaks or gasoline fumes are evident, check for
the cause and correct it immediately. —
Revision: November 20132014 Altima NAM
Page 3195 of 4801
RECOMMENDED FLUIDS AND LUBRICANTSMA-11
< PERIODIC MAINTENANCE >
C
D E
F
G H
I
J
K L
M B
MA
N
O A
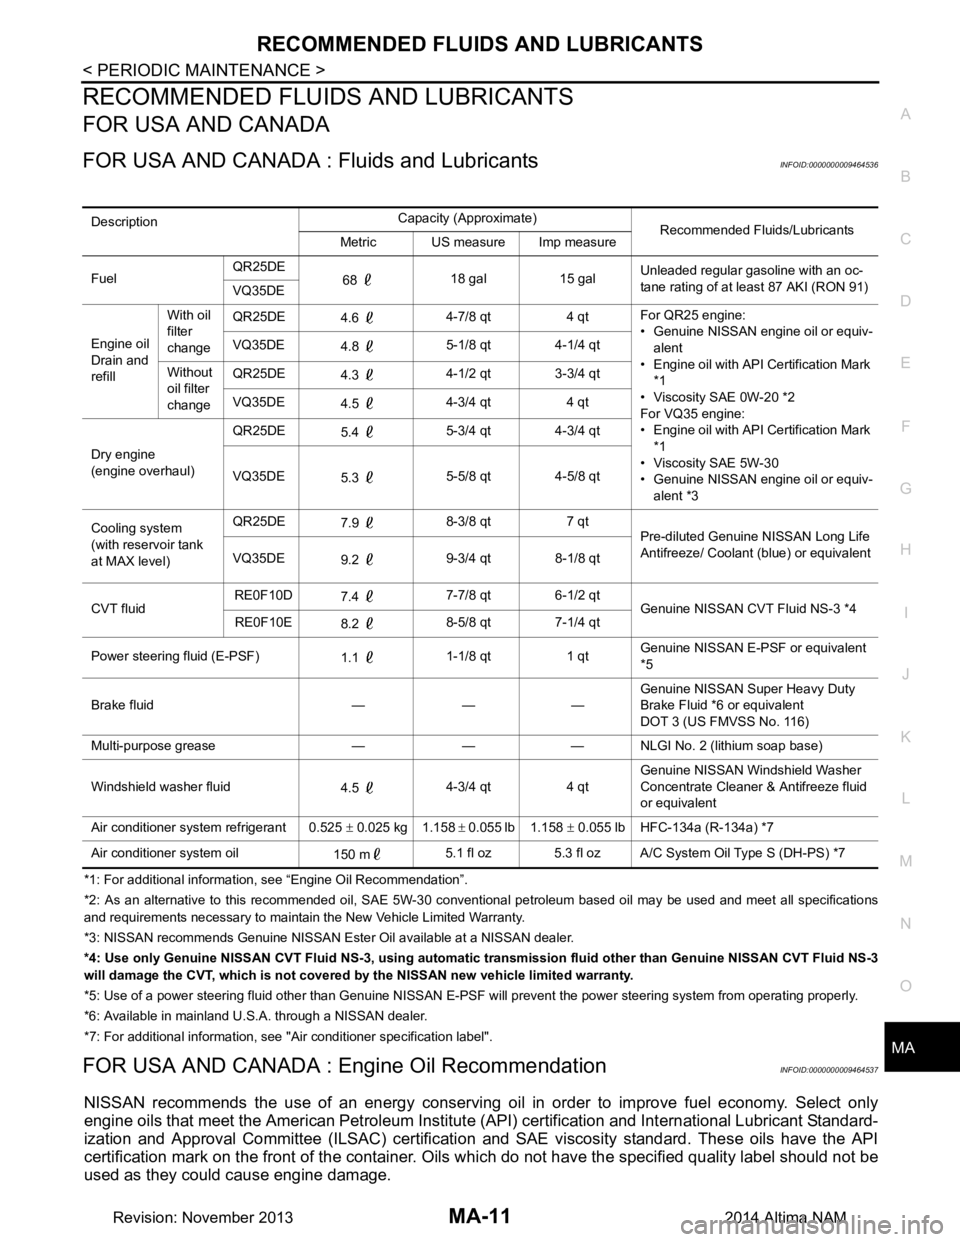
RECOMMENDED FLUIDS AND LUBRICANTS
FOR USA AND CANADA
FOR USA AND CANADA :
Fluids and LubricantsINFOID:0000000009464536
*1: For additional information, see “Engine Oil Recommendation”.
*2: As an alternative to this recommended oil, SAE 5W-30 conventional petroleum based oil may be used and meet all specificatio ns
and requirements necessary to maintain the New Vehicle Limited Warranty.
*3: NISSAN recommen ds Genuine NISSAN Ester Oil av ailable at a NISSAN dealer.
*4: Use only Genuine NISSAN CVT Fluid NS -3, using automatic transmission fluid other than Genuine NISSAN CVT Fluid NS-3
will damage the CVT, which is not covered by the NISSAN new vehicle limited warranty.
*5: Use of a power steering fluid other than Genuine NISSAN E-PSF will prevent the power steering system from operating properly.
*6: Available in mainland U. S.A. through a NISSAN dealer.
*7: For additional information, see "Air conditioner specification label".
FOR USA AND CANADA : En gine Oil RecommendationINFOID:0000000009464537
NISSAN recommends the use of an energy conserving o il in order to improve fuel economy. Select only
engine oils that meet the American Petroleum Institut e (API) certification and International Lubricant Standard-
ization and Approval Committee (ILSAC) certificati on and SAE viscosity standard. These oils have the API
certification mark on the front of the container. Oils which do not have the specified quality label should not be
used as they could cause engine damage.
Description Capacity (Approximate)
Recommended Fluids/Lubricants
Metric US measure Imp measure
Fuel QR25DE
68 18 gal 15 gal Unleaded regular gasoline with an oc-
tane rating of at least 87 AKI (RON 91)
VQ35DE
Engine oil
Drain and
refill With oil
filter
change QR25DE
4.6 4-7/8 qt 4 qt For QR25 engine:
• Genuine NISSAN engine oil or equiv- alent
• Engine oil with API Certification Mark
*1
• Viscosity SAE 0W-20 *2
For VQ35 engine:
• Engine oil with API Certification Mark
*1
• Viscosity SAE 5W-30
• Genuine NISSAN engine oil or equiv-
alent *3
VQ35DE
4.8 5-1/8 qt 4-1/4 qt
Without
oil filter
change QR25DE
4.3 4-1/2 qt 3-3/4 qt
VQ35DE 4.5 4-3/4 qt 4 qt
Dry engine
(engine overhaul) QR25DE
5.4 5-3/4 qt 4-3/4 qt
VQ35DE 5.3 5-5/8 qt 4-5/8 qt
Cooling system
(with reservoir tank
at MAX level) QR25DE
7.9 8-3/8 qt 7 qt
Pre-diluted Genuine NISSAN Long Life
Antifreeze/ Coolant (blue) or equivalent
VQ35DE 9.2 9-3/4 qt 8-1/8 qt
CVT fluid RE0F10D
7.4 7-7/8 qt 6-1/2 qt
Genuine NISSAN CVT Fluid NS-3 *4
RE0F10E 8.2 8-5/8 qt 7-1/4 qt
Power steering fluid (E-PSF) 1.1 1-1/8 qt 1 qt Genuine NISSAN E-PSF or equivalent
*5
Brake fluid — — — Genuine NISSAN Super Heavy Duty
Brake Fluid *6 or equivalent
DOT 3 (US FMVSS No. 116)
Multi-purpose grease — — — NLGI No. 2 (lithium soap base)
Windshield washer fluid 4.5 4-3/4 qt 4 qt Genuine NISSAN Windshield Washer
Concentrate Cleaner & Antifreeze fluid
or equivalent
Air conditioner system refrigerant 0.525 ± 0.025 kg 1.158 ± 0.055 lb 1.158 ± 0.055 lb HFC-134a (R-134a) *7
Air conditioner system oil 150 m5.1 fl oz 5.3 fl oz A/C System Oil Type S (DH-PS) *7
Revision: November 20132014 Altima NAM
Page 3199 of 4801
ENGINE MAINTENANCE (QR25DE)MA-15
< PERIODIC MAINTENANCE >
C
D E
F
G H
I
J
K L
M B
MA
N
O A
1. Install the radiator drain plug. Install the reservoir tank and cylin-
der block drain plug, if removed for a total system drain or for
engine removal or repair.
• The radiator must be completely empty of coolant and
water.
• Apply sealant to the threads of the cylinder block drain
plug. Use Genuine High Pe rformance Thread Sealant or
equivalent. Refer to GI-21, "Recommended Chemical
Products and Sealants".
: Front
CAUTION:
Do not reuse copper sealing washers.
2. If disconnected, reattach the upper radiator hose at the engine side.
3. Set the vehicle heater controls to the full HOT and heat er ON position. Turn the vehicle ignition ON with
the engine OFF as necessary to activate the heater mode.
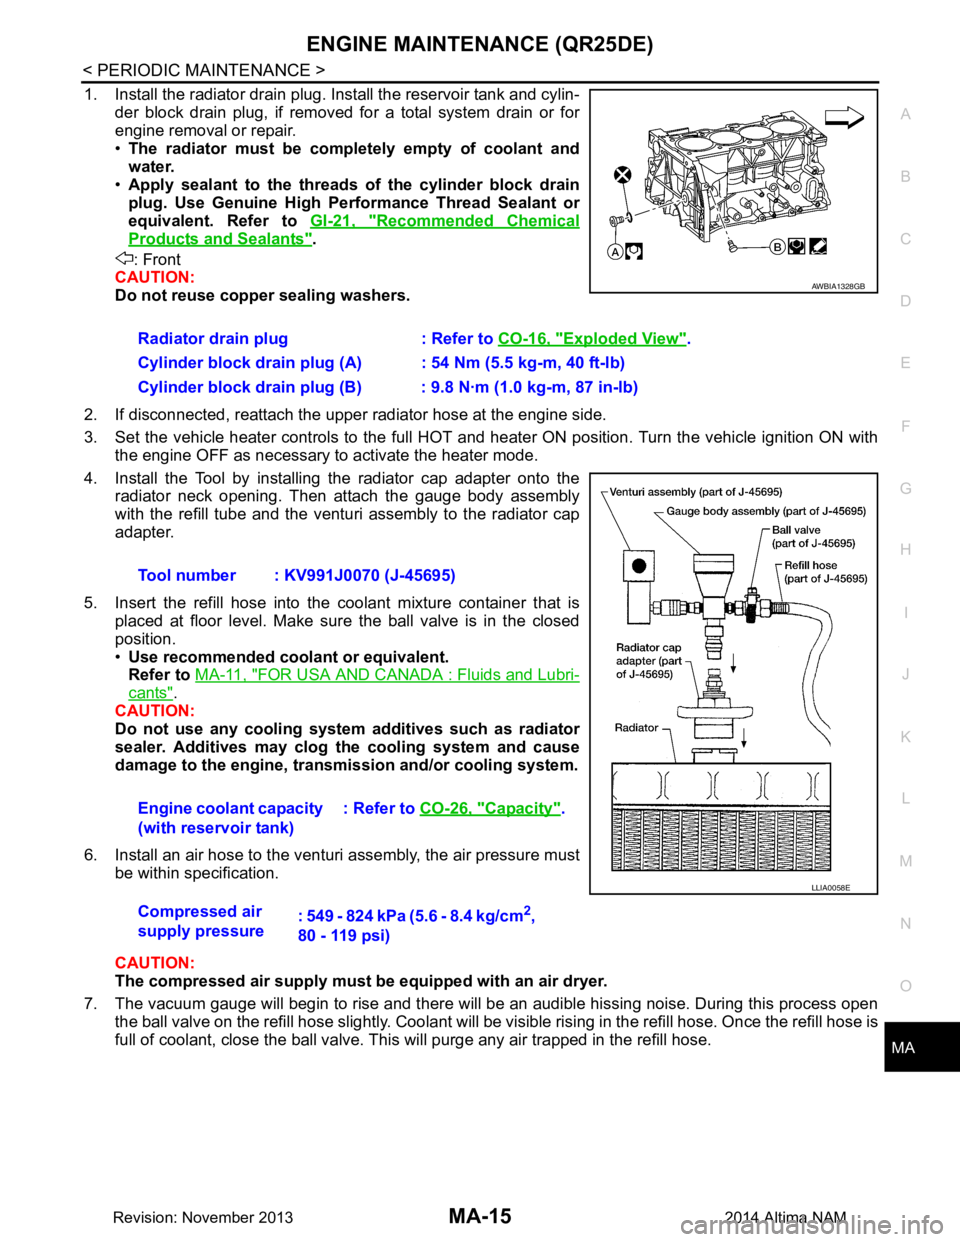
4. Install the Tool by installing the radiator cap adapter onto the radiator neck opening. Then attach the gauge body assembly
with the refill tube and the venturi assembly to the radiator cap
adapter.
5. Insert the refill hose into the coolant mixture container that is
placed at floor level. Make sure the ball valve is in the closed
position.
• Use recommended coolant or equivalent.
Refer to MA-11, "FOR USA AND CANADA : Fluids and Lubri-
cants".
CAUTION:
Do not use any cooling system additives such as radiator
sealer. Additives may clog th e cooling system and cause
damage to the engine, transmission and/or cooling system.
6. Install an air hose to the venturi assembly, the air pressure must be within specification.
CAUTION:
The compressed air supply must be equipped with an air dryer.
7. The vacuum gauge will begin to rise and there will be an audible hissing noise. During this process open the ball valve on the refill hose slightly. Coolant will be vi sible rising in the refill hose. Once the refill hose is
full of coolant, close the ball valve. Th is will purge any air trapped in the refill hose.
Radiator drain plug : Refer to
CO-16, "Exploded View"
.
Cylinder block drain plug (A) : 54 Nm (5.5 kg-m, 40 ft-lb)
Cylinder block drain plug (B) : 9.8 N·m (1.0 kg-m, 87 in-lb)
Tool number : KV991J0070 (J-45695)
Engine coolant capacity
(with reservoir tank) : Refer to
CO-26, "Capacity"
.
Compressed air
supply pressure : 549 - 824 kPa (5.6 - 8.4 kg/cm
2,
80 - 119 psi)
AWBIA1328GB
LLIA0058E
Revision: November 20132014 Altima NAM
Page 3208 of 4801
MA-24
< PERIODIC MAINTENANCE >
ENGINE MAINTENANCE (VQ35DE)
REFILLING ENGINE COOLANT
1. Install the radiator drain plug. If the cooling system was drained completely, install the reservoir tank and
the cylinder block drain plugs.
• The radiator must be complete ly empty of coolant and water.
• Apply sealant to the threads of the cylinder block drain plug. Use Genuine High Performance
Thread Sealant or equivalent. Refer to GI-21, "Recommended Chemical Products and Sealants"
.
CAUTION:
Do not reuse copp er sealing washers.
2. If disconnected, reattach the upper radiator hose at the engine side.
3. Set the vehicle heater controls to the full HOT and heat er ON position. Turn the vehicle ignition ON with
the engine OFF as necessary to activate the heater mode.
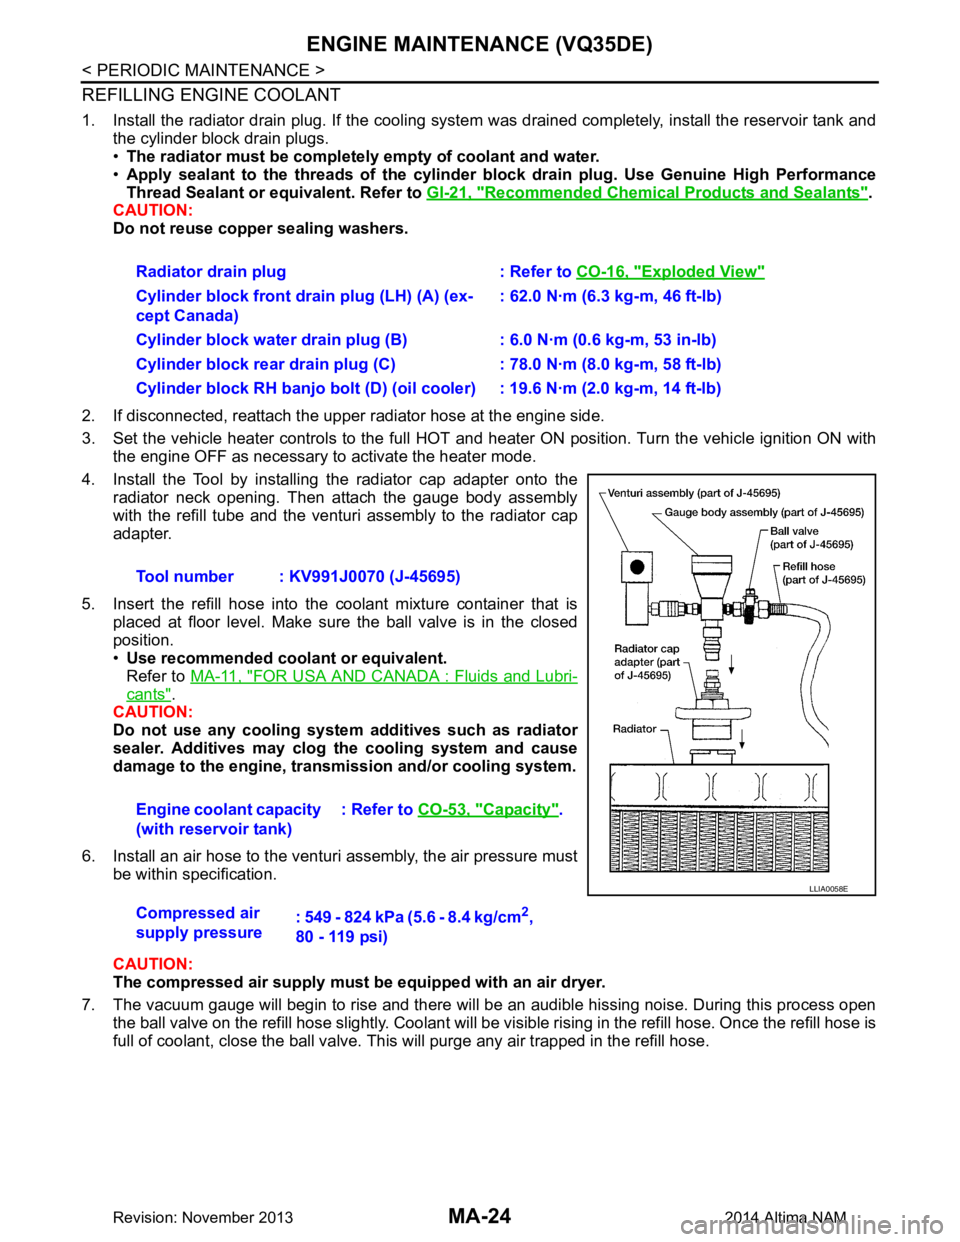
4. Install the Tool by installing the radiator cap adapter onto the radiator neck opening. Then attach the gauge body assembly
with the refill tube and the venturi assembly to the radiator cap
adapter.
5. Insert the refill hose into the coolant mixture container that is placed at floor level. Make sure the ball valve is in the closed
position.
• Use recommended coolant or equivalent.
Refer to MA-11, "FOR USA AND CANADA : Fluids and Lubri-
cants".
CAUTION:
Do not use any cooling system additives such as radiator
sealer. Additives may clog th e cooling system and cause
damage to the engine, transm ission and/or cooling system.
6. Install an air hose to the venturi assembly, the air pressure must be within specification.
CAUTION:
The compressed air supply must be equipped with an air dryer.
7. The vacuum gauge will begin to rise and there will be an audible hissing noise. During this process open the ball valve on the refill hose slightly. Coolant will be vi sible rising in the refill hose. Once the refill hose is
full of coolant, close the ball valve. This will purge any air trapped in the refill hose. Radiator drain plug : Refer to
CO-16, "Exploded View"
Cylinder block front drain plug (LH) (A) (ex-
cept Canada) : 62.0 N·m (6.3 kg-m, 46 ft-lb)
Cylinder block water drain plug (B) : 6.0 N·m (0.6 kg-m, 53 in-lb)
Cylinder block rear drain plug (C) : 78.0 N·m (8.0 kg-m, 58 ft-lb)
Cylinder block RH banjo bolt (D) (oil cooler) : 19.6 N·m (2.0 kg-m, 14 ft-lb)
Tool number : KV991J0070 (J-45695)
Engine coolant capacity
(with reservoir tank) : Refer to
CO-53, "Capacity"
.
Compressed air
supply pressure : 549 - 824 kPa (5.6 - 8.4 kg/cm
2,
80 - 119 psi)
LLIA0058E
Revision: November 20132014 Altima NAM
Page 3211 of 4801
ENGINE MAINTENANCE (VQ35DE)MA-27
< PERIODIC MAINTENANCE >
C
D E
F
G H
I
J
K L
M B
MA
N
O A
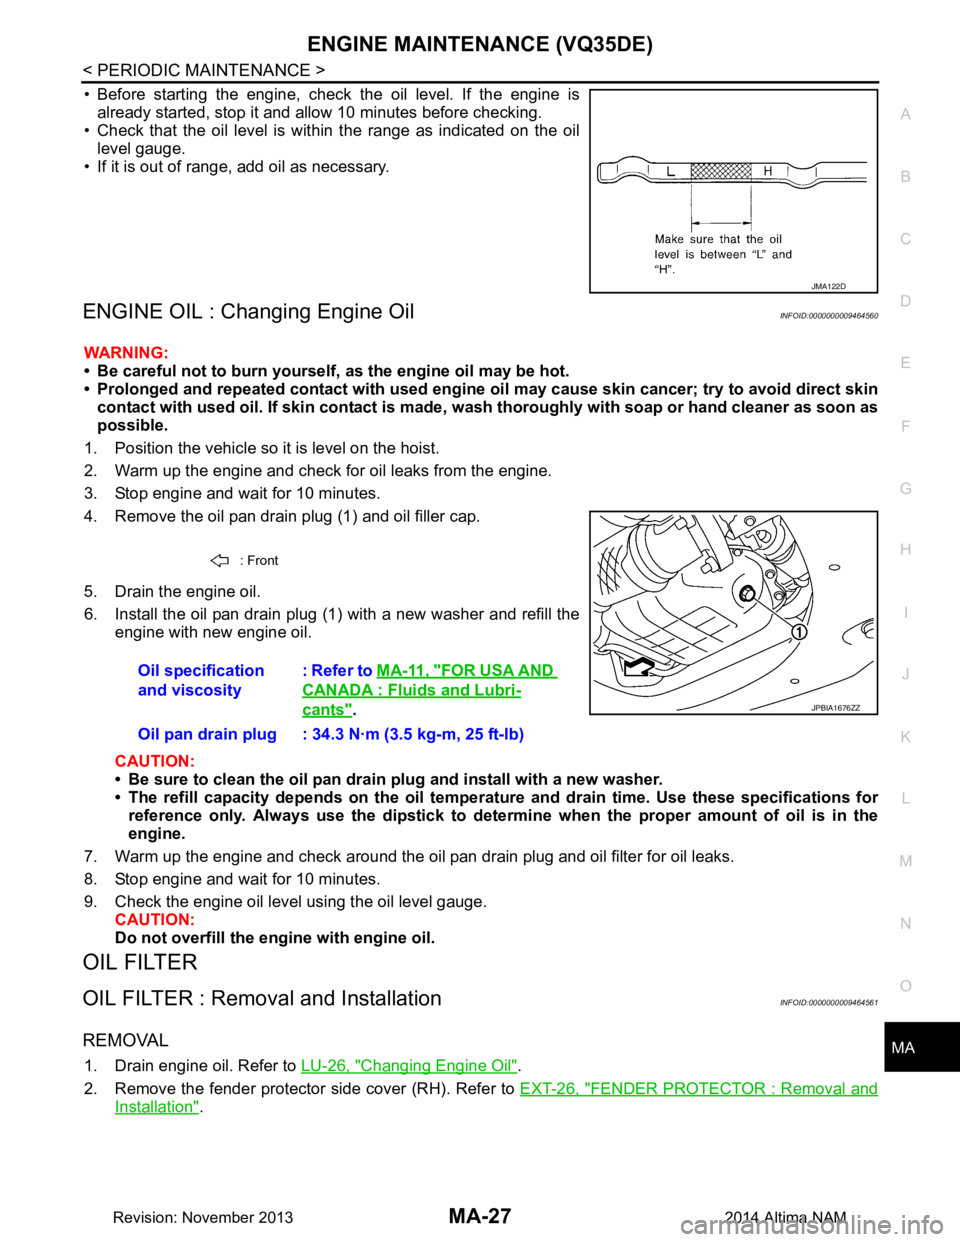
• Before starting the engine, check the oil level. If the engine is
already started, stop it and a llow 10 minutes before checking.
• Check that the oil level is within the range as indicated on the oil
level gauge.
• If it is out of range, add oil as necessary.
ENGINE OIL : Changing Engine OilINFOID:0000000009464560
WARNING:
• Be careful not to burn yourself, as the engine oil may be hot.
• Prolonged and repeated contact with used engine oil may cau se skin cancer; try to avoid direct skin
contact with used oil. If skin contact is made, w ash thoroughly with soap or hand cleaner as soon as
possible.
1. Position the vehicle so it is level on the hoist.
2. Warm up the engine and check for oil leaks from the engine.
3. Stop engine and wait for 10 minutes.
4. Remove the oil pan drain plug (1) and oil filler cap.
5. Drain the engine oil.
6. Install the oil pan drain plug (1) with a new washer and refill the engine with new engine oil.
CAUTION:
• Be sure to clean the oil pan drain plug and install with a new washer.
• The refill capacity depends on the oil temper ature and drain time. Use these specifications for
reference only. Always use the dipstick to determin e when the proper amount of oil is in the
engine.
7. Warm up the engine and check around the oil pan drain plug and oil filter for oil leaks.
8. Stop engine and wait for 10 minutes.
9. Check the engine oil level using the oil level gauge. CAUTION:
Do not overfill the en gine with engine oil.
OIL FILTER
OIL FILTER : Removal and InstallationINFOID:0000000009464561
REMOVAL
1. Drain engine oil. Refer to LU-26, "Changing Engine Oil".
2. Remove the fender protector side cover (RH). Refer to EXT-26, "FENDER PROTECTOR : Removal and
Installation".
JMA122D
: Front
Oil specification
and viscosity : Refer to
MA-11, "FOR USA AND
CANADA : Fluids and Lubri-
cants".
Oil pan drain plug : 34.3 N·m (3.5 kg-m, 25 ft-lb)JPBIA1676ZZ
Revision: November 20132014 Altima NAM
Page 3257 of 4801

MWI-2
Wiring Diagram .......................................................30
METER ...............................................................32
Wiring Diagram .................................................... ...32
BASIC INSPECTION ...................................51
DIAGNOSIS AND REPAIR WORKFLOW ...... ...51
Work flow ............................................................. ...51
DTC/CIRCUIT DIAGNOSIS ...................... ...53
U1000 CAN COMM CIRCUIT ......................... ...53
DTC Logic ............................................................ ...53
Diagnosis Procedure .............................................53
U1010 CONTROL UNIT (CAN) .........................54
Description ........................................................... ...54
DTC Logic ...............................................................54
Diagnosis Procedure ..............................................54
B2205 VEHICLE SPEED ...................................55
Description ........................................................... ...55
DTC Logic ...............................................................55
Diagnosis Procedure .............................................55
B2267 ENGINE SPEED .....................................56
Description ........................................................... ...56
DTC Logic ...............................................................56
Diagnosis Procedure ..............................................56
B2268 WATER TEMP ........................................57
Description ........................................................... ...57
DTC Logic ...............................................................57
Diagnosis Procedure ..............................................57
POWER SUPPLY AND GROUND CIRCUIT .....58
COMBINATION METER ........................................ ...58
COMBINATION METER : Diagnosis Procedure ....58
BCM (BODY CONTROL MODULE) ...................... ...58
BCM (BODY CONTROL MODULE) : Diagnosis
Procedure ............................................................ ...
58
IPDM E/R (INTELLIGENT POWER DISTRIBU-
TION MODULE ENGINE ROOM) .......................... ...
59
IPDM E/R (INTELLIGENT POWER DISTRIBU-
TION MODULE ENGINE ROOM) : Diagnosis Pro-
cedure .................................................................. ...
59
FUEL LEVEL SENSOR SIGNAL CIRCUIT .......61
Description ........................................................... ...61
Component Function Check ...................................61
Diagnosis Procedure .............................................61
Component Inspection ............................................62
PARKING BRAKE SWITCH SIGNAL CIR-
CUIT ................................................................ ...
63
Description ........................................................... ...63
Component Function Check ...................................63
Diagnosis Procedure ..............................................63
Component Inspection ......................................... ...63
WASHER FLUID LEVEL SWITCH CIRCUIT ....64
Description ........................................................... ...64
Diagnosis Procedure ...............................................64
Component Inspection ............................................64
AMBIENT SENSOR SIGNAL CIRCUIT ............66
Description ........................................................... ...66
Component Function Check ...................................66
Diagnosis Procedure ...............................................66
Component Inspection ............................................67
METER CONTROL SWITCH SIGNAL CIR-
CUIT ................................................................ ...
68
Diagnosis Procedure ............................................ ...68
Component Inspection ............................................69
STEERING SWITCH ..........................................70
Description ........................................................... ...70
Diagnosis Procedure ...............................................70
Component Inspection ............................................70
SYMPTOM DIAGNOSIS ............................72
THE FUEL GAUGE INDICATOR DOES NOT
OPERATE ....................................................... ...
72
Description ........................................................... ...72
Diagnosis Procedure ...............................................72
THE METER CONTROL SWITCH IS INOPER-
ATIVE .............................................................. ...
73
Description ........................................................... ...73
Diagnosis Procedure ...............................................73
THE OIL PRESSURE WARNING CONTIN-
UES DISPLAYING, OR DOES NOT DISPLAY ...
74
Description ........................................................... ...74
Diagnosis Procedure ...............................................74
THE PARKING BRAKE RELEASE WARNING
CONTINUES DISPLAYING, OR DOES NOT
DISPLAY ......................................................... ...
75
Description ........................................................... ...75
Diagnosis Procedure ...............................................75
THE LOW WASHER FLUID WARNING CON-
TINUES DISPLAYING, or DOES NOT DIS-
PLAY ............................................................... ...
76
Description ........................................................... ...76
Diagnosis Procedure ...............................................76
THE DOOR OPEN WARNING CONTINUES
DISPLAYING, OR DOES NOT DISPLAY ...... ...
77
Description ........................................................... ...77
Diagnosis Procedure ...............................................77
THE TRUNK OPEN WARNING CONTINUES
DISPLAYING, OR DOES NOT DISPLAY ...... ...
78
Description ........................................................... ...78
Diagnosis Procedure ...............................................78
Revision: November 20132014 Altima NAMRevision: November 20132014 Altima NAM