2014 NISSAN TEANA steering wheel adjustment
[x] Cancel search: steering wheel adjustmentPage 3721 of 4801
RSU-4
< SYMPTOM DIAGNOSIS >
NOISE, VIBRATION AND HARSHNESS (NVH) TROUBLESHOOTING
SYMPTOM DIAGNOSIS
NOISE, VIBRATION AND HARSHNESS (NVH) TROUBLESHOOTING
NVH Troubleshooting ChartINFOID:0000000009464452
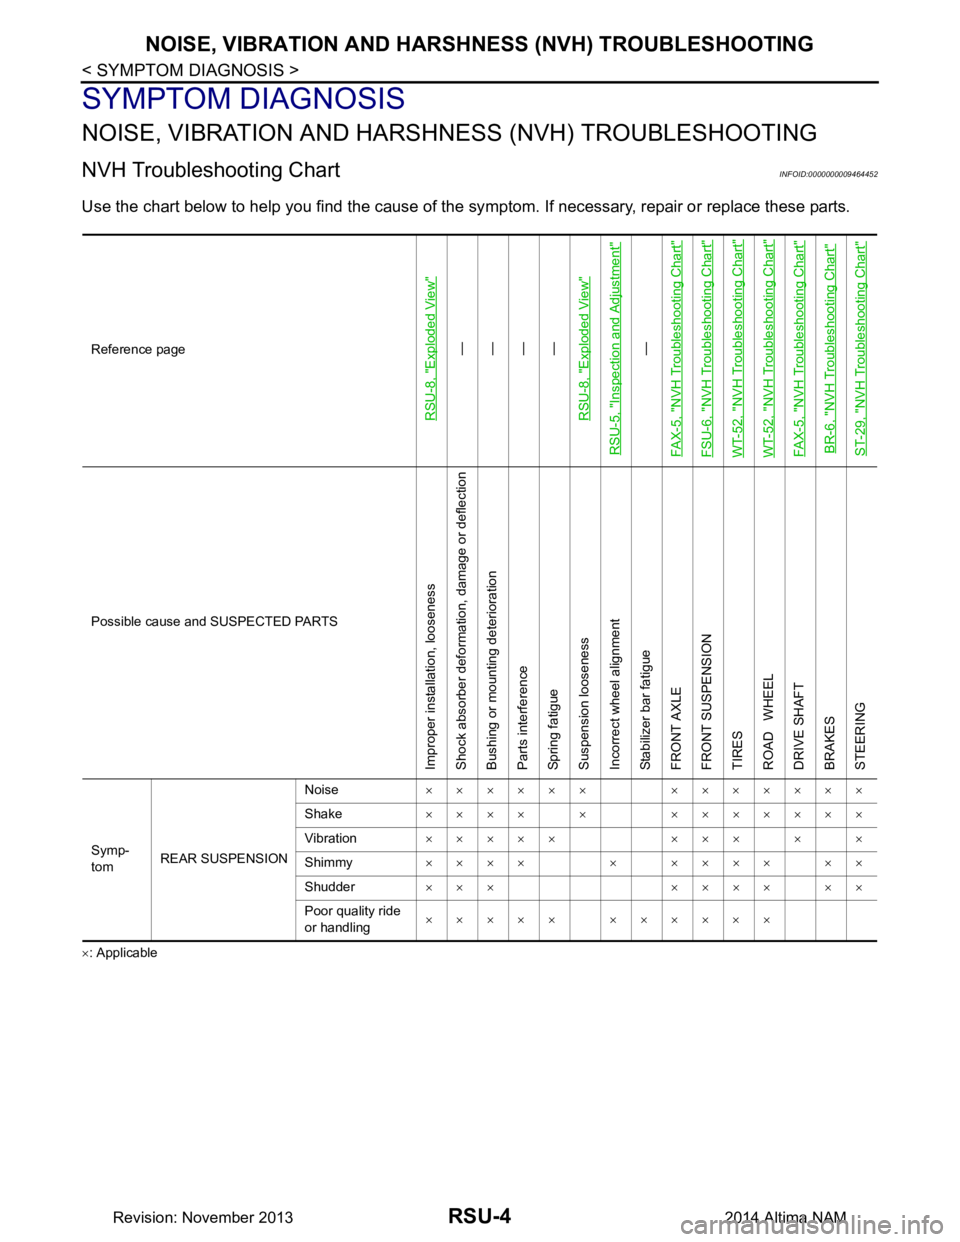
Use the chart below to help you find the cause of the sy mptom. If necessary, repair or replace these parts.
×: ApplicableReference page
RSU-8, "Exploded View"
—
—
—
—
RSU-8, "Exploded View"
RSU-5, "Inspection and Adjustment"
—
FAX-5, "NVH Troubleshooting Chart"
FSU-6, "NVH Troubleshooting Chart"WT-52, "NVH Troubleshooting Chart"WT-52, "NVH Troubleshooting Chart"FAX-5, "NVH Troubleshooting Chart"BR-6, "NVH Troubleshooting Chart"ST-29, "NVH Troubleshooting Chart"
Possible cause and SUSPECTED PARTS
Improper installation, looseness
Shock absorber deformation, damage or deflection
Bushing or mounting deterioration
Parts interference
Spring fatigue
Suspension looseness
Incorrect wheel alignment
Stabilizer bar fatigue
FRONT AXLE
FRONT SUSPENSION
TIRES
ROAD WHEEL
DRIVE SHAFT
BRAKES
STEERING
Symp-
tom REAR SUSPENSION Noise
×××××× ×××××××
Shake ×××× × ×××××××
Vibration ××××× ××× × ×
Shimmy ×××× × ×××× ××
Shudder ××× ×××× ××
Poor quality ride
or handling ××××× ××××××
Revision: November 20132014 Altima NAM
Page 3723 of 4801
RSU-6
< PERIODIC MAINTENANCE >
REAR SUSPENSION ASSEMBLY
• Check the wheelarch height in the unladen condition. Refer to RSU-17, "Wheelarch Height (Unladen*1)".
GENERAL INFORMATION AND RECOMMENDATIONS
1. A Four-Wheel Thrust Alignment should be performed.
• This type of alignment is recommended for any NISSAN vehicle.
• The four-wheel “thrust” process helps ensure that the vehicle is properly aligned and the steering wheel
is centered.
• The alignment machine itself should be ca pable of accepting any NISSAN vehicle.
• The alignment machine should be checked to ensure that it is level.
2. Make sure the alignment machine is properly calibrated. • Your alignment machine should be regularly calibrated in order to give correct information.
• Check with the manufacturer of your specific al ignment machine for their recommended Service/Cali-
bration Schedule.
THE ALIGNMENT PROCESS
IMPORTANT: Use only the alignment specifications listed in this Service Manual. Refer to RSU-17,
"Wheelarch Height (Unladen*1)".
1. When displaying the alignment settings, many alignm ent machines use “indicators”: (Green/red, plus or
minus, Go/No Go). Do NOT use these indicators.
• The alignment specifications programmed into your alignment machine that operate these indicators
may not be correct.
• This may result in an ERROR.
2. Most camera-type alignment machines are equipped with both "Rolling Compensation" method and optional "Jacking Compensation" method to "com pensate" the alignment targets or head units.
"Rolling Compensation" is the preferred method.
• If using the "Rolling Compensation" method, after installing the alignment targets or head units, push or pull on the rear wheel to move the vehicle. Do not push or pull the vehicle body.
• If using the "Jacking Compensation" method, after in stalling the alignment targets or head units, raise
the vehicle and rotate the wheels 1/2 turn both ways.
NOTE:
Do not use the "Rolling Compensation" method if you are using sensor-type alignment equipment.
• Follow all instructions for the alignment machine you are using for more information.
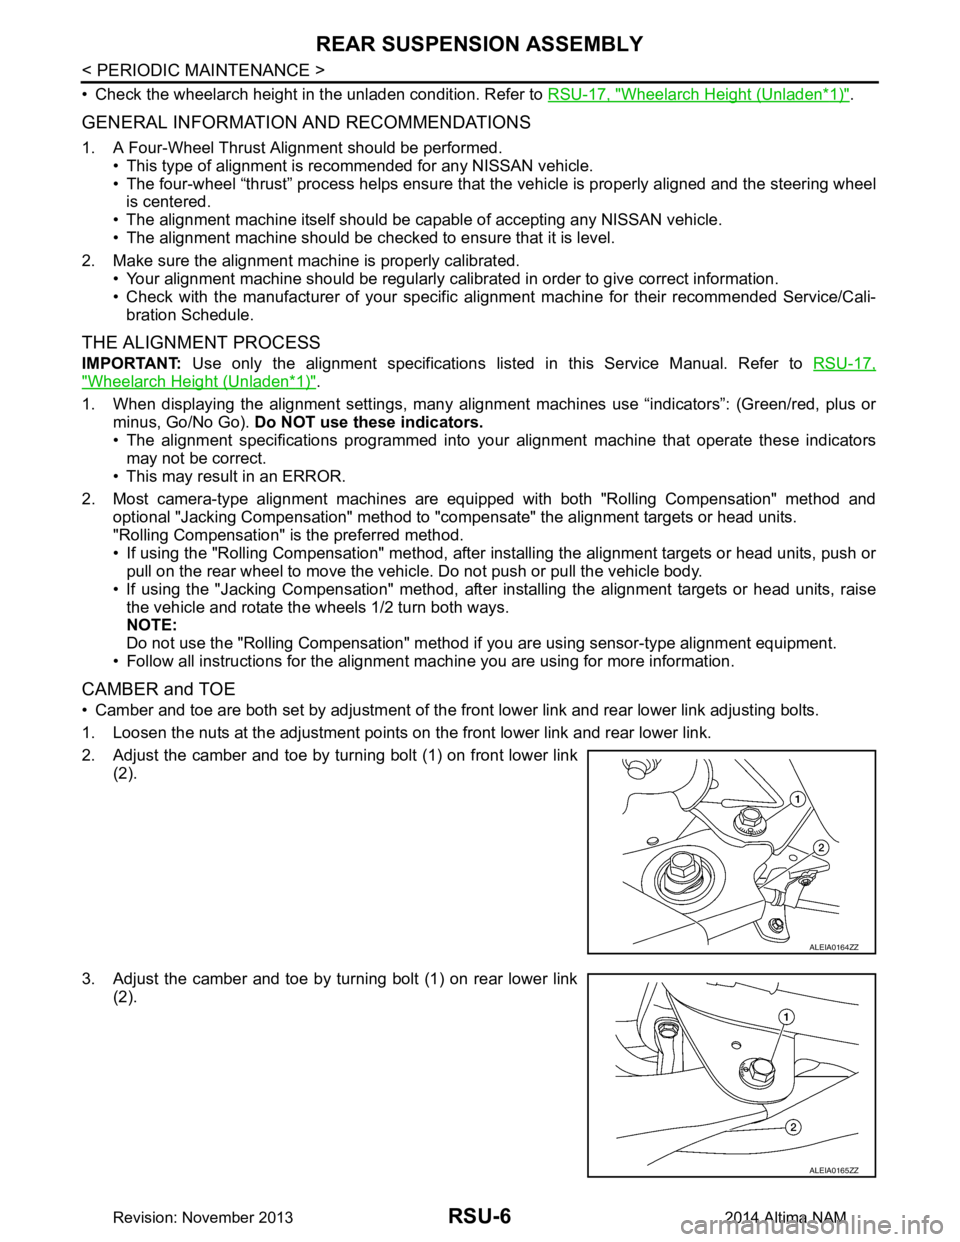
CAMBER and TOE
• Camber and toe are both set by adjustment of the fr ont lower link and rear lower link adjusting bolts.
1. Loosen the nuts at the adjustment points on the front lower link and rear lower link.
2. Adjust the camber and toe by turning bolt (1) on front lower link (2).
3. Adjust the camber and toe by turning bolt (1) on rear lower link (2).
ALEIA0164ZZ
ALEIA0165ZZ
Revision: November 20132014 Altima NAM
Page 3728 of 4801
REAR SUSPENSION ASSEMBLYRSU-11
< UNIT REMOVAL AND INSTALLATION >
C
D
F
G H
I
J
K L
M A
B
RSU
N
O P
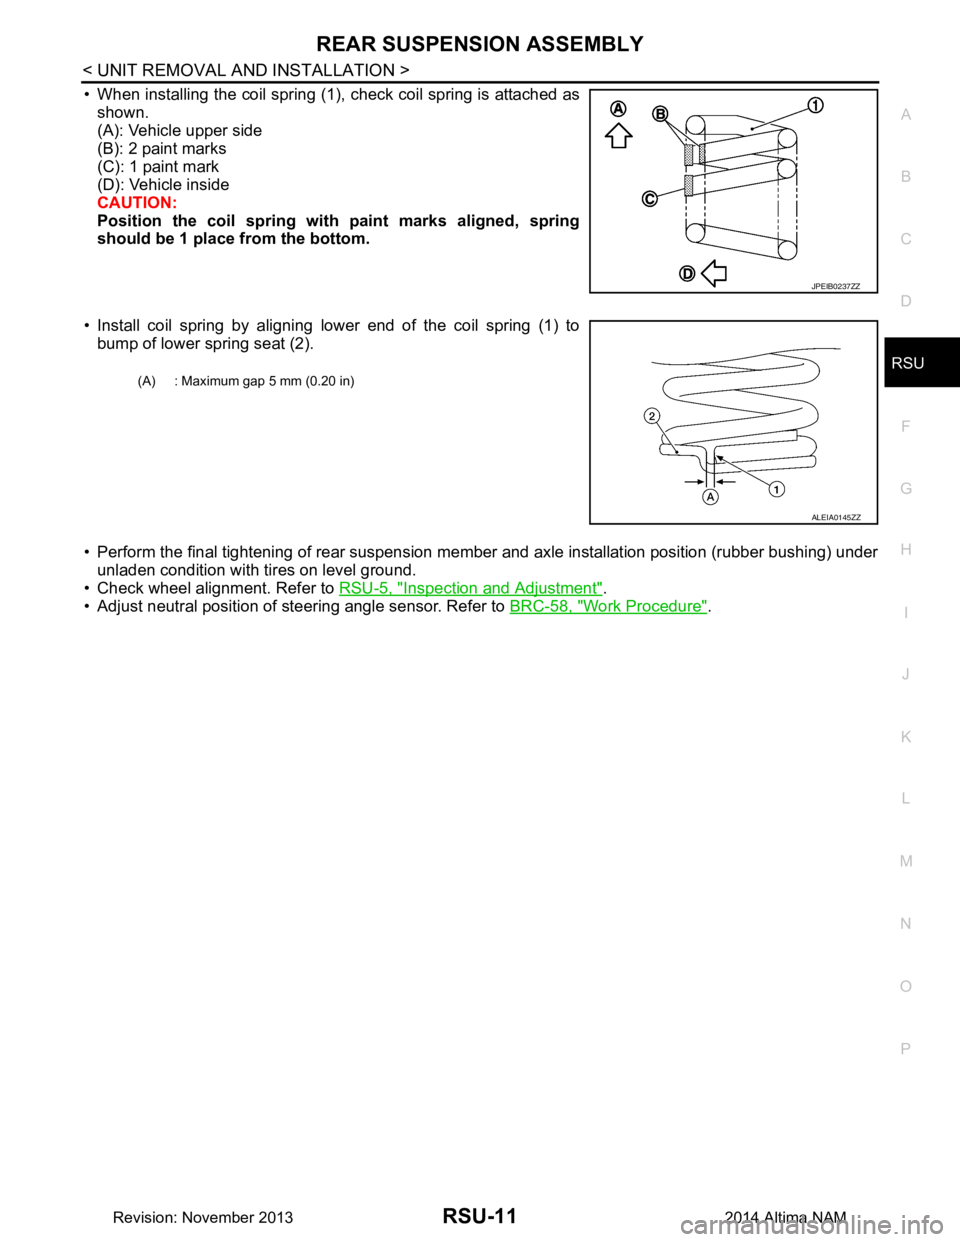
• When installing the coil spring (1), check coil spring is attached as shown.
(A): Vehicle upper side
(B): 2 paint marks
(C): 1 paint mark
(D): Vehicle inside
CAUTION:
Position the coil spring with paint marks aligned, spring
should be 1 place from the bottom.
• Install coil spring by aligning lower end of the coil spring (1) to bump of lower spring seat (2).
• Perform the final tightening of rear suspension me mber and axle installation position (rubber bushing) under
unladen condition with tires on level ground.
• Check wheel alignment. Refer to RSU-5, "Inspection and Adjustment"
.
• Adjust neutral position of steering angle sensor. Refer to BRC-58, "Work Procedure"
.
JPEIB0237ZZ
(A) : Maximum gap 5 mm (0.20 in)
ALEIA0145ZZ
Revision: November 20132014 Altima NAM
Page 3733 of 4801
RSU-16
< REMOVAL AND INSTALLATION >
SUSPENSION ARM
SUSPENSION ARM
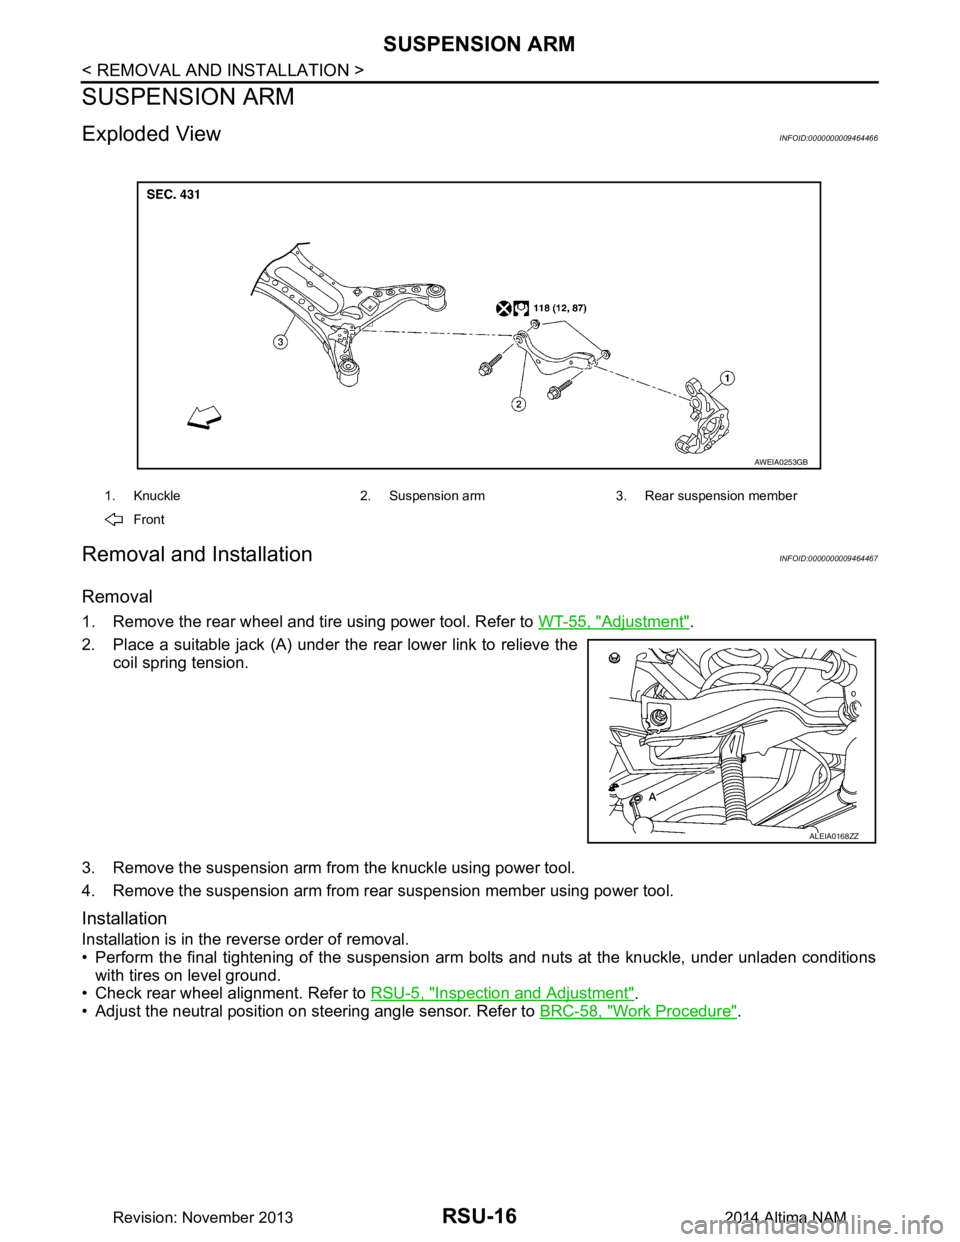
Exploded ViewINFOID:0000000009464466
Removal and InstallationINFOID:0000000009464467
Removal
1. Remove the rear wheel and tire using power tool. Refer to WT-55, "Adjustment".
2. Place a suitable jack (A) under the rear lower link to relieve the coil spring tension.
3. Remove the suspension arm from the knuckle using power tool.
4. Remove the suspension arm from rear suspension member using power tool.
Installation
Installation is in the reverse order of removal.
• Perform the final tightening of the suspension arm bolts and nuts at the knuckle, under unladen conditions
with tires on level ground.
• Check rear wheel alignment. Refer to RSU-5, "Inspection and Adjustment"
.
• Adjust the neutral position on steering angle sensor. Refer to BRC-58, "Work Procedure"
.
1. Knuckle 2. Suspension arm 3. Rear suspension member
Front
AWEIA0253GB
ALEIA0168ZZ
Revision: November 20132014 Altima NAM
Page 3978 of 4801
SR-16
< REMOVAL AND INSTALLATION >
SPIRAL CABLE
• Do not strike or drop the spiral cable.
• Replace the spiral cable if it has been dropped or sus-
tained an impact.
• Do not disassemble the spiral cable.
• Do not allow oil, grease, detergent or water to come in contact with the spiral cable.
INSTALLATION
Installation is in the reverse order of removal.
• The turn signal lever must be in the neutral position for spiral cable installation.
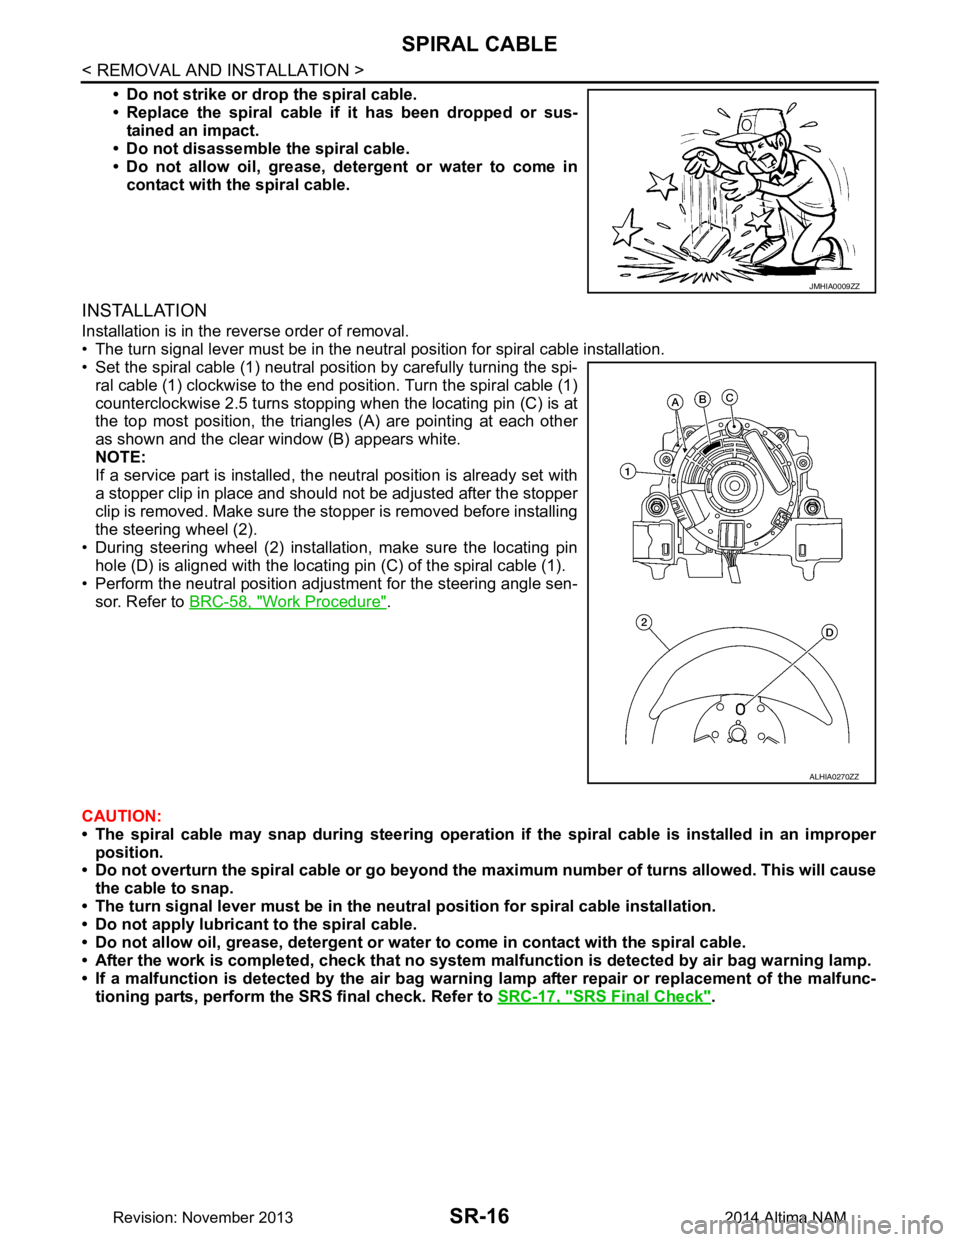
• Set the spiral cable (1) neutral position by carefully turning the spi-
ral cable (1) clockwise to the end position. Turn the spiral cable (1)
counterclockwise 2.5 turns stopping when the locating pin (C) is at
the top most position, the triangl es (A) are pointing at each other
as shown and the clear window (B) appears white.
NOTE:
If a service part is installed, the neutral position is already set with
a stopper clip in place and should not be adjusted after the stopper
clip is removed. Make sure the stopper is removed before installing
the steering wheel (2).
• During steering wheel (2) installation, make sure the locating pin hole (D) is aligned with the locating pin (C) of the spiral cable (1).
• Perform the neutral position adjustment for the steering angle sen-
sor. Refer to BRC-58, "Work Procedure"
.
CAUTION:
• The spiral cable may snap during steering operation if the spiral cable is installed in an improper
position.
• Do not overturn the spiral cable or go beyond the maximum number of turns allowed. This will cause
the cable to snap.
• The turn signal lever must be in the ne utral position for spiral cable installation.
• Do not apply lubricant to the spiral cable.
• Do not allow oil, grease, detergent or water to come in contact with the spiral cable.
• After the work is completed, check that no system malfunction is detected by air bag warning lamp.
• If a malfunction is detected by the air bag warnin g lamp after repair or replacement of the malfunc-
tioning parts, perform the SRS final check. Refer to SRC-17, "SRS Final Check"
.
JMHIA0009ZZ
ALHIA0270ZZ
Revision: November 20132014 Altima NAM
Page 4139 of 4801
ST-36
< REMOVAL AND INSTALLATION >
STEERING GEAR AND LINKAGE
STEERING GEAR AND LINKAGE
Exploded ViewINFOID:0000000009461272
Removal and InstallationINFOID:0000000009461273
NOTE:
When removing components such as hoses, tubes/lines, etc. , cap or plug openings to prevent fluid from spill-
ing.
REMOVAL
1. Remove the front wheels and tires using power tool. Refer to WT-55, "Adjustment".
2. Disconnect stabilizer connecting rods at st eering knuckles and reposition. Refer to FSU-19, "Exploded
View".
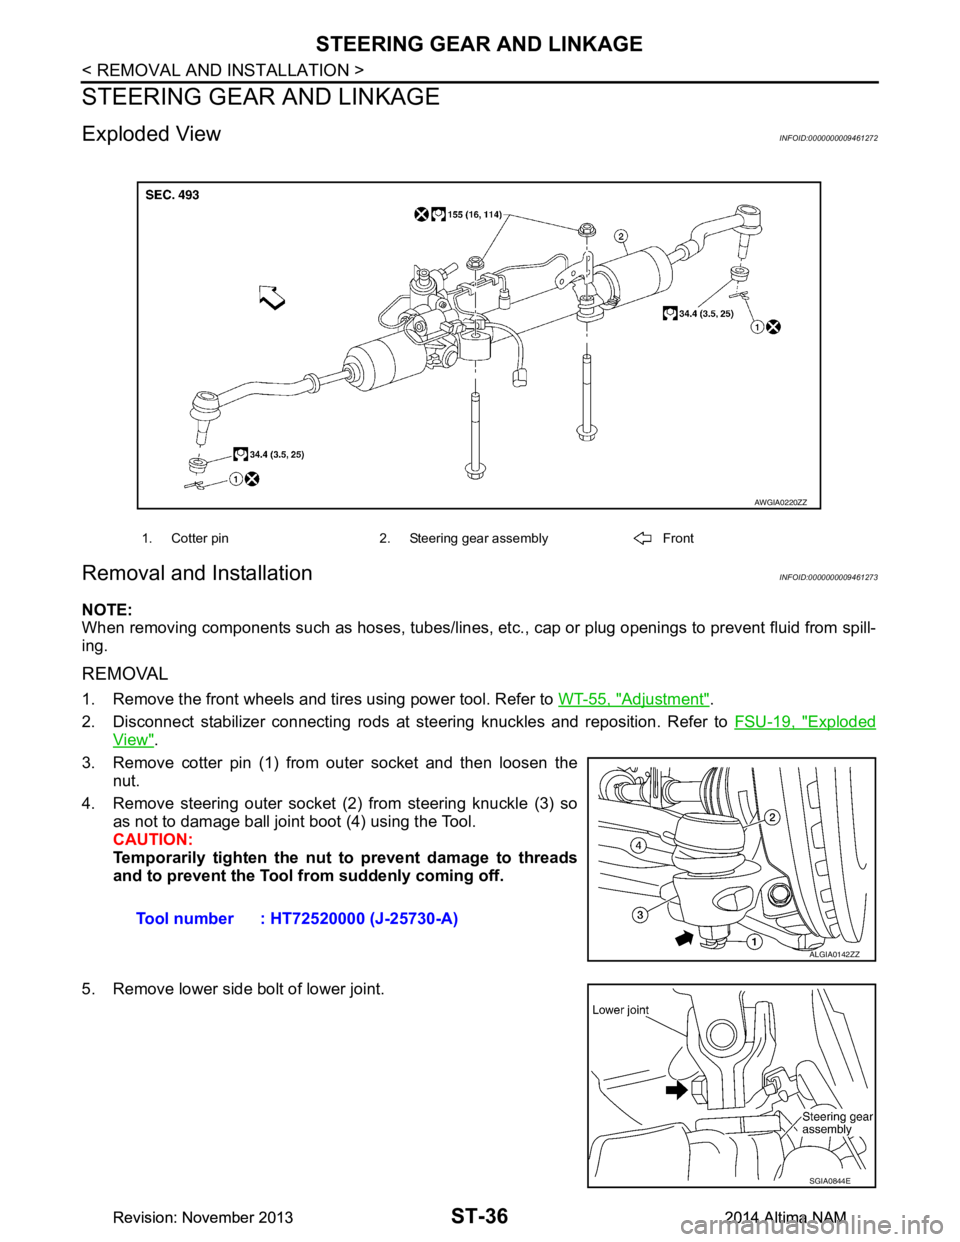
3. Remove cotter pin (1) from outer socket and then loosen the nut.
4. Remove steering outer socket (2) from steering knuckle (3) so as not to damage ball joint boot (4) using the Tool.
CAUTION:
Temporarily tighten the nut to prevent damage to threads
and to prevent the Tool fr om suddenly coming off.
5. Remove lower side bolt of lower joint.
1. Cotter pin 2. Steering gear assembly Front
AWGIA0220ZZ
Tool number : HT72520000 (J-25730-A)
ALGIA0142ZZ
SGIA0844E
Revision: November 20132014 Altima NAMRevision: November 20132014 Altima NAM
Page 4140 of 4801
STEERING GEAR AND LINKAGEST-37
< REMOVAL AND INSTALLATION >
C
D E
F
H I
J
K L
M A
B
ST
N
O P
6. Remove front exhaust tube. Refer to EX-5, "Exploded View" (QR25DE), EX-10, "Exploded View"
(VQ35DE).
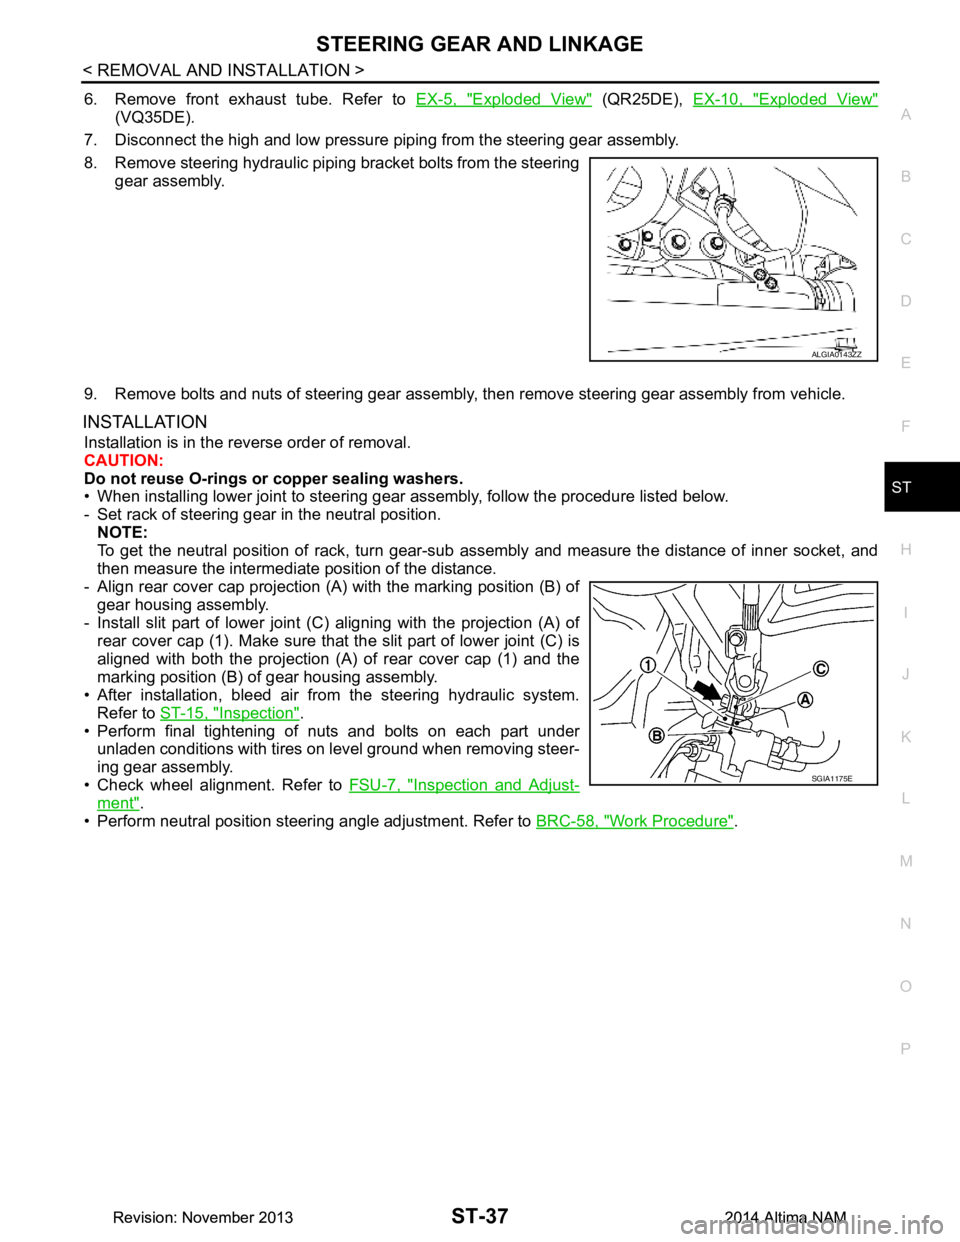
7. Disconnect the high and low pressure piping from the steering gear assembly.
8. Remove steering hydraulic piping bracket bolts from the steering gear assembly.
9. Remove bolts and nuts of steering gear assembly, then remove steering gear assembly from vehicle.
INSTALLATION
Installation is in the reverse order of removal.
CAUTION:
Do not reuse O-rings or copper sealing washers.
• When installing lower joint to steering gear assembly, follow the procedure listed below.
- Set rack of steering gear in the neutral position. NOTE:
To get the neutral position of rack, turn gear-sub a ssembly and measure the distance of inner socket, and
then measure the intermediat e position of the distance.
- Align rear cover cap projection (A) with the marking position (B) of
gear housing assembly.
- Install slit part of lower joint (C) aligning with the projection (A) of
rear cover cap (1). Make sure that the slit part of lower joint (C) is
aligned with both the projection (A) of rear cover cap (1) and the
marking position (B) of gear housing assembly.
• After installation, bleed air from the steering hydraulic system. Refer to ST-15, "Inspection"
.
• Perform final tightening of nuts and bolts on each part under
unladen conditions with tires on level ground when removing steer-
ing gear assembly.
• Check wheel alignment. Refer to FSU-7, "Inspection and Adjust-
ment".
• Perform neutral position steering angle adjustment. Refer to BRC-58, "Work Procedure"
.
ALGIA0143ZZ
SGIA1175E
Revision: November 20132014 Altima NAMRevision: November 20132014 Altima NAM
Page 4154 of 4801
PRECAUTIONSSTC-3
< PRECAUTION >
C
D E
F
H I
J
K L
M A
B
STC
N
O P
PRECAUTION
PRECAUTIONS
Precaution for Supplemental Restraint System (SRS) "AIR BAG" and "SEAT BELT
PRE-TENSIONER"
INFOID:0000000009951730
The Supplemental Restraint System such as “A IR BAG” and “SEAT BELT PRE-TENSIONER”, used along
with a front seat belt, helps to reduce the risk or severi ty of injury to the driver and front passenger for certain
types of collision. Information necessary to service t he system safely is included in the SR and SB section of
this Service Manual.
WARNING:
• To avoid rendering the SRS inoper ative, which could increase the risk of personal injury or death in
the event of a collision which would result in air bag inflation, all maintenance must be performed by
an authorized NISSAN/INFINITI dealer.
• Improper maintenance, including in correct removal and installation of the SRS, can lead to personal
injury caused by unintentional act ivation of the system. For removal of Spiral Cable and Air Bag
Module, see the SR section.
• Do not use electrical test equipm ent on any circuit related to the SRS unless instructed to in this
Service Manual. SRS wiring harnesses can be identi fied by yellow and/or orange harnesses or har-
ness connectors.
PRECAUTIONS WHEN USING POWER TOOLS (AIR OR ELECTRIC) AND HAMMERS
WARNING:
• When working near the Airbag Diagnosis Sensor Un it or other Airbag System sensors with the Igni-
tion ON or engine running, DO NOT use air or el ectric power tools or strike near the sensor(s) with a
hammer. Heavy vibration could activate the sensor( s) and deploy the air bag(s), possibly causing
serious injury.
• When using air or electric power tools or hammers , always switch the Ignition OFF, disconnect the
battery and wait at least three mi nutes before performing any service.
Service Notice and Precautions for Hydrau lic Pump Electric Power Steering System
INFOID:0000000009460340
• Check each tire for proper air pressure and size. Refer to WT-60, "Tire".
• Verify that the steering system components are G enuine NISSAN parts and have been installed properly.
• Check the steering column for loose mounting bolts.
• Check the steering gear assembly for loose mounting bolts. Check the inner sockets and outer sockets for
damage or wear. Inspect the boots and seals for leakage of power steering fluid.
• Verify proper wheel alignment. Refer to FSU-7, "Inspection and Adjustment"
.
• Check for any damage, wear, or modification to the suspension and body that would result in increased
weight or an improper wheelarch height. Refer to FSU-26, "Wheelarch Height (Unladen*
1)".
• Check for proper battery voltage.
• Verify that all power steering pump assembly connections are clean and fully seated.
• Verify that only Genuine NISSAN E-PSF is used. Use of any power steering fluid other than Genuine NIS-
SAN E-PSF will prevent the power st eering system from proper operation.
• An audible high pitch noise may be heard from the engine compartment when the steering wheel is oper-
ated, particularly at low speeds such as a parking lot maneuver. This condition is not a malfunction, rather
normal system operation. Steering at low speeds or parking lot maneuvers demands higher hydraulic assis-
tance, resulting in larger power st eering pump load and increased system noise.
• The power steering pump is electrically controlled by the power steering control module.
• Before connecting or disconnecting the power steeri ng control module harness connectors, turn ignition
switch “OFF” and disconnect battery ground cable. Batter y voltage is applied to power steering control mod-
ule even if ignition switch is turned “OFF”.
Revision: November 20132014 Altima NAMRevision: November 20132014 Altima NAM