2014 NISSAN TEANA check oil
[x] Cancel search: check oilPage 3183 of 4801
![NISSAN TEANA 2014 Service Manual
OIL COOLERLU-33
< REMOVAL AND INSTALLATION > [VQ35DE]
C
D E
F
G H
I
J
K L
M A
LU
NP
O
When removing components such as hoses, tubes/lines, etc.
, cap or plug openings to prevent fluid from spill-
in NISSAN TEANA 2014 Service Manual
OIL COOLERLU-33
< REMOVAL AND INSTALLATION > [VQ35DE]
C
D E
F
G H
I
J
K L
M A
LU
NP
O
When removing components such as hoses, tubes/lines, etc.
, cap or plug openings to prevent fluid from spill-
in](/manual-img/5/57390/w960_57390-3182.png)
OIL COOLERLU-33
< REMOVAL AND INSTALLATION > [VQ35DE]
C
D E
F
G H
I
J
K L
M A
LU
NP
O
When removing components such as hoses, tubes/lines, etc.
, cap or plug openings to prevent fluid from spill-
ing.
REMOVAL
1. Remove the engine under cover. Refer to EXT-17, "Removal and Installation".
2. Remove the RH wheel and tire. Refer to WT-53, "Inspection"
.
3. Remove the front fender protector side cover RH. Refer to EXT-26, "FENDER PROTECTOR : Exploded
View".
4. Drain engine coolant. Refer to CO-36, "Changing Engine Coolant"
.
CAUTION:
Do not spill coolant on the drive belt.
5. Disconnect water hoses from oil cooler.
6. Remove the oil filter. Refer to LU-27, "Removal and Installation"
.
7. Remove oil cooler.
8. Remove core support cover. Refer to DLK-179, "Removal and Installation"
.
9. Remove front air duct. Refer to EM-84, "Removal and Installation"
.
10. Remove reservoir tank. Refer to CO-40, "Exploded View"
.
INSPECTION AFTER REMOVAL
1. Check oil cooler for cracks.
2. Check oil cooler for clogging by blowing through coolant inlet. If necessary, replace oil cooler.
Oil Pressure Relief Valve
Inspect oil pressure relief valve for movement, cracks and breaks by pushing the ball. If replacement is neces-
sary, remove valve by prying it out with a suitable tool. Install a new valve in place by tapping it.
INSTALLATION
Installation is in the reverse order of removal.
CAUTION:
• Do not reuse O-ring.
• Do not reuse copper gasket.
• When installing the oil cooler, align the oil cooler slot with the stopper of the oil pan.
INSPECTION AFTER INSTALLATION
1. Check the engine oil level and the engine coolant level and add engine oil and engine coolant. Refer to LU-9, "Inspection"
and CO-11, "System Inspection".
2. Start the engine, and check that there is no leakage of engine oil or engine coolant.
3. Stop the engine and wait for 10 minutes.
4. Check the engine oil level and the engine coolant level again. Refer to LU-9, "Inspection"
and CO-11,
"System Inspection".
Revision: November 20132014 Altima NAM
Page 3185 of 4801
MA-1
MAINTENANCE
C
D E
F
G H
I
J
K L
M B
MA
SECTION MA
N
O A
CONTENTS
MAINTENANCE
PRECAUTION ................
...............................3
PRECAUTIONS .............................................. .....3
Precaution for Supplemental Restraint System
(SRS) "AIR BAG" and "SEAT BELT PRE-TEN-
SIONER" ............................................................. ......
3
PREPARATION ............................................4
PREPARATION .............................................. .....4
Special Service Tool ........................................... ......4
Commercial Service Tool ..........................................4
PERIODIC MAINTENANCE ..........................5
GENERAL MAINTE NANCE ........................... .....5
FOR USA AND CANADA ...................................... ......5
FOR USA AND CANADA : Explanation of General
Maintenance ........................................................ ......
5
PERIODIC MAINTENANCE ................................7
FOR USA AND CANADA ...................................... ......7
FOR USA AND CANADA : Introduction of Periodic
Maintenance ........................................................ ......
7
RECOMMENDED FLUIDS AND LUBRI-
CANTS ............................................................ ....
11
FOR USA AND CANADA ...................................... ....11
FOR USA AND CANADA : Fluids and Lubricants ....11
FOR USA AND CANADA : Engine Oil Recom-
mendation ........................................................... ....
11
FOR USA AND CANADA : Engine Coolant Mix-
ture Ratio ............................................................. ....
12
ENGINE MAINTENANCE (QR25DE) .................13
DRIVE BELTS ....................................................... ....13
DRIVE BELTS : Checking Drive Belts ....................13
DRIVE BELTS : Tension Adjustment ......................13
ENGINE COOLANT ............................................... ....13
ENGINE COOLANT : System Inspection ................13
ENGINE COOLANT : Changing Engine Coolant ....14
FUEL LINES ........................................................... ....16
FUEL LINES : Inspection .........................................16
AIR CLEANER FILTER ......................................... ....16
AIR CLEANER FILTER : Removal and Installation
....
17
ENGINE OIL ........................................................... ....17
ENGINE OIL : Inspection .........................................17
ENGINE OIL : Changing Engine Oil ........................17
OIL FILTER ............................................................ ....18
OIL FILTER : Removal and Installation ...................18
SPARK PLUG ........................................................ ....19
SPARK PLUG : Removal and Installation ...............20
EVAP VAPOR LINES ............................................ ....21
EVAP VAPOR LINES : Inspection ...........................21
ENGINE MAINTENANCE (VQ35DE) ................22
DRIVE BELTS ........................................................ ....22
DRIVE BELTS : Checking Drive Belts .....................22
DRIVE BELTS : Tension Adjustment ......................22
ENGINE COOLANT ............................................... ....22
ENGINE COOLANT : System Inspection ................22
ENGINE COOLANT : Changing Engine Coolant ....23
FUEL LINES ........................................................... ....25
FUEL LINES : Inspection .........................................25
AIR CLEANER FILTER ......................................... ....25
AIR CLEANER FILTER : Removal and Installation
....
26
ENGINE OIL ........................................................... ....26
ENGINE OIL : Inspection .........................................26
ENGINE OIL : Changing Engine Oil ........................27
OIL FILTER ............................................................ ....27
Revision: November 20132014 Altima NAM
Page 3186 of 4801

MA-2
OIL FILTER : Removal and Installation ..................27
SPARK PLUG ........................................................ ...28
SPARK PLUG : Removal and Installation ..............29
EVAP VAPOR LINES ............................................. ...30
EVAP VAPOR LINES : Inspection ..........................30
CHASSIS AND BODY MAINTENANCE ......... ...31
IN-CABIN MICROFILTER ...................................... ...31
IN-CABIN MICROFILTER : Removal and Installa-
tion ....................................................................... ...
31
EXHAUST SYSTEM ............................................... ...31
EXHAUST SYSTEM : Checking Exhaust System ...31
CVT FLUID ............................................................. ...31
CVT FLUID : RE0F10D ..........................................32
CVT FLUID : Inspection ..........................................32
CVT FLUID : Replacement .....................................32
CVT FLUID : Adjustment ........................................34
CVT FLUID : RE0F10E ..........................................35
CVT FLUID : Inspection ..........................................35
CVT FLUID : Replacement .....................................35
CVT FLUID : Adjustment ........................................37
WHEELS ................................................................ ...38
WHEELS : Inspection .............................................38
WHEELS : Adjustment ...........................................39
BRAKE FLUID LEVEL AND LEAKS ........................40
BRAKE FLUID LEVEL AND LEAKS : Inspection ...40
BRAKE LINES AND CABLES ............................... ...41
BRAKE LINES AND CABLES : Inspection .............41
BRAKE FLUID ........................................................ ...41
BRAKE FLUID : Drain and Refill .............................41
DISC BRAKE .......................................................... ...42
DISC BRAKE : Front Brake Pad .............................42
DISC BRAKE : Inspection .......................................42
DISC BRAKE : Front Brake Rotor ...........................42
DISC BRAKE : Inspection .......................................42
DISC BRAKE : Rear Brake Pad ..............................43
DISC BRAKE : Inspection .......................................43
DISC BRAKE : Rear Brake Rotor ...........................43
DISC BRAKE : Inspection .......................................43
STEERING GEAR AND LINKAGE ........................ ...43
STEERING GEAR AND LINKAGE : Inspection ......43
POWER STEERING FLUID AND LINES ............... ...43
POWER STEERING FLUID AND LINES : Inspec-
tion ....................................................................... ...
44
AXLE AND SUSPENSION PARTS ........................ ...44
AXLE AND SUSPENSION PARTS : Inspection .....44
DRIVE SHAFT ........................................................ ...45
DRIVE SHAFT : Inspection .....................................45
LOCKS, HINGES AND HOOD LATCH .................. ...45
LOCKS, HINGES AND HOOD LATCH : Lubricat-
ing ........................................................................ ...
45
SEAT BELT, BUCKLES, RETRACTORS, AN-
CHORS AND ADJUSTERS ................................... ...
45
SEAT BELT, BUCKLES, RETRACTORS, AN-
CHORS AND ADJUSTERS : Inspection .............. ...
45
Revision: November 20132014 Altima NAM
Page 3188 of 4801
MA-4
< PREPARATION >
PREPARATION
PREPARATION
PREPARATION
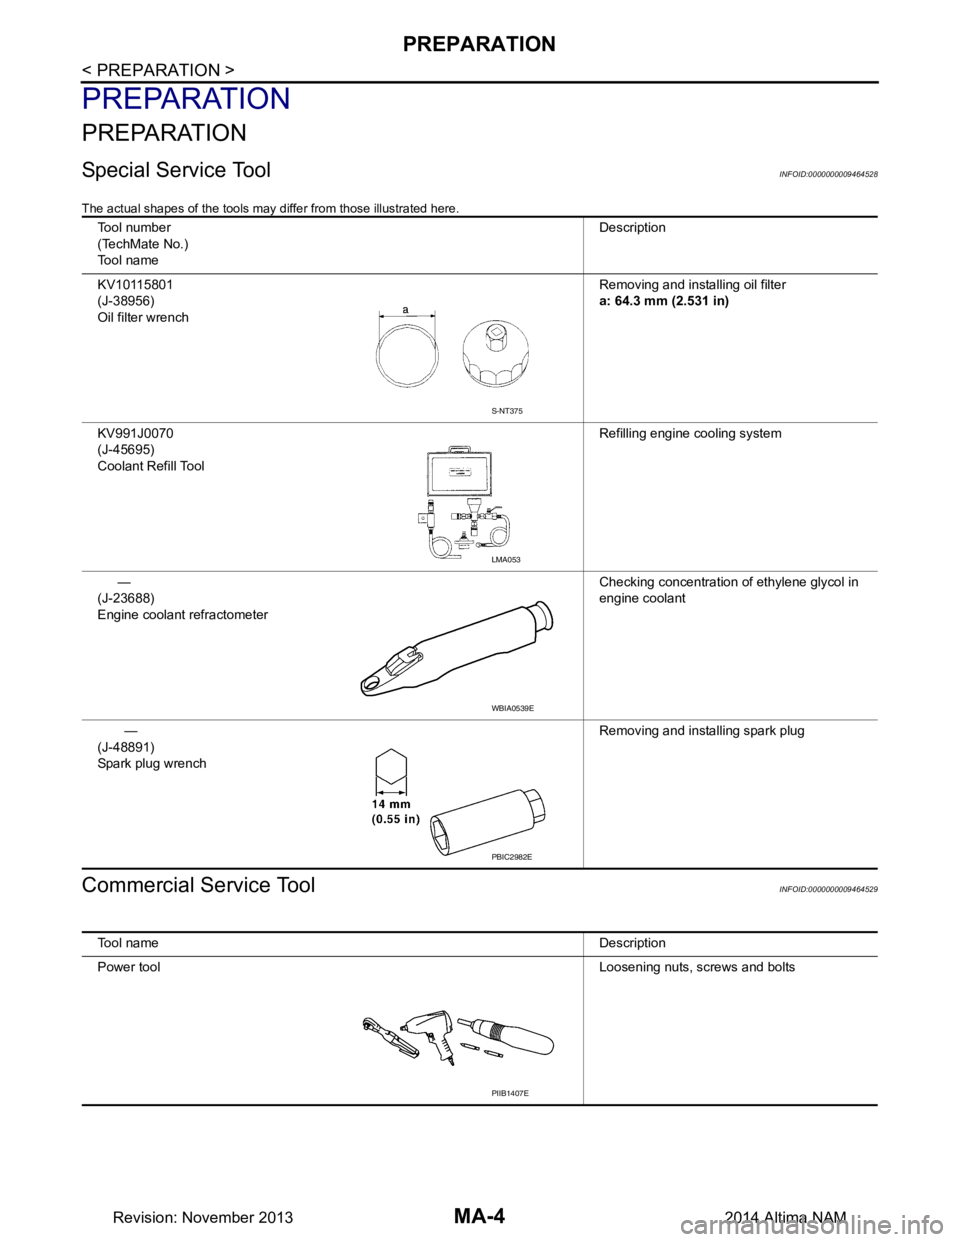
Special Service ToolINFOID:0000000009464528
The actual shapes of the tools may differ from those illustrated here.
Commercial Service ToolINFOID:0000000009464529
Tool number
(TechMate No.)
Tool name Description
KV10115801
(J-38956)
Oil filter wrench Removing and installing oil filter
a: 64.3 mm (2.531 in)
KV991J0070
(J-45695)
Coolant Refill Tool Refilling engine cooling system
—
(J-23688)
Engine coolant refractometer Checking concentration of ethylene glycol in
engine coolant
—
(J-48891)
Spark plug wrench Removing and installing spark plug
S-NT375
LMA053
WBIA0539E
PBIC2982E
Tool name
Description
Power tool Loosening nuts, screws and bolts
PIIB1407E
Revision: November 20132014 Altima NAM
Page 3190 of 4801
MA-6
< PERIODIC MAINTENANCE >
GENERAL MAINTENANCE
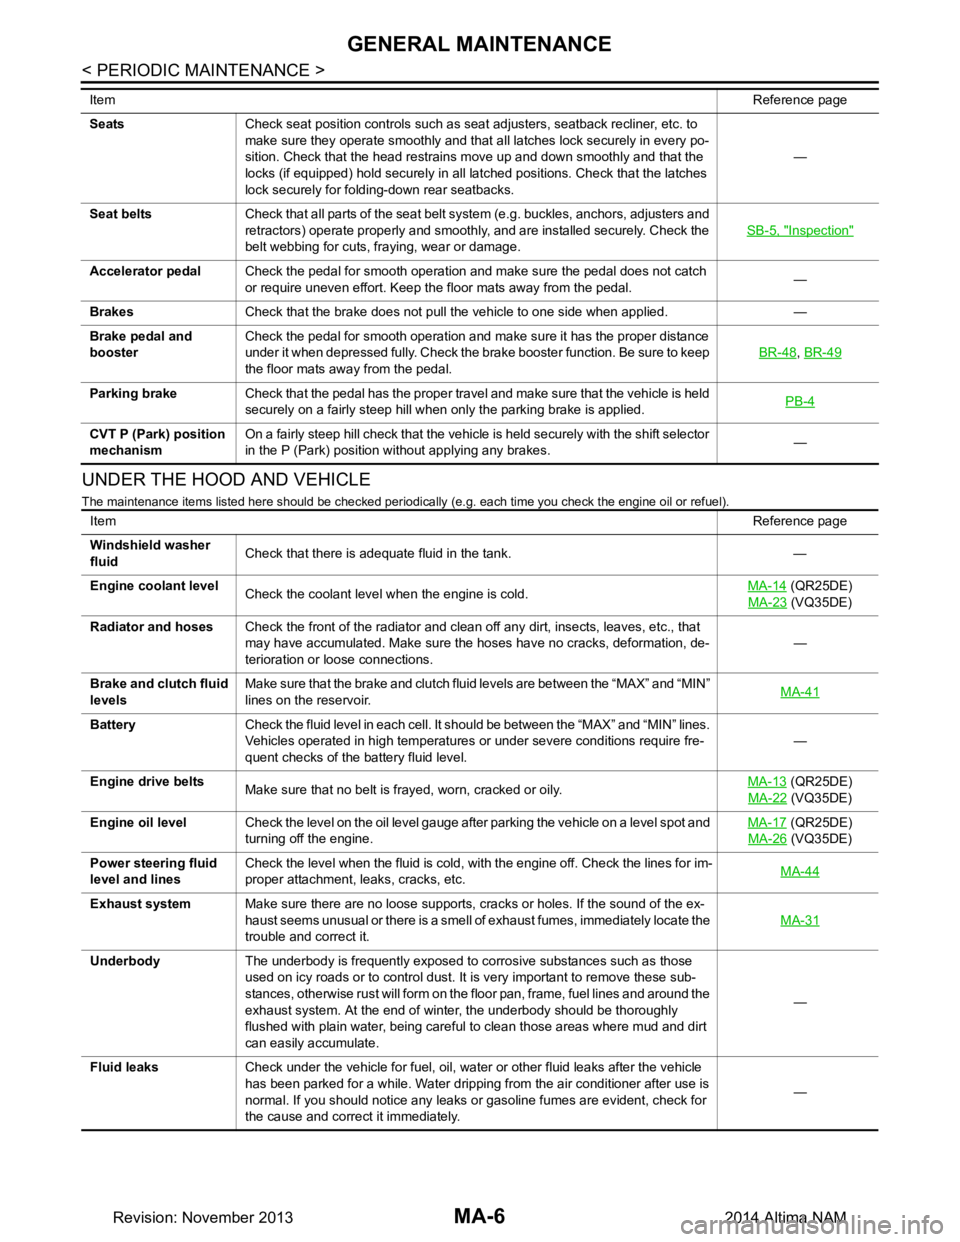
UNDER THE HOOD AND VEHICLE
The maintenance items listed here should be checked periodically (e.g. each time you check the engine oil or refuel).
SeatsCheck seat position controls such as seat adjusters, seatback recliner, etc. to
make sure they operate smoothly and that all latches lock securely in every po-
sition. Check that the head restrains move up and down smoothly and that the
locks (if equipped) hold securely in all latched positions. Check that the latches
lock securely for folding-down rear seatbacks. —
Seat belts Check that all parts of the seat belt system (e.g. buckles, anchors, adjusters and
retractors) operate properly and smoothly, and are installed securely. Check the
belt webbing for cuts, fraying, wear or damage. SB-5, "Inspection"
Accelerator pedal
Check the pedal for smooth operation and make sure the pedal does not catch
or require uneven effort. Keep the floor mats away from the pedal. —
Brakes Check that the brake does not pull the vehicle to one side when applied. —
Brake pedal and
booster Check the pedal for smooth operation and make sure it has the proper distance
under it when depressed fully. Check the brake booster function. Be sure to keep
the floor mats away from the pedal. BR-48
,
BR-49
Parking brake Check that the pedal has the proper travel and make sure that the vehicle is held
securely on a fairly steep hill when only the parking brake is applied. PB-4
CVT P (Park) position
mechanism On a fairly steep hill check that the vehicle is held securely with the shift selector
in the P (Park) position without applying any brakes. —
Item
Reference page
ItemReference page
Windshield washer
fluid Check that there is adequate fluid in the tank. —
Engine coolant level Check the coolant level when the engine is cold. MA-14
(QR25DE)
MA-23
(VQ35DE)
Radiator and hoses Check the front of the radiator and clean off any dirt, insects, leaves, etc., that
may have accumulated. Make sure the hoses have no cracks, deformation, de-
terioration or loose connections. —
Brake and clutch fluid
levels Make sure that the brake and clutch fluid levels are between the “MAX” and “MIN”
lines on the reservoir. MA-41
Battery
Check the fluid level in each cell. It should be between the “MAX” and “MIN” lines.
Vehicles operated in high temperatures or under severe conditions require fre-
quent checks of the battery fluid level. —
Engine drive belts Make sure that no belt is frayed, worn, cracked or oily. MA-13
(QR25DE)
MA-22
(VQ35DE)
Engine oil level Check the level on the oil level gauge after parking the vehicle on a level spot and
turning off the engine. MA-17
(QR25DE)
MA-26
(VQ35DE)
Power steering fluid
level and lines Check the level when the fluid is cold, with the engine off. Check the lines for im-
proper attachment, leaks, cracks, etc. MA-44
Exhaust system
Make sure there are no loose supports, cracks or holes. If the sound of the ex-
haust seems unusual or there is a smell of exhaust fumes, immediately locate the
trouble and correct it. MA-31
Underbody
The underbody is frequently exposed to corrosive substances such as those
used on icy roads or to control dust. It is very important to remove these sub-
stances, otherwise rust will form on the floor pan, frame, fuel lines and around the
exhaust system. At the end of winter, the underbody should be thoroughly
flushed with plain water, being careful to clean those areas where mud and dirt
can easily accumulate. —
Fluid leaks Check under the vehicle for fuel, oil, water or other fluid leaks after the vehicle
has been parked for a while. Water dripping from the air conditioner after use is
normal. If you should notice any leaks or gasoline fumes are evident, check for
the cause and correct it immediately. —
Revision: November 20132014 Altima NAM
Page 3201 of 4801
ENGINE MAINTENANCE (QR25DE)MA-17
< PERIODIC MAINTENANCE >
C
D E
F
G H
I
J
K L
M B
MA
N
O A
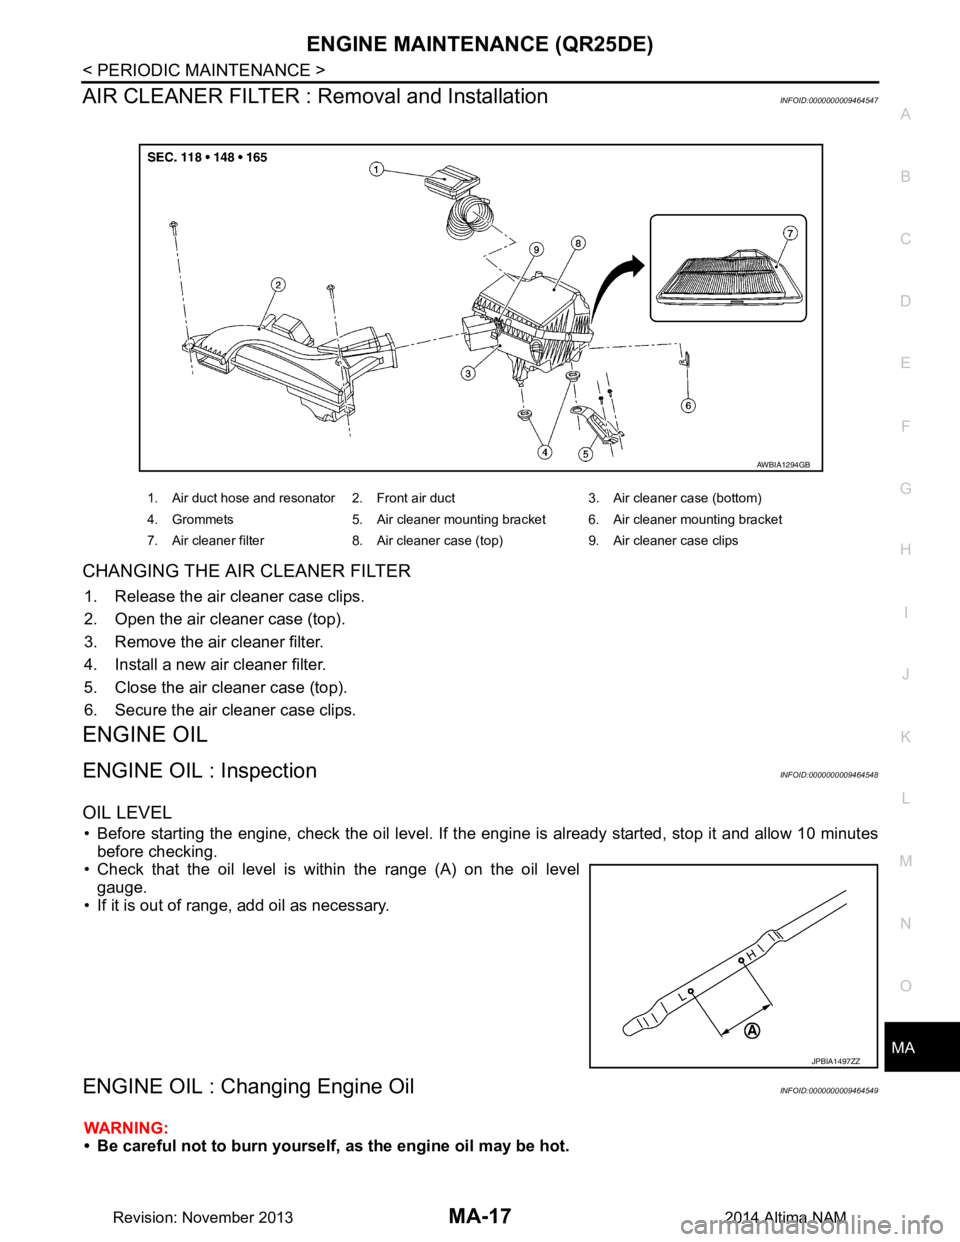
AIR CLEANER FILTER : Removal and InstallationINFOID:0000000009464547
CHANGING THE AIR CLEANER FILTER
1. Release the air cleaner case clips.
2. Open the air cleaner case (top).
3. Remove the air cleaner filter.
4. Install a new air cleaner filter.
5. Close the air cleaner case (top).
6. Secure the air cleaner case clips.
ENGINE OIL
ENGINE OIL : InspectionINFOID:0000000009464548
OIL LEVEL
• Before starting the engine, check the oil level. If t he engine is already started, stop it and allow 10 minutes
before checking.
• Check that the oil level is within the range (A) on the oil level gauge.
• If it is out of range, add oil as necessary.
ENGINE OIL : Changing Engine OilINFOID:0000000009464549
WARNING:
• Be careful not to burn yourself, as the engine oil may be hot.
1. Air duct hose and resonator 2. Front air duct 3. Air cleaner case (bottom)
4. Grommets 5. Air cleaner mounting bracket 6. Air cleaner mounting bracket
7. Air cleaner filter 8. Air cleaner case (top) 9. Air cleaner case clips
AWBIA1294GB
JPBIA1497ZZ
Revision: November 20132014 Altima NAM
Page 3202 of 4801
MA-18
< PERIODIC MAINTENANCE >
ENGINE MAINTENANCE (QR25DE)
• Prolonged and repeated contact with used engine oil may cause skin cancer: try to avoid direct skin
contact with used oil. If skin contact is made, wash thoroughly with soap or hand cleaner as soon as
possible.
1. Position the vehicle so it is level on the hoist.
2. Warm up the engine and check for oil leaks from the engine.
3. Stop engine and wait for 10 minutes.
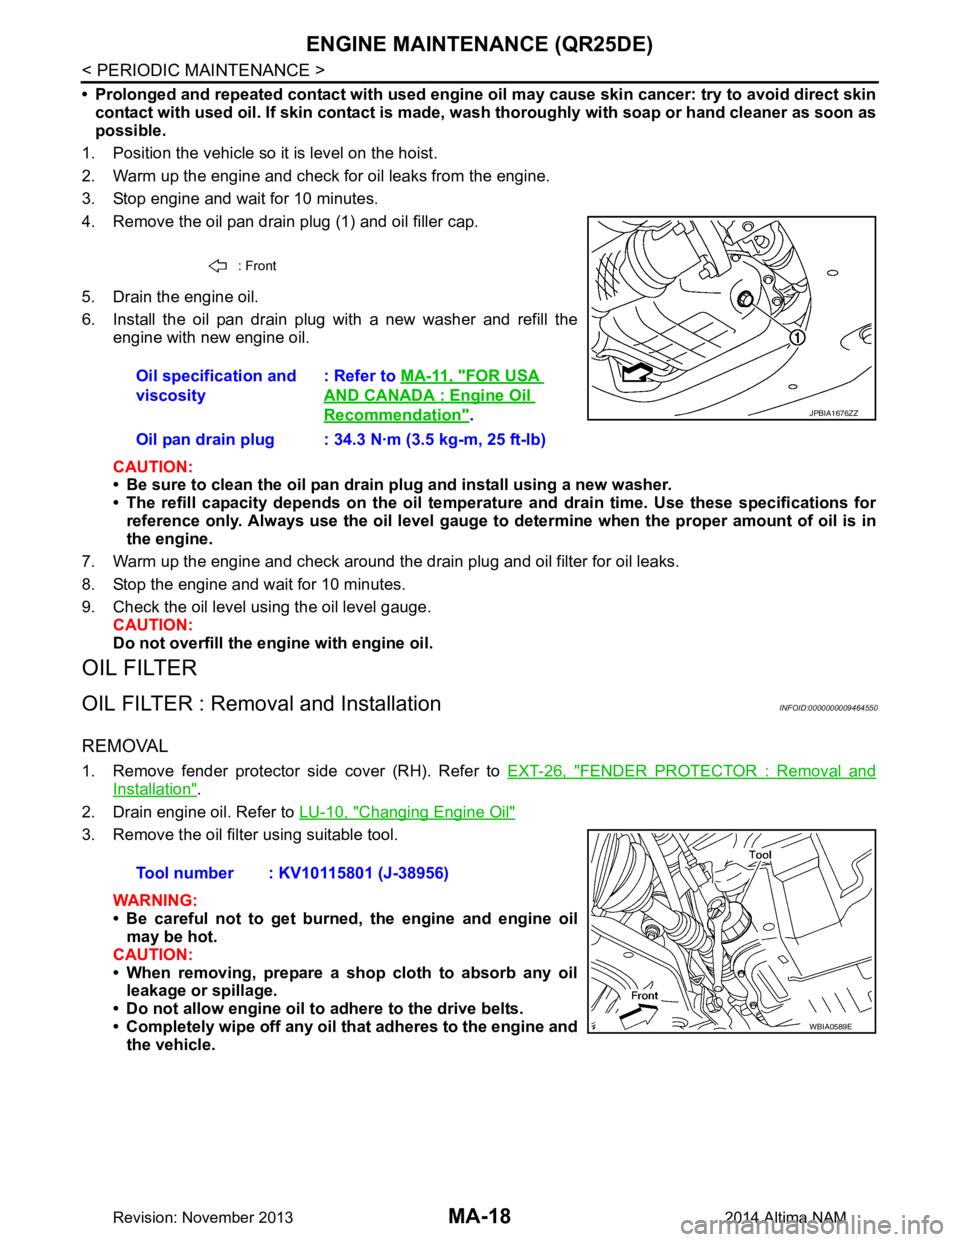
4. Remove the oil pan drain plug (1) and oil filler cap.
5. Drain the engine oil.
6. Install the oil pan drain plug with a new washer and refill the engine with new engine oil.
CAUTION:
• Be sure to clean the oil pan drain plug and install using a new washer.
• The refill capacity depends on the oil temper ature and drain time. Use these specifications for
reference only. Always use the oil level gauge to determine when the proper amount of oil is in
the engine.
7. Warm up the engine and check around the drain plug and oil filter for oil leaks.
8. Stop the engine and wait for 10 minutes.
9. Check the oil level using the oil level gauge. CAUTION:
Do not overfill the engine with engine oil.
OIL FILTER
OIL FILTER : Removal and InstallationINFOID:0000000009464550
REMOVAL
1. Remove fender protector side cover (RH). Refer to EXT-26, "FENDER PROTECTOR : Removal and
Installation".
2. Drain engine oil. Refer to LU-10, "Changing Engine Oil"
3. Remove the oil filter using suitable tool.
WARNING:
• Be careful not to get burned, the engine and engine oil may be hot.
CAUTION:
• When removing, prepare a shop cloth to absorb any oil leakage or spillage.
• Do not allow engine oil to adhere to the drive belts.
• Completely wipe off any oil that adheres to the engine and
the vehicle.
: Front
Oil specification and
viscosity : Refer to
MA-11, "FOR USA
AND CANADA : Engine Oil
Recommendation".
Oil pan drain plug : 34.3 N·m (3.5 kg-m, 25 ft-lb)JPBIA1676ZZ
Tool number : KV10115801 (J-38956)
WBIA0589E
Revision: November 20132014 Altima NAM
Page 3203 of 4801
ENGINE MAINTENANCE (QR25DE)MA-19
< PERIODIC MAINTENANCE >
C
D E
F
G H
I
J
K L
M B
MA
N
O A
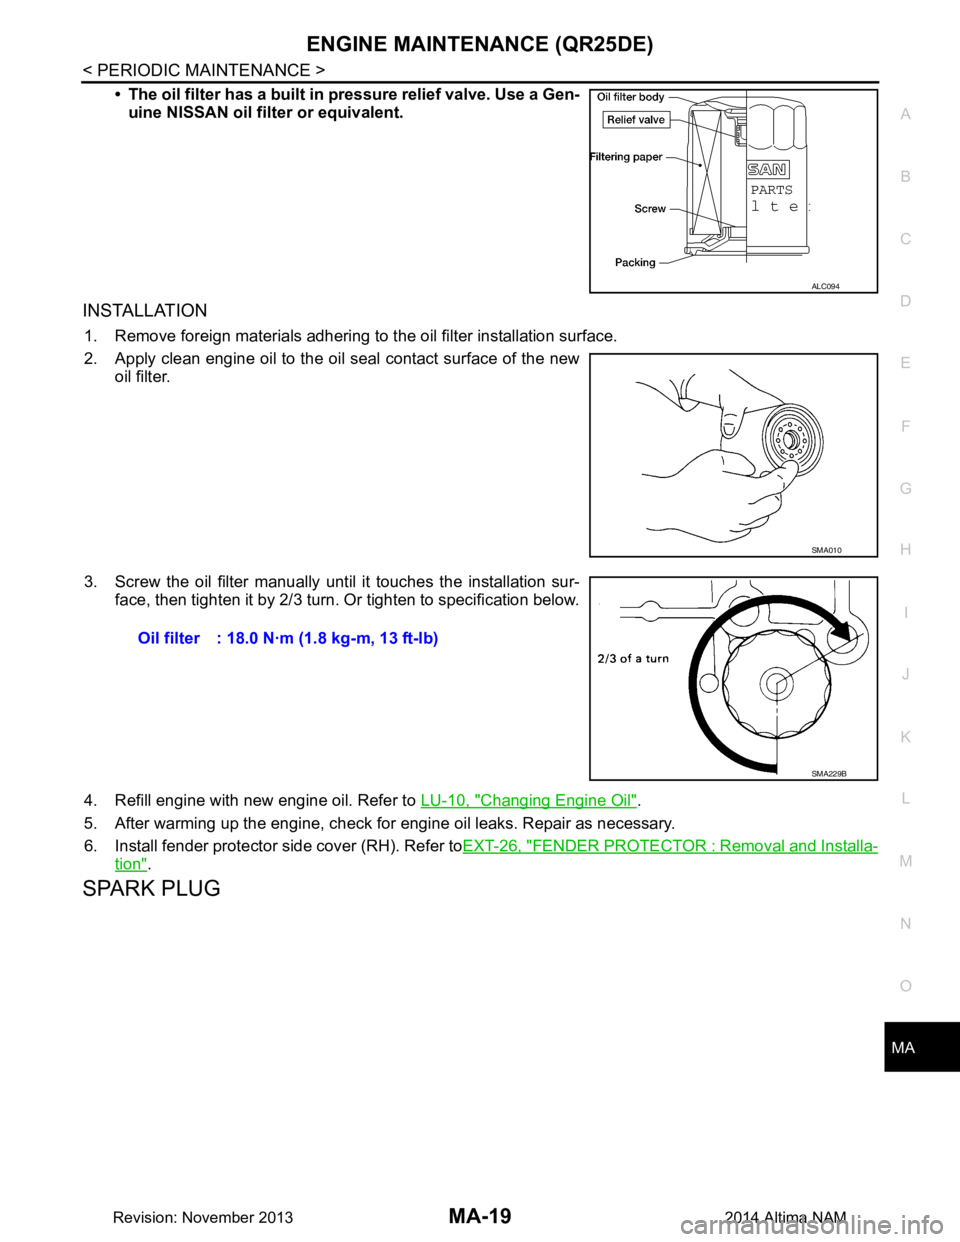
• The oil filter has a built in pressure relief valve. Use a Gen-
uine NISSAN oil filter or equivalent.
INSTALLATION
1. Remove foreign materials adhering to the oil filter installation surface.
2. Apply clean engine oil to the oil seal contact surface of the new oil filter.
3. Screw the oil filter manually unt il it touches the installation sur-
face, then tighten it by 2/3 turn. Or tighten to specification below.
4. Refill engine with new engine oil. Refer to LU-10, "Changing Engine Oil"
.
5. After warming up the engine, check for engine oil leaks. Repair as necessary.
6. Install fender protector side cover (RH). Refer to EXT-26, "FENDER PROTECTOR : Removal and Installa-
tion".
SPARK PLUG
ALC094
SMA010
Oil filter : 18.0 N·m (1.8 kg-m, 13 ft-lb)
SMA229B
Revision: November 20132014 Altima NAM