2014 NISSAN TEANA check oil
[x] Cancel search: check oilPage 3728 of 4801
REAR SUSPENSION ASSEMBLYRSU-11
< UNIT REMOVAL AND INSTALLATION >
C
D
F
G H
I
J
K L
M A
B
RSU
N
O P
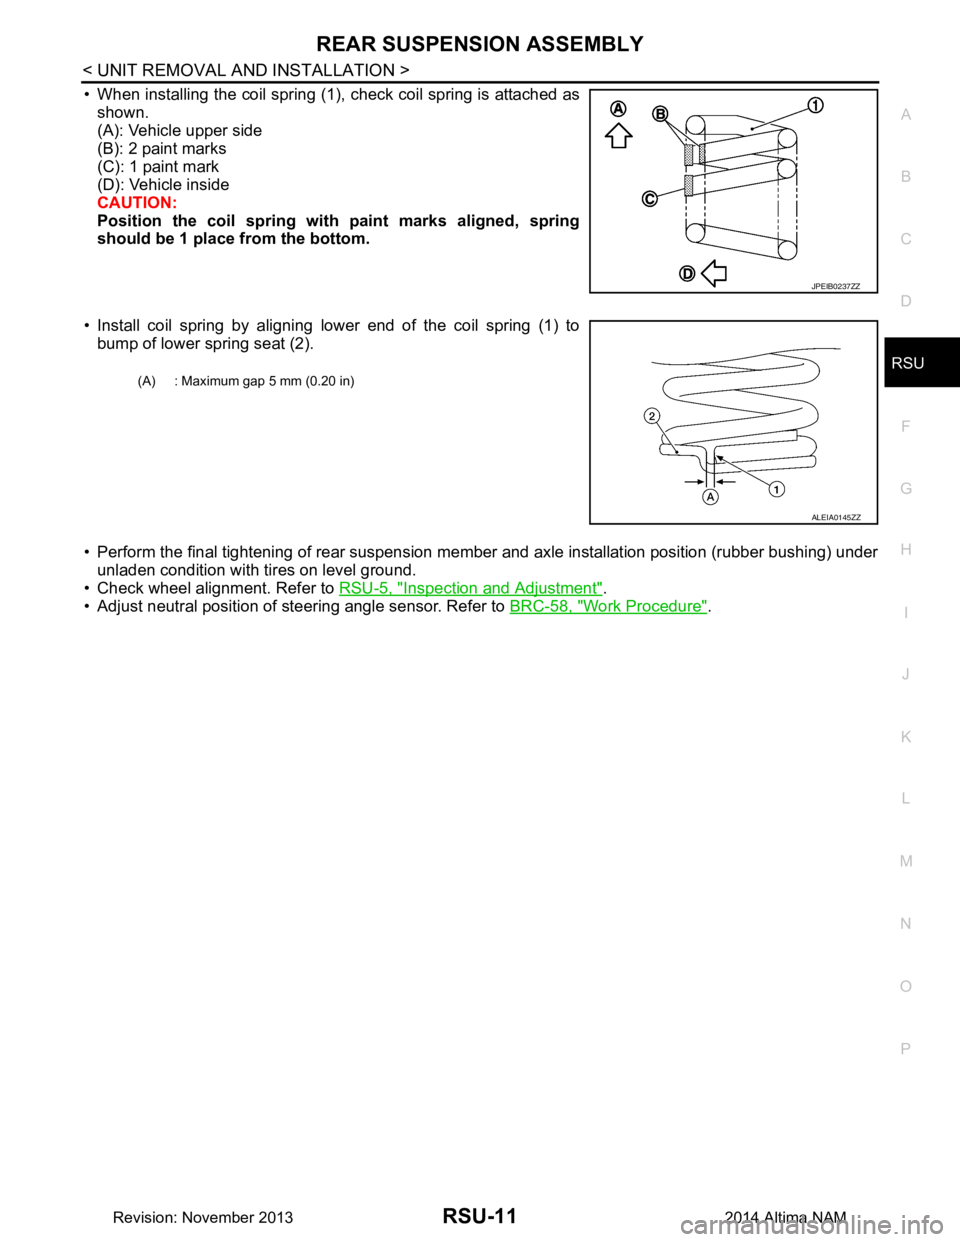
• When installing the coil spring (1), check coil spring is attached as shown.
(A): Vehicle upper side
(B): 2 paint marks
(C): 1 paint mark
(D): Vehicle inside
CAUTION:
Position the coil spring with paint marks aligned, spring
should be 1 place from the bottom.
• Install coil spring by aligning lower end of the coil spring (1) to bump of lower spring seat (2).
• Perform the final tightening of rear suspension me mber and axle installation position (rubber bushing) under
unladen condition with tires on level ground.
• Check wheel alignment. Refer to RSU-5, "Inspection and Adjustment"
.
• Adjust neutral position of steering angle sensor. Refer to BRC-58, "Work Procedure"
.
JPEIB0237ZZ
(A) : Maximum gap 5 mm (0.20 in)
ALEIA0145ZZ
Revision: November 20132014 Altima NAM
Page 3733 of 4801
RSU-16
< REMOVAL AND INSTALLATION >
SUSPENSION ARM
SUSPENSION ARM
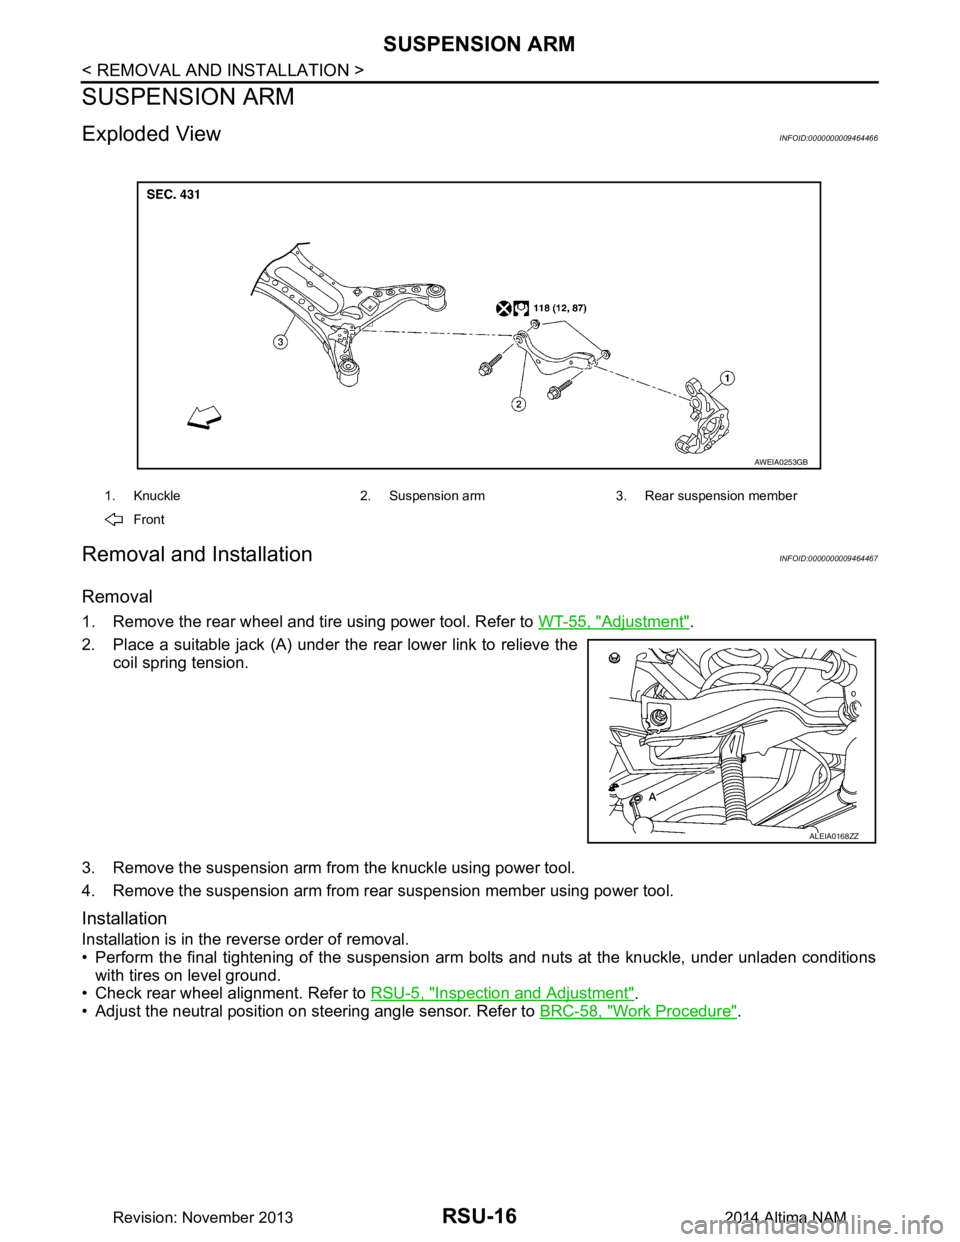
Exploded ViewINFOID:0000000009464466
Removal and InstallationINFOID:0000000009464467
Removal
1. Remove the rear wheel and tire using power tool. Refer to WT-55, "Adjustment".
2. Place a suitable jack (A) under the rear lower link to relieve the coil spring tension.
3. Remove the suspension arm from the knuckle using power tool.
4. Remove the suspension arm from rear suspension member using power tool.
Installation
Installation is in the reverse order of removal.
• Perform the final tightening of the suspension arm bolts and nuts at the knuckle, under unladen conditions
with tires on level ground.
• Check rear wheel alignment. Refer to RSU-5, "Inspection and Adjustment"
.
• Adjust the neutral position on steering angle sensor. Refer to BRC-58, "Work Procedure"
.
1. Knuckle 2. Suspension arm 3. Rear suspension member
Front
AWEIA0253GB
ALEIA0168ZZ
Revision: November 20132014 Altima NAM
Page 3737 of 4801
SB-2
< PRECAUTION >
PRECAUTIONS
PRECAUTION
PRECAUTIONS
Precaution for Supplemental Restraint System (SRS) "AIR BAG" and "SEAT BELT
PRE-TENSIONER"
INFOID:0000000009951757
The Supplemental Restraint System such as “A IR BAG” and “SEAT BELT PRE-TENSIONER”, used along
with a front seat belt, helps to reduce the risk or severi ty of injury to the driver and front passenger for certain
types of collision. Information necessary to service the system safely is included in the SR and SB section of
this Service Manual.
WARNING:
• To avoid rendering the SRS inopera tive, which could increase the risk of personal injury or death in
the event of a collision which would result in air bag inflation, all maintenance must be performed by
an authorized NISS AN/INFINITI dealer.
• Improper maintenance, including in correct removal and installation of the SRS, can lead to personal
injury caused by unintent ional activation of the system. For re moval of Spiral Cable and Air Bag
Module, see the SR section.
• Do not use electrical test equipmen t on any circuit related to the SRS unless instructed to in this
Service Manual. SRS wiring harn esses can be identified by yellow and/or orange harnesses or har-
ness connectors.
PRECAUTIONS WHEN USING POWER TOOLS (AIR OR ELECTRIC) AND HAMMERS
WARNING:
• When working near the Airbag Diagnosis Sensor Unit or other Airbag System sensors with the Igni-
tion ON or engine running, DO NOT use air or electri c power tools or strike near the sensor(s) with a
hammer. Heavy vibration could activate the sensor( s) and deploy the air bag(s), possibly causing
serious injury.
• When using air or electric power tools or hammers , always switch the Ignition OFF, disconnect the
battery and wait at least three minutes before performing any service.
Precaution for Seat Belt ServiceINFOID:0000000009462957
CAUTION:
• Before removing the seat belt pre-tensioner assembl y, turn the ignition switch OFF, disconnect both
battery terminals and wait at least three minutes. For approximately three minutes after the battery
terminals have been removed, it is still possible for the air bag and seat belt pre-tensioner to deploy.
Therefore, do not attempt work on any SRS conn ectors or wires until at least three minutes have
passed.
• After replacing or reinstalling seat belt pre -tensioner assembly or reconnecting seat belt pre-ten-
sioner assembly connector, make sure entire SRS operates properly. Refer to SRC-15, "SRS Opera-
tion Check".
• Do not disassemble buckle or seat belt assembly.
• Replace anchor bolts if th ey are deformed or worn out.
• Do not oil tongue or buckle.
• If any component of seat belt assembly is questionable, do not re pair. Replace the whole seat belt
assembly.
• If webbing is cut, frayed or damaged, replace seat belt assembly.
• When replacing seat belt assembly, use a genuine NISSAN seat belt assembly.
Precaution for WorkINFOID:0000000009462958
• When removing or disassembling each component, be careful not to damage or deform it. If a component may be subject to interference, be sure to protect it with a shop cloth.
• When removing (disengaging) components with a screwdriver or similar tool, be sure to wrap the component with a shop cloth or vinyl tape to protect it.
• Protect the removed parts with a s hop cloth and prevent them from being dropped.
• Replace a deformed or damaged clip.
• If a part is specified as a non-reusable part, always replace it with a new one.
• Be sure to tighten bolts and nuts securely to the specified torque.
• After installation is complete, be sure to check that each part works properly.
Revision: November 20132014 Altima NAM
Page 3751 of 4801
SE-2
< PRECAUTION >
PRECAUTIONS
PRECAUTION
PRECAUTIONS
Precaution for Supplemental Restraint System (SRS) "AIR BAG" and "SEAT BELT
PRE-TENSIONER"
INFOID:0000000009951559
The Supplemental Restraint System such as “A IR BAG” and “SEAT BELT PRE-TENSIONER”, used along
with a front seat belt, helps to reduce the risk or severi ty of injury to the driver and front passenger for certain
types of collision. Information necessary to service the system safely is included in the SR and SB section of
this Service Manual.
WARNING:
• To avoid rendering the SRS inopera tive, which could increase the risk of personal injury or death in
the event of a collision which would result in air bag inflation, all maintenance must be performed by
an authorized NISS AN/INFINITI dealer.
• Improper maintenance, including in correct removal and installation of the SRS, can lead to personal
injury caused by unintent ional activation of the system. For re moval of Spiral Cable and Air Bag
Module, see the SR section.
• Do not use electrical test equipmen t on any circuit related to the SRS unless instructed to in this
Service Manual. SRS wiring harn esses can be identified by yellow and/or orange harnesses or har-
ness connectors.
PRECAUTIONS WHEN USING POWER TOOLS (AIR OR ELECTRIC) AND HAMMERS
WARNING:
• When working near the Airbag Diagnosis Sensor Unit or other Airbag System sensors with the Igni-
tion ON or engine running, DO NOT use air or electri c power tools or strike near the sensor(s) with a
hammer. Heavy vibration could activate the sensor( s) and deploy the air bag(s), possibly causing
serious injury.
• When using air or electric power tools or hammers , always switch the Ignition OFF, disconnect the
battery and wait at least three minutes before performing any service.
Precaution for WorkINFOID:0000000009462924
• When removing or disassembling each component, be careful not to damage or deform it. If a component may be subject to interference, be sure to protect it with a shop cloth.
• When removing (disengaging) components with a screwdriver or similar tool, be sure to wrap the component with a shop cloth or vinyl tape to protect it.
• Protect the removed parts with a s hop cloth and prevent them from being dropped.
• Replace a deformed or damaged clip.
• If a part is specified as a non-reusable part, always replace it with a new one.
• Be sure to tighten bolts and nuts securely to the specified torque.
• After installation is complete, be sure to check that each part works properly.
• Follow the steps below to clean components:
- Water soluble dirt:
• Dip a soft cloth into lukewarm water, wring the water out of the cloth and wipe the dirty area.
• Then rub with a soft, dry cloth.
- Oily dirt:
• Dip a soft cloth into lukewarm water with mild detergent (concentration: within 2 to 3%) and wipe the dirty area.
• Then dip a cloth into fresh water, wring the water out of the cloth and wipe the detergent off.
• Then rub with a soft, dry cloth.
- Do not use organic solvent such as thinner, benzene, alcohol or gasoline.
- For genuine leather seats, use a genuine leather seat cleaner.
Revision: November 20132014 Altima NAMRevision: November 20132014 Altima NAM
Page 3799 of 4801
SE-50
< UNIT DISASSEMBLY AND ASSEMBLY >
FRONT SEAT
Assembly
Assembly is in the reverse order of disassembly.
CAUTION:
• Smooth out all wrin kles during assembly.
• Always route side air bag module harness in original location. Replace any deformed or damaged
clips with same type and color. Always install clips in the original location in the harness.
• After work is completed, check that no system ma lfunction is detected causing the air bag warning
lamp to illuminate.
• If a malfunction is detected by the air bag warnin g lamp after repair or replacement of the malfunc-
tion parts, perform the SRS final check. Refer to SRC-17, "SRS Final Check"
.
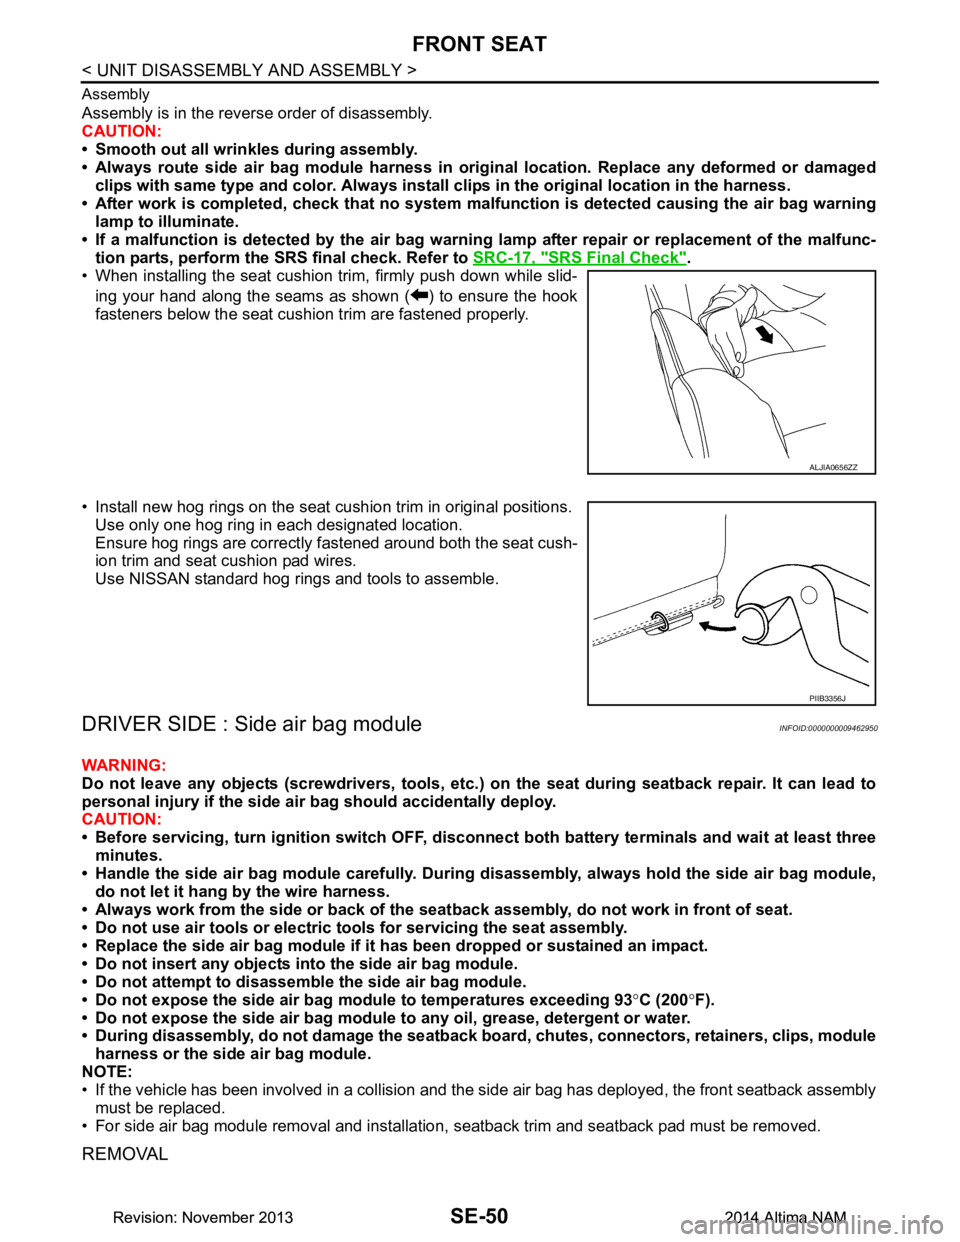
• When installing the seat cushion trim, firmly push down while slid-
ing your hand along the seams as shown ( ) to ensure the hook
fasteners below the seat cushion trim are fastened properly.
• Install new hog rings on the seat cushion trim in original positions. Use only one hog ring in each designated location.
Ensure hog rings are correctly fastened around both the seat cush-
ion trim and seat cushion pad wires.
Use NISSAN standard hog rings and tools to assemble.
DRIVER SIDE : Side air bag moduleINFOID:0000000009462950
WARNING:
Do not leave any objects (screwdrivers, tools, etc. ) on the seat during seatback repair. It can lead to
personal injury if the side ai r bag should accidentally deploy.
CAUTION:
• Before servicing, turn ignition sw itch OFF, disconnect both battery terminals and wait at least three
minutes.
• Handle the side air bag module carefully. During disassembly, alw ays hold the side air bag module,
do not let it hang by the wire harness.
• Always work from the side or back of the seat back assembly, do not work in front of seat.
• Do not use air tools or electric tools for servicing the seat assembly.
• Replace the side air bag module if it h as been dropped or sustained an impact.
• Do not insert any objects into the side air bag module.
• Do not attempt to disassemble the side air bag module.
• Do not expose the side air bag module to temperatures exceeding 93 °C (200 °F).
• Do not expose the side air bag module to any oil, grease, detergent or water.
• During disassembly, do not damage the seatback board, chutes, connectors, retainers, clips, module
harness or the side air bag module.
NOTE:
• If the vehicle has been involved in a collision and the side air bag has deployed, the front seatback assembly
must be replaced.
• For side air bag module removal and installation, seatback trim and seatback pad must be removed.
REMOVAL
ALJIA0656ZZ
PIIB3356J
Revision: November 20132014 Altima NAMRevision: November 20132014 Altima NAM
Page 3829 of 4801
SEC-4
< PRECAUTION >
PRECAUTIONS
PRECAUTION
PRECAUTIONS
Precaution for Supplemental Restraint System (SRS) "AIR BAG" and "SEAT BELT
PRE-TENSIONER"
INFOID:0000000009951563
The Supplemental Restraint System such as “A IR BAG” and “SEAT BELT PRE-TENSIONER”, used along
with a front seat belt, helps to reduce the risk or severi ty of injury to the driver and front passenger for certain
types of collision. Information necessary to service the system safely is included in the SR and SB section of
this Service Manual.
WARNING:
• To avoid rendering the SRS inopera tive, which could increase the risk of personal injury or death in
the event of a collision which would result in air bag inflation, all maintenance must be performed by
an authorized NISS AN/INFINITI dealer.
• Improper maintenance, including in correct removal and installation of the SRS, can lead to personal
injury caused by unintent ional activation of the system. For re moval of Spiral Cable and Air Bag
Module, see the SR section.
• Do not use electrical test equipmen t on any circuit related to the SRS unless instructed to in this
Service Manual. SRS wiring harn esses can be identified by yellow and/or orange harnesses or har-
ness connectors.
PRECAUTIONS WHEN USING POWER TOOLS (AIR OR ELECTRIC) AND HAMMERS
WARNING:
• When working near the Airbag Diagnosis Sensor Unit or other Airbag System sensors with the Igni-
tion ON or engine running, DO NOT use air or electri c power tools or strike near the sensor(s) with a
hammer. Heavy vibration could activate the sensor( s) and deploy the air bag(s), possibly causing
serious injury.
• When using air or electric power tools or hammers , always switch the Ignition OFF, disconnect the
battery and wait at least three minutes before performing any service.
Precaution for WorkINFOID:0000000009461062
• When removing or disassembling each component, be careful not to damage or deform it. If a component may be subject to interference, be sure to protect it with a shop cloth.
• When removing (disengaging) components with a screwdriver or similar tool, be sure to wrap the component with a shop cloth or vinyl tape to protect it.
• Protect the removed parts with a s hop cloth and prevent them from being dropped.
• Replace a deformed or damaged clip.
• If a part is specified as a non-reusable part, always replace it with a new one.
• Be sure to tighten bolts and nuts securely to the specified torque.
• After installation is complete, be sure to check that each part works properly.
• Follow the steps below to clean components:
- Water soluble dirt:
• Dip a soft cloth into lukewarm water, wring the water out of the cloth and wipe the dirty area.
• Then rub with a soft, dry cloth.
- Oily dirt:
• Dip a soft cloth into lukewarm water with mild detergent (concentration: within 2 to 3%) and wipe the dirty area.
• Then dip a cloth into fresh water, wring the water out of the cloth and wipe the detergent off.
• Then rub with a soft, dry cloth.
- Do not use organic solvent such as thinner, benzene, alcohol or gasoline.
- For genuine leather seats, use a genuine leather seat cleaner.
Revision: November 20132014 Altima NAMRevision: November 20132014 Altima NAM
Page 3975 of 4801
DRIVER AIR BAG MODULESR-13
< REMOVAL AND INSTALLATION >
C
D E
F
G
I
J
K L
M A
B
SR
N
O P
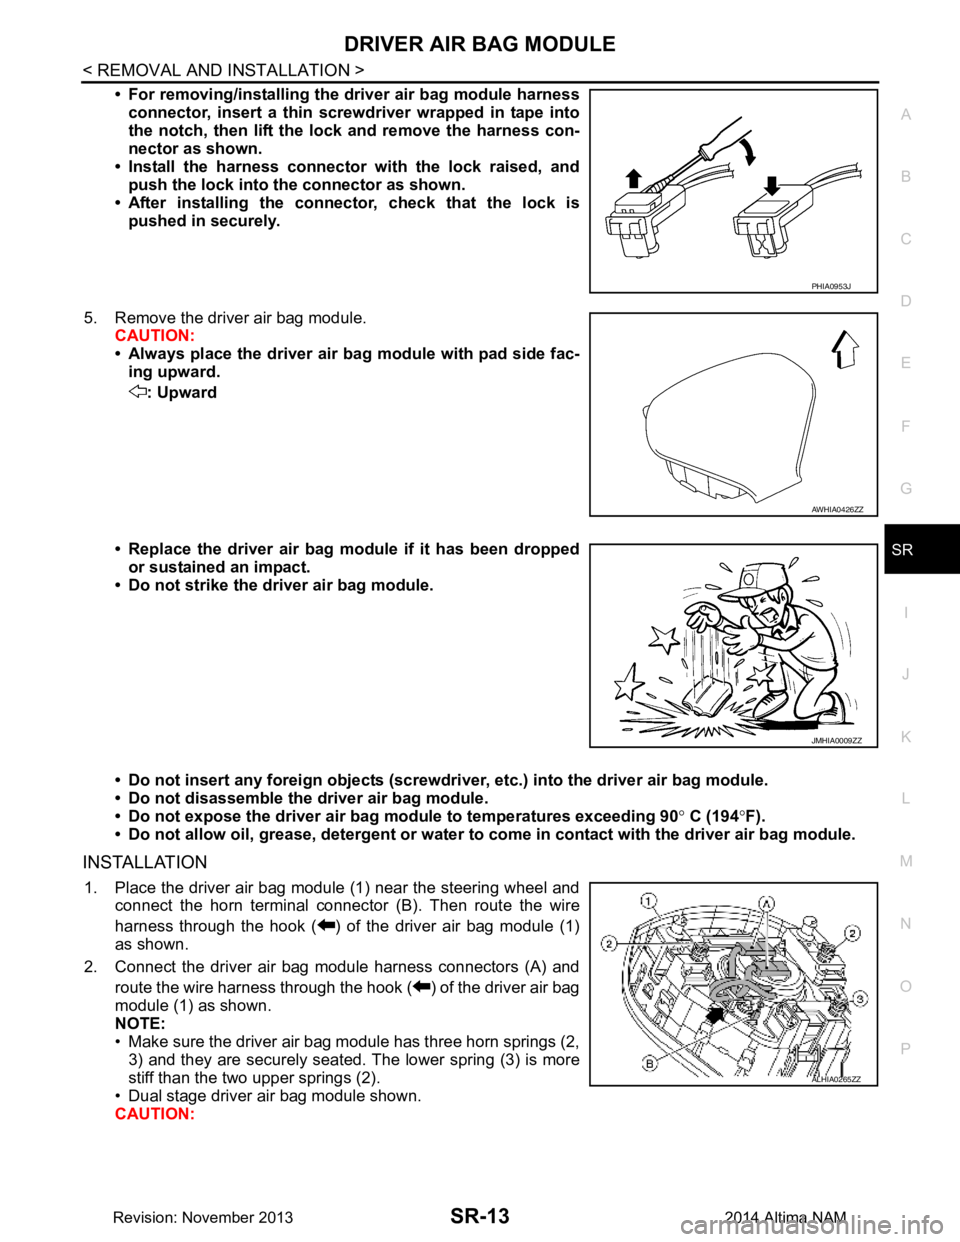
• For removing/installing the driver air bag module harness
connector, insert a thin screwdriver wrapped in tape into
the notch, then lift the lock and remove the harness con-
nector as shown.
• Install the harness connector with the lock raised, and push the lock into the connector as shown.
• After installing the connector, check that the lock is pushed in securely.
5. Remove the driver air bag module. CAUTION:
• Always place the driver air ba g module with pad side fac-
ing upward.
: Upward
• Replace the driver air bag module if it has been dropped or sustained an impact.
• Do not strike the driver air bag module.
• Do not insert any foreign objects (screwdri ver, etc.) into the driver air bag module.
• Do not disassemble the driver air bag module.
• Do not expose the driver air ba g module to temperatures exceeding 90 ° C (194 °F).
• Do not allow oil, grease, detergent or water to come in contact with the driver air bag module.
INSTALLATION
1. Place the driver air bag module (1) near the steering wheel and
connect the horn terminal connec tor (B). Then route the wire
harness through the hook ( ) of the driver air bag module (1)
as shown.
2. Connect the driver air bag module harness connectors (A) and route the wire harness through the hook ( ) of the driver air bag
module (1) as shown.
NOTE:
• Make sure the driver air bag module has three horn springs (2, 3) and they are securely seated. The lower spring (3) is more
stiff than the two upper springs (2).
• Dual stage driver air bag module shown.
CAUTION:
PHIA0953J
AWHIA0426ZZ
JMHIA0009ZZ
ALHIA0265ZZ
Revision: November 20132014 Altima NAM
Page 3978 of 4801
SR-16
< REMOVAL AND INSTALLATION >
SPIRAL CABLE
• Do not strike or drop the spiral cable.
• Replace the spiral cable if it has been dropped or sus-
tained an impact.
• Do not disassemble the spiral cable.
• Do not allow oil, grease, detergent or water to come in contact with the spiral cable.
INSTALLATION
Installation is in the reverse order of removal.
• The turn signal lever must be in the neutral position for spiral cable installation.
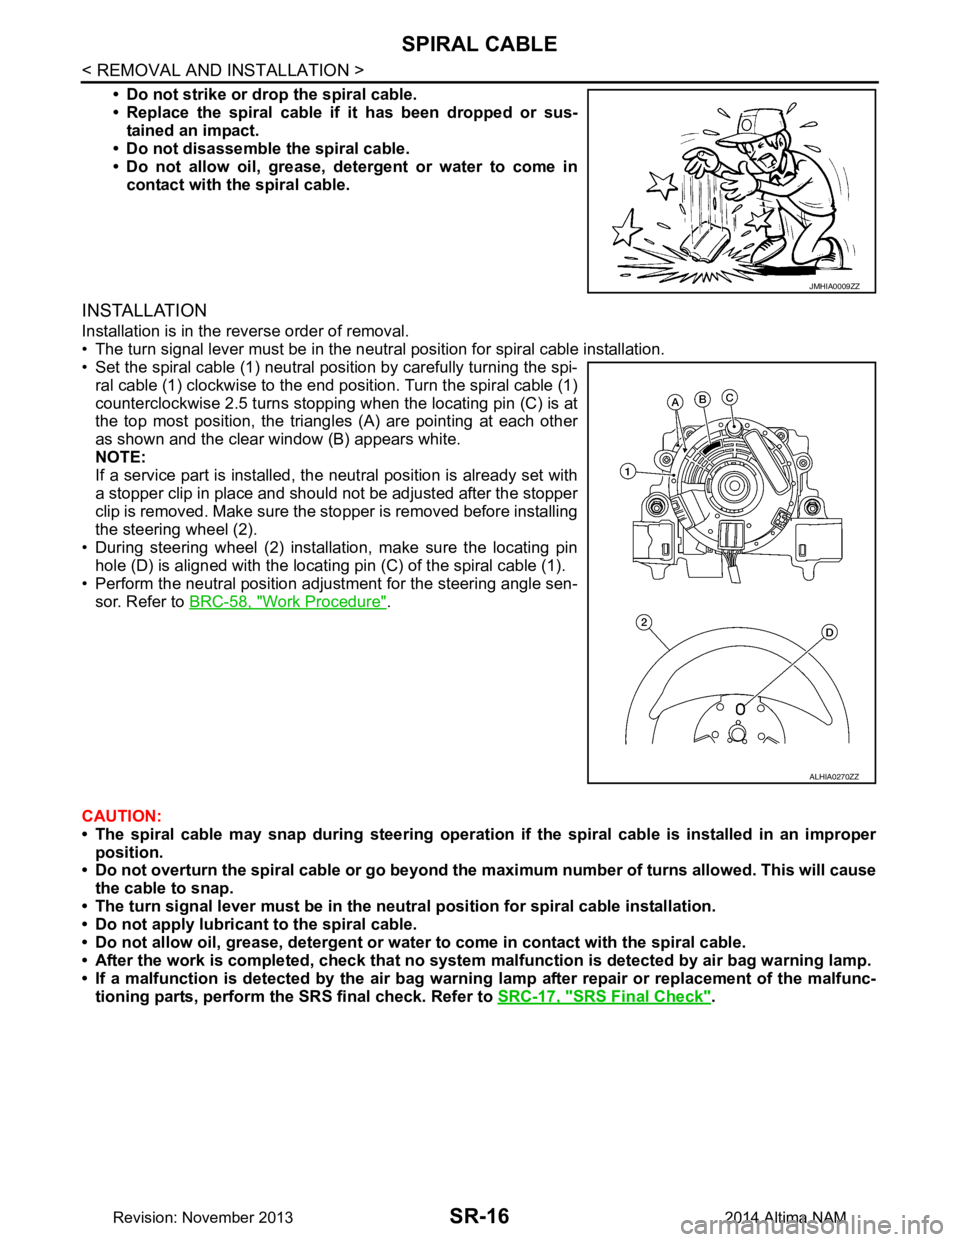
• Set the spiral cable (1) neutral position by carefully turning the spi-
ral cable (1) clockwise to the end position. Turn the spiral cable (1)
counterclockwise 2.5 turns stopping when the locating pin (C) is at
the top most position, the triangl es (A) are pointing at each other
as shown and the clear window (B) appears white.
NOTE:
If a service part is installed, the neutral position is already set with
a stopper clip in place and should not be adjusted after the stopper
clip is removed. Make sure the stopper is removed before installing
the steering wheel (2).
• During steering wheel (2) installation, make sure the locating pin hole (D) is aligned with the locating pin (C) of the spiral cable (1).
• Perform the neutral position adjustment for the steering angle sen-
sor. Refer to BRC-58, "Work Procedure"
.
CAUTION:
• The spiral cable may snap during steering operation if the spiral cable is installed in an improper
position.
• Do not overturn the spiral cable or go beyond the maximum number of turns allowed. This will cause
the cable to snap.
• The turn signal lever must be in the ne utral position for spiral cable installation.
• Do not apply lubricant to the spiral cable.
• Do not allow oil, grease, detergent or water to come in contact with the spiral cable.
• After the work is completed, check that no system malfunction is detected by air bag warning lamp.
• If a malfunction is detected by the air bag warnin g lamp after repair or replacement of the malfunc-
tioning parts, perform the SRS final check. Refer to SRC-17, "SRS Final Check"
.
JMHIA0009ZZ
ALHIA0270ZZ
Revision: November 20132014 Altima NAM