2014 NISSAN TEANA check oil
[x] Cancel search: check oilPage 2568 of 4801
GI-40
< BASIC INSPECTION >
SERVICE INFORMATION FOR ELECTRICAL INCIDENT
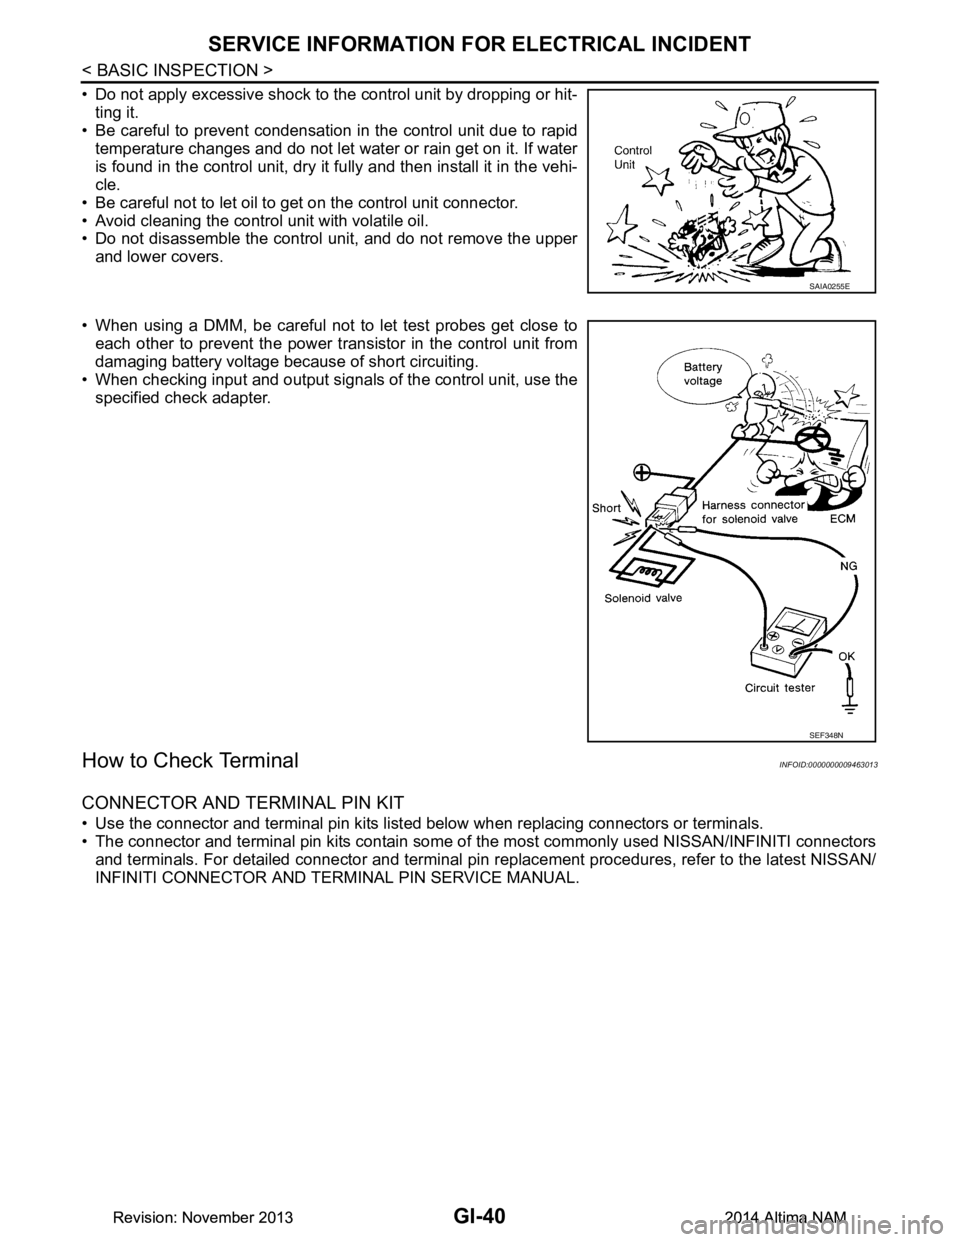
• Do not apply excessive shock to the control unit by dropping or hit-ting it.
• Be careful to prevent condensation in the control unit due to rapid
temperature changes and do not let water or rain get on it. If water
is found in the control unit, dry it fully and then install it in the vehi-
cle.
• Be careful not to let oil to get on the control unit connector.
• Avoid cleaning the control unit with volatile oil.
• Do not disassemble the control unit, and do not remove the upper
and lower covers.
• When using a DMM, be careful not to let test probes get close to each other to prevent the power tr ansistor in the control unit from
damaging battery voltage because of short circuiting.
• When checking input and output signals of the control unit, use the
specified check adapter.
How to Check TerminalINFOID:0000000009463013
CONNECTOR AND TERMINAL PIN KIT
• Use the connector and terminal pin kits listed below when replacing connectors or terminals.
• The connector and terminal pin kits contain some of the most commonly used NISSAN/INFINITI connectors
and terminals. For detailed connector and terminal pin r eplacement procedures, refer to the latest NISSAN/
INFINITI CONNECTOR AND TERMINAL PIN SERVICE MANUAL.
SAIA0255E
SEF348N
Revision: November 20132014 Altima NAMRevision: November 20132014 Altima NAM
Page 2583 of 4801

PRECAUTIONSGW-3
< PRECAUTION >
C
D E
F
G H
I
J
L
M A
B
GW
N
O P
• When removing (disengaging) components with a screwdriver or similar tool, be sure to wrap the component with a shop cloth or vinyl tape to protect it.
• Protect the removed parts with a shop cloth and prevent them from being dropped.
• Replace a deformed or damaged clip.
• If a part is specified as a non-reusabl e part, always replace it with a new one.
• Be sure to tighten bolts and nuts securely to the specified torque.
• After installation is complete, be sure to check that each part works properly.
• Follow the steps below to clean components:
- Water soluble dirt:
• Dip a soft cloth into lukewarm water, wring the water out of the cloth and wipe the dirty area.
• Then rub with a soft, dry cloth.
-Oily dirt:
• Dip a soft cloth into lukewarm water with mild detergent (concentration: within 2 to 3%) and wipe the dirty
area.
• Then dip a cloth into fresh water, wring the water out of the cloth and wipe the detergent off.
• Then rub with a soft, dry cloth.
- Do not use organic solvent such as thinner, benzene, alcohol or gasoline.
- For genuine leather seats, use a genuine leather seat cleaner.
Revision: November 20132014 Altima NAM
Page 2609 of 4801
PRECAUTIONSHA-3
< PRECAUTION >
C
D E
F
G H
J
K L
M A
B
HA
N
O P
PRECAUTION
PRECAUTIONS
Precaution for Supplemental Restraint System (SRS) "AIR BAG" and "SEAT BELT
PRE-TENSIONER"
INFOID:0000000009951784
The Supplemental Restraint System such as “A IR BAG” and “SEAT BELT PRE-TENSIONER”, used along
with a front seat belt, helps to reduce the risk or severi ty of injury to the driver and front passenger for certain
types of collision. Information necessary to service t he system safely is included in the SR and SB section of
this Service Manual.
WARNING:
• To avoid rendering the SRS inoper ative, which could increase the risk of personal injury or death in
the event of a collision which would result in air bag inflation, all maintenance must be performed by
an authorized NISSAN/INFINITI dealer.
• Improper maintenance, including in correct removal and installation of the SRS, can lead to personal
injury caused by unintentional act ivation of the system. For removal of Spiral Cable and Air Bag
Module, see the SR section.
• Do not use electrical test equipm ent on any circuit related to the SRS unless instructed to in this
Service Manual. SRS wiring harnesses can be identi fied by yellow and/or orange harnesses or har-
ness connectors.
PRECAUTIONS WHEN USING POWER TOOLS (AIR OR ELECTRIC) AND HAMMERS
WARNING:
• When working near the Airbag Diagnosis Sensor Un it or other Airbag System sensors with the Igni-
tion ON or engine running, DO NOT use air or el ectric power tools or strike near the sensor(s) with a
hammer. Heavy vibration could activate the sensor( s) and deploy the air bag(s), possibly causing
serious injury.
• When using air or electric power tools or hammers , always switch the Ignition OFF, disconnect the
battery and wait at least three mi nutes before performing any service.
Precaution for WorkINFOID:0000000009463909
• When removing or disassembling each component, be ca reful not to damage or deform it. If a component
may be subject to interference, be sure to protect it with a shop cloth.
• When removing (disengaging) components with a screwdriver or similar tool, be sure to wrap the component with a shop cloth or vinyl tape to protect it.
• Protect the removed parts with a shop cloth and prevent them from being dropped.
• Replace a deformed or damaged clip.
• If a part is specified as a non-reusabl e part, always replace it with a new one.
• Be sure to tighten bolts and nuts securely to the specified torque.
• After installation is complete, be sure to check that each part works properly.
• Follow the steps below to clean components:
- Water soluble dirt:
• Dip a soft cloth into lukewarm water, wring the water out of the cloth and wipe the dirty area.
• Then rub with a soft, dry cloth.
-Oily dirt:
• Dip a soft cloth into lukewarm water with mild detergent (concentration: within 2 to 3%) and wipe the dirty area.
• Then dip a cloth into fresh water, wring the water out of the cloth and wipe the detergent off.
• Then rub with a soft, dry cloth.
- Do not use organic solvent such as thinner, benzene, alcohol or gasoline.
- For genuine leather seats, use a genuine leather seat cleaner.
Precaution for Workin g with HFC-134a (R-134a)INFOID:0000000009463910
WARNING:
• CFC-12 (R-12) refrigerant and HFC-134a (R-134a) refr igerant are not compatible. If the refrigerants
are mixed compressor failure is likely to occur. Refer to HA-21, "Leak Test"
. To determine the purity
of HFC-134a (R-134a) in the vehicle and recovery tank, use Refrigerant Recovery/Recycling Recharg-
ing equipment and Refrigerant Identifier.
Revision: November 20132014 Altima NAM
Page 2612 of 4801
HA-6
< PRECAUTION >
PRECAUTIONS
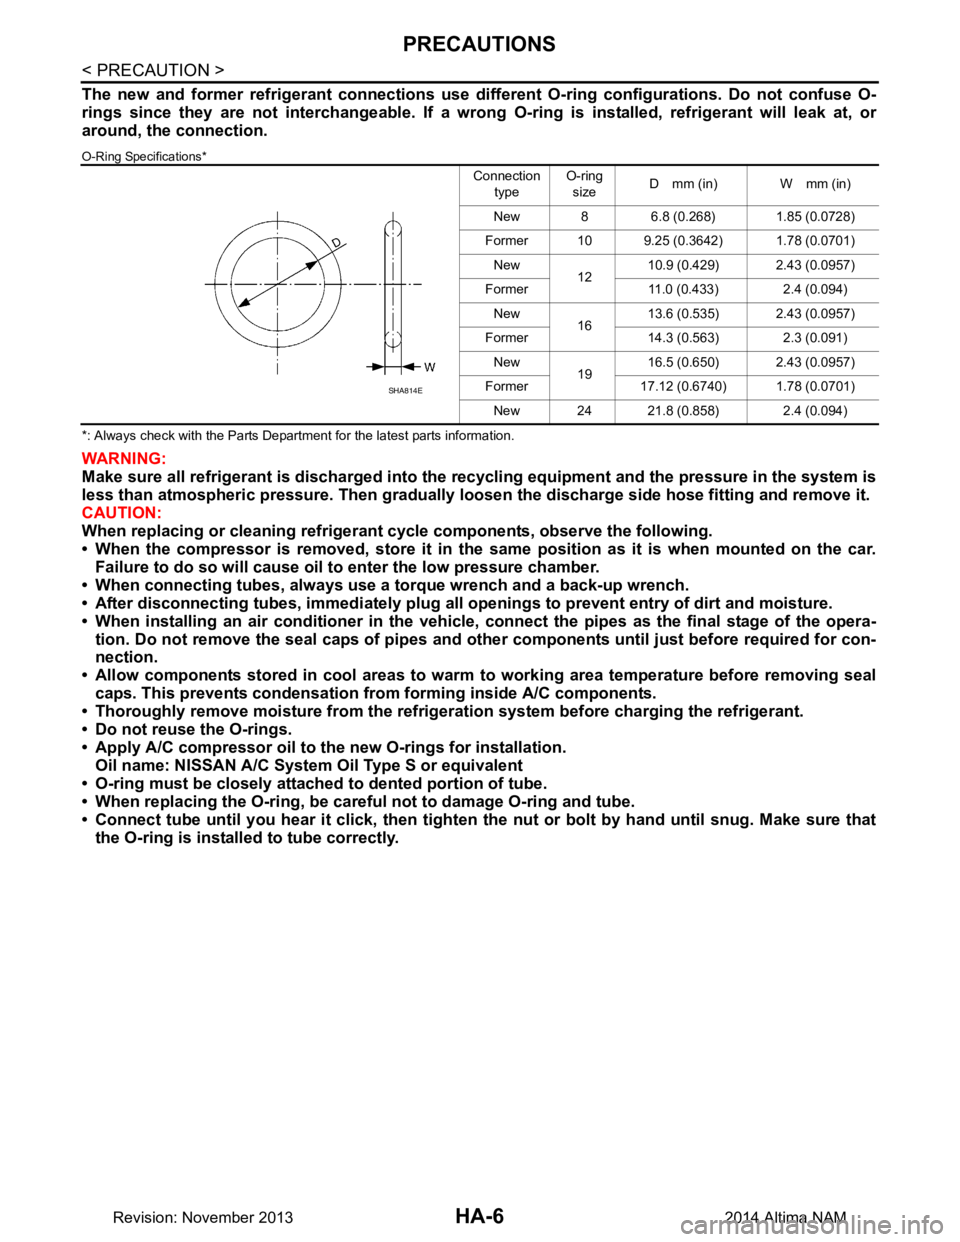
The new and former refrigerant connections use different O-ring configurations. Do not confuse O-
rings since they are not interchangeable. If a wrong O-ring is installed, refrigerant will leak at, or
around, the connection.
O-Ring Specifications*
*: Always check with the Parts Department for the latest parts information.
WARNING:
Make sure all refrigerant is discharged into the recycling equipment and the pressure in the system is
less than atmospheric pressure. Then gradually loo sen the discharge side hose fitting and remove it.
CAUTION:
When replacing or cleaning refrigeran t cycle components, observe the following.
• When the compressor is removed, store it in the same position as it is when mounted on the car.
Failure to do so will cause oil to enter the low pressure chamber.
• When connecting tubes, always use a torque wrench and a back-up wrench.
• After disconnecting tubes, immedi ately plug all openings to prevent entry of dirt and moisture.
• When installing an air conditioner in the vehicle, connect the pipes as the final stage of the opera-
tion. Do not remove the seal caps of pipes and othe r components until just before required for con-
nection.
• Allow components stored in cool areas to warm to working area temperature before removing seal
caps. This prevents condensation from forming inside A/C components.
• Thoroughly remove moisture from the refrigerat ion system before charging the refrigerant.
• Do not reuse the O-rings.
• Apply A/C compressor oil to th e new O-rings for installation.
Oil name: NISSAN A/C System Oil Type S or equivalent
• O-ring must be closely attached to dented portion of tube.
• When replacing the O-ring, be careful not to damage O-ring and tube.
• Connect tube until you hear it cl ick, then tighten the nut or bolt by hand until snug. Make sure that
the O-ring is installed to tube correctly.
Connection
type O-ring
size D mm (in) W mm (in)
New 8 6.8 (0.268) 1.85 (0.0728)
Former 10 9.25 (0.3642) 1.78 (0.0701) New 1210.9 (0.429) 2.43 (0.0957)
Former 11.0 (0.433) 2.4 (0.094) New 1613.6 (0.535) 2.43 (0.0957)
Former 14.3 (0.563) 2.3 (0.091) New 1916.5 (0.650) 2.43 (0.0957)
Former 17.12 (0.6740) 1.78 (0.0701) New 24 21.8 (0.858) 2.4 (0.094)
SHA814E
Revision: November 20132014 Altima NAM
Page 2626 of 4801
HA-20
< SYMPTOM DIAGNOSIS >
NOISE
NOISE
Symptom TableINFOID:0000000009463925
Symptom Noise source Probable cause Corrective action
Unusual noise from compressor
when A/C is ON. Inside of compressor
Wear, breakage or clogging of foreign
material in inner parts. Check compressor oil. Re-
fer to HA-25, "Inspection"
.
Magnet clutch Contact of clutch disc with pulley. Check clearance between
clutch disc and pulley.
Compressor body Loosened compressor mounting bolts. Check bolts for tightness.
Refer to HA-30, "COM-
PRESSOR : Exploded
View".
Unusual noise from cooler piping. Cooler piping (pipe and
flexible hose) Improper installation of clip and brack-
et. Check the installation condi-
tion of the cooler piping. Re-
fer to HA-34, "Exploded
View".
Unusual noise from expansion
valve when A/C is ON. Expansion valveShortage of refrigerant. • Check for leakage.
• Collect all refrigerant,
evacuate refrigerant cycle
again, and then refill it
with the specified amount
of refrigerant.
Wear, breakage or clogging of foreign
material in inner parts. Eliminate foreign material
from expansion valve or re-
place it.
Unusual noise from belt. — Loosened beltCheck belt tension. Refer to
MA-13, "DRIVE BELTS :
Checking Drive Belts"
(QR25DE) or MA-22,
"DRIVE BELTS : Checking
Drive Belts" (VQ35DE).
Internal compressor parts get locked Replace compressor. Refer
to HA-30, "COMPRESSOR
: Removal and Installation".
Revision: November 20132014 Altima NAM
Page 2629 of 4801
REFRIGERANTHA-23
< PERIODIC MAINTENANCE >
C
D E
F
G H
J
K L
M A
B
HA
N
O P
6. Start the engine and set A/C control in the following conditions. • A/C switch ON
• Air flow: VENT (ventilation)
• Intake door position: Recirculation
• Temperature setting: Full cold
• Fan (blower) speed: Maximum speed set
7. Run the engine at approximately 1,500 rpm for 2 minutes or more.
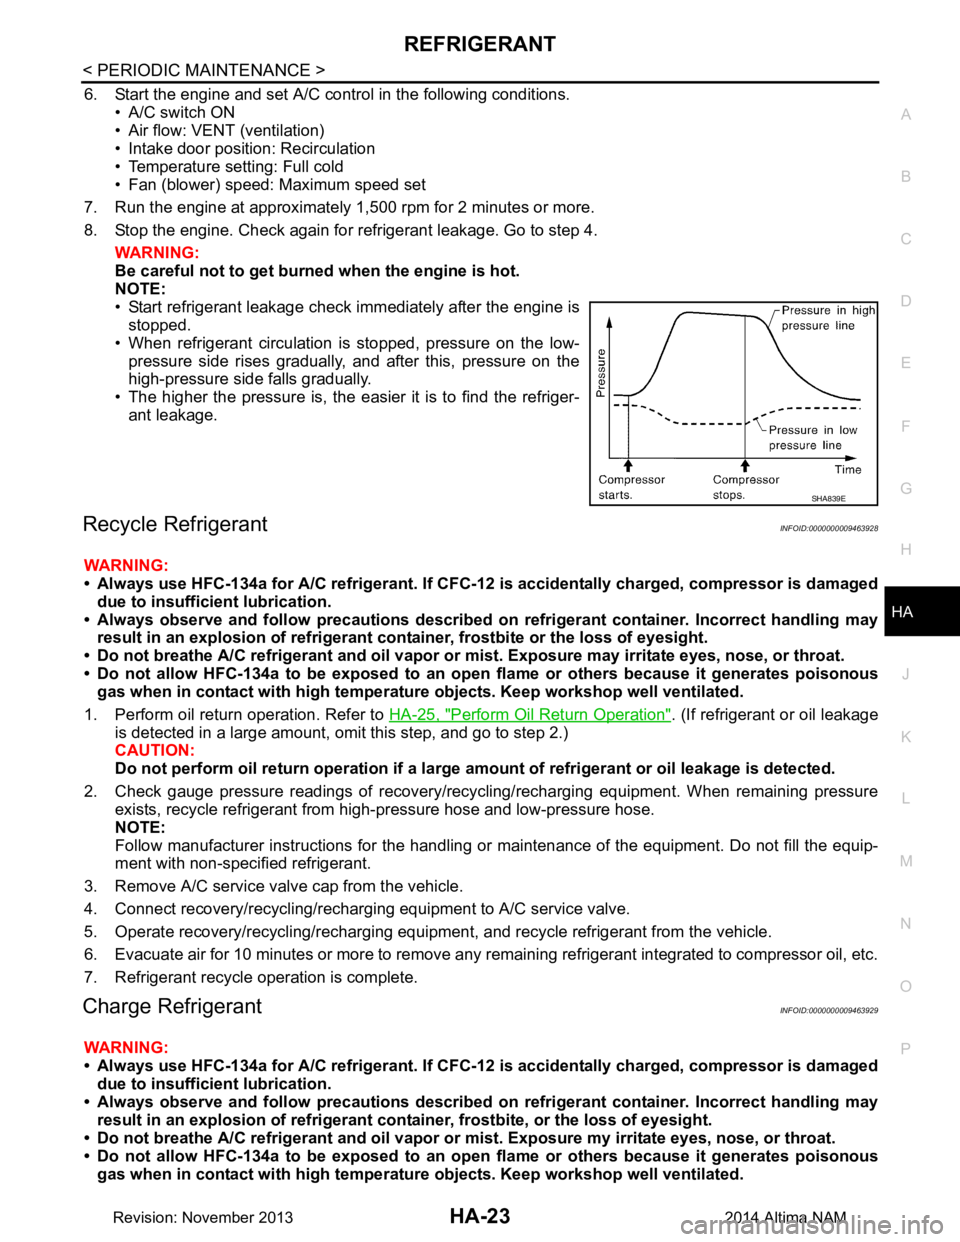
8. Stop the engine. Check again for refrigerant leakage. Go to step 4. WARNING:
Be careful not to get burned when the engine is hot.
NOTE:
• Start refrigerant leakage check immediately after the engine is stopped.
• When refrigerant circulation is stopped, pressure on the low- pressure side rises gradually, and after this, pressure on the
high-pressure side falls gradually.
• The higher the pressure is, the easier it is to find the refriger-
ant leakage.
Recycle RefrigerantINFOID:0000000009463928
WARNING:
• Always use HFC-134a for A/C refrigerant. If CFC-12 is accidentally charged, compressor is damaged
due to insufficient lubrication.
• Always observe and follow precaution s described on refrigerant container. Incorrect handling may
result in an explosion of refrigerant co ntainer, frostbite or the loss of eyesight.
• Do not breathe A/C refrigerant and oil vapor or mi st. Exposure may irritate eyes, nose, or throat.
• Do not allow HFC-134a to be exposed to an open flame or others because it generates poisonous
gas when in contact with high temperatur e objects. Keep workshop well ventilated.
1. Perform oil return operation. Refer to HA-25, "Perform Oil Return Operation"
. (If refrigerant or oil leakage
is detected in a large amount, omit this step, and go to step 2.)
CAUTION:
Do not perform oil return operation if a large am ount of refrigerant or oil leakage is detected.
2. Check gauge pressure readings of recovery/recyc ling/recharging equipment. When remaining pressure
exists, recycle refrigerant from high-pressure hose and low-pressure hose.
NOTE:
Follow manufacturer instructions for the handling or maintenance of the equipment. Do not fill the equip-
ment with non-specified refrigerant.
3. Remove A/C service valve cap from the vehicle.
4. Connect recovery/recycling/recharging equipment to A/C service valve.
5. Operate recovery/recycling/recharging equipment , and recycle refrigerant from the vehicle.
6. Evacuate air for 10 minutes or more to remove any remaining refrigerant integrated to compressor oil, etc.
7. Refrigerant recycle operation is complete.
Charge RefrigerantINFOID:0000000009463929
WARNING:
• Always use HFC-134a for A/C refrigerant. If CFC-12 is accidentally charged, compressor is damaged
due to insufficient lubrication.
• Always observe and follow precaution s described on refrigerant container. Incorrect handling may
result in an explosion of refrigerant co ntainer, frostbite, or the loss of eyesight.
• Do not breathe A/C refrigerant and oil vapor or mi st. Exposure my irritate eyes, nose, or throat.
• Do not allow HFC-134a to be exposed to an open flame or others because it generates poisonous
gas when in contact with high temperatur e objects. Keep workshop well ventilated.
SHA839E
Revision: November 20132014 Altima NAM
Page 2630 of 4801

HA-24
< PERIODIC MAINTENANCE >
REFRIGERANT
1. Connect recovery/recycling/recharging equipment to the A/C service valve.
2. Operate recovery/recycling/recharging equipment, and evacuate air from A/C system for 25 minutes or
more.
CAUTION:
Evacuate air for 15 minutes or more if the parts are replaced.
3. Check the airtightness of A/C system for 25 minutes or more. If pressure raises more than the specified
level, charge A/C system with approximately 200g refriger ant and check that there is no refrigerant leak-
age. Refer to HA-21, "Leak Test"
.
CAUTION:
Check the airtightness for 15 minutes or more if the parts are replaced.
4. If parts other than compressor are replaced, fill co mpressor oil according to parts that are replaced.
5. Charge the specified amount of refrigerant to A/C system.
6. Check that A/C system operates normally.
7. Disconnect recovery/recycling/recharging equipment. (Col lect the refrigerant from the high-pressure hose
and low-pressure hose of recovery/recycling/recharging equipment.)
8. Install A/C service valve cap.
9. Refrigerant charge is complete.
Revision: November 20132014 Altima NAM
Page 2631 of 4801
OIL
HA-25
< PERIODIC MAINTENANCE >
C
D E
F
G H
J
K L
M A
B
HA
N
O P
OIL
DescriptionINFOID:0000000009463930
MAINTENANCE OF OIL LEVEL
The compressor oil is circulating in the system together wi th the refrigerant. It is necessary to fill compressor
with oil when replacing A/C system parts or when a large amount of refrigerant leakage is detected. It is impor-
tant to always maintain oil level within the spec ified level, otherwise the following conditions may occur:
• Insufficient oil amount: Stuck compressor
• Excessive oil amount: Insufficient coo ling (caused by insufficient heat exchange)
InspectionINFOID:0000000009463931
If a compressor is malfunctioning (internal noise, insufficient cooling), check the compressor oil.
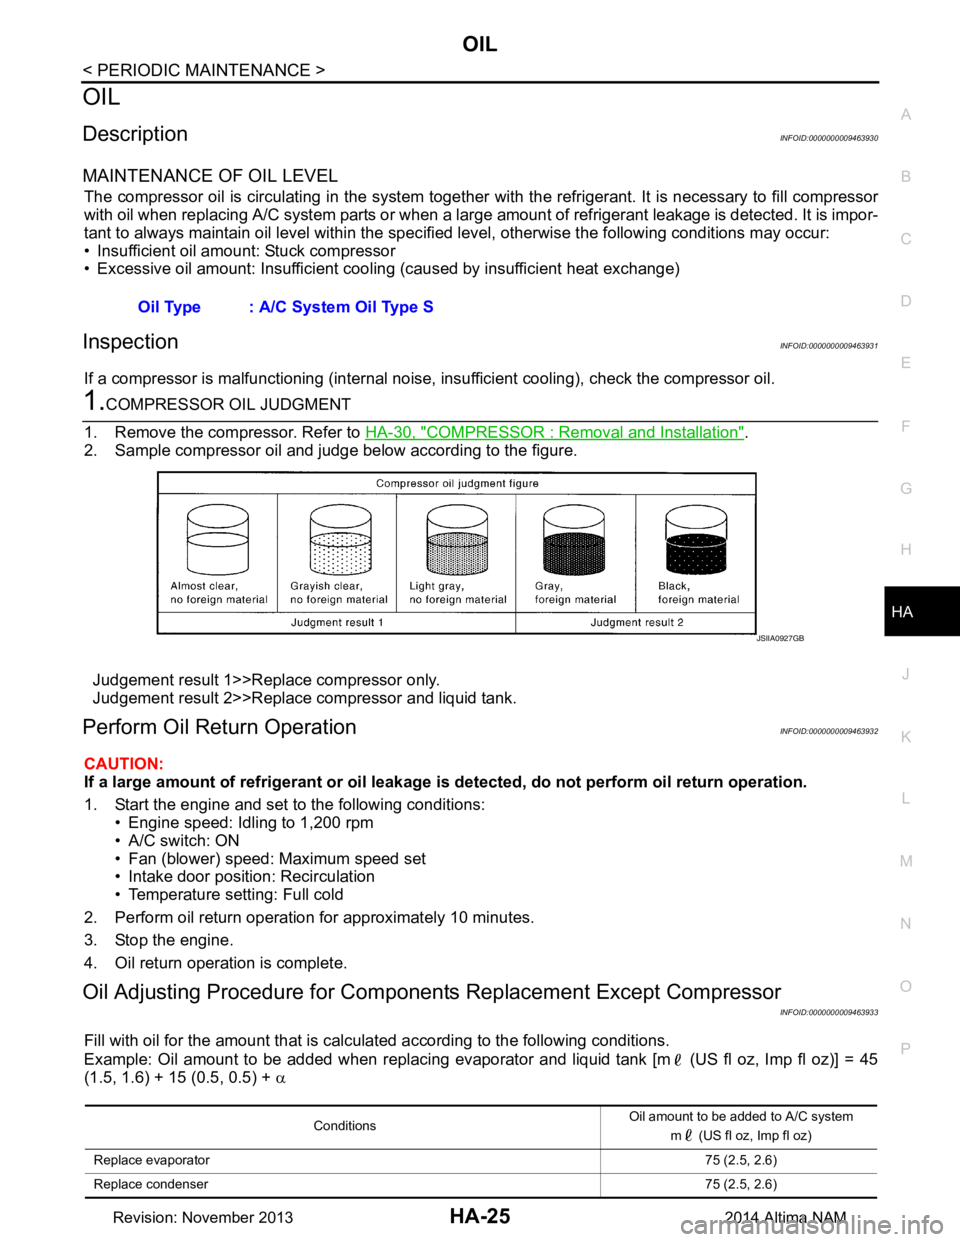
1.COMPRESSOR OIL JUDGMENT
1. Remove the compressor. Refer to HA-30, "COMPRESSOR : Removal and Installation"
.
2. Sample compressor oil and judge below according to the figure.
Judgement result 1>>Replace compressor only.
Judgement result 2>>Replace compressor and liquid tank.
Perform Oil Return OperationINFOID:0000000009463932
CAUTION:
If a large amount of refrigerant or oil leakage is detected, do not perform oil return operation.
1. Start the engine and set to the following conditions: • Engine speed: Idling to 1,200 rpm
• A/C switch: ON
• Fan (blower) speed: Maximum speed set
• Intake door position: Recirculation
• Temperature setting: Full cold
2. Perform oil return operation for approximately 10 minutes.
3. Stop the engine.
4. Oil return operation is complete.
Oil Adjusting Procedure for Component s Replacement Except Compressor
INFOID:0000000009463933
Fill with oil for the amount that is calculated according to the following conditions.
Example: Oil amount to be added when replacing evaporator and liquid tank [m (US fl oz, Imp fl oz)] = 45
(1.5, 1.6) + 15 (0.5, 0.5) + α
Oil Type : A/C System Oil Type S
JSIIA0927GB
Conditions
Oil amount to be added to A/C system
m (US fl oz, Imp fl oz)
Replace evaporator 75 (2.5, 2.6)
Replace condenser 75 (2.5, 2.6)
Revision: November 20132014 Altima NAM