2014 NISSAN TEANA power steering
[x] Cancel search: power steeringPage 3227 of 4801

CHASSIS AND BODY MAINTENANCEMA-43
< PERIODIC MAINTENANCE >
C
D E
F
G H
I
J
K L
M B
MA
N
O A
DISC BRAKE : Rear Brake PadINFOID:0000000009464583
DISC BRAKE : InspectionINFOID:0000000009464584
PA D W E A R
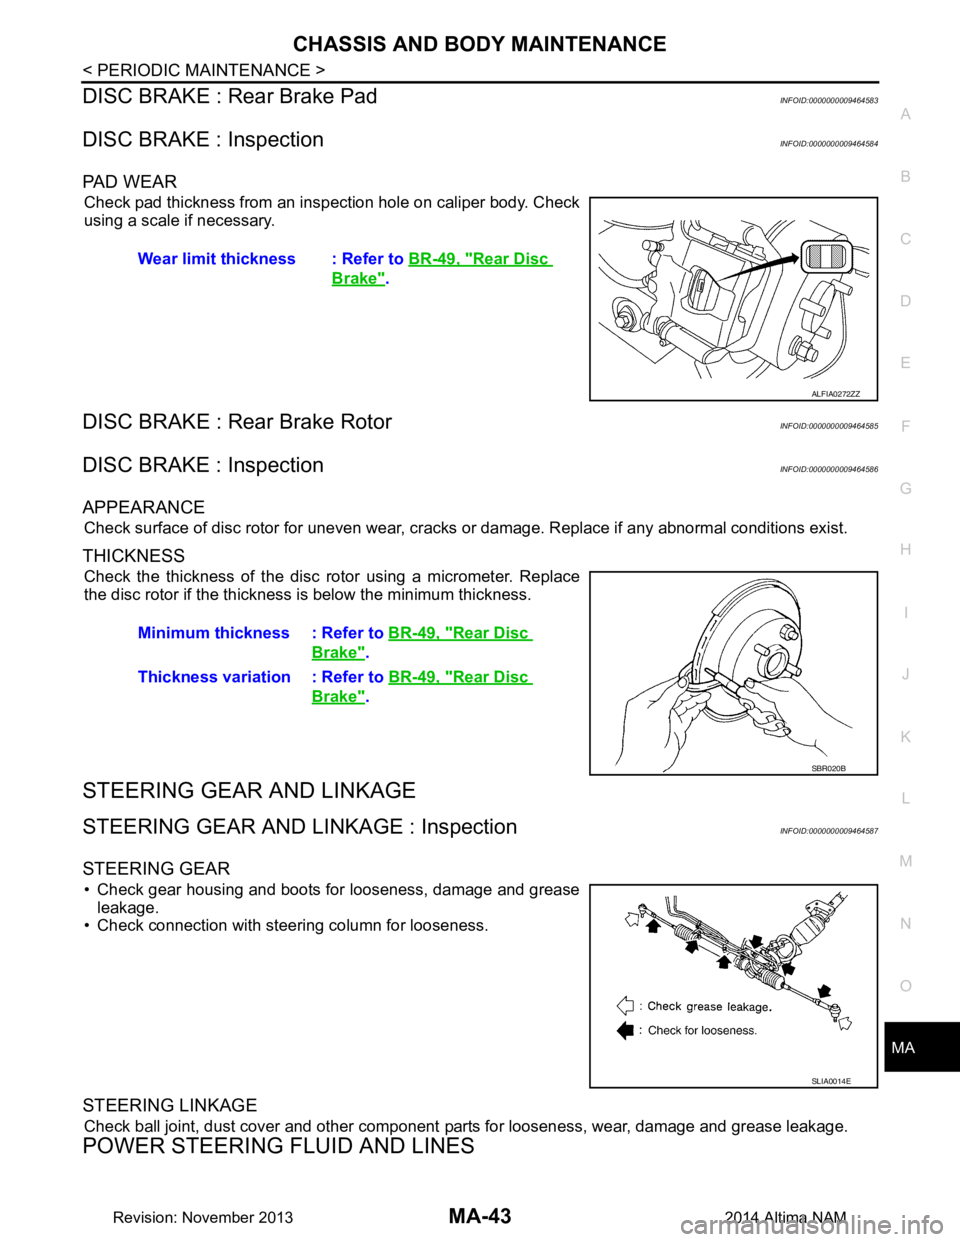
Check pad thickness from an inspection hole on caliper body. Check
using a scale if necessary.
DISC BRAKE : Rear Brake RotorINFOID:0000000009464585
DISC BRAKE : InspectionINFOID:0000000009464586
APPEARANCE
Check surface of disc rotor for uneven wear, cracks or damage. Replace if any abnormal conditions exist.
THICKNESS
Check the thickness of the disc rotor using a micrometer. Replace
the disc rotor if the thickness is below the minimum thickness.
STEERING GEAR AND LINKAGE
STEERING GEAR AND LINKAGE : InspectionINFOID:0000000009464587
STEERING GEAR
• Check gear housing and boots for looseness, damage and grease leakage.
• Check connection with steering column for looseness.
STEERING LINKAGE
Check ball joint, dust cover and other component parts for looseness, wear, damage and grease leakage.
POWER STEERING FLUID AND LINES
Wear limit thickness : Refer to BR-49, "Rear Disc
Brake".
ALFIA0272ZZ
Minimum thickness : Refer to BR-49, "Rear Disc
Brake".
Thickness variation : Refer to BR-49, "Rear Disc
Brake".
SBR020B
SLIA0014E
Revision: November 20132014 Altima NAM
Page 3228 of 4801

MA-44
< PERIODIC MAINTENANCE >
CHASSIS AND BODY MAINTENANCE
POWER STEERING FLUID AND LINES : Inspection
INFOID:0000000009464588
FLUID LEVEL
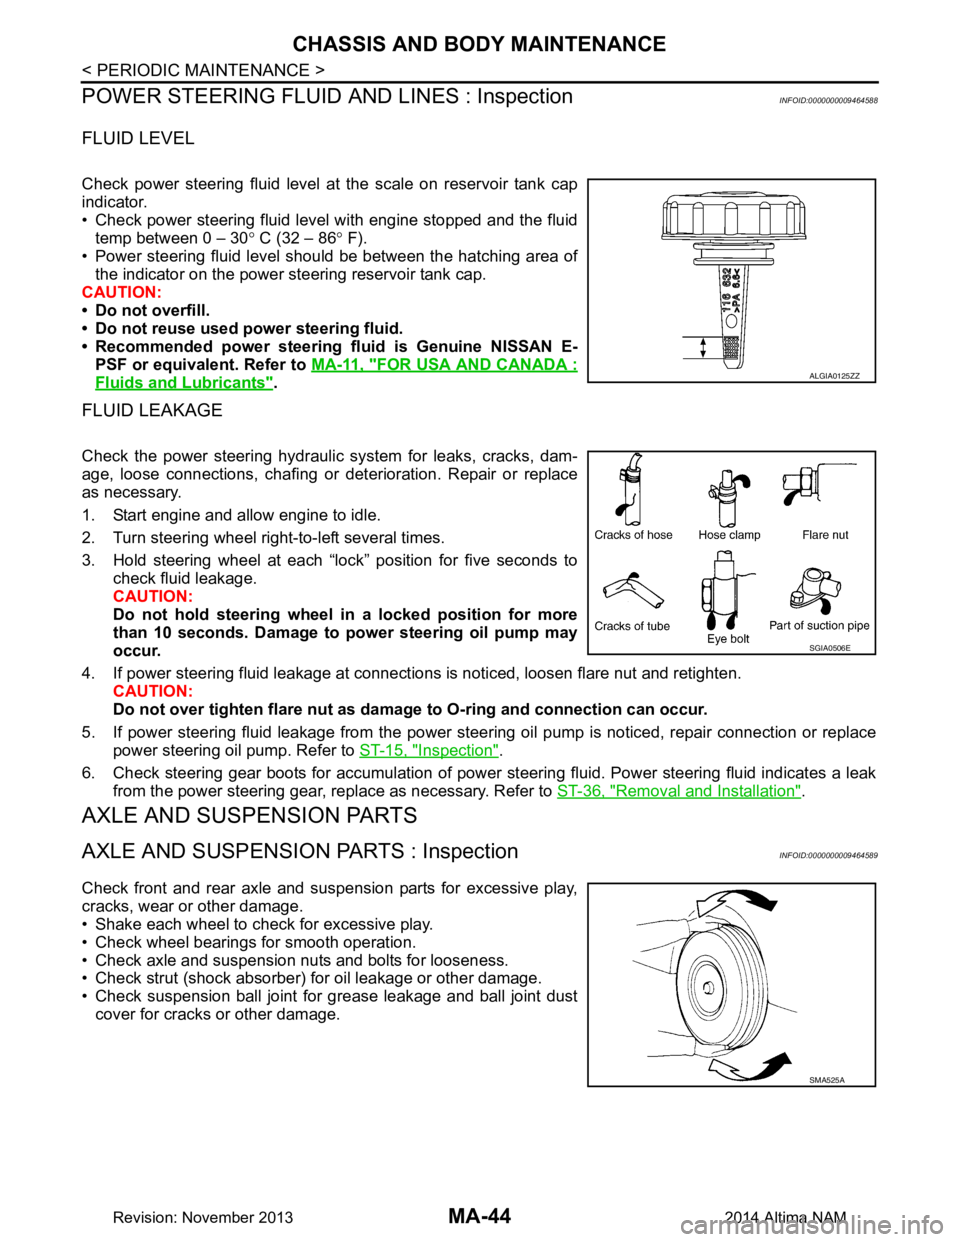
Check power steering fluid level at the scale on reservoir tank cap
indicator.
• Check power steering fluid level with engine stopped and the fluid temp between 0 – 30 ° C (32 – 86 ° F).
• Power steering fluid level should be between the hatching area of the indicator on the power steering reservoir tank cap.
CAUTION:
• Do not overfill.
• Do not reuse used power steering fluid.
• Recommended power steering fluid is Genuine NISSAN E-
PSF or equivalent. Refer to MA-11, "FOR USA AND CANADA :
Fluids and Lubricants".
FLUID LEAKAGE
Check the power steering hydraulic system for leaks, cracks, dam-
age, loose connections, chafing or det erioration. Repair or replace
as necessary.
1. Start engine and allow engine to idle.
2. Turn steering wheel right-to-left several times.
3. Hold steering wheel at each “lock” position for five seconds to check fluid leakage.
CAUTION:
Do not hold steering wheel in a locked position for more
than 10 seconds. Damage to power steering oil pump may
occur.
4. If power steering fluid leakage at connections is noticed, loosen flare nut and retighten.
CAUTION:
Do not over tighten flare nut as damage to O-ring and connection can occur.
5. If power steering fluid leakage from the power steer ing oil pump is noticed, repair connection or replace
power steering oil pump. Refer to ST-15, "Inspection"
.
6. Check steering gear boots for accumulation of power steering fluid. Power steering fluid indicates a leak from the power steering gear, replace as necessary. Refer to ST-36, "Removal and Installation"
.
AXLE AND SUSPENSION PARTS
AXLE AND SUSPENSION PARTS : InspectionINFOID:0000000009464589
Check front and rear axle and suspension parts for excessive play,
cracks, wear or other damage.
• Shake each wheel to check for excessive play.
• Check wheel bearings for smooth operation.
• Check axle and suspension nuts and bolts for looseness.
• Check strut (shock absorber) for oil leakage or other damage.
• Check suspension ball joint for grease leakage and ball joint dust cover for cracks or other damage.
ALGIA0125ZZ
SGIA0506E
SMA525A
Revision: November 20132014 Altima NAM
Page 3257 of 4801

MWI-2
Wiring Diagram .......................................................30
METER ...............................................................32
Wiring Diagram .................................................... ...32
BASIC INSPECTION ...................................51
DIAGNOSIS AND REPAIR WORKFLOW ...... ...51
Work flow ............................................................. ...51
DTC/CIRCUIT DIAGNOSIS ...................... ...53
U1000 CAN COMM CIRCUIT ......................... ...53
DTC Logic ............................................................ ...53
Diagnosis Procedure .............................................53
U1010 CONTROL UNIT (CAN) .........................54
Description ........................................................... ...54
DTC Logic ...............................................................54
Diagnosis Procedure ..............................................54
B2205 VEHICLE SPEED ...................................55
Description ........................................................... ...55
DTC Logic ...............................................................55
Diagnosis Procedure .............................................55
B2267 ENGINE SPEED .....................................56
Description ........................................................... ...56
DTC Logic ...............................................................56
Diagnosis Procedure ..............................................56
B2268 WATER TEMP ........................................57
Description ........................................................... ...57
DTC Logic ...............................................................57
Diagnosis Procedure ..............................................57
POWER SUPPLY AND GROUND CIRCUIT .....58
COMBINATION METER ........................................ ...58
COMBINATION METER : Diagnosis Procedure ....58
BCM (BODY CONTROL MODULE) ...................... ...58
BCM (BODY CONTROL MODULE) : Diagnosis
Procedure ............................................................ ...
58
IPDM E/R (INTELLIGENT POWER DISTRIBU-
TION MODULE ENGINE ROOM) .......................... ...
59
IPDM E/R (INTELLIGENT POWER DISTRIBU-
TION MODULE ENGINE ROOM) : Diagnosis Pro-
cedure .................................................................. ...
59
FUEL LEVEL SENSOR SIGNAL CIRCUIT .......61
Description ........................................................... ...61
Component Function Check ...................................61
Diagnosis Procedure .............................................61
Component Inspection ............................................62
PARKING BRAKE SWITCH SIGNAL CIR-
CUIT ................................................................ ...
63
Description ........................................................... ...63
Component Function Check ...................................63
Diagnosis Procedure ..............................................63
Component Inspection ......................................... ...63
WASHER FLUID LEVEL SWITCH CIRCUIT ....64
Description ........................................................... ...64
Diagnosis Procedure ...............................................64
Component Inspection ............................................64
AMBIENT SENSOR SIGNAL CIRCUIT ............66
Description ........................................................... ...66
Component Function Check ...................................66
Diagnosis Procedure ...............................................66
Component Inspection ............................................67
METER CONTROL SWITCH SIGNAL CIR-
CUIT ................................................................ ...
68
Diagnosis Procedure ............................................ ...68
Component Inspection ............................................69
STEERING SWITCH ..........................................70
Description ........................................................... ...70
Diagnosis Procedure ...............................................70
Component Inspection ............................................70
SYMPTOM DIAGNOSIS ............................72
THE FUEL GAUGE INDICATOR DOES NOT
OPERATE ....................................................... ...
72
Description ........................................................... ...72
Diagnosis Procedure ...............................................72
THE METER CONTROL SWITCH IS INOPER-
ATIVE .............................................................. ...
73
Description ........................................................... ...73
Diagnosis Procedure ...............................................73
THE OIL PRESSURE WARNING CONTIN-
UES DISPLAYING, OR DOES NOT DISPLAY ...
74
Description ........................................................... ...74
Diagnosis Procedure ...............................................74
THE PARKING BRAKE RELEASE WARNING
CONTINUES DISPLAYING, OR DOES NOT
DISPLAY ......................................................... ...
75
Description ........................................................... ...75
Diagnosis Procedure ...............................................75
THE LOW WASHER FLUID WARNING CON-
TINUES DISPLAYING, or DOES NOT DIS-
PLAY ............................................................... ...
76
Description ........................................................... ...76
Diagnosis Procedure ...............................................76
THE DOOR OPEN WARNING CONTINUES
DISPLAYING, OR DOES NOT DISPLAY ...... ...
77
Description ........................................................... ...77
Diagnosis Procedure ...............................................77
THE TRUNK OPEN WARNING CONTINUES
DISPLAYING, OR DOES NOT DISPLAY ...... ...
78
Description ........................................................... ...78
Diagnosis Procedure ...............................................78
Revision: November 20132014 Altima NAMRevision: November 20132014 Altima NAM
Page 3262 of 4801

MWI
COMPONENT PARTSMWI-7
< SYSTEM DESCRIPTION >
C
D E
F
G H
I
J
K L
M B
A
O P
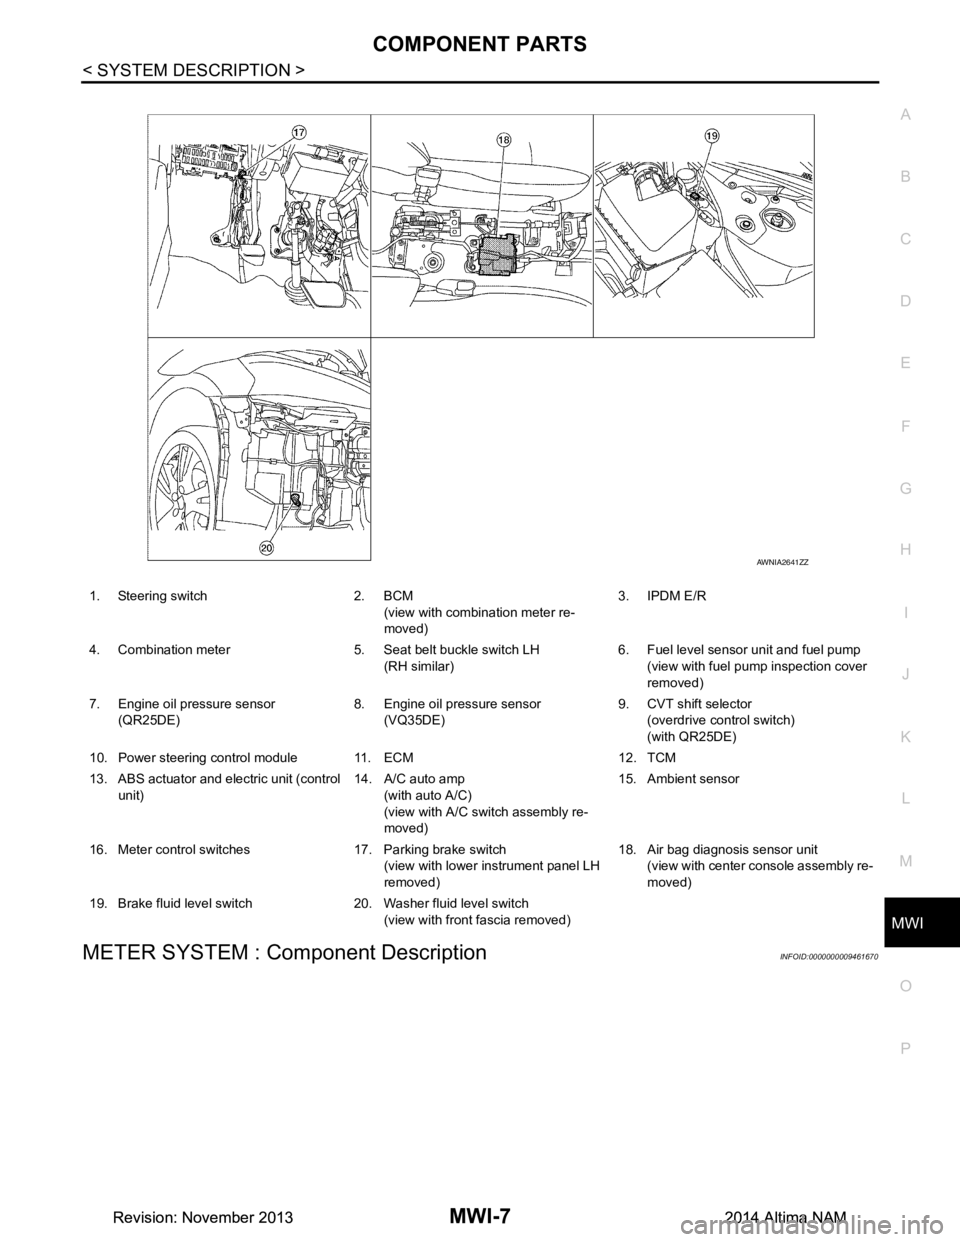
METER SYSTEM : Component DescriptionINFOID:0000000009461670
1. Steering switch 2. BCM (view with combination meter re-
moved) 3. IPDM E/R
4. Combination meter 5. Seat belt buckle switch LH (RH similar) 6. Fuel level sensor unit and fuel pump
(view with fuel pump inspection cover
removed)
7. Engine oil pressure sensor (QR25DE) 8. Engine oil pressure sensor
(VQ35DE) 9. CVT shift selector
(overdrive control switch)
(with QR25DE)
10. Power steering control module 11. ECM 12. TCM
13. ABS actuator and electric unit (control unit) 14. A/C auto amp
(with auto A/C)
(view with A/C swit ch assembly re-
moved) 15. Ambient sensor
16. Meter control switches 17. Parking brake switch (view with lower instrument panel LH
removed) 18. Air bag diagnosis sensor unit
(view with center console assembly re-
moved)
19. Brake fluid level switch 20. Washer fluid level switch (view with front fascia removed)
AWNIA2641ZZ
Revision: November 20132014 Altima NAMRevision: November 20132014 Altima NAM
Page 3263 of 4801

MWI-8
< SYSTEM DESCRIPTION >
COMPONENT PARTS
Unit Description
Combination meter Controls the following with the signals received from each unit via CAN communication and the signals
from switches and sensors:
• Speedometer
• Tachometer
• Engine coolant temperature gauge
• Fuel gauge
• Warning lamps
• Indicator lamps
• Meter illumination control
• Meter effect function
• Information display
Meter control switch Transmits the following signals to the combination meter:
• Trip reset switch signal
• Illumination control switch signal (+)
• Illumination control switch signal ( −)
ECM Transmits the following signals to the combination meter via CAN communication:
• Engine speed signal
• Engine coolant temperature signal
• Engine oil pressure warning signal
• Fuel consumption monitor signal
ABS actuator and electric unit
(control unit) Transmits the vehicle speed signal to the combination meter via CAN communication.
Power steering control module Transmits the EPS signal to the combination meter via CAN communication.
BCM Transmits the following signals to the combination meter via CAN communication:
• Tire pressure information
• Position light request signal
• Low tire pressure warning lamp signal
• Door switch signal
• Trunk lamp switch signal
TCM Receives the O/D OFF switch signal from the combination meter via CAN communication.
Transmits the O/D OFF indicator request signal to the combination meter via CAN communication.
CVT shift selector switch
(overdrive co ntrol switch)
(with QR25DE) Transmits the O/D OFF switch signal to the combination meter
Fuel level sensor unit Transmits the fuel level sensor signal to the combination meter.
Seat belt buckle switch LH
(RH similar) Transmits the seat belt buckle switch LH signal to the combination meter.
Air bag diagnosis sensor unit Transmits the following signals to the combination meter:
• Seat belt buckle switch RH signal
• Air bag warning indicator
Engine oil pressure sensor Transmits the engine oil pressure sensor signal to the ECM.
Ambient sensor Transmits the ambient sensor signal to the IPDM E/R.
A/C auto amp. • Receives the ambient sensor signal from the IPDM E/R (with auto A/C).
• Transmits the ambient sensor signal to the combination meter via CAN communication.
Parking brake switch Transmits the parking brake switch signal to the combination meter.
Washer fluid level switch Transmits the washer fluid level switch signal to the combination meter.
Steering switch Transmits the following signals to the information display:
• Display signal
• Menu up signal
• Menu down signal
• Enter signal
• Back signal
IPDM E/R • Receives the ambient sensor signal from the ambient sensor.
• Transmits the ambient sensor signal to the combination meter (without auto A/C).
• Transmits the ambient sensor signal to the A/C auto amp (with auto A/C).
Brake fluid level switch Transmits the brake fluid level switch signal to the combination meter.
Revision: November 20132014 Altima NAMRevision: November 20132014 Altima NAM
Page 3280 of 4801

MWI
COMBINATION METERMWI-25
< ECU DIAGNOSIS INFORMATION >
C
D E
F
G H
I
J
K L
M B
A
O P
4
(R) Ground Steering switch input 2 — — — —
5
(P) Ground ACC — Ignition
switch
ON Ignition switch ACC or ON
power supply Battery voltage
6
(G) Ground Security signal Input Ignition
switch
ON Security indicator ON 0 V
Security indicator OFF 12 V
7
(R) Ground Air bag signal Input Ignition
switch
ON Air bag warning lamp
ON —
Air bag warning lamp
OFF —
8
(W) Ground
Passenger seat belt warn-
ing signal InputIgnition
switch
ON Fastened 12 V
Unfastened 0 V
9
(V) Ground Seat belt buckle switch sig-
nal (driver seat) InputIgnition
switch
ON Fastened 12 V
Unfastened 0 V
11
(R) Ground Alternator signal Input Ignition
switch
ON Charge warning lamp ON 2 V
Charge warning lamp OFF Battery voltage
12
(G) Ground Parking brake switch signal Input Ignition
switch
ON Parking brake applied 0 V
Parking brake released 12 V
18
(BR) Ground AC PD cut Input Ignition
switch
ON Signal ON 0 V
Signal OFF 5 V
21
(BR) —Ignition — Ignition
switch
ON or
START —12 V
22
(G) — Battery power supply — Ignition
switch
OFF —Battery voltage
23
(GR) Ground Illumination control output
signal —Ignition
switch
ON —0 V
24
(W) Ground Steering switch ground — Ignition
switch
ON —0 V
25
(BR) Ground Brake fluid level switch Input Ignition
switch
ON Brake fluid level low 0 V
Brake fluid level normal Battery voltage
26
(R) Ground Fuel level sensor ground — Ignition
switch
ON —0 V
27
(W) Ground Fuel level sensor signal — — — —
30
(L) Ground Ambient sensor signal
(without auto A/C) InputIgnition
switch
ON —
0-5 V
(based on ambient temperature)
Te r m i n a l N o .
(Wire color) Description
ConditionVa l u e
(Approx.)
+ – Signal name Input/
Output
Revision: November 20132014 Altima NAMRevision: November 20132014 Altima NAM
Page 3364 of 4801
![NISSAN TEANA 2014 Service Manual
PCS
IPDM E/R (INTELLIGENT POWER DISTRIBUTION MODULE ENGINE ROOM)
PCS-15
< ECU DIAGNOSIS INFORMATION > [IPDM E/R]
C
D E
F
G H
I
J
K L
B
A
O P
N
7
(B) Ground Ground (Power) — Ignition switch ON 0V
NISSAN TEANA 2014 Service Manual
PCS
IPDM E/R (INTELLIGENT POWER DISTRIBUTION MODULE ENGINE ROOM)
PCS-15
< ECU DIAGNOSIS INFORMATION > [IPDM E/R]
C
D E
F
G H
I
J
K L
B
A
O P
N
7
(B) Ground Ground (Power) — Ignition switch ON 0V](/manual-img/5/57390/w960_57390-3363.png)
PCS
IPDM E/R (INTELLIGENT POWER DISTRIBUTION MODULE ENGINE ROOM)
PCS-15
< ECU DIAGNOSIS INFORMATION > [IPDM E/R]
C
D E
F
G H
I
J
K L
B
A
O P
N
7
(B) Ground Ground (Power) — Ignition switch ON 0V
9
(SB) Ground Tail RH Output Ignition
switch ON Lighting switch OFF 0V
Lighting switch 1ST Battery voltage
10
(V) Ground Tail LH Output Ignition
switch ON Lighting switch OFF 0V
Lighting switch 1ST Battery voltage
11
(Y) Ground Front wiper LO Output Ignition
switch ON Front wiper switch OFF 0V
Front wiper switch LO Battery voltage
13
(LG) Ground ECM battery Output Ignition switch OFF 0V
Ignition switch ON Battery voltage
14
(Y) Ground Daytime running lamps Output Ignition switch OFF Battery voltage
15
(R) Ground Fuel pump Output Approximately 1 second or more after
turning the ignition switch ON 0V
• Approximately 1 second after turning the ignition switch ON
• Engine running Battery voltage
18
(L) Ground Front wiper HI Output Ignition
switch ON Front wiper switch OFF 0V
Front wiper switch HI Battery voltage
19
(BR) Ground Power steering control unit Output Ignition switch OFF 0V
Ignition switch ON Battery voltage
21
(L) Ground ECM ignition switch Output Ignition switch OFF 0V
Ignition switch ON Battery voltage
22
(W) Ground Horn relay Input The horn is deactivated Battery voltage
The horn is activated 0V
23
(V) Ground Horn switch Input The horn is deactivated Battery voltage
The horn is activated 0V
27
(BG) Ground Fan motor relay mid Input Ignition switch OFF 0V
Ignition switch ON 0.7V
28
(P) —CAN-L
Input/
Output ——
29
(L) —CAN-H Input/
Output ——
31
(Y) Ground Detent switch Input Ignition
switch ON Press the CVT selector
button (CVT selector lever
P) Battery voltage
• CVT selector lever in any position other than
P
• Release the CVT selec- tor button (CVT selector
lever P) 0V
33
(R) Ground Starter control Input
Ignition
switch ON CVT selector lever in any
position other than P or N 0V
CVT selector lever P or N Battery voltage
34
(SB) Ground Wiper autostop Input Ignition
switch ON Front wiper stop position 0V
Any position other than
front wiper stop position Battery voltage
Te r m i n a l N o .
(Wire color) Description
ConditionVa l u e
(Approx.)
Signal name Input/
Output
+ −
Revision: November 20132014 Altima NAMRevision: November 20132014 Altima NAM
Page 3385 of 4801
![NISSAN TEANA 2014 Service Manual
PCS-36
< SYSTEM DESCRIPTION >[POWER DISTRIBUTION SYSTEM]
SYSTEM
SYSTEM
POWER DISTRIBUTION SYSTEM
POWER DISTRIBUTION SYSTEM : System DiagramINFOID:0000000009461624
POWER DISTRIBUTION SYSTEM
: System NISSAN TEANA 2014 Service Manual
PCS-36
< SYSTEM DESCRIPTION >[POWER DISTRIBUTION SYSTEM]
SYSTEM
SYSTEM
POWER DISTRIBUTION SYSTEM
POWER DISTRIBUTION SYSTEM : System DiagramINFOID:0000000009461624
POWER DISTRIBUTION SYSTEM
: System](/manual-img/5/57390/w960_57390-3384.png)
PCS-36
< SYSTEM DESCRIPTION >[POWER DISTRIBUTION SYSTEM]
SYSTEM
SYSTEM
POWER DISTRIBUTION SYSTEM
POWER DISTRIBUTION SYSTEM : System DiagramINFOID:0000000009461624
POWER DISTRIBUTION SYSTEM
: System DescriptionINFOID:0000000009461625
SYSTEM DESCRIPTION
• PDS (POWER DISTRIBUTION SYSTEM ) is the system that BCM controls with the operation of the push-
button ignition switch and performs the power distribution to each power circuit. This system is used instead
of the mechanical power supply changing mechanism wi th the operation of the conventional key cylinder.
• The push-button ignition switch can be operated when Intelligent Key is in the following condition.
- Intelligent Key is in the detection area of the inside key antenna.
- Intelligent Key backside is contacted to push-button ignition switch.
• The push-button ignition switch operation is input to BCM as a signal. BCM changes the power supply posi-
tion according to the status and operates the following relays to supply power to each power circuit.
- Ignition relay-1
- Ignition relay-2
- Accessory relay-1
- Accessory relay-2
- Front blower motor relay
NOTE:
The engine switch operation changes due to the conditions of brake pedal, selector lever and vehicle speed.
• The power supply position can be confirmed with the light ing of the indicators in the push-button ignition
switch.
BATTERY SAVER SYSTEM
When all the following conditions are met for 30 minutes, t he battery saver system will cut off the power supply
to prevent battery discharge.
• The ignition switch is in the ACC or ON position
• All doors are closed
• Selector lever is in the P (park) position
Reset Condition of Battery Saver System
In order to prevent the battery from discharging, the battery saver system will cut off the power supply when all
doors are closed, the selector lever is in P (park) positi on and the ignition switch is left in the ACC or ON posi-
tion for 30 minutes. If any of the following conditions are met the battery saver system is released and the
steering will change automatically to lock position from OFF position.
• Opening any door
• Operating door request switch on door handle
• Operating Intelligent Key
AWMIA1282GB
Revision: November 20132014 Altima NAMRevision: November 20132014 Altima NAM