2014 MITSUBISHI OUTLANDER SPORT light
[x] Cancel search: lightPage 305 of 388
Storage spaces8-68 For pleasant driving
8
E00712700709E00712902385
If any of the interior lamps are left switchedon with the operation mode in OFF, it goes
off automatically after approximately 30 min-utes.The lamps will illuminate again after theyautomatically go off if the power switch isoperated, if one of the doors or the tailgate isopened or closed, or if the keyless entry sys-tem or keyless operation system is operated.
E00713103046
E00726200268
To o p e n , p u l l t h e l e v e r ( A ) .
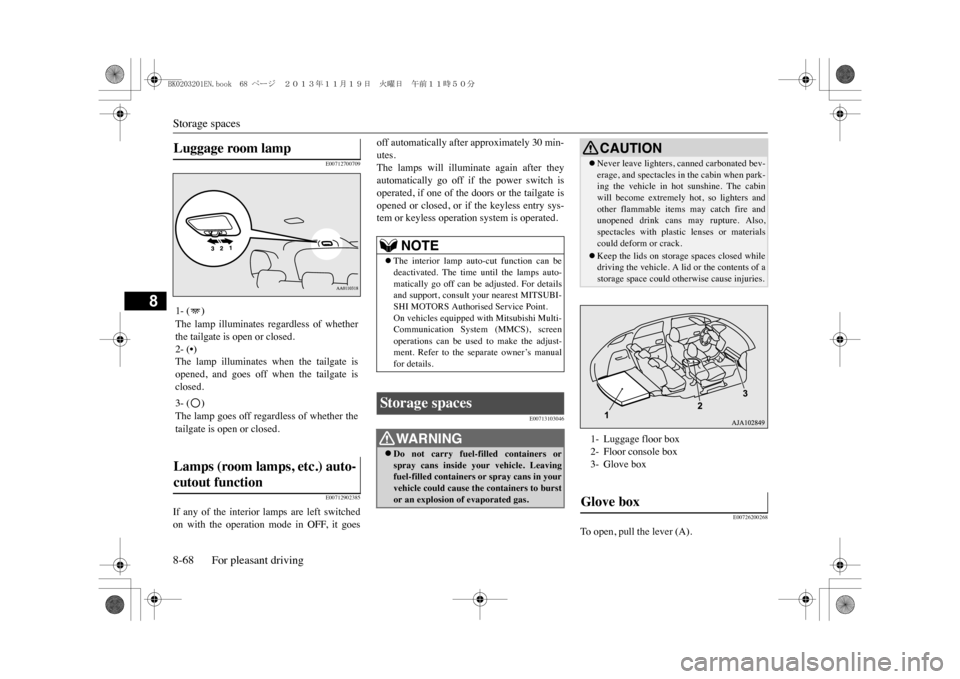
Luggage room lamp 1- ( )The lamp illuminates regardless of whetherthe tailgate is open or closed.2- (•)The lamp illuminates when the tailgate isopened, and goes off when the tailgate isclosed.3- ( )The lamp goes off regardless of whether thetailgate is open or closed.Lamps (room lamps, etc.) auto-cutout function
NOTE
zThe interior lamp auto-cut function can bedeactivated. The time un
til the lamps auto-
matically go off can be adjusted. For detailsand support, consult your nearest MITSUBI-SHI MOTORS Authorised Service Point.On vehicles equipped
with Mitsubishi Multi-
Communication System (MMCS), screenoperations can be used to make the adjust-ment. Refer to the se
parate owner’s manual
for details.
Storag e spaces
WA R N I N GzDo not carry fuel-filled containers orspray cans inside
your vehicle. Leaving
fuel-filled containers or spray cans in yourvehicle could cause the containers to burstor an explosion of evaporated gas.
CAUTIONzNever leave lighters,
canned carbonated bev-
erage, and spectacles in the cabin when park-ing the vehicle in hot sunshine. The cabinwill become extremely hot, so lighters andother flammable items may catch fire andunopened drink cans may rupture. Also,spectacles with plastic lenses or materialscould deform or crack.zKeep the lids on storage spaces closed whiledriving the vehicle. A lid or the contents of astorage space could otherwise cause injuries.1- Luggage floor box2- Floor console box3- Glove boxGlove box
BK0203201EN.book 68 ページ 2013年11月19日 火曜日 午前11時50分
Page 326 of 388

How to change a tyre
For emergencies 9-15
9
6. Get the jack, jack bar and wheel nutwrench ready.Refer to “Tools and jack” on page 9-6.
E00803201894
1. On vehicles with wheel covers, firstremove the covers (refer to “Wheel cov-ers” on page 9-18).Then loosen the wheel nuts a quarter turnwith the wheel nut wrench. Do notremove the wheel nuts yet.
2. Place the jack under one of the jackingpoints (A) shown in the illustration. Usethe jacking point closest to the tyre youwish to change.
3. Rotate the jack by hand until the flangeportion (B) fits in the groove (C) at the topof the jack.4. Insert the jack bar (D) into the wheel nutwrench (E). Then put the end of the jackbar into the shaft’s jack end, as shown inthe illustration.Slowly rotate the wheel nut wrench untilthe tyre is raised slightly off the groundsurface.
To c h a n g e a t y r e
WA R N I N GzSet the jack only at the positions shownhere. If the jack is set at a wrong position,it could dent your vehicle or the jackmight fall over and cause personal injury.zDo not use the jack on a tilted or soft sur-face.Otherwise, the jack might slip and causepersonal injury. Always use the jack on aflat, hard surface. Before setting the jack,make sure there are no sand or pebblesunder the jack base.
BK0203201EN.book 15 ページ 2013年11月19日 火曜日 午前11時50分
Page 328 of 388
![MITSUBISHI OUTLANDER SPORT 2014 3.G Owners Manual How to change a tyre
For emergencies 9-17
9
7. Turn the wheel nuts clockwise by hand toinitially tighten them.[Type 1: On vehicles with steel wheels]Te m p o r a r i l y t i g h t e n t h e w h](/manual-img/19/7545/w960_7545-327.png "MITSUBISHI OUTLANDER SPORT 2014 3.G Owners Manual How to change a tyre
For emergencies 9-17
9
7. Turn the wheel nuts clockwise by hand toinitially tighten them.[Type 1: On vehicles with steel wheels]Te m p o r a r i l y t i g h t e n t h e w h")
How to change a tyre
For emergencies 9-17
9
7. Turn the wheel nuts clockwise by hand toinitially tighten them.[Type 1: On vehicles with steel wheels]Te m p o r a r i l y t i g h t e n t h e w h e e l n u t s b yhand until the tapered parts of the wheelnuts make light contact with the seats ofthe wheel holes and the wheel is notloose.[Type 2: On vehicles with aluminiumwheels]Te m p o r a r i l y t i g h t e n t h e w h e e l n u t s b yhand until the flange parts of the wheelnuts make light contact with the wheeland the wheel is not loose.
8. Lower the vehicle slowly by rotating thewheel nut wrench anticlockwise until thetyre touches the ground.
9. Tighten the nuts in the order shown in theillustration until each nut has been tight-ened to the torque listed here.Tightening torque 88 to 108 N•m
10. On vehicles with wheel covers, install the
covers (refer to “Wheel covers” on page9-18).
11. Lower and remove the jack, then store the
jack, flat tyre, and chocks. Have yourdamaged tyre repaired as soon as possi-ble.
CAUTIONzNever apply oil to either the wheel bolts orthe nuts or they will tighten too much.
Ty p e 1Ty p e 2
NOTE
zOn vehicles with aluminium wheels, if all 4aluminium wheels are changed to steelwheels. e. g. when fitting winter tyres, usetapered nuts.
CAUTIONzNever use your foot or
a pipe extension for
extra force in the wheel nut wrench. If youdo so, you will tighten the nut too much.
BK0203201EN.book 17 ページ 2013年11月19日 火曜日 午前11時50分
Page 334 of 388
Operation under adverse driving conditions
For emergencies 9-23
9
zDo not drive on a flooded road. If youdrive on a flooded road, not only the Plug-in Hybrid EV System stops but also a fail-ure like electric leakage or short circuitmay occur.If you inevitably had to run on a floodedroad and the vehicle was exposed towater, be sure to have your vehicleinspected by a MITSUBISHI MOTORSAuthorised Service Point.zIf there is water on the brakes after driv-ing through puddles or washing the vehi-cle, resulting in temporarily ineffectivebrakes. In such cases, lightly depress thebrake pedal to see if the brakes operateproperly. If they do not, lightly depressthe pedal several times while driving inorder to dry the brake pads.zWhen driving in rain or on a road withmany puddles a layer of water may formbetween the tyres and the road surface.This reduces a tyre’s frictional resistanceon the road, resulting in loss of steeringstability and braking capability.To c o p e w i t h t h i s , o b s e r v e t h e f o l l o w i n gitems:
zWhen driving on a snow-covered or fro-zen road, it is recommended that you usesnow tyres or snow traction device (tyrechains).Refer to the “Snow tyres” and “Snowtraction device (tyre chains)” sections.zAv o i d h i g h - s p e e d o p e r a t i o n , s u d d e nacceleration, abrupt brake application andsharp cornering.zDepressing the brake pedal during travelon snowy or icy roads may cause tyreslippage and skidding. When tractionbetween the tyres and the road is reducedthe wheels may skid and the vehicle can-not readily be brought to a stop by con-ventional braking techniques. Brakingwill differ, depending upon whether youhave anti-lock brake system (ABS). Asyour vehicle is equipped with ABS, brakeby pressing the brake pedal hard, andkeeping it pressed.zAllow extra distance between your vehi-cle and the vehicle in front of you, andavoid sudden braking.
zAccumulation of ice on the braking sys-tem can cause the wheels to lock. Pullaway from a standstill slowly after con-firming safety around the vehicle.
Drive as slow as possible when driving onbumpy or rutted roads.This vehicle is intended for driving mainlyon roads with firm surface.4WD system makes possible driving on roadswithout special coverage, on flat and firmsurface. Please, remember that off-road abil-ity of your vehicle is limited. Your vehicle isnot intended for driving in heavy off-road,overcoming the rugged terrain, deep ruts, etc.
On a flooded road (a)Drive your vehicle at a slow speed.(b)Do not drive on worn tyres.
(c)Always maintain the specified tyre infla-tion pressures.
On a snow-covered or frozen road
CAUTIONzDo not press the accelerator pedal rapidly. Ifthe wheels break free of the ice, the vehiclecould suddenly start
moving and possibly
cause an accident.
On a bumpy or rutted road
CAUTIONzThe impact on tyres and/or wheels whendriving on a bumpy or rutted road can dam-age the tyre and/or wheel.
BK0203201EN.book 23 ページ 2013年11月19日 火曜日 午前11時50分
Page 337 of 388
Vehicle care precautions10-2 Vehicle care
10
E00900100548
In order to maintain the value of your vehicle,it is necessary to perform regular mainte-nance using the proper procedures.Always maintain your vehicle in compliancewith any environmental pollution control reg-ulations.Carefully select the materials used for wash-ing, etc., to be sure that they do not containcorrosives.If in doubt, we recommend you to consult aspecialist for the selection of these materials.
E00900200611
After cleaning the interior of your vehiclewith water, cleaner or similar, wipe and dry ina shady, well-ventilated area.
E00900301459
1. Lightly wipe these off with a soft clothsoaked in a mild soap and water solution.
2. Dip cloth in fresh water and wring it outwell. Using this cloth, wipe off the deter-gent thoroughly.
Ve h i c l e c a r e p r e c a u t i o n s
CAUTIONzCleaning products can
be dangerous. Always
follow the instructions of the cleaning prod-uct supplier.zTo a v o i d d a m a g e , n e v e r u s e t h e f o l l o w i n g t oclean your vehicle.•Petrol•Paint Thinner•Benzine•Kerosene•Turpentine•Naphtha•Lacquer Thinner•Carbon Tetrachloride•Nail Polish Remover•Acetone
Cleaning the interior of your vehicle
NOTE
zTo c l e a n t h e i n s i d e o f t h e t a i l g a t e w i n d o w,always use a soft cloth and wipe the windowglass along the demister heater element so asnot to cause damage.CAUTIONzDo not use organic substances (solvents,benzine, kerosene, alcohol, petrol, etc.) oralkaline or acidic solutions.These chemicals can cause discolouring,staining or cracking of the surface.If you use cleaners or polishing agents, makesure their ingredients
do not include the sub-
stances mentioned above.
Plastic, vinyl leather, fabric and flocked parts
NOTE
zDo not use cleaners, conditioners, and pro-tectants containing silicones or wax.Such products can cause discolouring and,when applied to the instrument panels orother parts, may cause reflections on thewindscreen and obscure vision.Also, if such products get on the switches ofthe electrical accessories, it may lead to fail-ure of these accessories.zDo not use synthetic fiber or dry cloth. Theycan cause discolouring
or damaging the sur-
face.zDo not place a deodorizer on the instrumentpanel or near lamps and instruments. Theingredients for deodoriz
er can cause discol-
ouring or cracking.
BK0203201EN.book 2 ページ 2013年11月19日 火曜日 午前11時50分
Page 338 of 388
Cleaning the exterior of your vehicle
Vehicle care 10-3
10
E00900500207
1. To maintain the value of your new vehi-cle, handle the upholstery carefully andkeep the interior clean.Use a vacuum cleaner and brush to cleanthe seats. If stained, vinyl and syntheticleather should be cleaned with an appro-priate cleaner. Cloth fabrics can becleaned with either upholstery cleaner or amild soap and water solution.2. Clean the carpeting with a vacuumcleaner and remove any stains with carpetcleaner. Oil and grease can be removed bylightly dabbing with a clean colourfastcloth and stain remover.
E00900600950
1. To clean, lightly wipe the leather with asoft cloth soaked in a mild soap and watersolution.2. Dip cloth in fresh water and wring it outwell. Using this cloth, wipe off the deter-gent thoroughly.3. Apply leather protecting agent to the gen-uine leather surface.
E00900700108
If the following is left on your vehicle, it maycause corrosion, discolouration and stains,wash the vehicle as soon as possible.zSeawater, road deicing products.
zSoot and dust, iron powder from factories,chemical substance (acids, alkalis, coal-tar, etc.).zDroppings from birds, carcasses ofinsects, tree sap, etc.
E00900903547
Chemicals contained in the dirt and dustpicked up from the road surface can damagethe paint coat and body of your vehicle if leftin prolonged contact.Frequent washing and waxing is the best wayto protect your vehicle from this damage.This will also be effective in protecting itfrom environmental elements such as rain,snow, salt air, etc.Do not wash the vehicle in direct sunlight.Park the vehicle in the shade and spray it withwater to remove dust. Next, using an ampleamount of clean water and a car washingbrush or sponge, wash the vehicle from top tobottom.Use a mild car washing soap if necessary.Rinse thoroughly and wipe dry with a softcloth. After washing the vehicle, carefullyclean the joints and flanges of the doors, bon-net and other sections where dirt is likely toremain.
Upholstery Genuine leather
*
NOTE
zIf genuine leather is
wet with water or is
washed in water, wipe off water as quickly aspossible with a dry, soft cloth.If left damp, mildew may grow.zOrganic solvents such as benzine, kerosene,alcohol and petrol, acid or alkaline solventsmay discolour the genui
ne leather surface.
Be sure to use neutral detergents.zRemove dirty patche
s or oil substances
quickly as they can stain genuine leather.zThe genuine leather surface may harden andshrink if it is exposed to direct rays of thesun for long hours. When your vehicle isparked, place it in the shade as much as pos-sible.zWhen the temperature of the vehicle interiorrises in summer, vinyl products left on thegenuine leather seat may deteriorate andstick to the seat.
Cleaning the exterior of your vehicle
Was hi n g
BK0203201EN.book 3 ページ 2013年11月19日 火曜日 午前11時50分
Page 339 of 388
Cleaning the exterior of your vehicle10-4 Vehicle care
10
Sea water contains salt, which generallyaccelerates corrosion of both ferrous and non-ferrous materials. Wind born spray from thesea can distribute salt for a distance of up to20 km from the shore line with prevailing on-shore winds, although the effect is generallyworse within 2 km of the shore. Salt spraycovers roads, and may be passed to your vehi-cle as dust, or as salt spray after rain. For thisreason it is important to wash all the vehicleincluding the underside (not forgetting theplug-in hybrid EV system bay and plug-inhybrid EV system bay components). See sec-tion entitled “Engine compartment” for rec-ommended cleaning practices.Ensure you request a MITSUBISHIMOTORS Authorised Service Point to con-duct the scheduled Preventative Maintenancecorrosion inspection if you live within 20 kmof the sea. Sea water spray in coastal condi-tions
WA R N I N GzDo not wash the vehicle while charging thetraction battery.Doing so could cause a fire or an electricshock.
zBefore washing the vehicle, make surethat the charging lid
and the inner lid are
completely closed.If the lid is open, the charging unit isexposed to water, resulting in a fire or anelectric shock.CAUTIONzWhen washing the under
side of your vehicle
or wheel, be careful not to injure your hands.zIf your vehicle has rain sensor wipers, placethe wiper switch lever in the “OFF” positionto deactivate the rain sensor before washingthe vehicle. Otherwise, the wipers will oper-ate in the presence of water spray on thewindscreen and may get damaged as a result.zRefrain from excessively using a car wash asits brushes may scratch the paint surface,causing it to lose its gloss. Scratches will beespecially visible on da
rker coloured vehi-
cles.zNever spray or splash
water on the electrical
components in the engine compartment.Doing so could have an adverse effect on theplug-in hybrid EV system startability.Exercise caution also when washing theunderbody; be careful not to spray water intothe engine compartment.WA R N I N G
zSome types of hot wa
ter washing equipment
apply high pressure and
heat to the vehicle.
They may cause heat distortion and damageto the vehicle resin parts and may result inflooding of the vehicle interior.Therefore;•Maintain a distance of approx. 70 cm ormore between the vehicle body and thewashing nozzle.•When washing around the door glass, holdthe nozzle at a distance of more than 70 cmand at right angles to the glass surface.
zAfter washing the vehicle, drive the vehicleslowly while lightly depressing the brakepedal several times in order to dry out thebrakes.Leaving the brakes wet could result inreduced braking performance. Also, there isa possibility that they could freeze up orbecome inoperative due
to rust, rendering the
vehicle unable to move.zUsing an automatic car wash, pay attentionto the following items, referring to the opera-tion manual or consulting a car wash opera-tor. If the following procedure is notfollowed, it could result in damage to yourvehicle.•The outside rear-view mirrors are retracted.•The antenna is removed.•The wiper arms are secured in place withtape.CAUTION
BK0203201EN.book 4 ページ 2013年11月19日 火曜日 午前11時50分
Page 340 of 388
Cleaning the exterior of your vehicle
Vehicle care 10-5
10
The salt and other chemicals spread on theroads in some areas in winter can have aharmful effect on the vehicle body. Youshould therefore wash the vehicle as often aspossible in accordance with our care-instruc-tions. It is recommended to have a preserva-tive applied and the underfloor protectionchecked before and after the cold weatherseason.After washing your vehicle, wipe off allwaterdrops from the rubber parts around thedoors to prevent the doors from freezing.
E00901000919
Wa x i n g t h e v e h i c l e w i l l h e l p p r e v e n t t h eadherence of dust and road chemicals to thepaintwork. Apply a wax solution after wash-ing the vehicle, or at least once every threemonths to assist di
splacing of water.
Do not wax your vehicle in direct sunlight.Yo u s h o u l d w a x a f t e r t h e s u r f a c e s h a v ecooled.For information on how to use wax refer tothe instruction manual of the wax.
E00901100066
The vehicle should only be polished if thepaintwork has become stained or lost its lus-tre. Do not polish parts with a mat coatingand the plastic bumpers. Doing so couldcause stains or damage the finish.
E00901300808
Use a sponge or chamois leather.If a car wax adheres on a grey or black roughsurface of the bumper, moulding or lamps,the surface becomes white. In such a case,wipe it off using lukewarm water and softcloth or chamois leather.
E00901400098
In order to prevent spots and corrosion ofchrome parts, wash with water, dry thor-oughly, and apply a special protective coat-ing. This should be done more frequently inwinter.
•If your vehicle is equi
pped with a roof rails,
consult a car wash opera
tor before using the
car washer.•If your vehicle has rain
sensor wipers, place
the wiper switch lever in the “OFF” posi-tion to deactivate the rain sensor.
During cold weather
NOTE
zTo p r e v e n t f r e e z i n g o f
the weatherstripping
on the doors, bonnet, etc., they should betreated with silicone spray.CAUTION
Wa x in g
CAUTIONzWa x e s c o n t a i n i n g h i
gh abrasive compounds
should not be used.zOn vehicles with the sunroof, be carefulwhen waxing the area around the sunroofopening, not to put any wax on the weather-strip (black rubber). If stained with wax, theweatherstrip cannot maintain a weatherproofseal with the sunroof.
Polishing
Cleaning plastic parts
CAUTIONzDo not use a scrubbing brush or other hardtools as they may damage the plastic partsurface.zDo not bring the plastic parts into contactwith petrol, light oil,
brake fluids, engine
oils, greases, paint thinners, and sulphuricacid (battery electrolyte) which may crack,stain or discolour
the plastic parts.
If they touch the plastic
parts, wipe them off
with soft cloth, chamois or the like and anaqueous solution of neutral detergent thenimmediately rinse the affected parts withwater.
Chrome parts
BK0203201EN.book 5 ページ 2013年11月19日 火曜日 午前11時50分