Page 379 of 422

Fuses 9-30 Vehicle care and maintenance
9
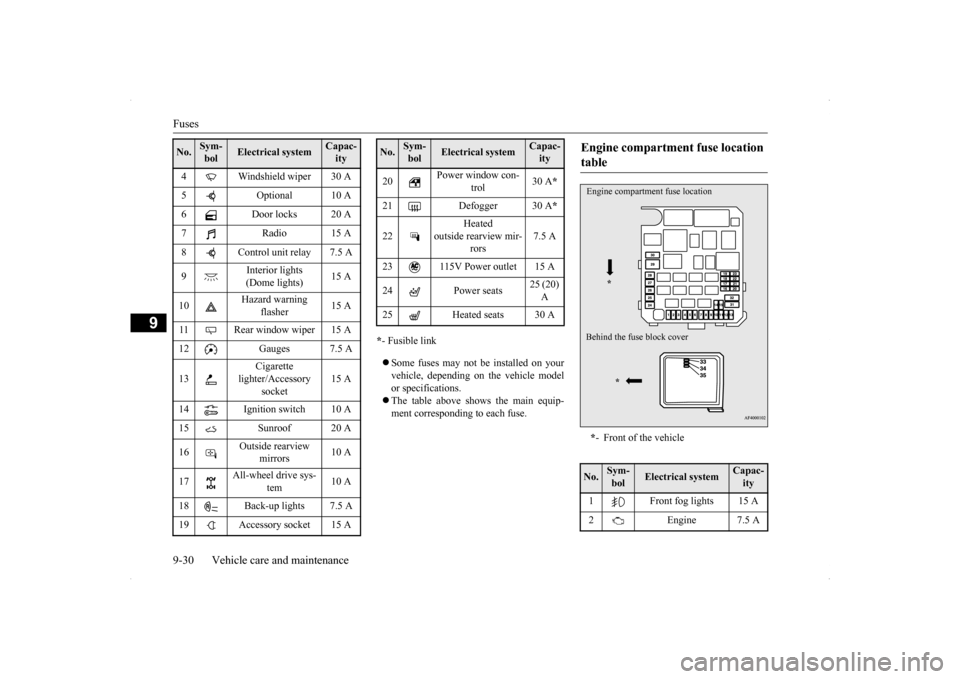
* - Fusible link Some fuses may not be installed on your vehicle, depending on the vehicle model or specifications. The table above shows the main equip- ment corresponding to each fuse.
4 Windshield wiper 30 A 5 Optional 10 A 6 Door locks 20 A 7Radio15 A8 Control unit relay 7.5 A 9
Interior lights (Dome lights)
15 A
10
Hazard warning
flasher
15 A
11 Rear window wiper 15 A 12 Gauges 7.5 A 13
Cigarette
lighter/Accessory
socket
15 A
14 Ignition switch 10 A 15 Sunroof 20 A 16
Outside rearview
mirrors
10 A
17
All-wheel drive sys-
tem
10 A
18 Back-up lights 7.5 A 19 Accessory socket 15 ANo.
Sym- bol
Electrical system
Capac-ity
20
Power window con-
trol
30 A
*
21 Defogger 30 A
*
22
Heated
outside rearview mir-
rors
7.5 A
23 115V Power outlet 15 A 24 Power seats
25 (20) A
25 Heated seats 30 ANo.
Sym- bol
Electrical system
Capac-ity
Engine compartment fuse location table * - Front of the vehicle
No.
Sym- bol
Electrical system
Capac-ity
1 Front fog lights 15 A 2 Engine 7.5 AEngine compartment fuse location
*
Behind the fuse
block cover
*
BK0200700US.bo
ok 30 ページ 2013年2月15日 金曜日 午後12時17分
Page 380 of 422

Fuses
Vehicle care and maintenance 9-31
9
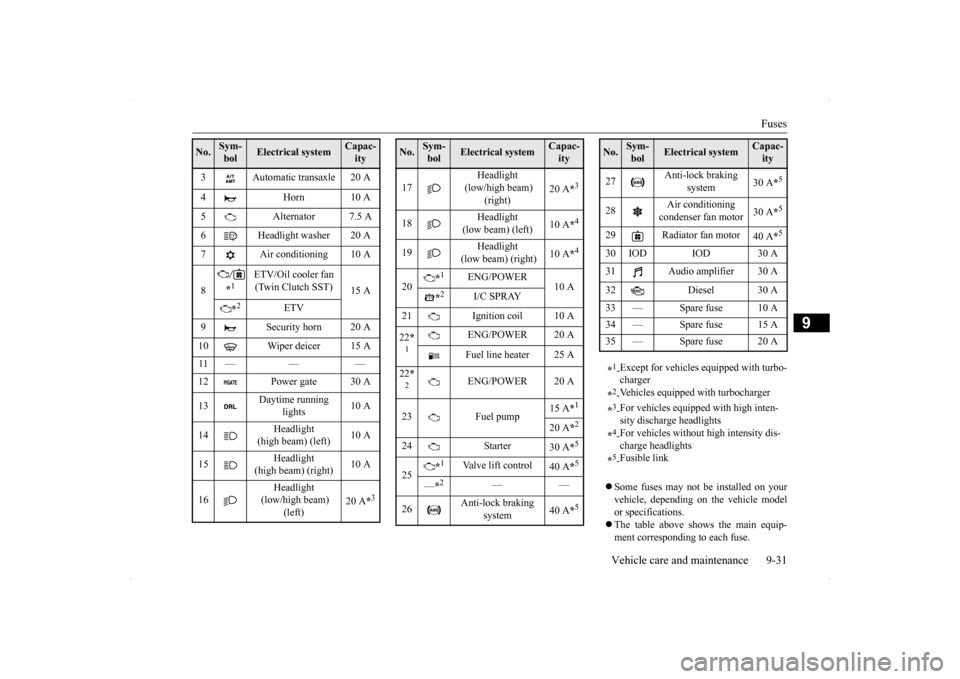
Some fuses may not be installed on your vehicle, depending on the vehicle model or specifications. The table above shows the main equip- ment corresponding to each fuse.
3 Automatic transaxle 20 A 4 Horn 10 A 5 Alternator 7.5 A 6 Headlight washer 20 A 7 Air conditioning 10 A 8
*1
ETV/Oil cooler fan (Twin Clutch SST)
15 A
*2
ETV
9 Security horn 20 A 10 Wiper deicer 15 A 11 — — — 12 Power gate 30 A 13
Daytime running
lights
10 A
14
Headlight
(high beam) (left)
10 A
15
Headlight
(high beam) (right)
10 A
16
Headlight
(low/high beam)
(left)
20 A
*3
No.
Sym- bol
Electrical system
Capac-ity
17
Headlight
(low/high beam)
(right)
20 A
*3
18
Headlight
(low beam) (left)
10 A
*4
19
Headlight
(low beam) (right)
10 A
*4
20
*1
ENG/POWER
10 A
*2
I/C SPRAY
21 Ignition coil 10 A 22 *1
ENG/POWER 20 A Fuel line heater 25 A
22 *2
ENG/POWER 20 A
23 Fuel pump
15 A
*1
20 A
*2
24 Starter
30 A
*5
25
*1
Valve lift control
40 A
*5
—*2
——
26
Anti-lock braking
system
40 A
*5
No.
Sym- bol
Electrical system
Capac-ity
27
Anti-lock braking
system
30 A
*5
28
Air conditioning condenser fan motor
30 A
*5
29 Radiator fan motor
40 A
*5
30 IOD IOD 30 A 31 Audio amplifier 30 A 32 Diesel 30 A 33 — Spare fuse 10 A 34 — Spare fuse 15 A35 — Spare fuse 20 A *1- Except for vehicles equipped with turbo- charger
*2- Vehicles equipped with turbocharger
*3- For vehicles equipped with high inten- sity discharge headlights
*4- For vehicles without high intensity dis- charge headlights
*5- Fusible link
No.
Sym- bol
Electrical system
Capac-ity
BK0200700US.bo
ok 31 ページ 2013年2月15日 金曜日 午後12時17分
Page 382 of 422

Replacement of light bulbs
Vehicle care and maintenance 9-33
9
N00942900219
Before replacing a bulb, be sure the light is off. Do not touch the glass part of the newbulb with your bare fingers; the oil from your skin will stay on the glass and dim or destroy the bulb when it gets hot.
N00943000158
The bulb should only be replaced with a newbulb with the same rating and type. The typeand rating are listed on the base of the bulb.
N00950300818
[For vehicles without high intensity dischargeheadlights]
If the replacement fuse blows again after a short time, have the electrical system checked by an authorized Mitsubishi Motors dealer or a repair faci
lity of your choice to
find and correct the cause.
Replacement of light bulbs
CAUTION Bulbs are extremely hot immediately after being turned off. When replacing a bulb, wait for it to coolsufficiently before touching it. You could otherwise be burned.NOTE
If you are unsure of how to carry out the work as required, it is recommended that these procedures be carried out by an autho-rized Mitsubishi Motors dealer or a repair facility of your choice. Be careful not to scratch the vehicle body when removing a light and lens.CAUTION
When it rains, or when the vehicle has been washed, the inside of the lens sometimes becomes temporarily foggy. This is the same phenomenon as when window glass mists up on a humid day, and does not indicate a func-tional problem. When the light is switched on, the heat will remove the fog. However, if water gathersinside the light, please have it checked by an authorized Mitsubishi Motors dealer or a repair facility of your choice.
Bulb capacity Outside
NOTE
Front
Description
Wattage
ANSI Trade No. or Bulb
type
1-
Front turn signal light
21 W WY21W
2-
Headlight, high beam
60 W
9005 HB3
3-
Headlight, low beam (Halogen bulb)
51 W
9006 HB4
4- Front fog
light
55 W H11
5-
Front side- marker and parking light
5 W WY5W
6- Side turn sig-
nal light
5 W —
SC00001000-7.f
m 33 ページ 2013年2月15日 金曜日 午後4時20分
Page 383 of 422
![MITSUBISHI LANCER SPORTBACK 2014 8.G Owners Manual Replacement of light bulbs 9-34 Vehicle care and maintenance
9
[For vehicles equipped with high intensity discharge headlights]
Description
Wattage or Can- dle power
ANSI Trade No. or Bulb type
1 MITSUBISHI LANCER SPORTBACK 2014 8.G Owners Manual Replacement of light bulbs 9-34 Vehicle care and maintenance
9
[For vehicles equipped with high intensity discharge headlights]
Description
Wattage or Can- dle power
ANSI Trade No. or Bulb type
1](/manual-img/19/7508/w960_7508-382.png)
Replacement of light bulbs 9-34 Vehicle care and maintenance
9
[For vehicles equipped with high intensity discharge headlights]
Description
Wattage or Can- dle power
ANSI Trade No. or Bulb type
1-
Front turn signal light
21 W WY21W
2-
Daytime run- ning light
27 W 32 cp
1156
3-
Headlight, low/high beam (Dis- charge bulb)
35 W —
4- Front fog
light
55 W H11
5-
Front side- marker and parking light
5 W WY5W
6- Side turn sig-
nal light
5 W —
WA R N I N G Check with an authorized Mitsubishi Motors dealer or a repair facility of your choice when it is necessary to repair a dis- charge headlight or to replace the bulb. The power circuit, bulb and electrodesgenerate high voltages that may cause a severe electrical shock.NOTE
It is not possible to re
pair or replace only the
bulb for the side turn signal light. Check with an authorized Mitsubishi Motors dealer or a repair
facility of your choice
when the light needs to be repaired or replaced.
Rear
Description
Wattage
ANSI Trade No. or Bulb type
7-
High- mounted stop light
——
8-
License plate light
5 W W5W
9- Back-up light 18 W W16W 10-
Tail and stop light
21/5 W W21/5W
11-
Rear turn sig- nal light
21 W WY21W
12-
Rear side- marker light
5 W W5W
NOTE
The high-mounted stop light uses LEDs rather than bulbs. For repair and replace- ment, contact an authorized Mitsubishi Motors dealer or a repair facility of yourchoice.
SC00001000-7.f
m 34 ページ 2013年2月15日 金曜日 午後4時20分
Page 384 of 422
Replacement of light bulbs
Vehicle care and maintenance 9-35
9
N00950400545
N00901800091
1. For vehicles equipped with turbocharger, when replacing the bulb on the driver’s side, remove the bolt (A) holding downthe relay box and move the relay box toward the rear of the vehicle.
2. For vehicles equipped with turbocharger, when replacing the bulb on the passen- ger’s side, lift up the engine coolant reser- voir (B). 3. Turn the bulb (C) counterclockwise, and then remove the headlight bulb with holder.
Inside
Description
Wattage
1- Cargo room light 8 W2- Dome light (rear) (if so
equipped)
8 W
3- Dome light (front)/Reading
light
8 W
Headlights (low beam, except for vehicles equipped with high intensity discharge headlights) * - Front of the vehicle
*- Front of the vehicle * - Front of the vehicle
BK0200700US.bo
ok 35 ページ 2013年2月15日 金曜日 午後12時17分
Page 385 of 422

Replacement of light bulbs 9-36 Vehicle care and maintenance
9
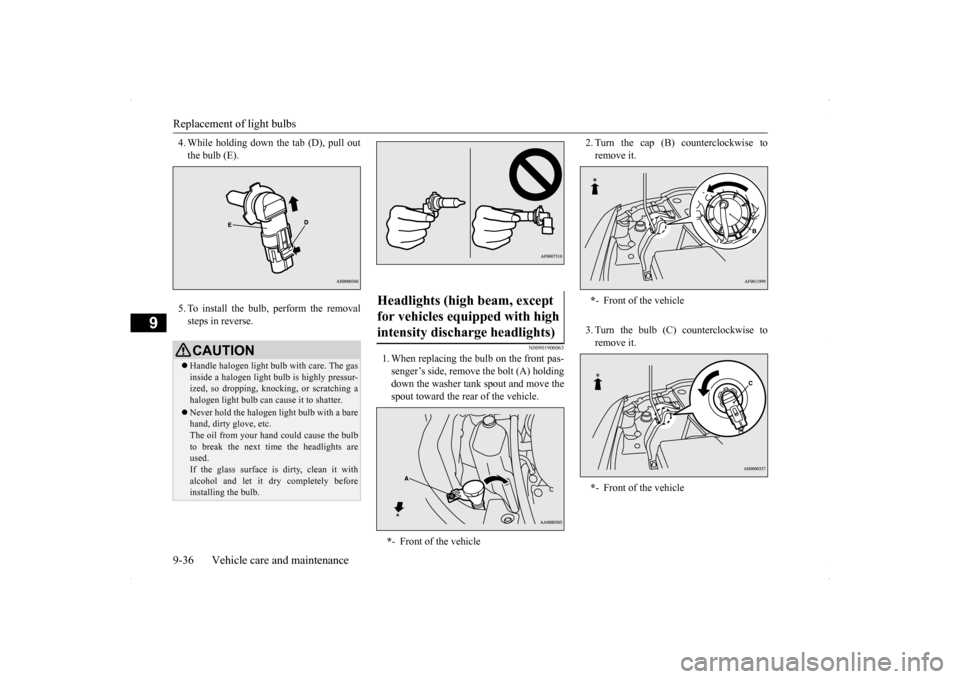
4. While holding down the tab (D), pull out the bulb (E). 5. To install the bulb, perform the removal steps in reverse.
N00901900063
1. When replacing the bulb on the front pas-senger’s side, remove the bolt (A) holdingdown the washer tank spout and move thespout toward the rear of the vehicle.
2. Turn the cap (B) counterclockwise to remove it. 3. Turn the bulb (C) counterclockwise to remove it.
CAUTION Handle halogen light bulb with care. The gas inside a halogen light bulb is highly pressur- ized, so dropping, knocking, or scratching ahalogen light bulb can cause it to shatter. Never hold the halogen light bulb with a bare hand, dirty glove, etc. The oil from your hand could cause the bulb to break the next time the headlights areused. If the glass surface is dirty, clean it with alcohol and let it dry completely beforeinstalling the bulb.
Headlights (high beam, except for vehicles equipped with high intensity discharge headlights) * - Front of the vehicle
*- Front of the vehicle * - Front of the vehicle
BK0200700US.bo
ok 36 ページ 2013年2月15日 金曜日 午後12時17分
Page 386 of 422

Replacement of light bulbs
Vehicle care and maintenance 9-37
9
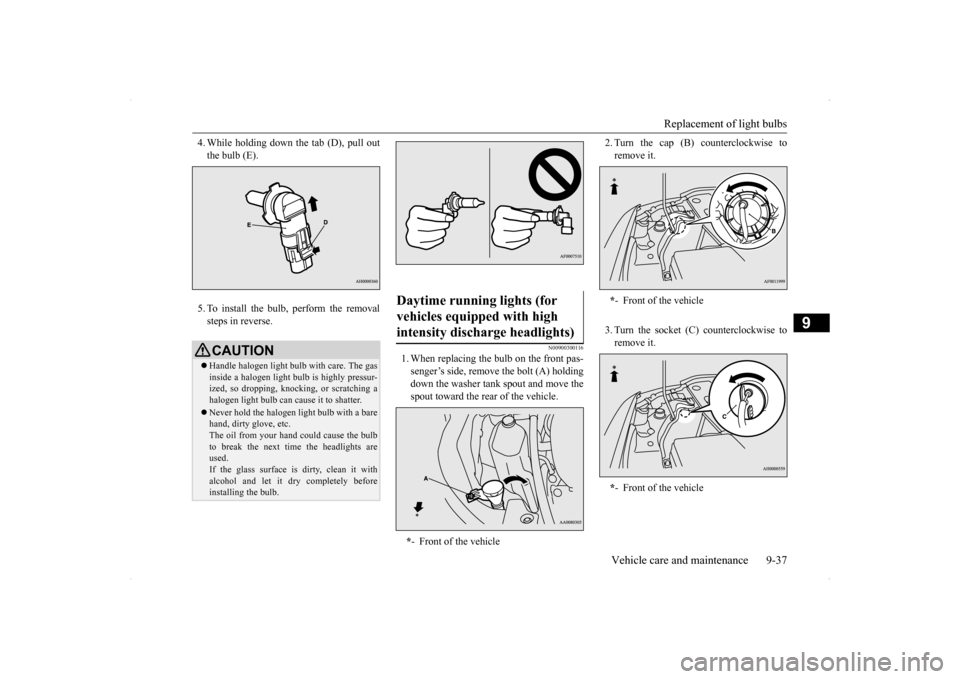
4. While holding down
the tab (D), pull out
the bulb (E). 5. To install the bulb, perform the removal steps in reverse.
N00900300116
1. When replacing the bulb on the front pas-senger’s side, remove the bolt (A) holdingdown the washer tank spout and move thespout toward the rear of the vehicle.
2. Turn the cap (B) counterclockwise to remove it. 3. Turn the socket (C) counterclockwise to remove it.
CAUTION Handle halogen light bulb with care. The gas inside a halogen light bulb is highly pressur- ized, so dropping, knocking, or scratching ahalogen light bulb can cause it to shatter. Never hold the halogen light bulb with a bare hand, dirty glove, etc. The oil from your hand could cause the bulb to break the next time the headlights areused. If the glass surface is dirty, clean it with alcohol and let it dry completely beforeinstalling the bulb.
Daytime running lights (for vehicles equipped with high intensity discharge headlights) * - Front of the vehicle
*- Front of the vehicle * - Front of the vehicle
BK0200700US.bo
ok 37 ページ 2013年2月15日 金曜日 午後12時17分
Page 387 of 422

Replacement of light bulbs 9-38 Vehicle care and maintenance
9
4. Turn the bulb counterclockwise while pressing it and pull it out of the socket. 5. To install a bulb, perform the removal steps in reverse.
N00902000029
Do not attempt to disassemble or repair head- lights, and do not attempt to replace their bulbs.
N00943200121
The alignment of the headlights should bechecked by an authorized Mitsubishi Motorsdealer or a repair facility of your choice.
N00917300495
1. For vehicles equipped with turbocharger,when replacing the bulb on the driver’sside, remove the bo
lt (A) holding down
the relay box and move the relay box toward the rear of the vehicle.
2. For vehicles equipped with turbocharger, when replacing the bulb on the passen- ger’s side, lift up the engine coolant reser- voir (B). 3. Turn the socket (C) counterclockwise to remove it.
Headlights (low/high beam, for vehicles equipped with high intensity discharge lights)
WA R N I N G A high voltage is present in the power cir- cuit and in the bulbs and bulb terminals. To avoid the risk of an electric shock, con-tact an authorized Mitsubishi dealer whenever repair or replacement is neces- sary.
Adjustment of headlight aim Front side-marker and parking lights (except for vehicles equipped with high intensity discharge headlights) * - Front of the vehicle
*- Front of the vehicle * - Front of the vehicle
BK0200700US.bo
ok 38 ページ 2013年2月15日 金曜日 午後12時17分