Page 388 of 422
Replacement of light bulbs
Vehicle care and maintenance 9-39
9
4. Pull the bulb out of the socket. 5. To install the bulb, perform the removal steps in reverse.
N00917300541
1. To create enough work space, turn thesteering wheel all the way in the directionopposite to the side you wish to replace.
2. Remove the clips (A), and screws (B) or bolts (B) to turn up the cover (C).
3. Turn the socket (D) counterclockwise to remove it. 4. Pull the bulb out of the socket.5. To install the bulb, perform the removal steps in reverse.
Front side-marker and parking lights (for vehicles equipped with high intensity discharge headlights)
Type 1Type 2
BK0200700US.bo
ok 39 ページ 2013年2月15日 金曜日 午後12時17分
Page 389 of 422
Replacement of light bulbs 9-40 Vehicle care and maintenance
9
N00943400325
1. Remove the clips (A) and clips (B), then remove the duct (C) and the upper cover(D).
2. Remove the entire socket and bulb assem- bly (E) by turning it counterclockwise.
3. Remove the bulb by pulling it out. 4. To install the bulb, perform the removal steps in reverse.
N00943601786
1. Remove the screw (A) and pull the coverout.
Front turn signal lights Except for vehicles with turbocharger
* - Front of the vehicle
Vehicles with turbocharger
Front fog lights (Type 1)
(if so
equipped)
BK0200700US.bo
ok 40 ページ 2013年2月15日 金曜日 午後12時17分
Page 390 of 422

Replacement of light bulbs
Vehicle care and maintenance 9-41
9
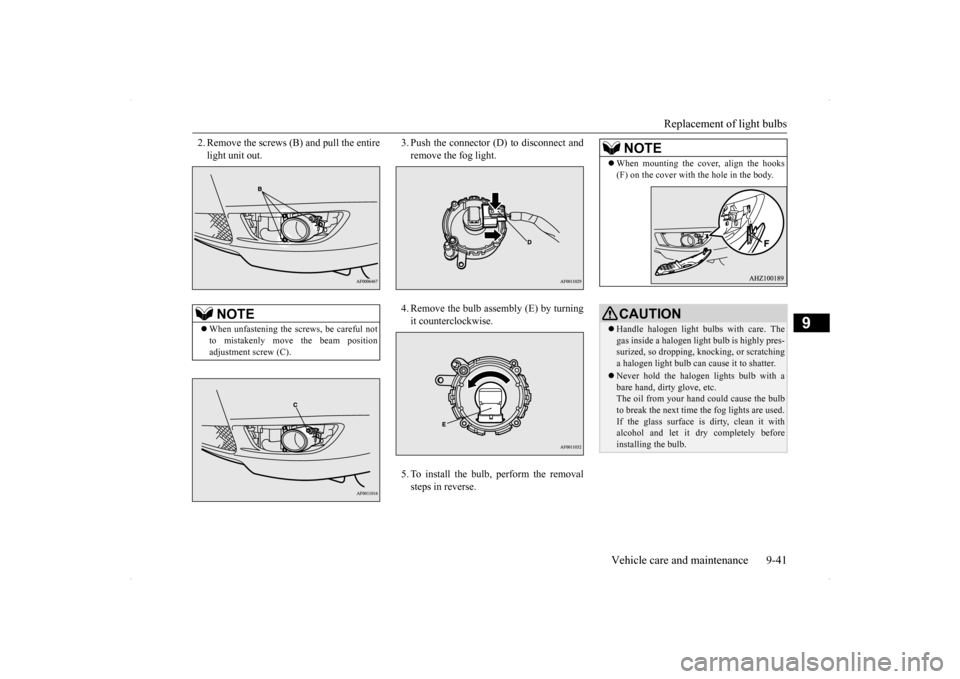
2. Remove the screws (B) and pull the entire light unit out.
3. Push the connector (D) to disconnect and remove the fog light. 4. Remove the bulb assembly (E) by turning it counterclockwise. 5. To install the bulb, perform the removal steps in reverse.
NOTE
When unfastening the screws, be careful not to mistakenly move the beam position adjustment screw (C).
NOTE
When mounting the cover, align the hooks (F) on the cover with the hole in the body.CAUTION Handle halogen light bulbs with care. The gas inside a halogen light bulb is highly pres-surized, so dropping, knocking, or scratching a halogen light bulb can cause it to shatter. Never hold the halogen lights bulb with a bare hand, dirty glove, etc. The oil from your hand could cause the bulbto break the next time the fog lights are used. If the glass surface is dirty, clean it with alcohol and let it dry completely beforeinstalling the bulb.
BK0200700US.bo
ok 41 ページ 2013年2月15日 金曜日 午後12時17分
Page 391 of 422
Replacement of light bulbs 9-42 Vehicle care and maintenance
9
N00943601799
1. Remove the screw (A).
2. Pull the cover out in the direction of the arrow shown in the illustration. 3. Remove the screws (B) and pull the entire light unit out.
4. Push the connector (D) to disconnect and remove the fog light.
Front fog lights (Type 2)
(if so
equipped)
NOTE
When unfastening the screws, be careful not to mistakenly move the beam position adjustment screw (C).Passenger’s side Driver’s side
NOTE
BK0200700US.bo
ok 42 ページ 2013年2月15日 金曜日 午後12時17分
Page 392 of 422

Replacement of light bulbs
Vehicle care and maintenance 9-43
9
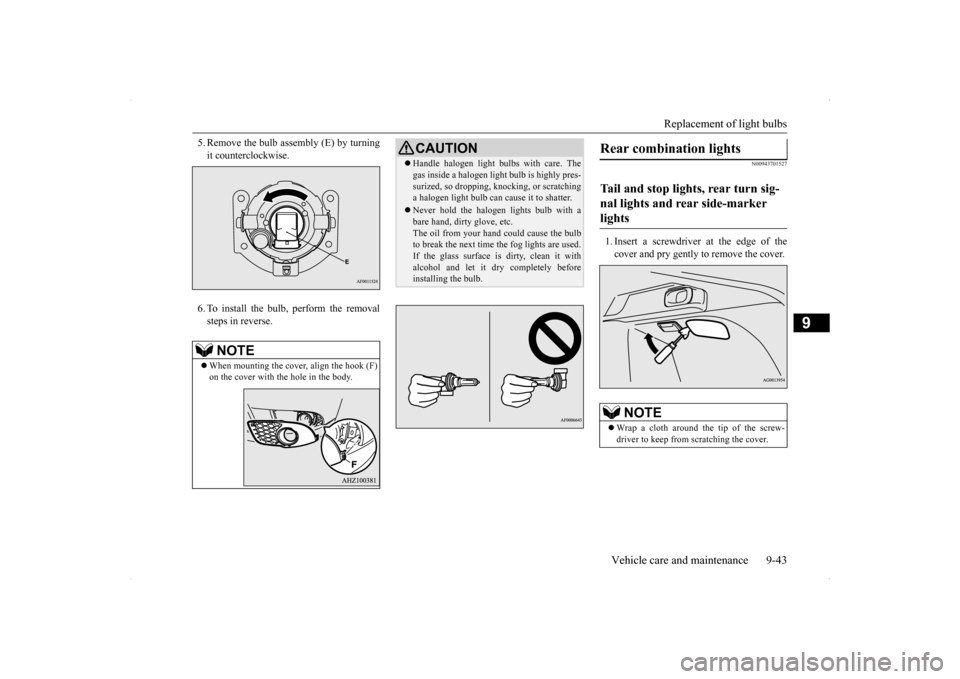
5. Remove the bulb assembly (E) by turning it counterclockwise. 6. To install the bulb, perform the removal steps in reverse.
N00943701527
1. Insert a screwdriver at the edge of the cover and pry gently to remove the cover.
NOTE
When mounting the cover, align the hook (F) on the cover with the hole in the body.
CAUTION Handle halogen light bulbs with care. The gas inside a halogen light bulb is highly pres- surized, so dropping, knocking, or scratching a halogen light bulb can cause it to shatter. Never hold the halogen lights bulb with a bare hand, dirty glove, etc. The oil from your hand could cause the bulbto break the next time the fog lights are used. If the glass surface is dirty, clean it with alcohol and let it dry completely beforeinstalling the bulb.
Rear combination lights Tail and stop lights, rear turn sig- nal lights and rear side-marker lights
NOTE
Wrap a cloth around the tip of the screw- driver to keep from scratching the cover.
BK0200700US.bo
ok 43 ページ 2013年2月15日 金曜日 午後12時17分
Page 393 of 422
Replacement of light bulbs 9-44 Vehicle care and maintenance
9
2. Remove the socket and bulb assemblies by turning them counterclockwise. 3. Remove the bulb by pulling it out.
4. To install the bulb, perform the removal steps in reverse.
N00901200066
1. Insert a screwdriver into the notch of thecover and pry gently to remove the cover. 2. Remove the socket and bulb assembly by turning it counterclockwise.
A- Rear side-marker light B- Rear turn signal light C- Tail and stop light
Rear side-marker light
Tail and stop light and Rear turn signal light
NOTE
When installing the cover, make sure the arrow on the cover is pointing in the direc-tion of the front of the vehicle. *- Front of the vehicle
Back-up lights
NOTE
Wrap a cloth around the tip of the screw- driver to keep from scratching the cover.
BK0200700US.bo
ok 44 ページ 2013年2月15日 金曜日 午後12時17分
Page 394 of 422
Replacement of light bulbs
Vehicle care and maintenance 9-45
9
3. Remove the bulb by pulling it out. 4. To install the bulb, perform the removal steps in reverse.
N00944000357
1. When removing the light unit (A), push ittoward the left side of the vehicle body. 2. Use a screwdriver to gently pry up the tab (B) and remove the lens.
3. Pull the bulb out of the socket. 4. To install the bulb, perform the removal steps in reverse.
NOTE
When installing the lid, align the tab on the lid with the hole on the vehicle side.
License plate lights
NOTE
Wrap a piece of cloth around the tip of the screwdriver to keep from scratching the lens.
NOTE
When installing the light, insert tab (C) first then align and insert tab (D).
BK0200700US.bo
ok 45 ページ 2013年2月15日 金曜日 午後12時17分
Page 395 of 422
Replacement of light bulbs 9-46 Vehicle care and maintenance
9
N00944500235
1. Insert a screwdriver into the notch of the light assembly. Gently pry to remove the lens.
2. While holding down
the tab (A), pull out
the bulb.
3. To install the bulb, perform the removal steps in reverse.
Dome light (front)/Reading lights
NOTE
Wrap a cloth around the tip of the screw- driver to keep from scratching the lens.
NOTE
Before replacing the bulb, put the dome light (front)/reading lights switch into the “OFF”position. When mounting the lens, align the tab (B) with the hole on the vehicle body.
BK0200700US.bo
ok 46 ページ 2013年2月15日 金曜日 午後12時17分