2014 MITSUBISHI LANCER SPORTBACK engine
[x] Cancel search: enginePage 318 of 422

Listen to Audio Files on a USB Device
Comfort controls 7-47
7
Press the MEDIA key to set USB as the source. The selected source is indicated on the dis- play. Press the key or key to select the track. This enables selection of the next or previous track.
Hold down the 3 key or the 4 key. Fast forward/rewind is possible. Repeat playback, random playback, and scan playback are possible. Press the 1RPT key. Repeat playback of th
e track currently being
played. Hold down the 1RPT key.
Regarding how to connect USB devices, refer to “How to connect a USB memory device” on page 5-180. When connecting a USB device, use a con- nection cable. Failure to use a connection cable when connecting may place undue load on, or damage the USB connector. Set up the device in order that no unsafe actions, such as plugging in the connectioncable are taken while driving. When inserting and removing the USB device, for safety’s sake first stop the vehi- cle. Do not insert other than audio devices into the USB port. Damage to the device or equipment may result. Depending on the status of the USB device, it may take some time until the device is rec-ognized, or playback starts. Depending on USB devices, buttons on the product will not operate while the USB device is connected. USB device specifications and settings may mean that connection is not possible, or result in differences in operation or display. Depending on audio data in the USB device, track information may not be displayed cor- rectly. Depending on the status of the vehicle and device, the iPod/iPhone may not play back after starting the engine. Data containing copyright information may not play back.NOTE
This product can play back MP3, WMA, and AAC format audio files. Depending on the type of USB device, usage may not be possible, or functions that can beused may be restricted. The recommended file system for USB memory is FAT32. The maximum supported capacity for USB memory is 32GB. Operate the USB device containing recorded audio files while connected to this product.
Play Back of Audio Files on a USB Device Select the Track (File)
NOTE
Fast Forward or Rewind Switch Playback Mode Repeat Playback (RPT)
NOTE
Pressing again will cancel. Selecting a file will cancel this. However, it will not be cancelled in vehicles with a Bluetooth
® 2.0 interface.
Folder Repeat Playback
BK0200700US.bo
ok 47 ページ 2013年2月15日 金曜日 午後12時17分
Page 320 of 422
Listen to Bluetooth Audio (if so equipped)
Comfort controls 7-49
7
N00717500020
This product can play back tracks on com- mercially-available Bluetooth-capable audio devices.
Regarding how to connect your Bluetooth device, refer to “Connecting the Bluetooth
®
2.0 interface and Bluetooth device” on page 5-165. Operation methods below describe situations once connection has been completed. 1. Press the MEDIA key to set Bluetooth Audio as the source. The selected source is indicated on the display. 2. Press the 5 key. Bluetooth Audio play- back starts.
While the file is selected, press the 6 key to return to the previous operation. While the file is selected, hold down the 6 key to cancel track search mode. If there is no operation for five seconds after selecting the file, that file is played back. Operations such as selecting a track will can- cel track search mode.
Listen to Bluetooth Audio
(if
so equipped)
CAUTION Never hold these devices in your hand to operate while driving, as this is dangerous. Do not leave the Bluetooth audio device unattended in the vehicle. Depending on how the devices are handled, audio files being damaged or lost, therefore it is recommended that data be backed up.NOTE
NOTE
Depending on the type of Bluetooth-capable audio devices, usage may not be possible, or functions that can be used may be restricted. Confirm together with the user manuals for the commercially-available Bluetooth-capa- ble audio devices. Depending on the type of Bluetooth-capable audio devices, volume levels may differ. There is the danger of loud volumes, so priorto use, it is recommended that you turn the volume down. “Adjust Volume” (P.7-36)
Depending on the status of the Bluetooth audio device, it may take some time until thedevice is recognized, or playback starts. Bluetooth audio device specifications and settings may mean that connection is not possible, or result in differences in operation or display. Depending on audio data in the Bluetooth audio device, track information may not bedisplayed correctly. Depending on the status of the vehicle and device, the iPod/iPhone may not play back after starting the engine.
Connect a Bluetooth-capable Audio Device
NOTE
If the iPod/iPhone is connected via Bluetooth as a Bluetooth-capable audio device, then donot connect the iPod/iPhone using an iPod cable. Connection using both methods will result in erroneous operation.
Play Bluetooth Audio
NOTE
Hold down the 5 key to pause. Press the 6 key to stop.
BK0200700US.bo
ok 49 ページ 2013年2月15日 金曜日 午後12時17分
Page 334 of 422
8
For emergenciesIf the vehicle breaks
down ................................................................8-2
Jump-starting the engi
ne .........................................
..........................8-2
Engine overheating ..........
.................................................................8-4
Tools and jack ..................
.................................................................8-5
How to change a tire
...............................................
..........................8-6
Towing .................................................
...........................................8-13
Operation under adverse driv
ing conditions ...................................8-15
BK0200700US.bo
ok 1 ページ 2013年2月15日 金曜日 午後12時17分
Page 335 of 422
If the vehicle breaks down 8-2 For emergencies
8
N00836300204
If your vehicle breaks down on the road, move to the shoulder and turn on the hazardwarning flashers. If there is no shoulder, or the shoulder is not safe, drive in the right lane slowly, with the hazard lights flashing, untilyou come to a safe stopping place. Keep the flashers flashing. If the engine stops, there will be no power assist to the steering and brakes, making these difficult to use. The brake booster will not work, so the brakes will not grip well. The brake pedalwill be harder to press than usual. Since there is no power steering assist, the steering wheel will be hard to turn.
Get help from your passengers, bystanders, etc. to push the vehicl
e and move it to a safe
zone.
N00836400654
If the engine cannot be started because the battery is weak or dead, you can start it withthe battery from another vehicle using jumper cables. 1. Take off any metal jewelry such as watch bands or bracelets that might make an accidental electrical contact.
2. Position the vehicles close enough together so that the jumper cables can reach, but be sure the vehicles aren’t touching each other. 3. You could be injured if the vehicles move. Set the parking brake firmly on each vehi- cle. Put an automatic transaxle, CVT or Twin Clutch SST in “P” (PARK) or amanual transaxle in “N” (Neutral). Turn the ignition switch to the “LOCK” posi- tion.
If the vehicle breaks down If the engine stops/fails When the engine fails at the intersection
Jump-starting the engine
WA R N I N G When using jumper cables to start a vehi- cle, follow the procedures and be very cau- tious. CAUTION Do not try to start your vehicle by pushing or towing. Vehicles equipped with continuously variable transmission (CVT) or Twin Clutch SST cannot be started this way. Pushing ortowing a vehicle that has a manual transaxle may overheat and damage the catalytic con- verter. Also, there is more risk of an accidentwhen a vehicle is being pushed or towed.
CAUTION Check the other vehicle. It must have a 12- volt battery. If the other system isn’t 12-volt, both systems can be damaged.WA R N I N G Turn the ignition switch to the “LOCK” position on both vehicles. Make sure thatthe cables or your clothes cannot be caught by the fan or drive belt. Personal injury could result. NOTE
Turn off all lights, heater, and other electrical loads. This will avoid sparks and help saveboth batteries.
BK0200700US.bo
ok 2 ページ 2013年2月15日 金曜日 午後12時17分
Page 336 of 422
Jump-starting the engine For emergencies 8-3
8
4. Make sure your battery electrolyte is at the proper level. (Refer to “Checking bat- tery electrolyte level” on page 9-15.) 5. For vehicles equipped with turbocharger, remove the air duct and then the battery upper cover.(Refer to “Removing and installing the battery upper cover” on page 9-14.)
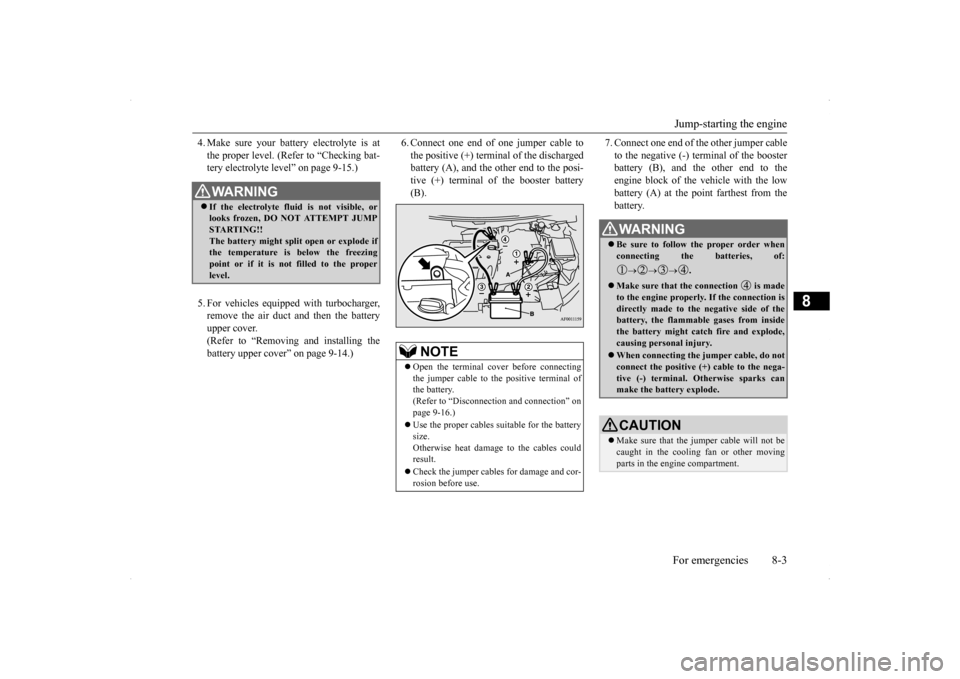
6. Connect one end of one jumper cable to the positive (+) terminal of the discharged battery (A), and the other end to the posi- tive (+) terminal of the booster battery(B).
7. Connect one end of the other jumper cable to the negative (-) terminal of the booster battery (B), and the other end to the engine block of the vehicle with the lowbattery (A) at the point farthest from the battery.
WA R N I N G If the electrolyte fluid is not visible, or looks frozen, DO NOT ATTEMPT JUMP STARTING!! The battery might split open or explode if the temperature is below the freezing point or if it is not filled to the properlevel.
NOTE
Open the terminal cover before connecting the jumper cable to the positive terminal of the battery. (Refer to “Disconnection and connection” on page 9-16.) Use the proper cables suitable for the battery size. Otherwise heat damage to the cables couldresult. Check the jumper cables for damage and cor- rosion before use.
WA R N I N G Be sure to follow the proper order when connecting the batteries, of:
.
Make sure that the connection is made to the engine properly. If the connection isdirectly made to the negative side of the battery, the flammable gases from inside the battery might catch fire and explode, causing personal injury. When connecting the jumper cable, do not connect the positive (+) cable to the nega- tive (-) terminal. Otherwise sparks canmake the battery explode.CAUTION Make sure that the jumper cable will not be caught in the cooling fan or other movingparts in the engine compartment.
BK0200700US.bo
ok 3 ページ 2013年2月15日 金曜日 午後12時17分
Page 337 of 422
Engine overheating 8-4 For emergencies
8
8. Start the engine in the vehicle providing the boost. Let the engine idle a few min- utes, then start the engine in the vehicle with the low battery. 9. After the engine is started, disconnect the cables in the reverse order from the wayyou connected them.
10. For vehicles equipped with turbocharger,
install the battery upper cover and thenthe air duct. (Refer to “Removing and installing the battery upper cover” on page 9-14.)
If you drive your vehicle with a low battery charge, after the engine has been started by using jumper cables, the engine may misfire. This can cause the anti-lock braking systemwarning light to blink on and off. This is only due to the low battery voltage. It is not a problem with the brake system. If this hap-pens, fully charge the battery and ensure the charging system is operating properly.
N00836500323
When the engine is overheating, the informa- tion screen in the multi-information displaywill be interrupted and the engine coolant temperature warning display will appear. Also “ ” will blink. If this happens: 1. Stop the vehicle in a safe place. Turn on the hazard warning flashers. 2. With the engine still running, carefully raise the engine hood to vent the engine compartment.3. Check that the cooling fan is running. If the fan is not turning, stop the engine immediately and contact an authorizedMitsubishi Motors dealer or a repair facil- ity of your choice for assistance. 4. If you see steam or spray coming from under the hood, turn off the engine.
NOTE
If the engine is started with the air duct removed, the noise produced as air is drawn into the engine will be greater than when the duct is installed.WA R N I N G Charging your battery while it is still in your vehicle might cause the battery tocatch fire and explode. If you have to charge it while in the vehicle, disconnect the negative terminal. Keep sparks, cigarettes and flames away from the battery because the battery may explode. Keep your work area well vented when charging or using the battery in an enclosed space.
Remove all the caps before charging the battery. Electrolyte (battery acid) is corrosive diluted sulphuric acid. If electrolyte comesin contact with your hands, eyes, clothes, or the painted surface of your vehicle, thoroughly flush with water. If electrolytegets in your eyes, flush them immediately and thoroughly with water, and get prompt medical attention. Always wear protective clothing and gog- gles when working near the battery. Keep the battery out of the reach of chil- dren.
As your vehicle has anti-lock brakes
WA R N I N G
Engine overheating
WA R N I N G To avoid personal injury, keep hands, hair, jewelry and clothes away from the cooling fan. The cooling fan can start at any time.
BK0200700US.bo
ok 4 ページ 2013年2月15日 金曜日 午後12時17分
Page 338 of 422
Tools and jack
For emergencies 8-5
8
5. If you do not see steam or spray coming from under the hood, leave the engine on until the bar graph for the engine coolant temperature warning display on the multi-information display goes down. When it is in the middle of the normal zone, you can start driving again. If the bar graphstays in the red zone, turn off the engine. 6. When you do not see any more steam or spray, open the hood. Look for obvious leaks, such as a split radiator hose. Be careful as components will be hot. Anyleak source must be repaired. 7. If there is no obvious leak source, check the coolant level in the reserve tank. Ifthere is none, or if it is too low, slowly add coolant.
8. If the reserve tank needs coolant, you will probably also need to add coolant to the radiator. Do not loosen or remove the radiator cap until the engine has cooleddown. 9. Start the engine, and slowly add coolant, up to the bottom of the filler neck. Useplain water if you have to (and replace it with the right coolant as soon as possible).
10. Replace the radiator cap and tighten it
fully. Check the engine coolant tempera- ture display on the multi-information dis- play. You can start driving again when thebar graph for the engine coolant tempera- ture display returns to the normal zone.
11. Have your vehicle checked by your autho-
rized Mitsubishi Motors dealer or a repair facility of your choice.
N00836600324
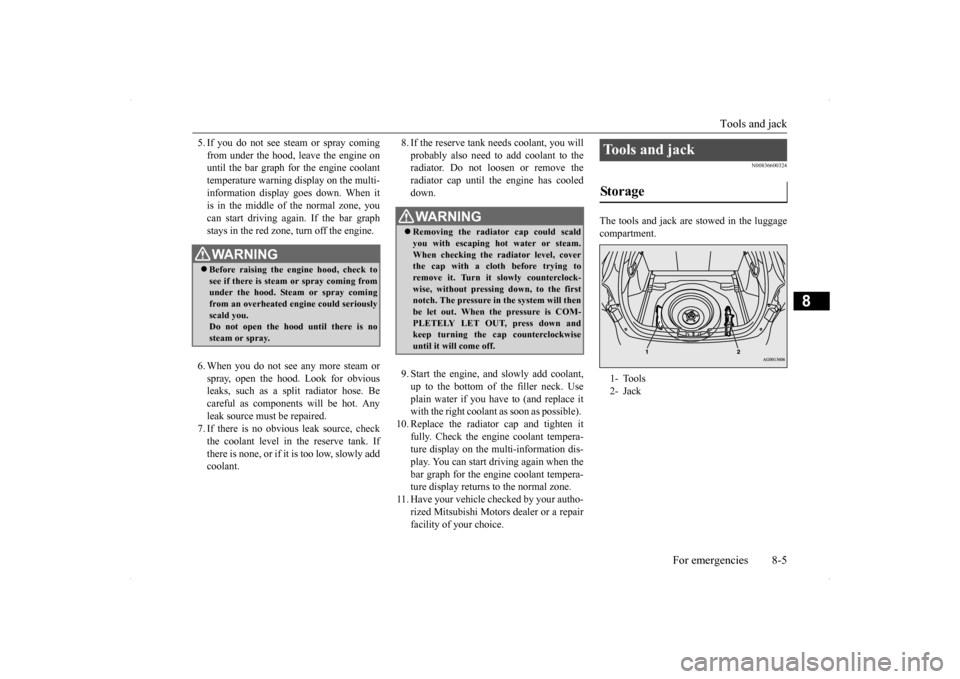
The tools and jack are stowed in the luggage compartment.
WA R N I N G Before raising the engine hood, check to see if there is steam or spray coming fromunder the hood. Steam or spray coming from an overheated engine could seriously scald you.Do not open the hood until there is no steam or spray.
WA R N I N G Removing the radiator cap could scald you with escaping hot water or steam.When checking the radiator level, cover the cap with a cloth before trying to remove it. Turn it slowly counterclock-wise, without pressing down, to the first notch. The pressure in the system will then be let out. When the pressure is COM-PLETELY LET OUT, press down and keep turning the cap counterclockwise until it will come off.
Tools and jack Storage 1- Tools 2- Jack
BK0200700US.bo
ok 5 ページ 2013年2月15日 金曜日 午後12時17分
Page 342 of 422
How to change a tire
For emergencies 8-9
8
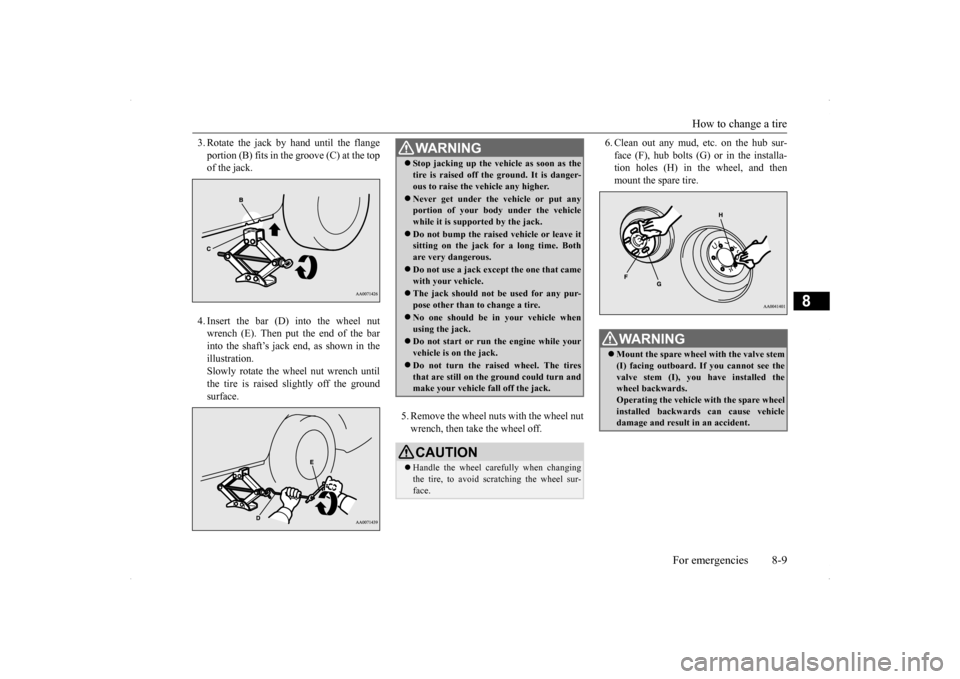
3. Rotate the jack by hand until the flange portion (B) fits in the groove (C) at the top of the jack. 4. Insert the bar (D) into the wheel nut wrench (E). Then put the end of the barinto the shaft’s jack end, as shown in the illustration. Slowly rotate the wheel nut wrench untilthe tire is raised slightly off the groundsurface.
5. Remove the wheel nuts with the wheel nut wrench, then take the wheel off.
6. Clean out any mud, etc. on the hub sur- face (F), hub bolts (G) or in the installa- tion holes (H) in the wheel, and then mount the spare tire.
WA R N I N G Stop jacking up the vehicle as soon as the tire is raised off the ground. It is danger- ous to raise the vehicle any higher. Never get under the vehicle or put any portion of your body under the vehicle while it is support
ed by the jack.
Do not bump the raised vehicle or leave it sitting on the jack for a long time. Both are very dangerous. Do not use a jack except the one that came with your vehicle. The jack should not be used for any pur- pose other than to change a tire. No one should be in your vehicle when using the jack. Do not start or run the engine while your vehicle is on the jack. Do not turn the raised wheel. The tires that are still on the ground could turn andmake your vehicle fall off the jack. CAUTION Handle the wheel carefully when changing the tire, to avoid scratching the wheel sur- face.
WA R N I N G Mount the spare wheel with the valve stem (I) facing outboard. If you cannot see the valve stem (I), you have installed the wheel backwards.Operating the vehicle with the spare wheel installed backwards can cause vehicle damage and result in an accident.
BK0200700US.bo
ok 9 ページ 2013年2月15日 金曜日 午後12時17分