2014 MERCEDES-BENZ B-CLASS SPORTS glove box
[x] Cancel search: glove boxPage 12 of 360
Folding in whe
nlocking( on-board
computer) ...................................... 206
Out of position (troubleshooting) ...100
Setting ........................................... 100
Storing settings (memory function) 101
Storing the parking position ..........100
Eyeglasses compartment .................251 F
Fille rcap
see Fuel filler flap
First-aid kit ......................................... 294
Flat tire MOExtended tires ..........................295
Preparing the vehicle .....................295
TIREFIT kit ...................................... 296
see Emergency spare wheel
Floormats ........................................... 277
Fogl amps
Extended range .............................. 108
Switching on/off ........................... 105
Foldin gtable ...................................... 253
Fron tfog lamps
Display message ............................ 222
Switching on/off ........................... 105
Front-passenger seat
Folding the backres tforward/back 253
Fuel
Additives ........................................ 349
Consumption statistics ..................194
Displaying the current
consumption .................................. 194
Displaying the range ......................194
Driving tips .................................... 155
Fuel gauge ....................................... 31
Grade (gasoline) ............................ 348
Important safety notes ..................348
Premium-grade unleade dgasoline .348
Problem (malfunction) ...................152
Refueling ........................................ 150
Tank content/reserve fuel .............348
Fue lfiller flap
Opening/closing ............................ 151
Fue llevel
Calling up the range (on-board
computer) ...................................... 194Fue
ltank
Capacity ........................................ 348
Problem (malfunction) ...................152
Fuses
Allocation chart ............................. 309
Before changing ............................. 308
Fuse box in the engine
compartment ................................. 308
Fuse box in the front-passenger
footwell .......................................... 309
Important safety notes ..................308 G
Garage door opener Clearing the memory .....................276
Important safety notes ..................273
Opening/closing the garage door ..276
Programming (button in the rear-
view mirror) ................................... 274
Gear or selector lever (cleaning
guidelines) ......................................... 290
Genuine parts ...................................... 21
Glove box ........................................... 251 H
Handbrake see Parking brake
Hazard warning lamps ......................107
Display message ............................ 236
Headlamps
Fogging up ..................................... 109
see Automatic headlamp mode
Head restraints
Adjusting ......................................... 95
Adjusting (electrically). ....................96
Adjusting (manually )........................ 95
Adjusting (rear) ................................ 96
Installing/removing (rear) ................96
Heating
see Climate control
High-beam headlamps
Changing bulbs .............................. 113
Display message ............................ 221
Switching on/off ........................... 106
Hill start assist .................................. 13810
Index
Page 18 of 360
SmartKey
Changing the battery .......................76
Changing the programming .............75
Checking the battery .......................76
Convenience closing feature ............84
Convenience opening feature ..........84
Display message ............................ 237
Door central locking/unlocking .......74
Important safety notes ....................74
Loss ................................................. 78
Mechanical key ................................ 75
Positions (ignition lock) .................137
Problem (malfunction) .....................78
Starting the engine ........................138
SmartKey position s(ignition lock) ..137
Sno wchains ...................................... 315
Sockets Center console .............................. 264
Luggage compartment ...................265
Points to observe before use .........264
Rea rcompartmen t......................... 265
Specialist workshop ............................ 25
Speed, controlling see Cruise control
Speedometer
Activating/deactivating the
additiona lspeedometer .................202
Digita l............................................ 195
In the Instrument cluster .................31
Segments ...................................... 191
Selecting the unit of measurement 202
see Instrument cluster
SRS
see SRS (Supplemental Restraint
System)
SRS (Supplemental Restraint
System)
Display message ............................ 216
Introduction ..................................... 40
Warning lamp ................................. 244
Warning lamp (function) ................... 41
Standin glamps
Changing bulbs .............................. 113
Display message ............................ 222
Switching on/off ........................... 106
Start/stop function
see ECO start/stop function
Starting (engine) ................................ 137 Status overview (on-board
computer)
.......................................... 199
STEE RCONTROL .................................. 70
Steering (display message) ..............236
Steering wheel Adjusting (manually )........................ 98
Button overview ............................... 33
Buttons (on-board computer) ......... 191
Cleaning ......................................... 290
Important safety notes ....................98
Paddle shifters ............................... 147
Steering wheel paddle shifters ........147
Stowage areas ................................... 251
Stowage compartments Armrest (front) ............................... 252
Armrest (under) ............................. 252
Center console .............................. 251
Cuph olders ................................... 261
Eyeglasses compartment ...............251
Glove box ...................................... .251
Important safety information .........251
Parce lnet ...................................... 253
Under driver's seat/front-
passenger sea t.............................. 252
Stowage space
Center console (rear) .....................252
Summer tires ..................................... 314
Sun visor ............................................ 263
Surround lighting (on-board
computer) .......................................... 204
Switchin gair-recirculation mode
on/off ................................................. 132
Switchin goff the alarm (ATA) ............70 T
Tachometer ........................................ 191
Tailgate Display message ............................ 235
Emergency unlocking .......................82
Important safety notes ....................81
Opening/closing (from outside) .......82
Opening dimensions ......................353
Tail lamps
Display message ............................ 221
see Lights
Tank content
Fuel gauge ....................................... 3116
Index
Page 47 of 360
function for the vehicle occupants in the
event of acrash.
i After an airb ag has been deployed, have
th ev ehicle towed to th eneares tqualified
specialist workshop, eve nifyour vehicle is
ready to drive.
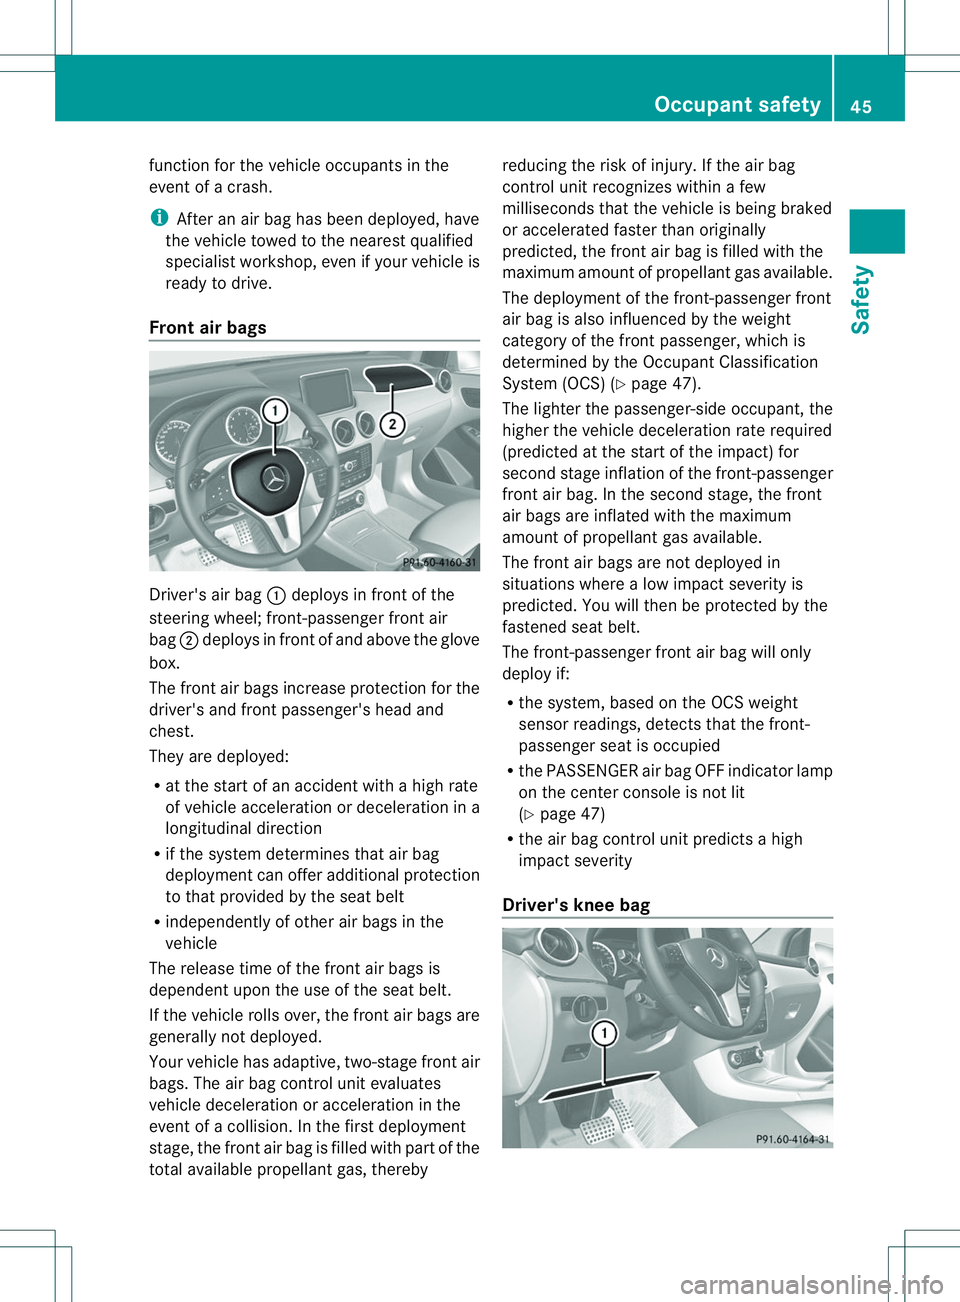
Front air bags Driver'
sair bag 001Adeploys in front of the
steerin gwheel; front-passenger front air
bag 0010deploys in front of and above the glove
box.
The front air bags increase protection for the
driver's and front passenger's head and
chest.
They are deployed:
R at the start of an accident with ahigh rate
of vehicle acceleration or deceleration in a
longitudinal direction
R if the system determines that air bag
deployment can offer additional protection
to that provided by the seat belt
R independently of other air bags in the
vehicle
The release time of the front air bags is
dependent upon the use of the seat belt.
If the vehicle rolls over, the front air bags are
generally not deployed.
Your vehicle has adaptive, two-stage front air
bags. The air bag control unit evaluates
vehicle deceleration or acceleration in the
event of acollision. In the first deployment
stage, the front air bag is filled with part of the
total available propellant gas, thereby reducing the risk of injury. If the air bag
control unit recognizes within
afew
milliseconds that the vehicle is being braked
or accelerated faster than originally
predicted, the front air bag is filled with the
maximum amount of propellant gas available.
The deployment of the front-passenger front
air bag is also influenced by the weight
category of the front passenger, which is
determined by the Occupant Classification
System (OCS) (Y page 47).
The lighter the passenger-side occupant ,the
higher the vehicle deceleration rate required
(predicted at the start of the impact) for
second stage inflation of the front-passenger
front air bag. In the second stage, the front
air bags are inflated with the maximum
amount of propellant gas available.
The front air bags are not deployed in
situations where alow impact severity is
predicted. You will then be protected by the
fastened seat belt.
The front-passenger front air bag will only
deploy if:
R the system, based on the OCS weight
sensor readings, detect sthat the front-
passenger seat is occupied
R the PASSENGER air bag OFF indicator lamp
on the center console is not lit
(Y page 47)
R the air bag control unit predicts ahigh
impact severity
Driver's knee bag Occupant safety
45Safety Z
Page 160 of 360
brake pads. This can result in
asignificantly
longer brakin gdistance.
R Brak eoccasionally to remov eany possible
salt residue. Make sure that you do not
endanger other road users when doing so.
R Carefully depress the brake pedal and the
beginning and end of ajourney.
R Maintain agreater distance to the vehicle
ahead.
Servicing the brakes !
If the red brake warning lamp lights up in
the instrument cluster and you hear a
warning ton ewhile the engin eisrunning,
the brake fluid level may be too low.
Observ eadditional warning messages in
the multifunction display.
The brake fluid level may be too low due to
brake pad wear or leaking brake lines.
Have the brake system checked
immediately. This work should be carried
out at aqualified specialist workshop.
! Afunction or performanc etest should
only be carried out on a2-axle
dynamometer. If yo uareplanning to have
the vehicl eteste dons uchad ynamometer,
contact an authorize dMercedes-Benz
Center to obtai nfurthe rinformatio nfirst.
Otherwise, yo ucould damage the drive
trai nort he brake system.
! As the ESP ®
system operates
automatically, the engine and the ignition
must be switched off (the SmartKe ymust
be in position 0or 1in the ignition lock) if:
R the electri cparking brak eistested on a
brake dynamometer (for amaximum of
ten seconds)
R the vehicle is towed with the front axle
raised.
Braking triggered automaticallybyE SP®
may seriouslyd amage the brake system.
All checks and maintenance work on the
brake system must be carried out at a qualified specialist workshop. Consult a
qualified specialist workshop to arrange this.
Have brake pads installed and brake fluid
replaced at
aqualified specialist workshop.
If the brake system has only been subject to
moderate loads, you should test the
functionality of your brakes at regular
intervals.
You can find adescription of Brake Assist
(BAS) on (Y page 64).
Mercedes-Benz recommends that you only
have brake pads/linings installed on your
vehicle which have been approved for
Mercedes-Benz vehicles or which correspond
to an equivalent quality standard. Brake
pads/linings which have not been approved
for Mercedes-Benz vehicles or which are not
of an equivalent quality could affect your
vehicle's operating safety.
Mercedes-Benz recommends that you only
use brake fluid that has been specially
approved for your vehicle by Mercedes-Benz,
or which corresponds to an equivalent quality
standard. Brake fluid which has not been
approved for Mercedes-Benz vehicles or
which is not of an equivalent quality could
affect your vehicle's operating safety.
Checking brake liningt hickness You can measure the break pad/lining
thickness using
atest gauge.C olor-coding
(green or red) on the test gauge allows you to
determin ewhether the brake pad/lining
thickness is still sufficient .The test gauge is
in the vehicle document wallet in the glove
box. 158
Driving tipsDriving and parking
Page 253 of 360
Stowage areas
Stowage space
Important safety notes G
WARNING
If objectsint he passenger compartmen tare
stowed incorrectly, they can slide or be
thrown around and hit vehicle occupants.
There is arisk of injury, particularly in the
event of sudden braking or asudden change
in direction.
R Always stow objectssot hat they cannot be
thrown around in such situations.
R Always make sure that objectsdon ot
protrude from stowage spaces, parcel nets
or stowage nets.
R Close the lockable stowage spaces while
driving.
R Stow and secure objectst hat are heavy,
hard, pointy, sharp-edged, fragile or too
large in the cargo compartment.
Observe the loading guidelines (Y page 250).
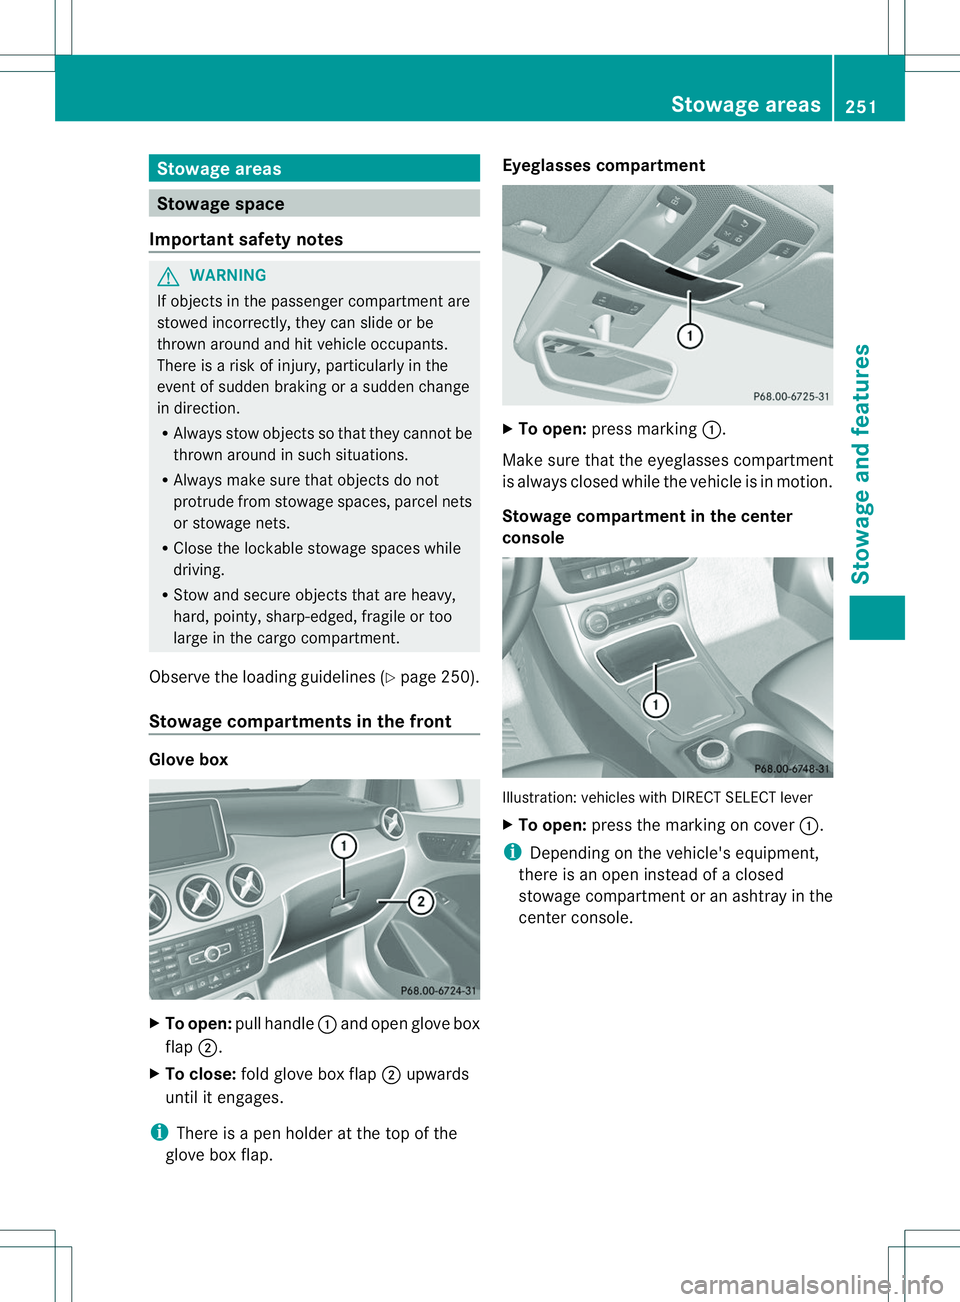
Stowage compartments in the front Glove box
X
To open: pull handle 001Aand open glove box
flap 0010.
X To close: fold glove box flap 0010upwards
until it engages.
i There is apen holder at the top of the
glove box flap. Eyeglasses compartment
X
To open: press marking 001A.
Make sure that the eyeglasses compartment
is always closed while the vehicle is in motion.
Stowage compartment in the center
console Illustration: vehicles with DIRECT SELECT lever
X
To open: press the marking on cover 001A.
i Depending on the vehicle's equipment,
there is an open instead of aclosed
stowage compartmen toranashtray in the
center console. Stowage areas
251Stowage and features Z