2014 FORD F150 ignition
[x] Cancel search: ignitionPage 115 of 472
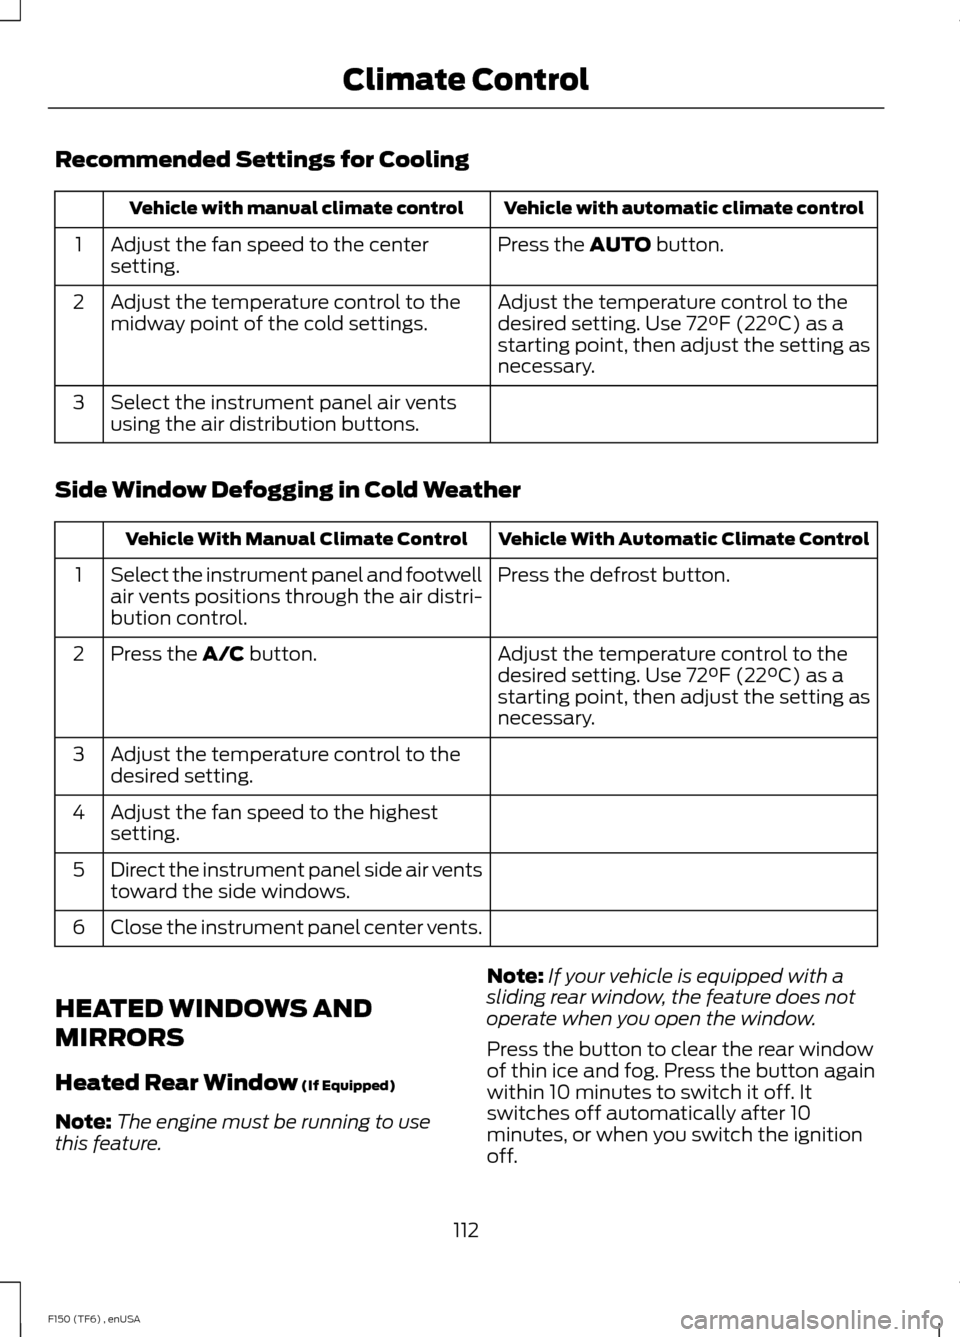
Recommended Settings for Cooling
Vehicle with automatic climate control
Vehicle with manual climate control
Press the AUTO button.
Adjust the fan speed to the center
setting.
1
Adjust the temperature control to the
desired setting. Use 72°F (22°C) as a
starting point, then adjust the setting as
necessary.
Adjust the temperature control to the
midway point of the cold settings.
2
Select the instrument panel air vents
using the air distribution buttons.
3
Side Window Defogging in Cold Weather Vehicle With Automatic Climate Control
Vehicle With Manual Climate Control
Press the defrost button.
Select the instrument panel and footwell
air vents positions through the air distri-
bution control.
1
Adjust the temperature control to the
desired setting. Use 72°F (22°C) as a
starting point, then adjust the setting as
necessary.
Press the
A/C button.
2
Adjust the temperature control to the
desired setting.
3
Adjust the fan speed to the highest
setting.
4
Direct the instrument panel side air vents
toward the side windows.
5
Close the instrument panel center vents.
6
HEATED WINDOWS AND
MIRRORS
Heated Rear Window
(If Equipped)
Note: The engine must be running to use
this feature. Note:
If your vehicle is equipped with a
sliding rear window, the feature does not
operate when you open the window.
Press the button to clear the rear window
of thin ice and fog. Press the button again
within 10 minutes to switch it off. It
switches off automatically after 10
minutes, or when you switch the ignition
off.
112
F150 (TF6) , enUSA Climate Control
Page 116 of 472
Do not use razor blades or other sharp
objects to clean the inside of the rear
window or to remove decals from the
inside of the rear window. This may
cause damage to the heated grid lines.
Your warranty does not cover this
damage.
Heated Exterior Mirror (If Equipped)
Note: Do not remove ice from the mirrors
with a scraper or attempt to readjust the
mirror glass that has frozen in place. These
actions could cause damage to the glass
and mirrors.
Note: Do not clean the housing or glass of
any mirror with harsh abrasives, fuel or other
petroleum-based cleaning products.
The heated mirrors remove ice, mist and
fog when you switch on the heated rear
window.
REMOTE START
(IF EQUIPPED)
The remote start feature allows you to
pre-condition the interior of your vehicle.
The climate control system works to
achieve comfort according to your previous
settings.
Note: You cannot adjust the system during
remote start operation.
Turn the ignition on to return the system
to its previous settings. You can now make
adjustments normally, but you need to turn
certain vehicle-dependent features back
on, such as:
• Heated seats.
• Cooled seats.
• Heated steering wheel.
• Heated mirrors.
• Heated rear window. You can adjust the default remote start
settings using the information display
controls. See
Information Displays
(page 87).
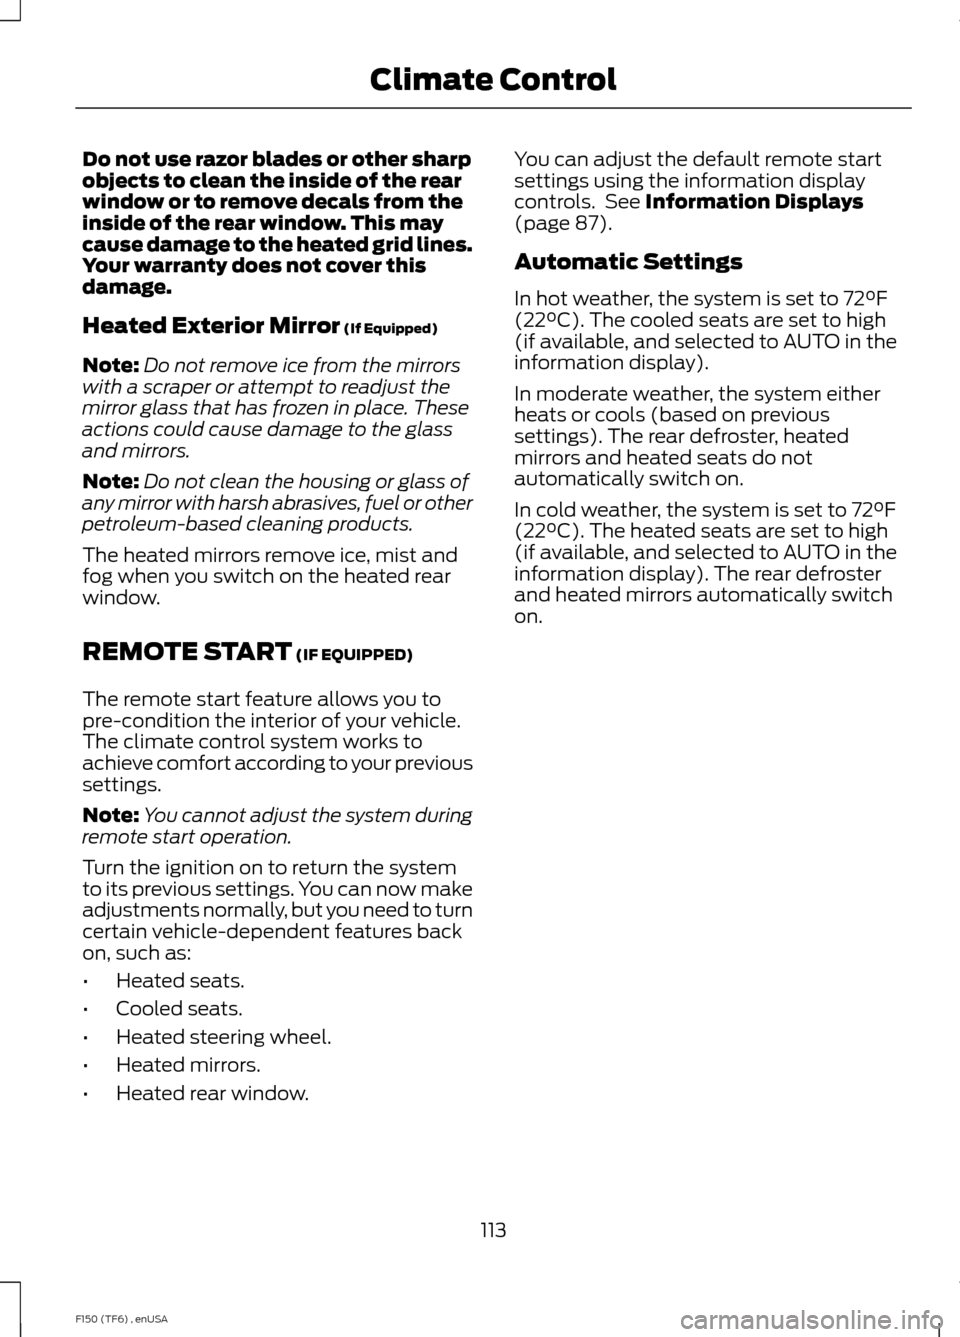
Automatic Settings
In hot weather, the system is set to 72°F
(22°C). The cooled seats are set to high
(if available, and selected to AUTO in the
information display).
In moderate weather, the system either
heats or cools (based on previous
settings). The rear defroster, heated
mirrors and heated seats do not
automatically switch on.
In cold weather, the system is set to 72°F
(22°C). The heated seats are set to high
(if available, and selected to AUTO in the
information display). The rear defroster
and heated mirrors automatically switch
on.
113
F150 (TF6) , enUSA Climate Control
Page 121 of 472
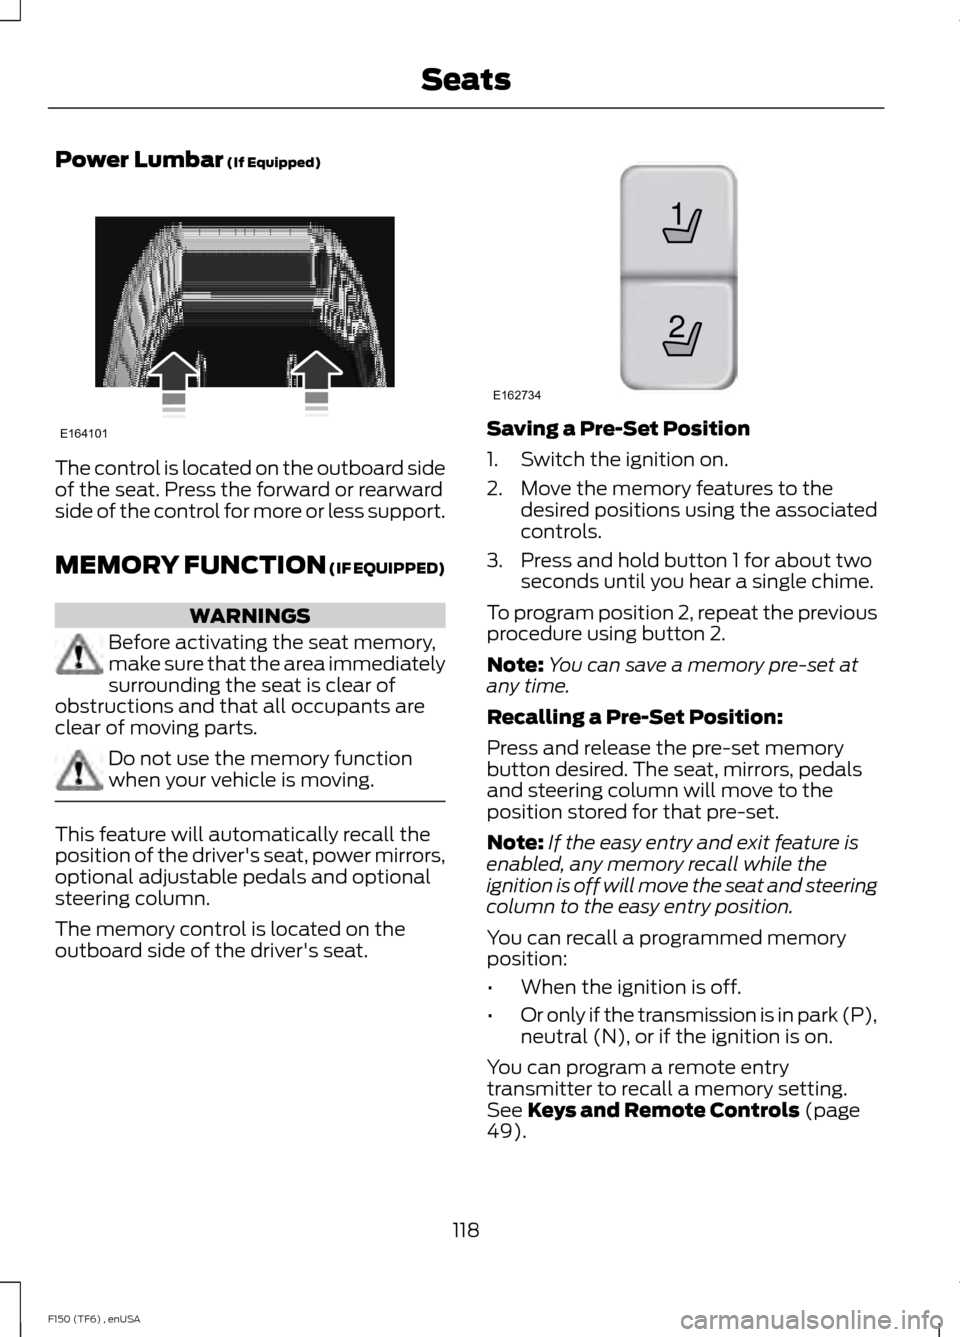
Power Lumbar (If Equipped)
The control is located on the outboard side
of the seat. Press the forward or rearward
side of the control for more or less support.
MEMORY FUNCTION
(IF EQUIPPED)
WARNINGS
Before activating the seat memory,
make sure that the area immediately
surrounding the seat is clear of
obstructions and that all occupants are
clear of moving parts. Do not use the memory function
when your vehicle is moving.
This feature will automatically recall the
position of the driver's seat, power mirrors,
optional adjustable pedals and optional
steering column.
The memory control is located on the
outboard side of the driver's seat. Saving a Pre-Set Position
1. Switch the ignition on.
2. Move the memory features to the
desired positions using the associated
controls.
3. Press and hold button 1 for about two seconds until you hear a single chime.
To program position 2, repeat the previous
procedure using button 2.
Note: You can save a memory pre-set at
any time.
Recalling a Pre-Set Position:
Press and release the pre-set memory
button desired. The seat, mirrors, pedals
and steering column will move to the
position stored for that pre-set.
Note: If the easy entry and exit feature is
enabled, any memory recall while the
ignition is off will move the seat and steering
column to the easy entry position.
You can recall a programmed memory
position:
• When the ignition is off.
• Or only if the transmission is in park (P),
neutral (N), or if the ignition is on.
You can program a remote entry
transmitter to recall a memory setting.
See
Keys and Remote Controls (page
49).
118
F150 (TF6) , enUSA SeatsE164101 21
E162734
Page 122 of 472
You can also program a personal keyless
entry code to recall a memory setting. See
Locks (page 57).
Easy Entry and Exit Feature
(If
Equipped)
If you enable the easy entry and exit
feature, it automatically moves the driver's
seat rearward 2 inches (5 centimeters)
when the transmission selector lever is in
position
P and you remove the key from
the ignition.
If the seat is located less than 2 inches (5
centimeters) from the rear of the seat
track, the seat travel will be less than 2
inches (5 centimeters) rearward.
The driver's seat will return to the previous
position when you put the key in the
ignition.
You can enable or disable this feature
through the information display. See
Information Displays
(page 87).
REAR SEATS
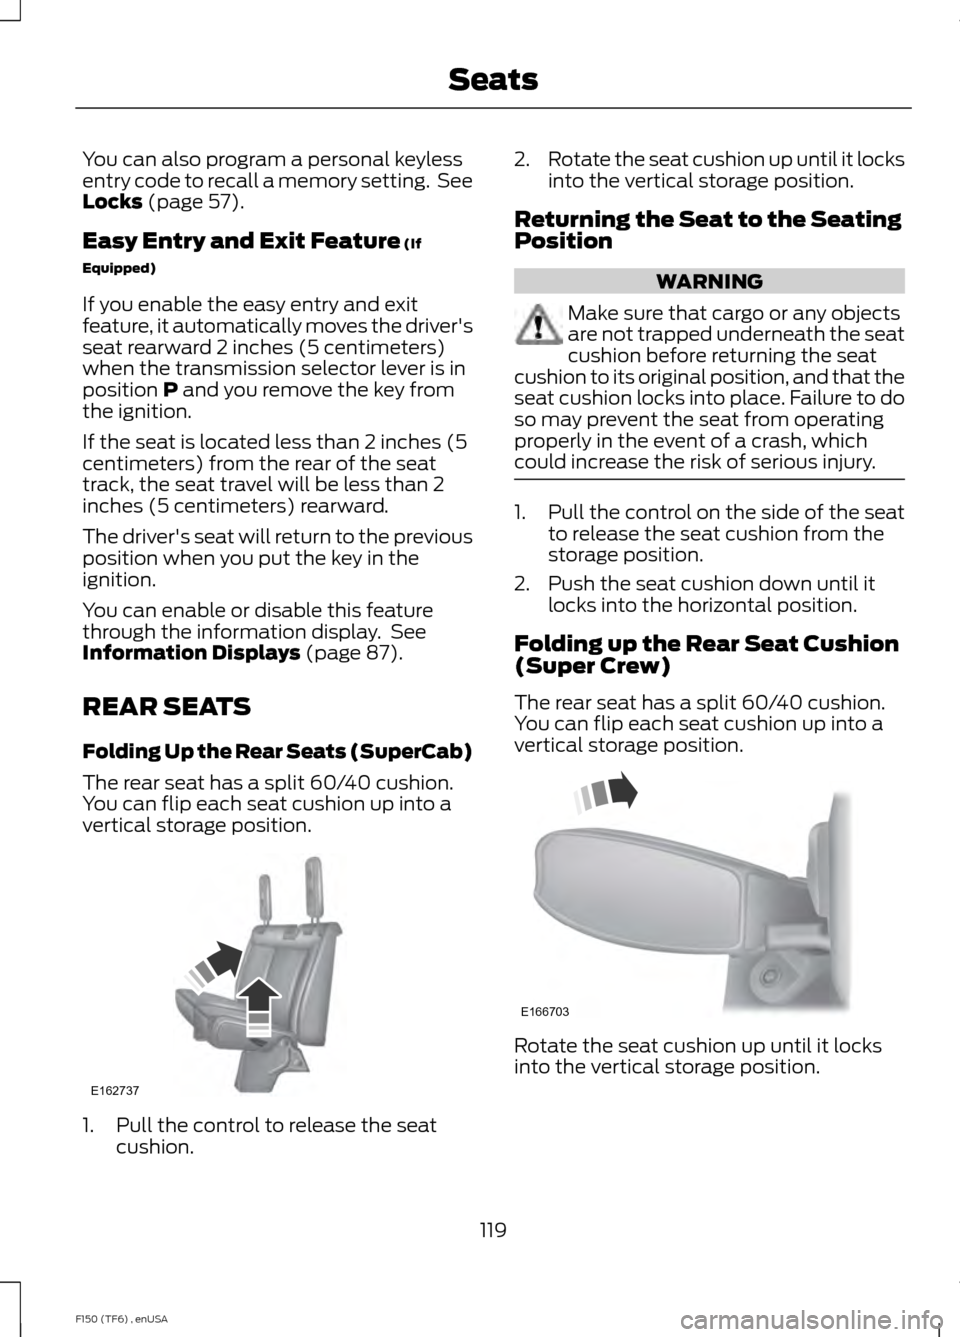
Folding Up the Rear Seats (SuperCab)
The rear seat has a split 60/40 cushion.
You can flip each seat cushion up into a
vertical storage position. 1. Pull the control to release the seat
cushion. 2.
Rotate the seat cushion up until it locks
into the vertical storage position.
Returning the Seat to the Seating
Position WARNING
Make sure that cargo or any objects
are not trapped underneath the seat
cushion before returning the seat
cushion to its original position, and that the
seat cushion locks into place. Failure to do
so may prevent the seat from operating
properly in the event of a crash, which
could increase the risk of serious injury. 1. Pull the control on the side of the seat
to release the seat cushion from the
storage position.
2. Push the seat cushion down until it locks into the horizontal position.
Folding up the Rear Seat Cushion
(Super Crew)
The rear seat has a split 60/40 cushion.
You can flip each seat cushion up into a
vertical storage position. Rotate the seat cushion up until it locks
into the vertical storage position.
119
F150 (TF6) , enUSA SeatsE162737 E166703
Page 124 of 472
Rear Heated Seats (If Equipped)
WARNING
People who are unable to feel pain
to the skin because of advanced age,
chronic illness, diabetes, spinal cord
injury, medication, alcohol use, exhaustion,
or other physical conditions, must exercise
care when using the seat heater. The seat
heater may cause burns even at low
temperatures, especially if used for long
periods of time. Do not place anything on
the seat that insulates against heat, such
as a blanket or cushion, because this may
cause the seat heater to overheat. Do not
puncture the seat with pins, needles, or
other pointed objects because this may
damage the heating element which may
cause the seat heater to overheat. An
overheated seat may cause serious
personal injury. Do not do the following:
•
Place heavy objects on the seat.
• Operate the seat heater if water or any
other liquid is spilled on the seat. Allow
the seat to dry thoroughly.
The rear seat heat controls are located on
the rear door armrest.
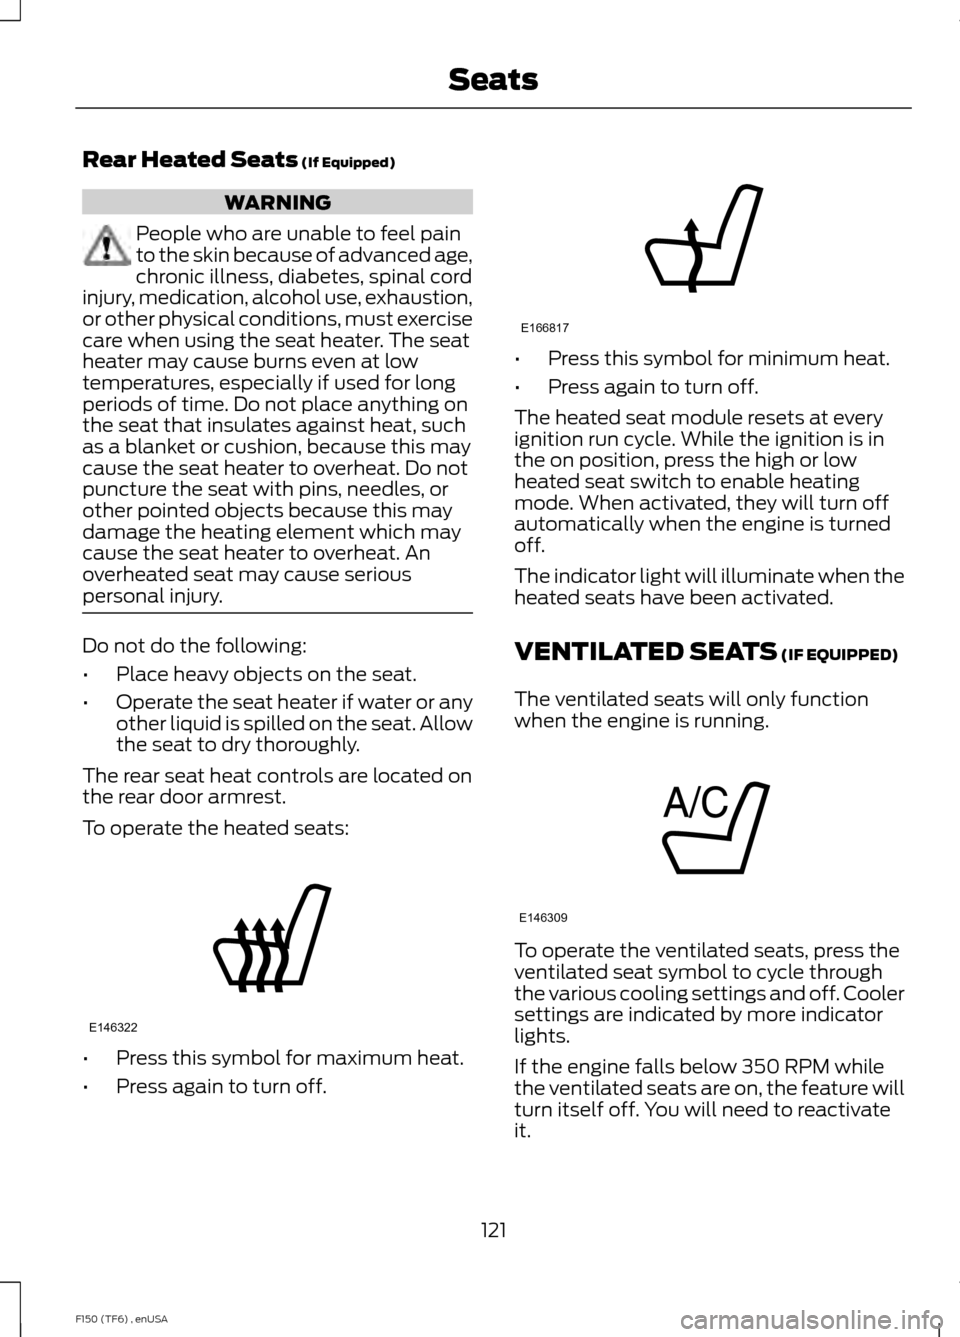
To operate the heated seats: •
Press this symbol for maximum heat.
• Press again to turn off. •
Press this symbol for minimum heat.
• Press again to turn off.
The heated seat module resets at every
ignition run cycle. While the ignition is in
the on position, press the high or low
heated seat switch to enable heating
mode. When activated, they will turn off
automatically when the engine is turned
off.
The indicator light will illuminate when the
heated seats have been activated.
VENTILATED SEATS
(IF EQUIPPED)
The ventilated seats will only function
when the engine is running. To operate the ventilated seats, press the
ventilated seat symbol to cycle through
the various cooling settings and off. Cooler
settings are indicated by more indicator
lights.
If the engine falls below 350 RPM while
the ventilated seats are on, the feature will
turn itself off. You will need to reactivate
it.
121
F150 (TF6) , enUSA SeatsE146322 E166817 E146309
Page 128 of 472
The system includes two primary features,
a garage door opener and a platform for
remote activation of devices within the
home. This functionality allows you to
program garage door openers as well as
security devices and home lighting
systems.
You can find additional system information
online at www.learcar2U.com or by calling
the toll-free help line on 1-866-572-2728.
Rolling Code Programming
Note:
If you do not follow the time-sensitive
instructions, the device will time out and
you will have to repeat the complete
procedure.
Note: It may be helpful to have another
person assist you in programming the
transmitter.
1. Switch the ignition on.
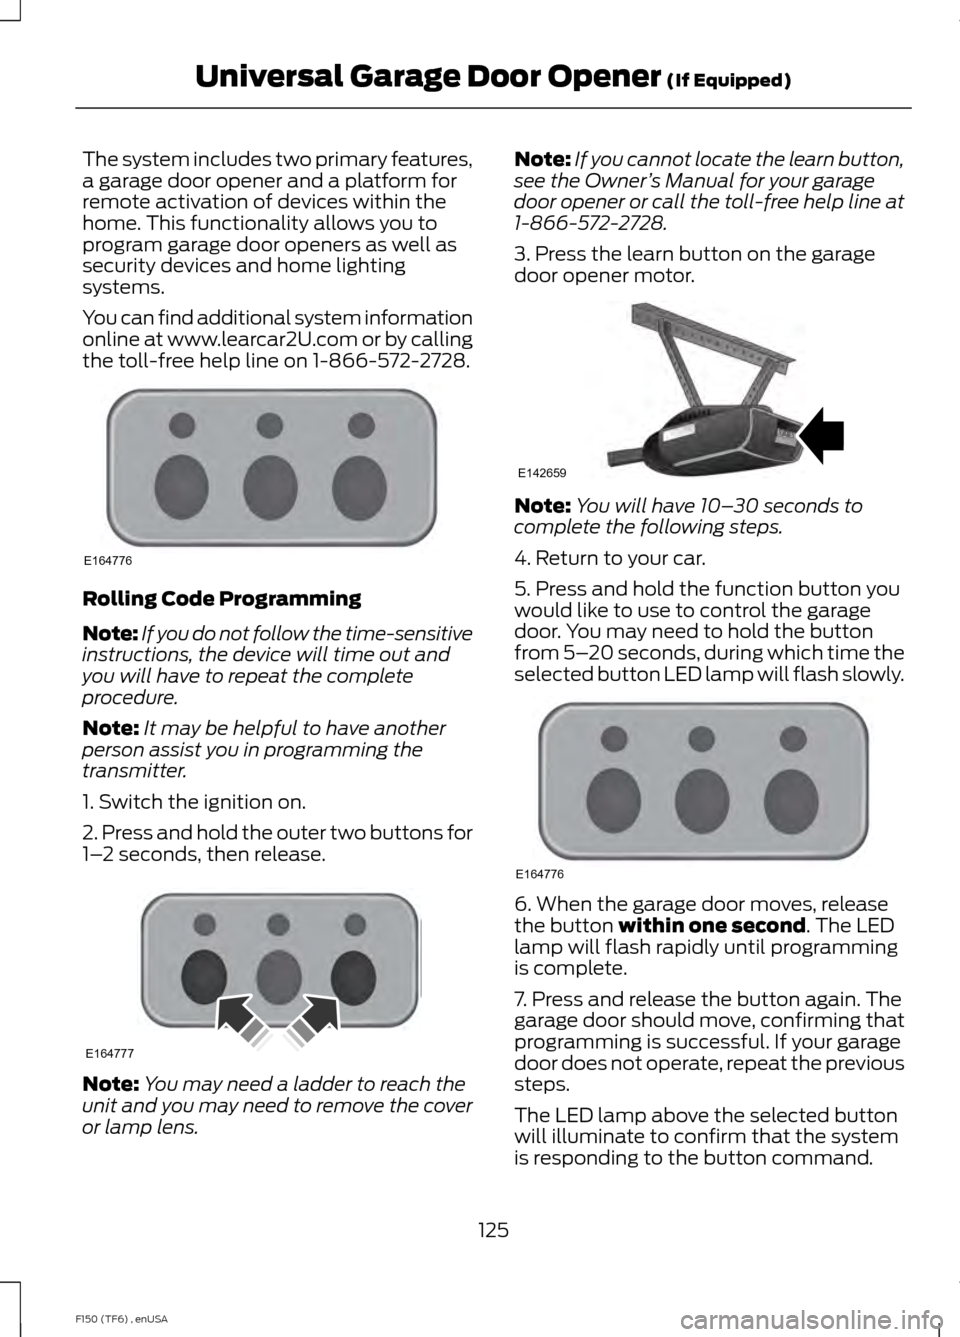
2. Press and hold the outer two buttons for
1– 2 seconds, then release. Note:
You may need a ladder to reach the
unit and you may need to remove the cover
or lamp lens. Note:
If you cannot locate the learn button,
see the Owner ’s Manual for your garage
door opener or call the toll-free help line at
1-866-572-2728.
3. Press the learn button on the garage
door opener motor. Note:
You will have 10– 30 seconds to
complete the following steps.
4. Return to your car.
5. Press and hold the function button you
would like to use to control the garage
door. You may need to hold the button
from 5– 20 seconds, during which time the
selected button LED lamp will flash slowly. 6. When the garage door moves, release
the button within one second. The LED
lamp will flash rapidly until programming
is complete.
7. Press and release the button again. The
garage door should move, confirming that
programming is successful. If your garage
door does not operate, repeat the previous
steps.
The LED lamp above the selected button
will illuminate to confirm that the system
is responding to the button command.
125
F150 (TF6) , enUSA Universal Garage Door Opener
(If Equipped)E164776 E164777 E142659 E164776
Page 129 of 472
To program another rolling code device,
repeat Steps 1 through 6, substituting a
different function button in Step 5.
Fixed Code Programming
Note:
It may be helpful to have another
person assist you in programming the
transmitter.
To program units with fixed code DIP
switches, you will need the garage door
hand-held transmitter, paper and a pen or
pencil.
1. Switch the ignition on.
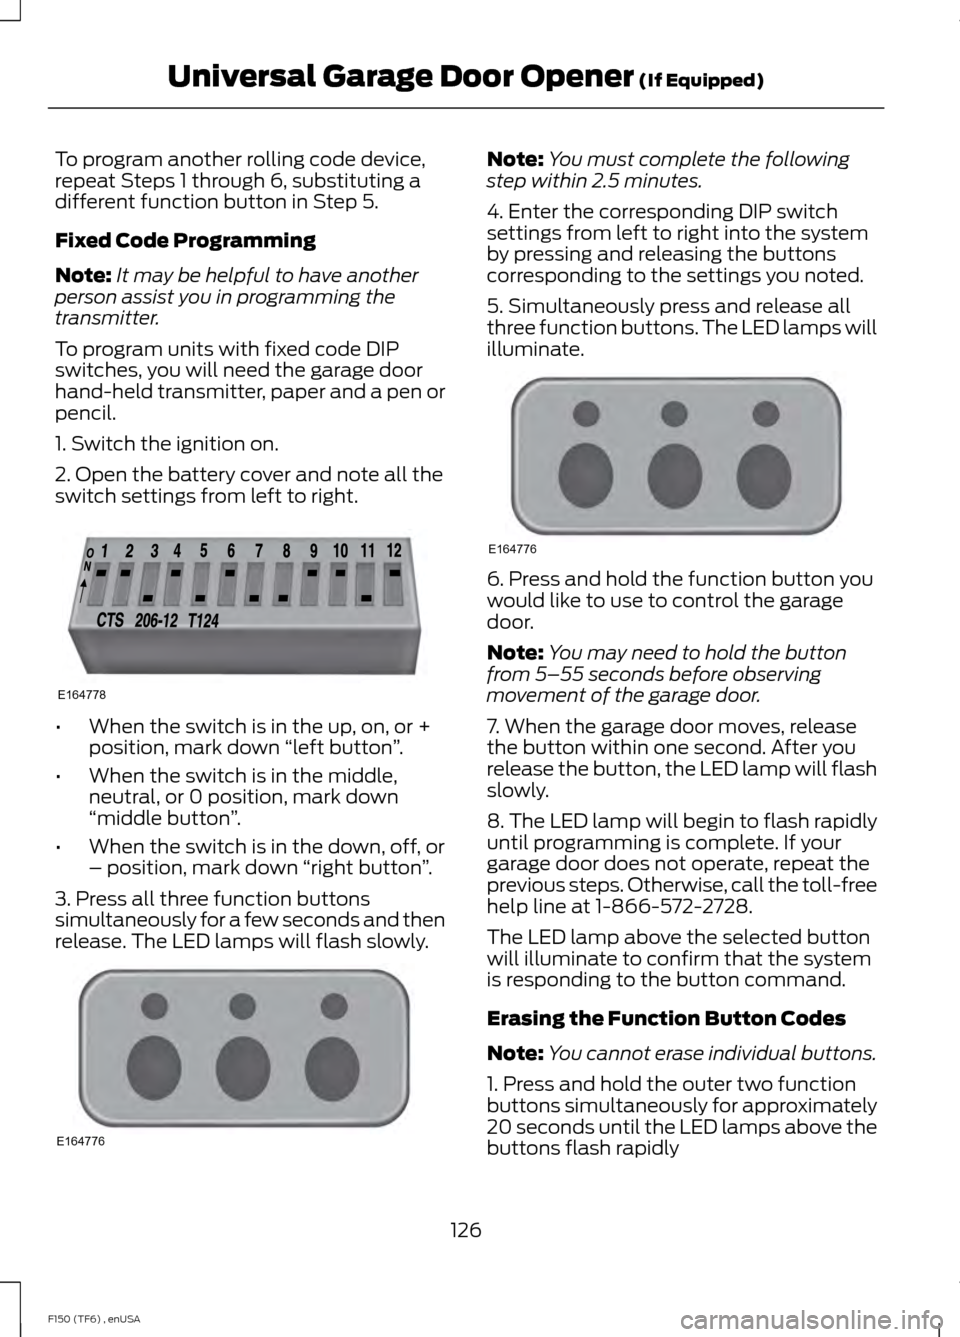
2. Open the battery cover and note all the
switch settings from left to right. •
When the switch is in the up, on, or +
position, mark down “left button ”.
• When the switch is in the middle,
neutral, or 0 position, mark down
“middle button ”.
• When the switch is in the down, off, or
– position, mark down “right button”.
3. Press all three function buttons
simultaneously for a few seconds and then
release. The LED lamps will flash slowly. Note:
You must complete the following
step within 2.5 minutes.
4. Enter the corresponding DIP switch
settings from left to right into the system
by pressing and releasing the buttons
corresponding to the settings you noted.
5. Simultaneously press and release all
three function buttons. The LED lamps will
illuminate. 6. Press and hold the function button you
would like to use to control the garage
door.
Note:
You may need to hold the button
from 5–55 seconds before observing
movement of the garage door.
7. When the garage door moves, release
the button within one second. After you
release the button, the LED lamp will flash
slowly.
8. The LED lamp will begin to flash rapidly
until programming is complete. If your
garage door does not operate, repeat the
previous steps. Otherwise, call the toll-free
help line at 1-866-572-2728.
The LED lamp above the selected button
will illuminate to confirm that the system
is responding to the button command.
Erasing the Function Button Codes
Note: You cannot erase individual buttons.
1. Press and hold the outer two function
buttons simultaneously for approximately
20 seconds until the LED lamps above the
buttons flash rapidly
126
F150 (TF6) , enUSA Universal Garage Door Opener (If Equipped)E164778 E164776 E164776
Page 131 of 472
In-vehicle Programming
This process is to program your hand-held
transmitter and your in-vehicle HomeLink
button.
Note:
Put a new battery in the hand-held
transmitter. This will ensure quicker training
and accurate transmission of the
radio-frequency signal. 1.
With your vehicle parked outside of the
garage, turn your ignition to the on
position, but do not start your vehicle.
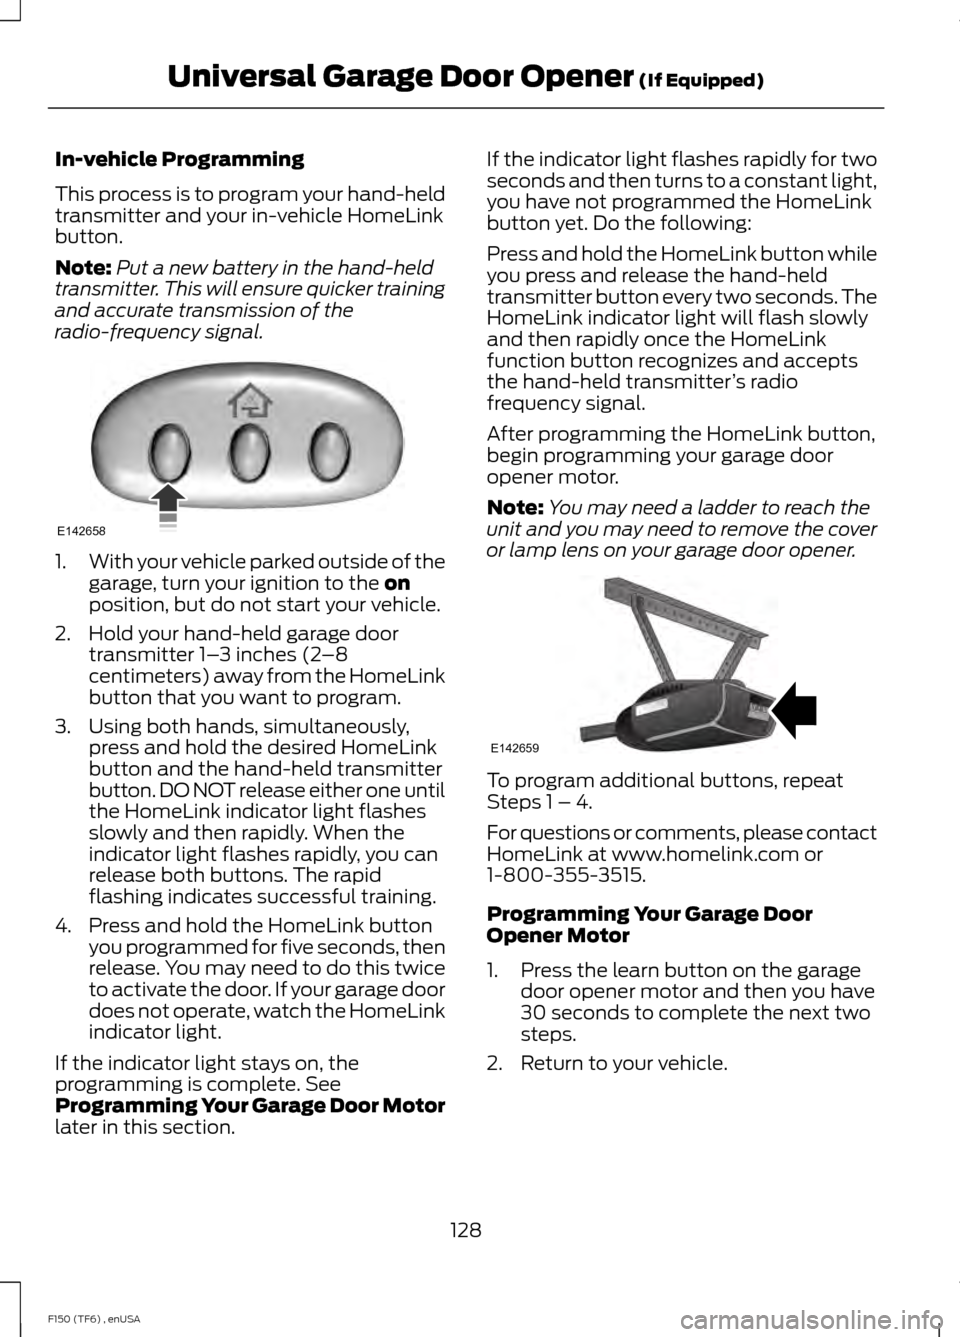
2. Hold your hand-held garage door transmitter 1– 3 inches (2–8
centimeters) away from the HomeLink
button that you want to program.
3. Using both hands, simultaneously, press and hold the desired HomeLink
button and the hand-held transmitter
button. DO NOT release either one until
the HomeLink indicator light flashes
slowly and then rapidly. When the
indicator light flashes rapidly, you can
release both buttons. The rapid
flashing indicates successful training.
4. Press and hold the HomeLink button you programmed for five seconds, then
release. You may need to do this twice
to activate the door. If your garage door
does not operate, watch the HomeLink
indicator light.
If the indicator light stays on, the
programming is complete. See
Programming Your Garage Door Motor
later in this section. If the indicator light flashes rapidly for two
seconds and then turns to a constant light,
you have not programmed the HomeLink
button yet. Do the following:
Press and hold the HomeLink button while
you press and release the hand-held
transmitter button every two seconds. The
HomeLink indicator light will flash slowly
and then rapidly once the HomeLink
function button recognizes and accepts
the hand-held transmitter
’s radio
frequency signal.
After programming the HomeLink button,
begin programming your garage door
opener motor.
Note: You may need a ladder to reach the
unit and you may need to remove the cover
or lamp lens on your garage door opener. To program additional buttons, repeat
Steps 1 – 4.
For questions or comments, please contact
HomeLink at www.homelink.com or
1-800-355-3515.
Programming Your Garage Door
Opener Motor
1. Press the learn button on the garage
door opener motor and then you have
30 seconds to complete the next two
steps.
2. Return to your vehicle.
128
F150 (TF6) , enUSA Universal Garage Door Opener
(If Equipped)E142658 E142659