2014 FORD F150 ignition
[x] Cancel search: ignitionPage 65 of 472

1.
Insert the first previously programmed
coded key into the ignition.
2. Switch the ignition from off to on. Keep
the ignition on for at least three
seconds, but no more than 10 seconds.
3. Switch the ignition off and remove the
first coded key from the ignition.
4. After three seconds but within 10 seconds of switching the ignition off,
insert the second previously coded key
into the ignition.
5. Switch the ignition from off to on. Keep
the ignition on for at least three
seconds, but no more than 10 seconds.
6. Switch the ignition off and remove the
second previously programmed coded
key from the ignition.
7. After three seconds but within 10 seconds of switching the ignition off
and removing the previously
programmed coded key, insert the new
unprogrammed key into the ignition.
8. Switch the ignition from off to on. Keep
the ignition on for at least six seconds
until you hear the door locks cycle.
9. Remove the newly programmed coded
key from the ignition.
The key will start the engine if
programming is successful. You can
operate the remote entry system if the new
key is an integrated keyhead transmitter.
If programming was not successful, wait
20 seconds and repeat Steps 1 through 8.
If you are still unsuccessful, take your
vehicle to an authorized dealer.
ANTI-THEFT ALARM (IF EQUIPPED)
The system warns you of an unauthorized
entry to your vehicle. It triggers if any door
or the hood opens without using the key,
remote control or keyless entry keypad. The direction indicators flash and the horn
sounds if the system triggers while the
alarm is armed.
Take all remote controls to an authorized
dealer if there is any potential alarm
problem with your vehicle.
Arming the Alarm
The alarm is ready to arm when there is
not a key in the ignition. Electronically lock
the vehicle to arm the alarm.
The direction indicators flash once after
you lock the vehicle. This indicates the
alarm is in the pre-armed mode. It will fully
arm in 20 seconds.
Disarming the Alarm
Disarm the alarm by any of the following
actions:
•
Press the power door unlock button
within the 20-second pre-armed mode.
• Unlock the doors with the remote
control or keyless entry keypad.
• Switch the ignition on or start the
vehicle.
• Use a key in the driver door to unlock
the vehicle, then switch the ignition on
within 12 seconds.
Note: Pressing the panic button on the
remote control will stop the horn and signal
indicators, but will not disarm the system.
62
F150 (TF6) , enUSA Security
Page 69 of 472

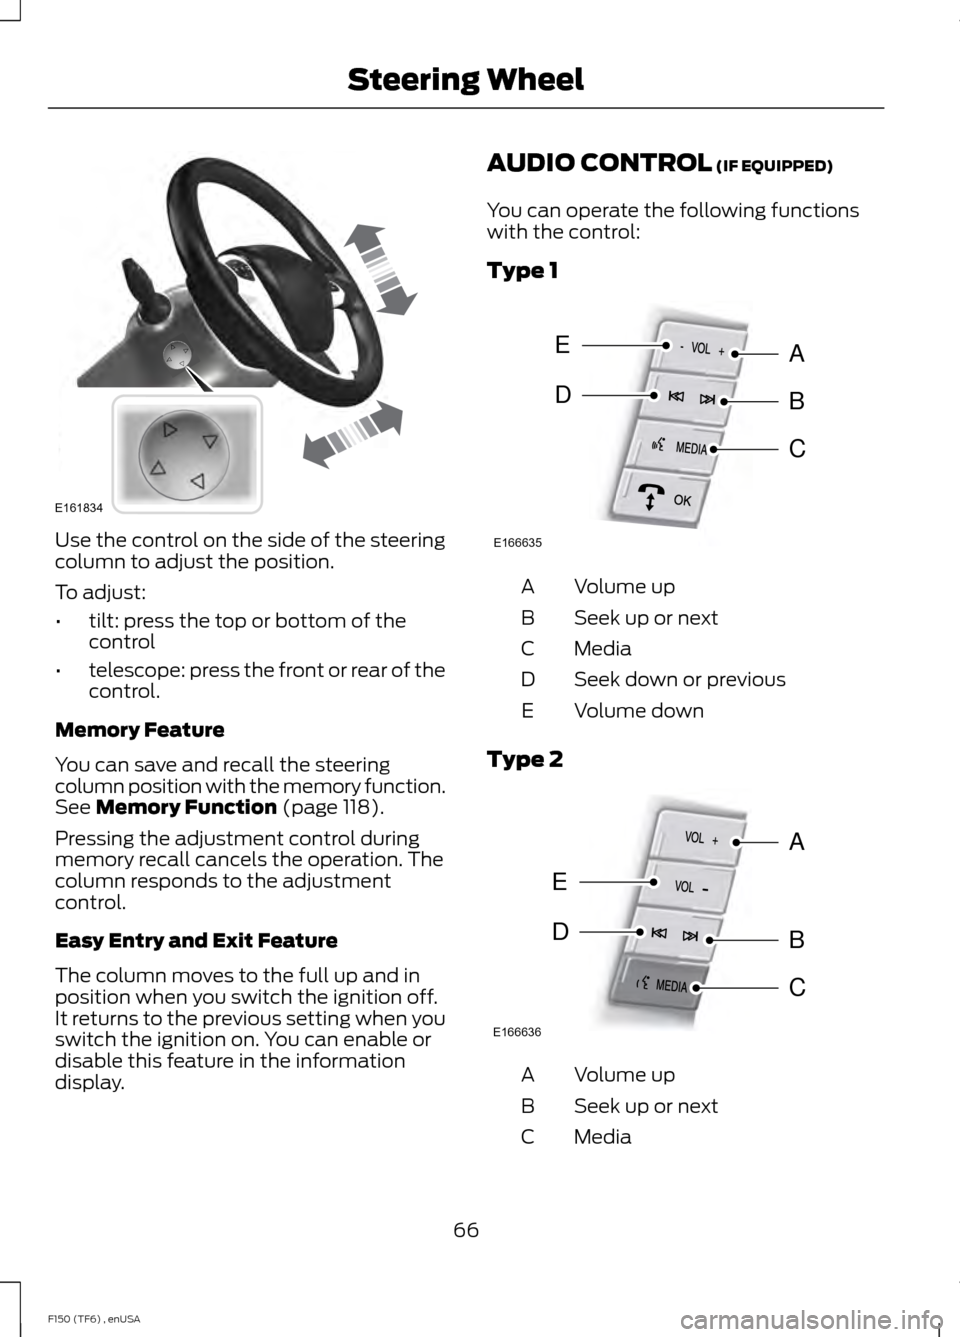
Use the control on the side of the steering
column to adjust the position.
To adjust:
•
tilt: press the top or bottom of the
control
• telescope: press the front or rear of the
control.
Memory Feature
You can save and recall the steering
column position with the memory function.
See Memory Function (page 118).
Pressing the adjustment control during
memory recall cancels the operation. The
column responds to the adjustment
control.
Easy Entry and Exit Feature
The column moves to the full up and in
position when you switch the ignition off.
It returns to the previous setting when you
switch the ignition on. You can enable or
disable this feature in the information
display. AUDIO CONTROL
(IF EQUIPPED)
You can operate the following functions
with the control:
Type 1 Volume up
A
Seek up or next
B
Media
C
Seek down or previous
D
Volume down
E
Type 2 Volume up
A
Seek up or next
B
Media
C
66
F150 (TF6) , enUSA Steering WheelE161834 E166635
E
DB
A
C E166636
E
DB
A
C
Page 74 of 472

LIGHTING CONTROL
•
Rotate the headlamp control clockwise
to the first position to turn on the
parking lamps, instrument panel lamps,
license plate lamps and tail lamps.
• Rotate clockwise to the second
position to also turn on the headlamps.
High Beams Push the lever toward the instrument panel
to switch the high beams on.
Push the lever toward the instrument panel
again or pull the lever towards you to
switch the high beams off. Headlamp Flasher
Pull the lever toward you to flash the
headlamps and release the lever to switch
the headlamps off.
AUTOLAMPS (IF EQUIPPED)
The autolamp system provides light
sensitive automatic on-off control of the
exterior lights normally controlled by the
headlamp control.
The autolamp system also keeps the lights
on for a predetermined amount of time
after the ignition switch is turned to off.
Using the message center, you can select
a delay from 0–
180 seconds.
71
F150 (TF6) , enUSA LightingE163267 E167827 E163268 E163269
A
Page 75 of 472

•
To turn autolamps on, rotate the
control to the fourth position.
• To turn autolamps off, rotate the
control to the first, second, or third
position.
INSTRUMENT LIGHTING
DIMMER Use the instrument lighting dimmer control
to adjust the brightness of the instrument
panel and all applicable lit components in
your vehicle.
•
Tap the left or right of the control to
the first detent to brighten or dim all
interior lit components incrementally.
• Press and hold the left or right of the
control to the first detent until the
desired lighting level is reached.
• Press and hold the right of the control
to the second detent to switch the
interior lights on.
• Press and hold the left of the control
to the second detent to switch the
interior lights off. DAYTIME RUNNING LAMPS (IF
EQUIPPED) WARNING
Always remember to switch your
headlamps on in low light situations
or during inclement weather. The
system does not activate the tail lamps
and may not provide adequate lighting
during these conditions. Failure to activate
your headlamps under these conditions
may result in a collision. The system turns the headlamps on with
a reduced intensity output (halogen
headlamps) or turns the front turn lamps
on (HID headlamps) in daylight conditions.
To switch the system on:
1. Ignition switch is in the on position.
2. Switch the lighting control to the off,
autolamp or parking lamp position.
FRONT FOG LAMPS
(IF EQUIPPED) The headlamp control also operates the
fog lamps. The fog lamps can be turned
on only when the headlamp control is in
the parking lamp (second) position,
headlamps on (third) position, or autolamp
(fourth) position, and the high beams are
not turned on.
72
F150 (TF6) , enUSA LightingE166125 E163271
A
Page 76 of 472

Pull headlamp control towards you to turn
fog lamps on. The fog lamp indicator light
will illuminate.
DIRECTION INDICATORS
The turn signal lever does not mechanically
lock in the upward or downward position
when activated. The turn signal control
activation and cancellation is electronic.
•
To operate the left turn signal, push the
lever down until it stops and release.
• To operate the right turn signal, push
the lever up until it stops and release.
• To manually cancel turn signal
operation, push the lever again in either
direction.
Lane Change
To indicate a left or right lane change:
• Push the lever up/down to the first
stop position and release. The turn
signals will flash three times and stop.
• Push the lever up/down to the first
stop position and hold. The turn signals
will flash for as long as the lever is held
in this position. INTERIOR LAMPS
Front Row Map Lamps (if
equipped)
To switch on the map lamps, press the
outer edge of the clear lens.
The front row map lamp will automatically
turn on when:
•
Any door is opened.
• You press and hold the instrument
panel dimmer switch to the right past
the second detent.
• Any of the remote entry controls are
pressed and the ignition is in the off
position.
Rear Dome Lamp (If Equipped) The rear dome lamp can be turned on or
off by sliding the control.
73
F150 (TF6) , enUSA LightingE163272 E166237 E166238
Page 77 of 472

•
ON: The dome light will stay on.
• DOOR
or middle position: The dome
light will only come on if a door is
opened.
• OFF
: The lamp will not come on at all.
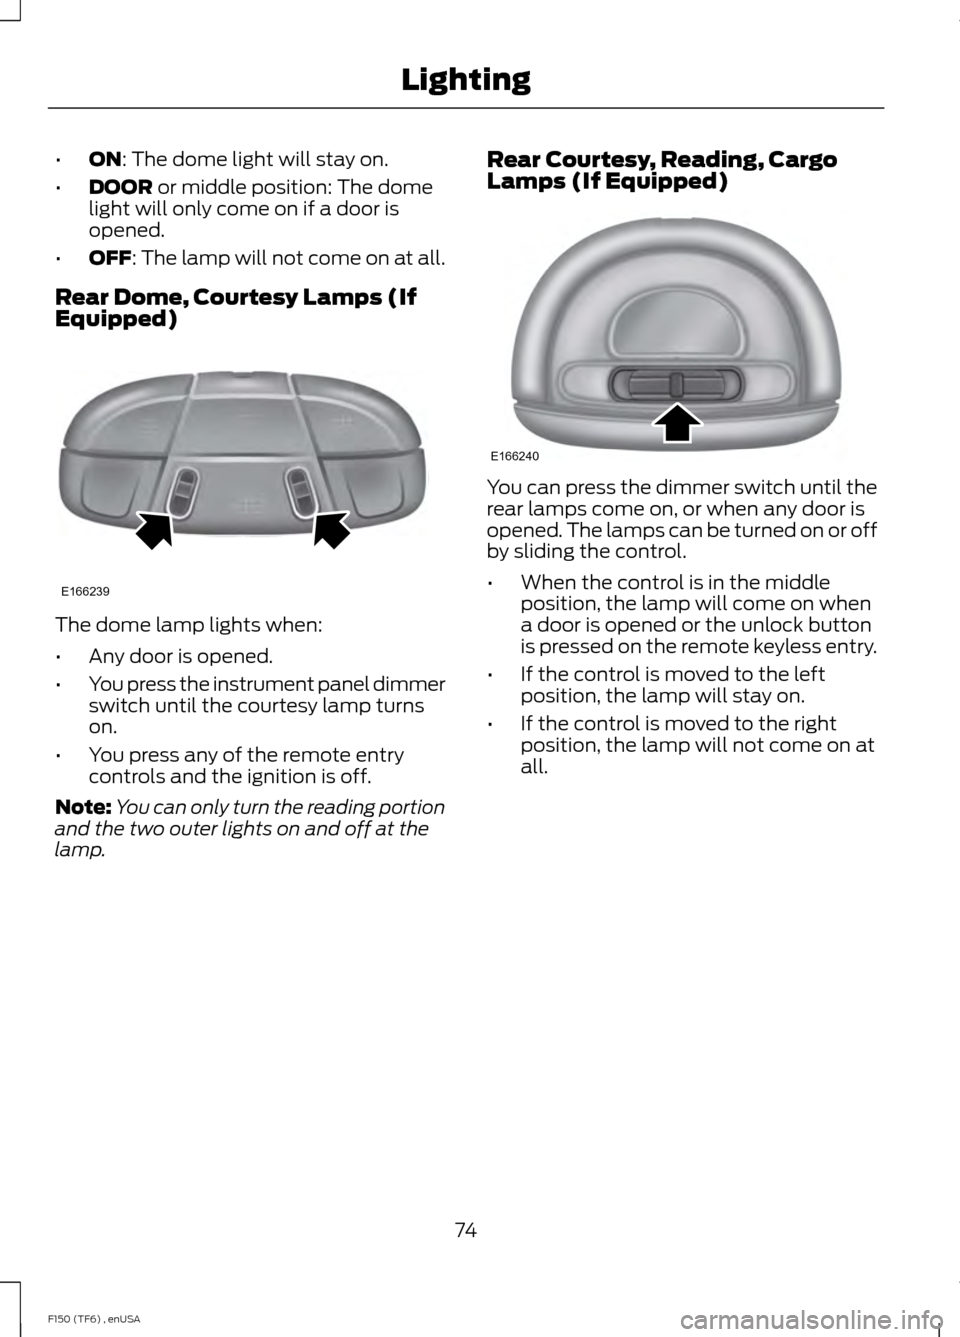
Rear Dome, Courtesy Lamps (If
Equipped) The dome lamp lights when:
•
Any door is opened.
• You press the instrument panel dimmer
switch until the courtesy lamp turns
on.
• You press any of the remote entry
controls and the ignition is off.
Note: You can only turn the reading portion
and the two outer lights on and off at the
lamp. Rear Courtesy, Reading, Cargo
Lamps (If Equipped) You can press the dimmer switch until the
rear lamps come on, or when any door is
opened. The lamps can be turned on or off
by sliding the control.
•
When the control is in the middle
position, the lamp will come on when
a door is opened or the unlock button
is pressed on the remote keyless entry.
• If the control is moved to the left
position, the lamp will stay on.
• If the control is moved to the right
position, the lamp will not come on at
all.
74
F150 (TF6) , enUSA LightingE166239 E166240
Page 79 of 472

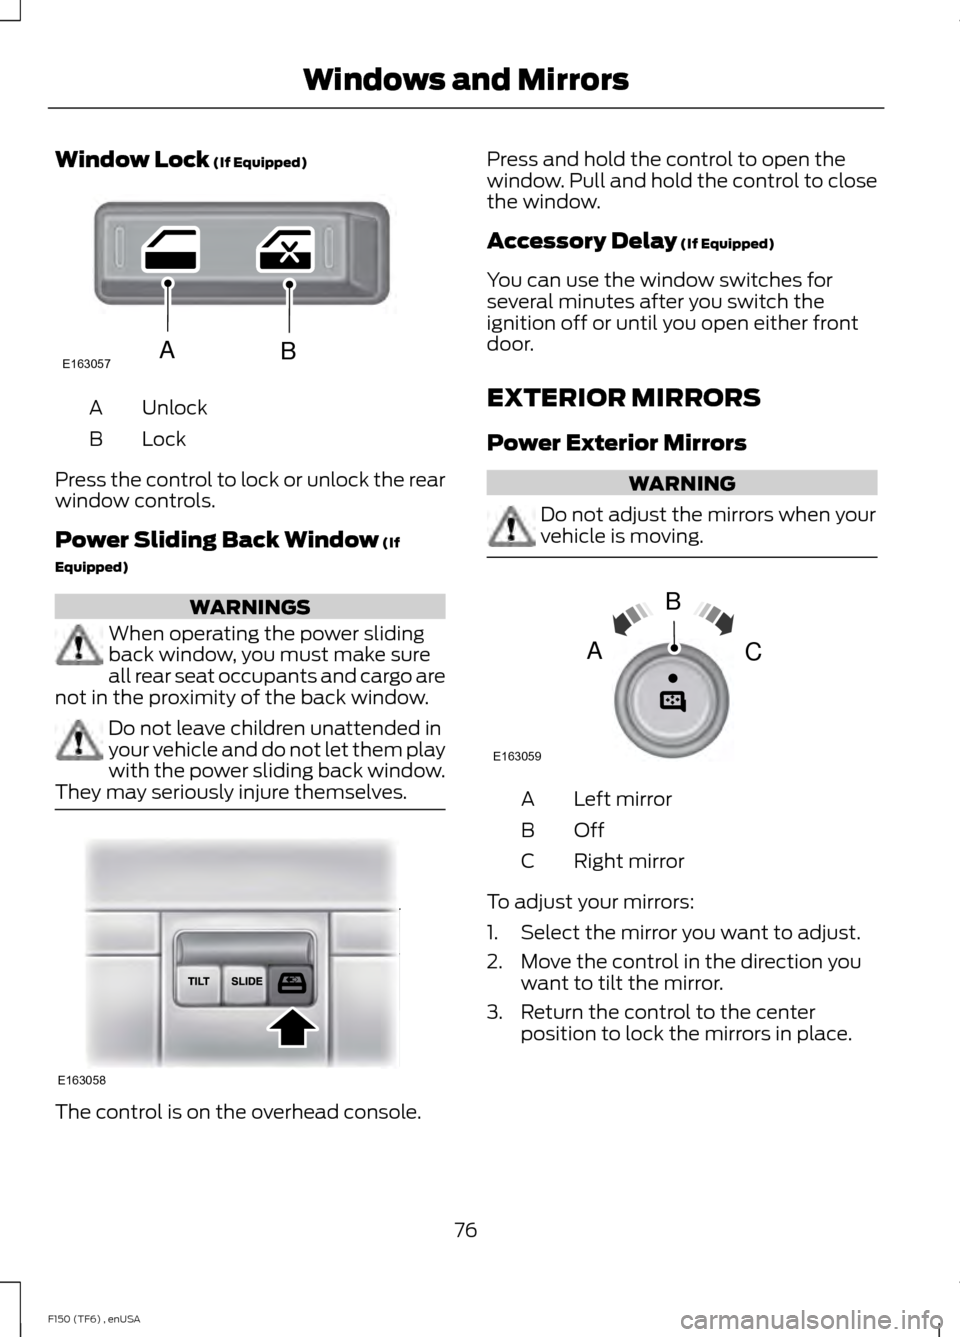
Window Lock (If Equipped)
Unlock
A
Lock
B
Press the control to lock or unlock the rear
window controls.
Power Sliding Back Window
(If
Equipped) WARNINGS
When operating the power sliding
back window, you must make sure
all rear seat occupants and cargo are
not in the proximity of the back window. Do not leave children unattended in
your vehicle and do not let them play
with the power sliding back window.
They may seriously injure themselves. The control is on the overhead console. Press and hold the control to open the
window. Pull and hold the control to close
the window.
Accessory Delay
(If Equipped)
You can use the window switches for
several minutes after you switch the
ignition off or until you open either front
door.
EXTERIOR MIRRORS
Power Exterior Mirrors WARNING
Do not adjust the mirrors when your
vehicle is moving.
Left mirror
A
OffB
Right mirror
C
To adjust your mirrors:
1. Select the mirror you want to adjust.
2. Move the control in the direction you want to tilt the mirror.
3. Return the control to the center position to lock the mirrors in place.
76
F150 (TF6) , enUSA Windows and MirrorsE163057AB E163058 E163059
B
AC
Page 85 of 472

Engine Oil Pressure Gauge
Indicates engine oil pressure. The needle
should stay in the normal operating range
(between L and H). If the needle falls
below the normal range, stop the vehicle,
turn off the engine and check the engine
oil level. Add oil if needed. If the oil level is
correct, have your vehicle checked by your
authorized dealer.
Engine Coolant Temperature
Gauge
WARNING
Never remove the coolant reservoir
cap while the engine is running or hot.
Indicates engine coolant temperature. At
normal operating temperature, the level
indicator will be in the normal range. If the
engine coolant temperature exceeds the
normal range, stop the vehicle as soon as
safely possible, switch off the engine and
let the engine cool.
Fuel Gauge
Switch the ignition on. The fuel gauge will
indicate approximately how much fuel is
left in the fuel tank. The fuel gauge may
vary slightly when your vehicle is moving
or on a gradient. The arrow adjacent to the
fuel pump symbol indicates on which side
of the vehicle the fuel filler door is located.
Transmission Fluid Temperature
Gauge
Indicates transmission fluid temperature.
At normal operating temperature, the level
indicator will be in the normal range. If the
transmission fluid temperature exceeds
the normal range, stop the vehicle as soon
as safely possible and verify the airflow is
not restricted such as snow or debris
blocking airflow through the grill. Also,
higher than normal operating temperature can be caused by special operation
conditions (i.e. snowplowing, towing or
off-road use). Refer to Special operating
conditions in the scheduled maintenance
information for instructions. Operating the
transmission for extended periods of time
with the gauge in the higher than normal
area may cause internal transmission
damage. Altering the severity of the driving
conditions is recommended to lower the
transmission temperature into the normal
range. If the gauge continues to show high
temperatures, see your authorized dealer.
Information Display
Odometer
Located in the bottom of the information
display Registers the accumulated
distance your vehicle has traveled.
Trip Computer
See General Information (page 87).
Vehicle Settings and Personalization
See
General Information (page 87).
WARNING LAMPS AND
INDICATORS
The following warning lamps and
indicators will alert you to a vehicle
condition that may become serious. Some
lamps will illuminate when you start your
vehicle to make sure they work. If any
lamps remain on after starting your vehicle,
refer to the respective system warning
lamp for further information.
Note: Some warning indicators appear in
the information display and function the
same as a warning lamp but do not display
when you start your vehicle.
82
F150 (TF6) , enUSA Instrument Cluster