2014 FORD F150 oil change
[x] Cancel search: oil changePage 92 of 472
Note:
Some options may appear slightly
different or not at all if the items are
optional. Note:
When returning to the SETUP menu
and a non-English language has been
selected, HOLD RESET FOR ENGLISH will
be displayed to change back to English.
Press and hold the RESET button to change
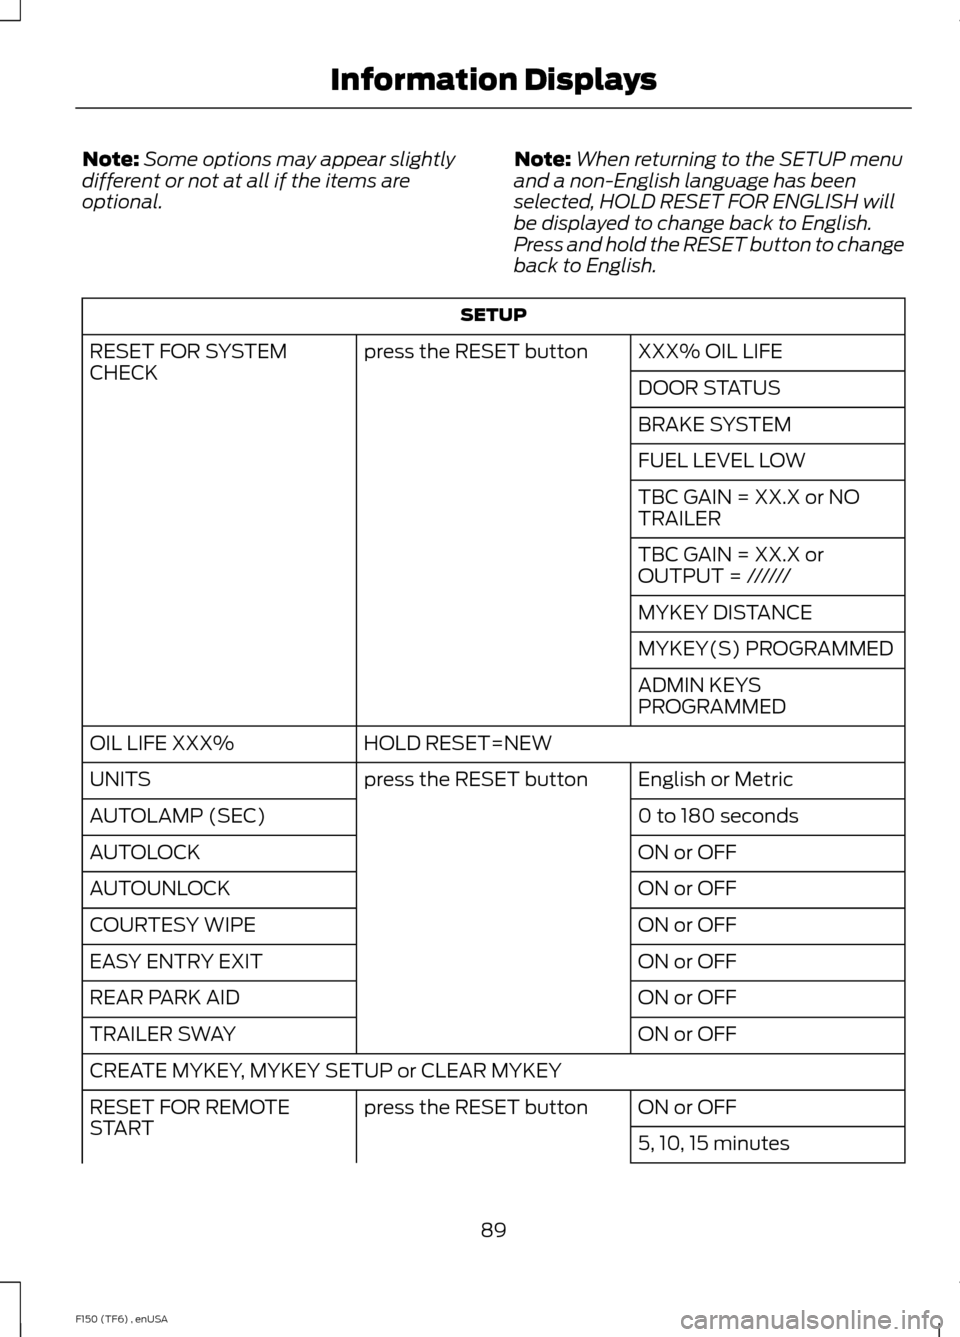
back to English. SETUP
XXX% OIL LIFE
press the RESET button
RESET FOR SYSTEM
CHECK
DOOR STATUS
BRAKE SYSTEM
FUEL LEVEL LOW
TBC GAIN = XX.X or NO
TRAILER
TBC GAIN = XX.X or
OUTPUT = //////
MYKEY DISTANCE
MYKEY(S) PROGRAMMED
ADMIN KEYS
PROGRAMMED
HOLD RESET=NEW
OIL LIFE XXX%
English or Metric
press the RESET button
UNITS
0 to 180 seconds
AUTOLAMP (SEC)
ON or OFF
AUTOLOCK
ON or OFF
AUTOUNLOCK
ON or OFF
COURTESY WIPE
ON or OFF
EASY ENTRY EXIT
ON or OFF
REAR PARK AID
ON or OFF
TRAILER SWAY
CREATE MYKEY, MYKEY SETUP or CLEAR MYKEY
ON or OFF
press the RESET button
RESET FOR REMOTE
START
5, 10, 15 minutes
89
F150 (TF6) , enUSA Information Displays
Page 93 of 472
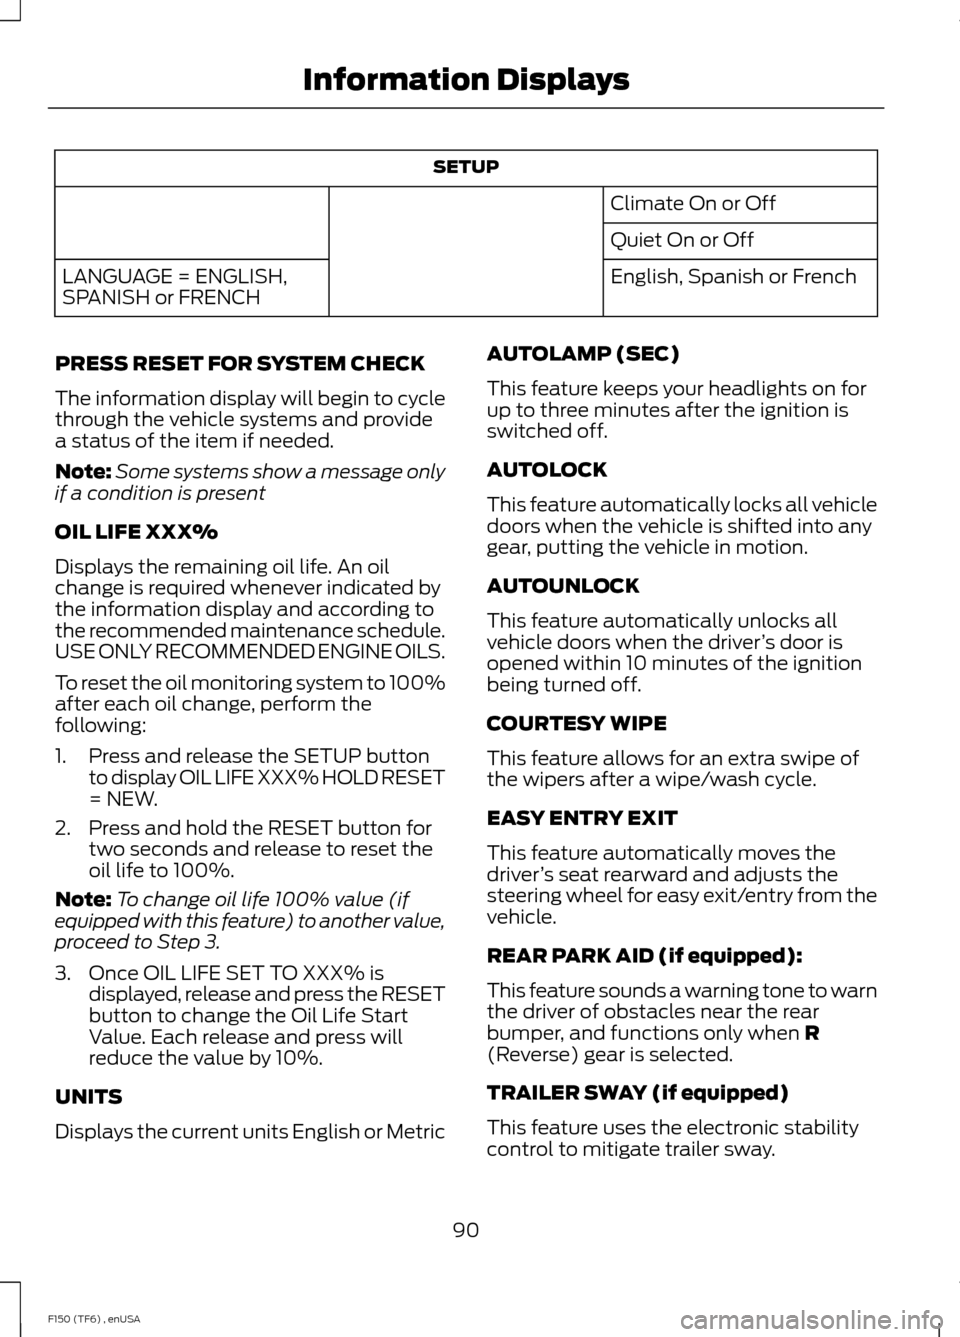
SETUP
Climate On or Off
Quiet On or Off
English, Spanish or French
LANGUAGE = ENGLISH,
SPANISH or FRENCH
PRESS RESET FOR SYSTEM CHECK
The information display will begin to cycle
through the vehicle systems and provide
a status of the item if needed.
Note: Some systems show a message only
if a condition is present
OIL LIFE XXX%
Displays the remaining oil life. An oil
change is required whenever indicated by
the information display and according to
the recommended maintenance schedule.
USE ONLY RECOMMENDED ENGINE OILS.
To reset the oil monitoring system to 100%
after each oil change, perform the
following:
1. Press and release the SETUP button to display OIL LIFE XXX% HOLD RESET
= NEW.
2. Press and hold the RESET button for two seconds and release to reset the
oil life to 100%.
Note: To change oil life 100% value (if
equipped with this feature) to another value,
proceed to Step 3.
3. Once OIL LIFE SET TO XXX% is displayed, release and press the RESET
button to change the Oil Life Start
Value. Each release and press will
reduce the value by 10%.
UNITS
Displays the current units English or Metric AUTOLAMP (SEC)
This feature keeps your headlights on for
up to three minutes after the ignition is
switched off.
AUTOLOCK
This feature automatically locks all vehicle
doors when the vehicle is shifted into any
gear, putting the vehicle in motion.
AUTOUNLOCK
This feature automatically unlocks all
vehicle doors when the driver
’s door is
opened within 10 minutes of the ignition
being turned off.
COURTESY WIPE
This feature allows for an extra swipe of
the wipers after a wipe/wash cycle.
EASY ENTRY EXIT
This feature automatically moves the
driver ’s seat rearward and adjusts the
steering wheel for easy exit/entry from the
vehicle.
REAR PARK AID (if equipped):
This feature sounds a warning tone to warn
the driver of obstacles near the rear
bumper, and functions only when R
(Reverse) gear is selected.
TRAILER SWAY (if equipped)
This feature uses the electronic stability
control to mitigate trailer sway.
90
F150 (TF6) , enUSA Information Displays
Page 104 of 472
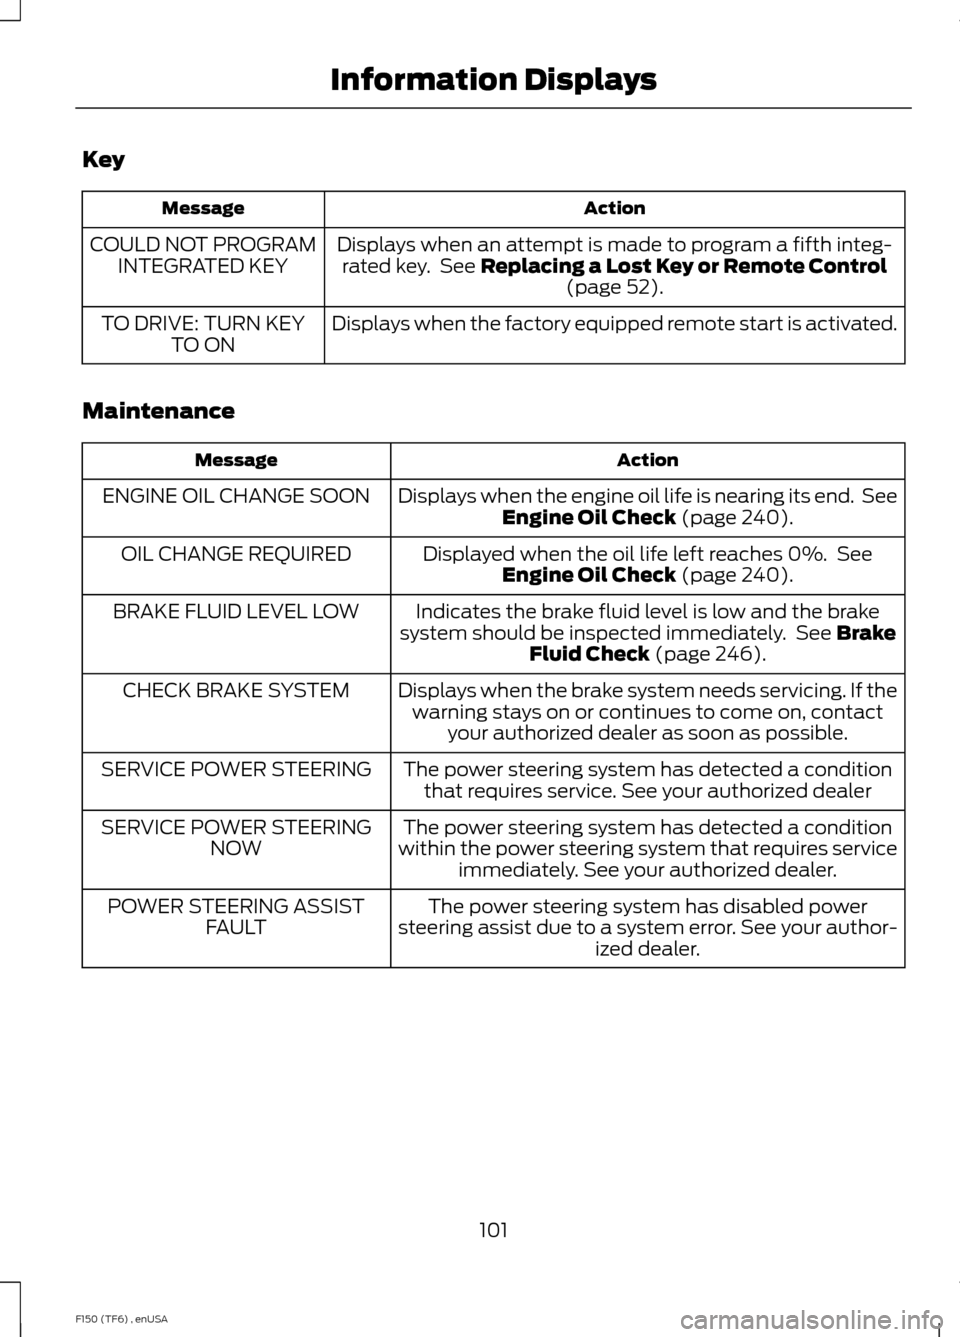
Key
Action
Message
Displays when an attempt is made to program a fifth integ-rated key. See Replacing a Lost Key or Remote Control (page 52).
COULD NOT PROGRAM
INTEGRATED KEY
Displays when the factory equipped remote start is activated.
TO DRIVE: TURN KEY
TO ON
Maintenance Action
Message
Displays when the engine oil life is nearing its end. SeeEngine Oil Check
(page 240).
ENGINE OIL CHANGE SOON
Displayed when the oil life left reaches 0%. SeeEngine Oil Check
(page 240).
OIL CHANGE REQUIRED
Indicates the brake fluid level is low and the brake
system should be inspected immediately. See
Brake
Fluid Check (page 246).
BRAKE FLUID LEVEL LOW
Displays when the brake system needs servicing. If thewarning stays on or continues to come on, contact your authorized dealer as soon as possible.
CHECK BRAKE SYSTEM
The power steering system has detected a conditionthat requires service. See your authorized dealer
SERVICE POWER STEERING
The power steering system has detected a condition
within the power steering system that requires service immediately. See your authorized dealer.
SERVICE POWER STEERING
NOW
The power steering system has disabled power
steering assist due to a system error. See your author- ized dealer.
POWER STEERING ASSIST
FAULT
101
F150 (TF6) , enUSA Information Displays
Page 213 of 472
BREAKING-IN
You need to break in new tires for
approximately 300 miles (480
kilometers). During this time, your vehicle
may exhibit some unusual driving
characteristics.
Avoid driving too fast during the first 1000
miles (1600 kilometers). Vary your speed
frequently and change up through the
gears early. Do not labor the engine.
Do not tow during the first 1000 miles
(1600 kilometers).
ECONOMICAL DRIVING
Your fuel economy is affected by several
things, such as how you drive, the
conditions you drive under, and how you
maintain your vehicle.
You may improve your fuel economy by
keeping these things in mind:
•
Accelerate and slow down in a smooth,
moderate fashion.
• Drive at steady speeds without
stopping.
• Anticipate stops; slowing down may
eliminate the need to stop.
• Combine errands and minimize
stop-and-go driving.
• Close the windows for high-speed
driving.
• Drive at reasonable speeds (traveling
at 55 mph [88 km/h] uses 15% less
fuel than traveling at 65 mph [105
km/h]).
• Keep the tires properly inflated and use
only the recommended size.
• Use the recommended engine oil.
• Perform all regularly scheduled
maintenance. Avoid these actions; they reduce your fuel
economy:
•
Sudden accelerations or hard
accelerations.
• Revving the engine before turning it off.
• Idle for periods longer than one minute.
• Warm up your vehicle on cold
mornings.
• Use the air conditioner or front
defroster.
• Use the speed control in hilly terrain.
• Rest your foot on the brake pedal while
driving.
• Drive a heavily loaded vehicle or tow a
trailer.
• Carry unnecessary weight
(approximately 1 mpg [0.4 km/L] is
lost for every 400 lb [180 kilogram] of
weight carried).
• Driving with the wheels out of
alignment.
Conditions
• Heavily loading a vehicle or towing a
trailer may reduce fuel economy at any
speed.
• Adding certain accessories to your
vehicle (for example bug deflectors,
rollbars, light bars, running boards, ski
racks or luggage racks) may reduce
fuel economy.
• To maximize the fuel economy, drive
with the tonneau cover installed (if
equipped).
• Using fuel blended with alcohol may
lower fuel economy.
• Fuel economy may decrease with lower
temperatures during the first 8– 10
miles (12 –16 kilometers) of driving.
• Driving on flat terrain offers improved
fuel economy as compared to driving
on hilly terrain.
210
F150 (TF6) , enUSA Driving Hints
Page 216 of 472

•
The tire air pressures recommended
for general driving are on the vehicle ’s
Safety Certification Label. The
maximum cold inflation pressure for
the tire and associated load rating are
on the tire sidewall. Tire air pressure
may require re-adjustment within these
pressure limits to accommodate the
additional weight of the snowplow
installation.
• Federal and some local regulations
require additional exterior lamps for
snowplow-equipped vehicles. Consult
your authorized dealer for additional
information.
Operating the Vehicle with the
Snowplow Attached
Note: Drive the vehicle at least 500 miles
(800 kilometers) before using your vehicle
for snow removal.
Ford recommends vehicle speed does not
exceed 45 mph (72 km/h) when
snowplowing.
The attached snowplow blade restricts
airflow to the radiator, and may cause the
engine to run at a higher temperature:
Attention to engine temperature is
especially important when outside
temperatures are above freezing. Angle
the blade to maximize airflow to the
radiator and monitor engine temperature
to determine whether a left or right angle
provides the best performance.
Follow the severe duty schedule in your
Scheduled Maintenance information for
engine oil and transmission fluid change
intervals. Snowplowing with your Airbag
Equipped Vehicle WARNINGS
Do not attempt to service, repair, or
modify the airbag supplemental
restraint system (SRS) or its fuses.
See your Ford or Lincoln Mercury dealer. Additional equipment such as
snowplow equipment may affect the
performance of the airbag sensors
increasing the risk of injury. Please refer to
the Body Builders Layout Book for
instructions about the appropriate
installation of additional equipment. All occupants of the vehicle,
including the driver, should always
properly wear their safety belts, even
when provided with an airbag
supplemental restraint system (SRS). Your vehicle is equipped with a driver and
passenger airbag supplemental restraint
system. The supplemental restraint system
will activate in certain frontal and offset
frontal collisions when the vehicle sustains
sufficient longitudinal deceleration.
Careless or high speed driving while
plowing snow which results in sufficient
vehicle decelerations can deploy the
airbag. Such driving also increases the risk
of accidents.
Never remove or defeat the tripping
mechanisms designed into the snow
removal equipment by its manufacturer.
Doing so may cause damage to the vehicle
and the snow removal equipment as well
as possible airbag deployment.
Engine temperature while plowing
Your engine may run at a higher
temperature than normal because the
attached snowplow blade will restrict
airflow to the radiator:
213
F150 (TF6) , enUSA Driving Hints
Page 244 of 472
Only use oils certified for gasoline engines
by the American Petroleum Institute (API).
An oil with this trademark symbol
conforms to the current engine and
emission system protection standards and
fuel economy requirements of the
International Lubricants Specification
Advisory Council (ILSAC), comprised of
U.S. and Japanese automobile
manufacturers.
1. Check the engine oil level.
2. If the engine oil level is not within the
normal range, add engine oil that
meets Ford specifications. See
Capacities and Specifications (page
296
).
3. Remove the engine oil filler cap and use a funnel to pour the engine oil into
the opening.
4. Recheck the engine oil level. Make sure
the oil level is not above the normal
operating range on the engine oil level
dipstick.
5. Install the engine oil level dipstick and ensure it is fully seated.
6. Fully install the engine oil filler cap by turning the filler cap clockwise until
three clicks are heard or until the cap
is fully seated.
ENGINE COOLANT CHECK WARNINGS
Do not add engine coolant when the
engine is hot. Steam and scalding
liquids released from a hot cooling
system can burn you badly. Also, spilling
coolant on hot engine parts can burn you. Do not put engine coolant in the
windshield washer fluid container. If
sprayed on the windshield, engine
coolant could make it difficult to see
through the windshield. WARNINGS
To reduce the risk of personal injury,
make sure the engine is cool before
unscrewing the coolant pressure
relief cap. The cooling system is under
pressure. steam and hot liquid can come
out forcefully when you loosen the cap
slightly. Do not add coolant further than the
MAX mark.
Checking the Engine Coolant
When the engine is cold, check the
concentration and level of the engine
coolant at the intervals listed in the
scheduled maintenance information. See
Scheduled Maintenance
(page 438).
Note: Make sure that the coolant level is
between the MIN and MAX marks on the
coolant reservoir.
Note: Coolant expands when it is hot. The
level may extend beyond the MAX mark.
Note: If the level is at the MIN mark, below
the MIN mark, or empty, add coolant
immediately. See
Adding Engine Coolant
in this chapter.
Maintain coolant concentration within
48% to 50%, which equates to a freeze
point between -30°F (-34°C) and -34°F
(-37°C).
Note: For best results, coolant
concentration should be tested with a
refractometer such as Rotunda tool
300-ROB75240 available from your
authorized dealer. Ford does not
recommend the use of hydrometers or
coolant test strips for measuring coolant
concentrations.
Note: Automotive fluids are not
interchangeable. Do not use engine coolant,
antifreeze or windshield washer fluid outside
of its specified function and vehicle location.
241
F150 (TF6) , enUSA Maintenance
Page 254 of 472

6.
For vehicles with HID headlamps:
there is a distinct cut-off (change from
light to dark) in the left portion of the
beam pattern. Position the top edge of
this cut-off 2 inches (5 centimeters)
below the horizontal reference line. 7. Locate the vertical adjuster on each
headlamp. Use a Phillips #2
screwdriver to turn the adjuster either
clockwise or counterclockwise to
adjust the vertical aim of the
headlamp. The horizontal edge of the
brighter light should touch the
horizontal reference line.
8. Repeat Steps 3 through 7 to adjust the
other headlamp.
9. Close the hood and turn off the lamps.
Horizontal Aim Adjustment
Horizontal aim is not required for this
vehicle and is not adjustable. REMOVING A HEADLAMP WARNING
Handle a halogen headlamp bulb
carefully and keep out of children
’s
reach. Grasp the bulb only by its
plastic base and do not touch the glass.
The oil from your hand could cause the
bulb to break the next time the headlamps
are operated. Note:
If the bulb is accidentally touched,
clean it with rubbing alcohol before
installing it.
Note: This procedure is for replacing the
headlamps, park lamps, turn lamps or side
marker lamps.
Replacing Halogen Headlamp
Bulbs (If Equipped)
1. Make sure the headlamp control is in the off position and open the hood. 2.
Remove the pushpin that holds the air
deflector or protective cover to the
upper inboard corner of the lamp.
251
F150 (TF6) , enUSA MaintenanceE142465 E167359 E167360
Page 268 of 472
Engine
•
The engine oil and filter should be
changed prior to storage, as used
engine oil contain contaminates that
may cause engine damage.
• Start the engine every 15 days. Run at
fast idle until it reaches normal
operating temperature
• With your foot on the brake, shift
through all the gears while the engine
is running.
Fuel system
• Fill the fuel tank with high-quality fuel
until the first automatic shutoff of the
fuel pump nozzle.
Cooling system
• Protect against freezing temperatures.
• When removing your vehicle from
storage, check coolant fluid level.
Confirm there are no cooling system
leaks, and fluid is at the recommended
level.
Battery
• Check and recharge as necessary. Keep
connections clean.
• If storing your vehicle for more than 30
days without recharging the battery, it
may be advisable to disconnect the
battery cables to ensure battery charge
is maintained for quick starting.
Note: If battery cables are disconnected, it
will be necessary to reset memory features.
Brakes
• Make sure brakes and parking brake
are fully released.
Tires
• Maintain recommended air pressure. Miscellaneous
•
Make sure all linkages, cables, levers
and pins under your vehicle are covered
with grease to prevent rust.
• Move vehicles at least 25 feet (8
meters) every 15 days to lubricate
working parts and prevent corrosion.
Removing Vehicle From Storage
When your vehicle is ready to come out of
storage, do the following:
• Wash your vehicle to remove any dirt
or grease film build-up on window
surfaces.
• Check windshield wipers for any
deterioration.
• Check under the hood for any foreign
material that may have collected
during storage (mice/squirrel nests).
• Check the exhaust for any foreign
material that may have collected
during storage.
• Check tire pressures and set tire
inflation per the Tire Label.
• Check brake pedal operation. Drive
your vehicle 15 feet (4.5 meters) back
and forth to remove rust build-up.
• Check fluid levels (including coolant,
oil and gas) to make sure there are no
leaks, and fluids are at recommended
levels.
• If the battery was removed, clean the
battery cable ends and inspect.
Contact your authorized dealer if you have
any concerns or issues.
265
F150 (TF6) , enUSA Vehicle Care