2014 FORD F150 tow bar
[x] Cancel search: tow barPage 96 of 472
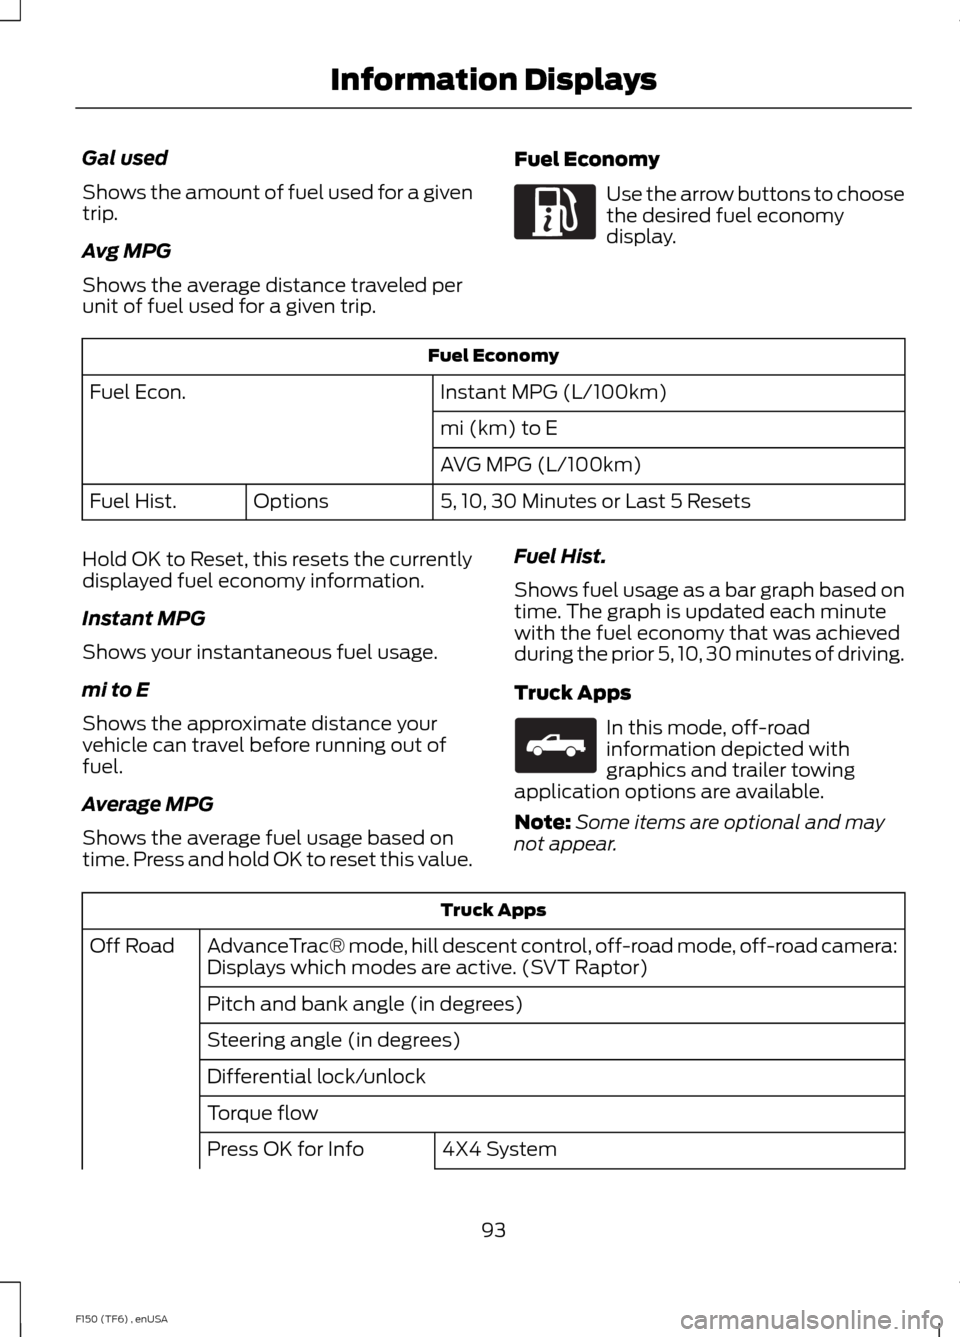
Gal used
Shows the amount of fuel used for a given
trip.
Avg MPG
Shows the average distance traveled per
unit of fuel used for a given trip.
Fuel Economy Use the arrow buttons to choose
the desired fuel economy
display.
Fuel Economy
Instant MPG (L/100km)
Fuel Econ.
mi (km) to E
AVG MPG (L/100km)
5, 10, 30 Minutes or Last 5 Resets
Options
Fuel Hist.
Hold OK to Reset, this resets the currently
displayed fuel economy information.
Instant MPG
Shows your instantaneous fuel usage.
mi to E
Shows the approximate distance your
vehicle can travel before running out of
fuel.
Average MPG
Shows the average fuel usage based on
time. Press and hold OK to reset this value. Fuel Hist.
Shows fuel usage as a bar graph based on
time. The graph is updated each minute
with the fuel economy that was achieved
during the prior 5, 10, 30 minutes of driving.
Truck Apps In this mode, off-road
information depicted with
graphics and trailer towing
application options are available.
Note: Some items are optional and may
not appear. Truck Apps
AdvanceTrac® mode, hill descent control, off-road mode, off-road camera:
Displays which modes are active. (SVT Raptor)
Off Road
Pitch and bank angle (in degrees)
Steering angle (in degrees)
Differential lock/unlock
Torque flow 4X4 System
Press OK for Info
93
F150 (TF6) , enUSA Information DisplaysE163180 E163181
Page 147 of 472
•
Turn the ignition off before fueling; an
inaccurate reading results if the engine
is left running.
• Use the same fill rate
(low-medium-high) each time the tank
is filled.
• Allow no more than two automatic
click-offs when filling.
Results are most accurate when the filling
method is consistent.
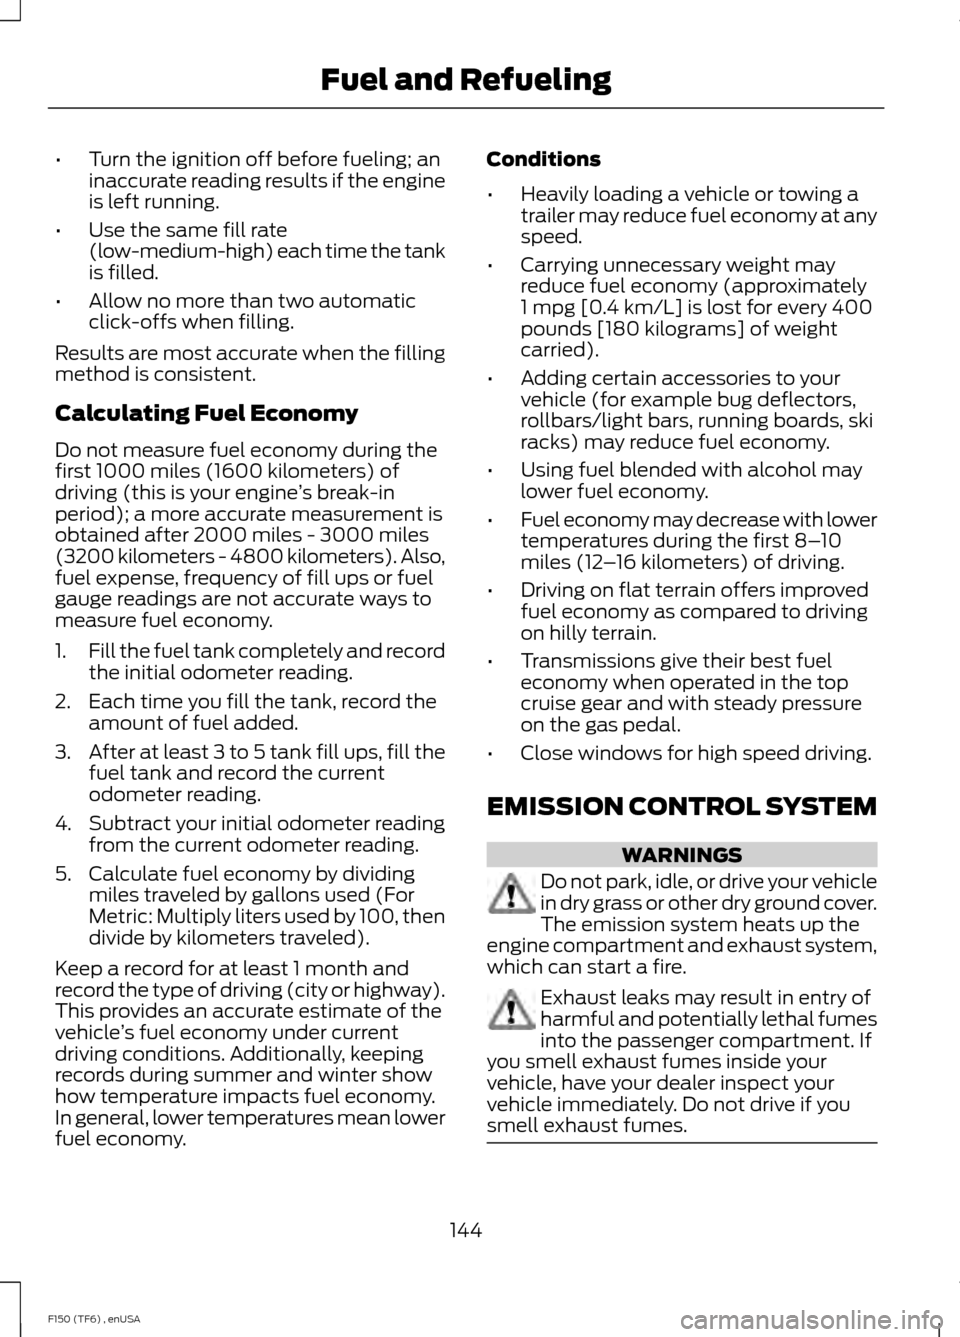
Calculating Fuel Economy
Do not measure fuel economy during the
first 1000 miles (1600 kilometers) of
driving (this is your engine ’s break-in
period); a more accurate measurement is
obtained after 2000 miles - 3000 miles
(3200 kilometers - 4800 kilometers). Also,
fuel expense, frequency of fill ups or fuel
gauge readings are not accurate ways to
measure fuel economy.
1. Fill the fuel tank completely and record
the initial odometer reading.
2. Each time you fill the tank, record the amount of fuel added.
3. After at least 3 to 5 tank fill ups, fill the
fuel tank and record the current
odometer reading.
4. Subtract your initial odometer reading from the current odometer reading.
5. Calculate fuel economy by dividing miles traveled by gallons used (For
Metric: Multiply liters used by 100, then
divide by kilometers traveled).
Keep a record for at least 1 month and
record the type of driving (city or highway).
This provides an accurate estimate of the
vehicle ’s fuel economy under current
driving conditions. Additionally, keeping
records during summer and winter show
how temperature impacts fuel economy.
In general, lower temperatures mean lower
fuel economy. Conditions
•
Heavily loading a vehicle or towing a
trailer may reduce fuel economy at any
speed.
• Carrying unnecessary weight may
reduce fuel economy (approximately
1 mpg [0.4 km/L] is lost for every 400
pounds [180 kilograms] of weight
carried).
• Adding certain accessories to your
vehicle (for example bug deflectors,
rollbars/light bars, running boards, ski
racks) may reduce fuel economy.
• Using fuel blended with alcohol may
lower fuel economy.
• Fuel economy may decrease with lower
temperatures during the first 8– 10
miles (12 –16 kilometers) of driving.
• Driving on flat terrain offers improved
fuel economy as compared to driving
on hilly terrain.
• Transmissions give their best fuel
economy when operated in the top
cruise gear and with steady pressure
on the gas pedal.
• Close windows for high speed driving.
EMISSION CONTROL SYSTEM WARNINGS
Do not park, idle, or drive your vehicle
in dry grass or other dry ground cover.
The emission system heats up the
engine compartment and exhaust system,
which can start a fire. Exhaust leaks may result in entry of
harmful and potentially lethal fumes
into the passenger compartment. If
you smell exhaust fumes inside your
vehicle, have your dealer inspect your
vehicle immediately. Do not drive if you
smell exhaust fumes. 144
F150 (TF6) , enUSA Fuel and Refueling
Page 194 of 472

TOWING A TRAILER
WARNINGS
Do not exceed the GVWR or
the GAWR specified on the
certification label. Towing trailers beyond the
maximum recommended
gross trailer weight exceeds the
limit of the vehicle and could
result in engine damage,
transmission damage, structural
damage, loss of vehicle control,
vehicle rollover and personal
injury. Your vehicle may have electrical
items, such as fuses or relays,
related to towing. See the Fuses
chapter.
Your vehicle's load capacity
designation is by weight, not by
volume, so you cannot necessarily
use all available space when
loading a vehicle.
Towing a trailer places an extra
load on your vehicle's engine,
transmission, axle, brakes, tires
and suspension. Inspect these
components periodically during,
and after, any towing operation. Load Placement
To help minimize how trailer
movement affects your vehicle
when driving:
•
Load the heaviest items closest
to the trailer floor.
• Load the heaviest items
centered between the left and
right side trailer tires.
• Load the heaviest items above
the trailer axles or just slightly
forward toward the trailer
tongue. Do not allow the final
trailer tongue weight to go
above or below 10-15% of the
loaded trailer weight.
• Select a tow bar with the
correct rise or drop. When both
the loaded vehicle and trailer
are connected, the trailer frame
should be level, or slightly
angled down toward your
vehicle, when viewed from the
side.
When driving with a trailer or
payload, a slight takeoff vibration
or shudder may be present due to
the increased payload weight.
Additional information regarding
proper trailer loading and setting
your vehicle up for towing is
located in another chapter of this
manual. See
Load Limit (page
179). You can also find the
information in the RV & Trailer
Towing Guide, available at an
authorized dealer.
191
F150 (TF6) , enUSA Towing
Page 203 of 472
SuperCrew
MaximumGCWR
Axle ratio
Engine
Wheelbase
(inches)
Driveline
17100 lb
(7756 kg)
3.73, 4.10
3.5L 2
17100 lb
(7756 kg)
3.73
3.5L 4
13500 lb
(6123 kg)
3.55
5.0L 15100 lb
(6849 kg)
3.73
15300 lb
(6940 kg)
3.73
5.0L 4
15600 lb
(7076 kg)
3.55
6.2L
17100 lb
(7756 kg)
3.73
6.2L 2
1 Limited.
2 MAX Trailer Tow Package.
3 SVT Raptor.
4 Heavy Duty Payload Package.
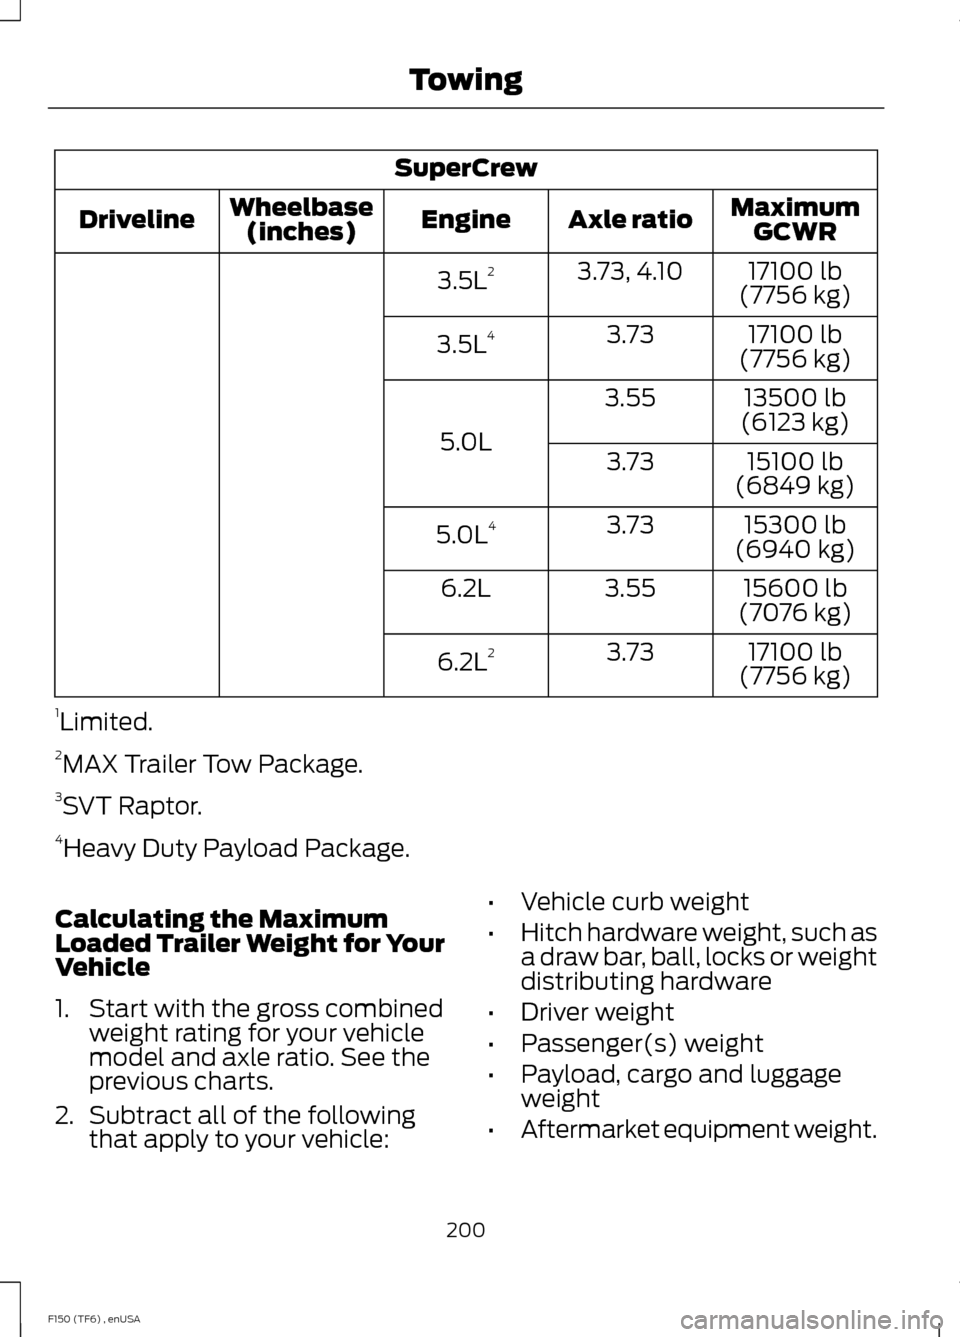
Calculating the Maximum
Loaded Trailer Weight for Your
Vehicle
1. Start with the gross combined weight rating for your vehicle
model and axle ratio. See the
previous charts.
2. Subtract all of the following
that apply to your vehicle: •
Vehicle curb weight
• Hitch hardware weight, such as
a draw bar, ball, locks or weight
distributing hardware
• Driver weight
• Passenger(s) weight
• Payload, cargo and luggage
weight
• Aftermarket equipment weight.
200
F150 (TF6) , enUSA Towing
Page 205 of 472
Weight-distributing Hitches
WARNING
Do not adjust a weight-distributing
hitch to any position where the rear
bumper of the vehicle is higher than
it was before attaching the trailer. Doing
so will defeat the function of the
weight-distributing hitch, which may cause
unpredictable handling, and could result
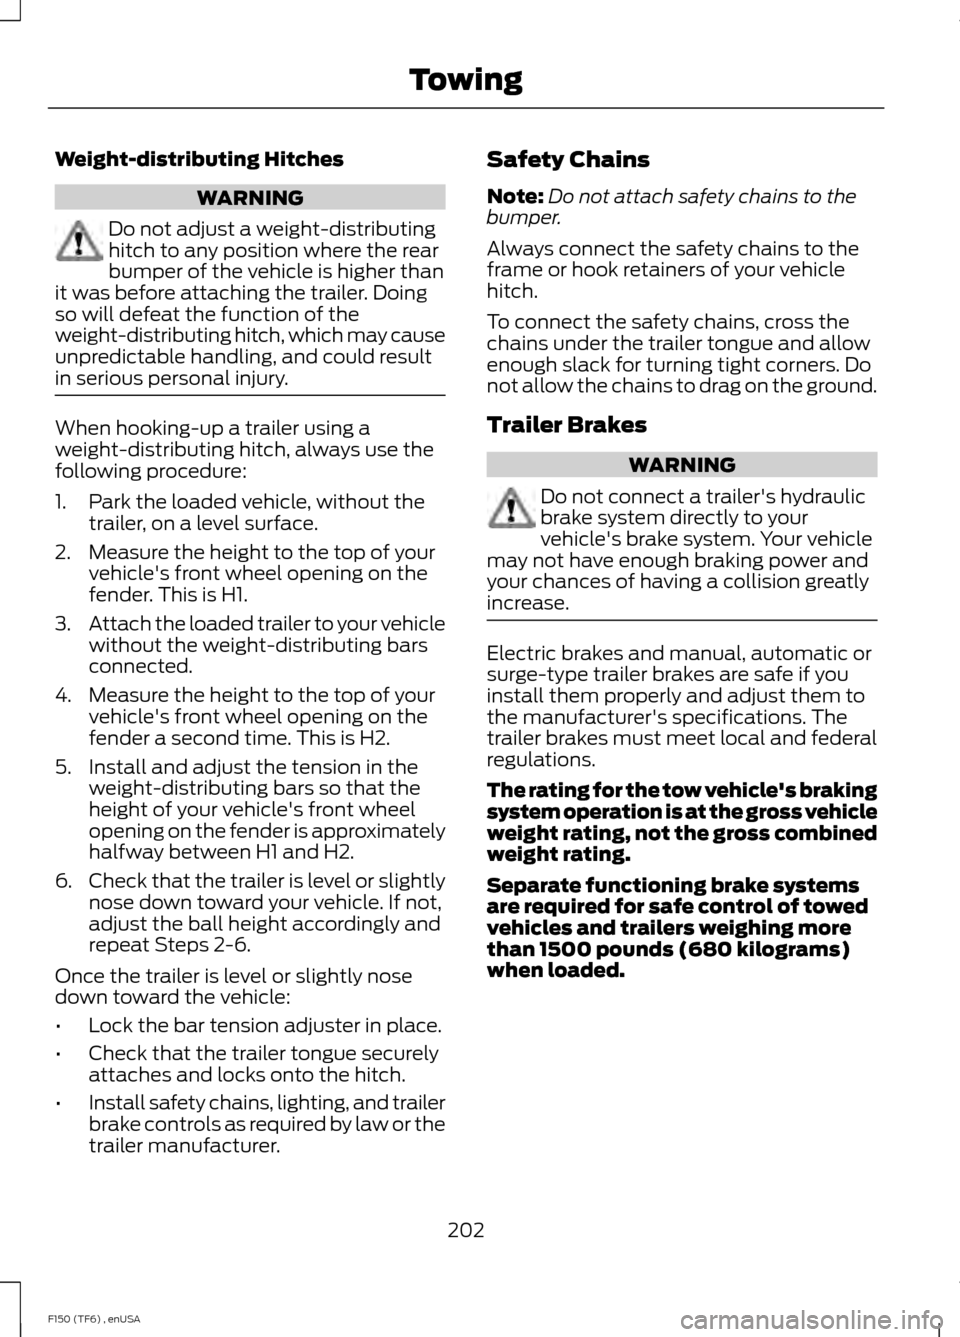
in serious personal injury. When hooking-up a trailer using a
weight-distributing hitch, always use the
following procedure:
1. Park the loaded vehicle, without the
trailer, on a level surface.
2. Measure the height to the top of your vehicle's front wheel opening on the
fender. This is H1.
3. Attach the loaded trailer to your vehicle
without the weight-distributing bars
connected.
4. Measure the height to the top of your vehicle's front wheel opening on the
fender a second time. This is H2.
5. Install and adjust the tension in the weight-distributing bars so that the
height of your vehicle's front wheel
opening on the fender is approximately
halfway between H1 and H2.
6. Check that the trailer is level or slightly
nose down toward your vehicle. If not,
adjust the ball height accordingly and
repeat Steps 2-6.
Once the trailer is level or slightly nose
down toward the vehicle:
• Lock the bar tension adjuster in place.
• Check that the trailer tongue securely
attaches and locks onto the hitch.
• Install safety chains, lighting, and trailer
brake controls as required by law or the
trailer manufacturer. Safety Chains
Note:
Do not attach safety chains to the
bumper.
Always connect the safety chains to the
frame or hook retainers of your vehicle
hitch.
To connect the safety chains, cross the
chains under the trailer tongue and allow
enough slack for turning tight corners. Do
not allow the chains to drag on the ground.
Trailer Brakes WARNING
Do not connect a trailer's hydraulic
brake system directly to your
vehicle's brake system. Your vehicle
may not have enough braking power and
your chances of having a collision greatly
increase. Electric brakes and manual, automatic or
surge-type trailer brakes are safe if you
install them properly and adjust them to
the manufacturer's specifications. The
trailer brakes must meet local and federal
regulations.
The rating for the tow vehicle's braking
system operation is at the gross vehicle
weight rating, not the gross combined
weight rating.
Separate functioning brake systems
are required for safe control of towed
vehicles and trailers weighing more
than 1500 pounds (680 kilograms)
when loaded.
202
F150 (TF6) , enUSA Towing
Page 207 of 472
The controller shows gain setting, output
bar graph, and trailer connectivity status
in the information display. They appear in
the information display as follows:
•
TBC GAIN = XX.X NO TRAILER:
Shows the current gain setting during
a given ignition cycle and when
adjusting the gain. This also displays if
you use the manual control lever or
make gain adjustments with no trailer
connected.
• TBC GAIN = XX.X OUTPUT=/ / / /
/ /: Displays when you push your
vehicle's brake pedal, or upon use of
the manual control. Bar indicators
illuminate in the information display to
indicate the amount of power going to
the trailer brakes relative to the brake
pedal or manual control input. One bar
indicates the least amount of output;
six bars indicate maximum output.
• TRAILER CONNECTED:
Displays
when the system senses a correct
trailer wiring connection (a trailer with
electric trailer brakes) during a given
ignition cycle.
• TRAILER DISCONNECTED:
Displays,
accompanied by a single audible time,
when the system senses a trailer
connection and then a disconnection,
either intentional or unintentional,
during a given ignition cycle. It also
displays if a truck or trailer-wiring fault
occurs causing the trailer to appear
disconnected. This message can also
display if you use the manual control
lever without a trailer connected.
Procedure for Adjusting Gain
Note: Only perform this procedure in a
traffic-free environment at speeds of
approximately 20-25 mph (30-40 km/h). The gain setting sets the trailer brake
controller for the specific towing condition.
You should change the setting as towing
conditions change. Changes to towing
conditions include trailer load, vehicle load,
road conditions and weather.
The gain should be set to provide the
maximum trailer braking assistance while
making sure the trailer wheels do not lock
when using the brakes. Locked trailer
wheels may lead to trailer instability.
1.
Make sure the trailer brakes are in good
working condition, functioning normally
and properly adjusted. See your trailer
dealer if necessary.
2. Hook up the trailer and make the electrical connections according to the
trailer manufacturer's instructions.
3. When you plug in a trailer with electric or electric-over-hydraulic brakes,
TRAILER CONNECTED
appears in
the information display.
4. Use the gain adjustment (+ and -) buttons to increase or decrease the
gain setting to the desired starting
point. A gain setting of 6.0 is a good
starting point for heavier loads.
5. In a traffic-free environment, tow the trailer on a dry, level surface at a speed
of 20-25 mph (30-40 km/h) and
squeeze the manual control lever
completely.
6. If the trailer wheels lock up, indicated by squealing tires, reduce the gain
setting. If the trailer wheels turn freely,
increase the gain setting. Repeat Steps
5 and 6 until the gain setting is at a
point just below trailer wheel lock-up.
If towing a heavier trailer, trailer wheel
lock-up may not be attainable even
with the maximum gain setting of 10.
204
F150 (TF6) , enUSA Towing
Page 213 of 472
BREAKING-IN
You need to break in new tires for
approximately 300 miles (480
kilometers). During this time, your vehicle
may exhibit some unusual driving
characteristics.
Avoid driving too fast during the first 1000
miles (1600 kilometers). Vary your speed
frequently and change up through the
gears early. Do not labor the engine.
Do not tow during the first 1000 miles
(1600 kilometers).
ECONOMICAL DRIVING
Your fuel economy is affected by several
things, such as how you drive, the
conditions you drive under, and how you
maintain your vehicle.
You may improve your fuel economy by
keeping these things in mind:
•
Accelerate and slow down in a smooth,
moderate fashion.
• Drive at steady speeds without
stopping.
• Anticipate stops; slowing down may
eliminate the need to stop.
• Combine errands and minimize
stop-and-go driving.
• Close the windows for high-speed
driving.
• Drive at reasonable speeds (traveling
at 55 mph [88 km/h] uses 15% less
fuel than traveling at 65 mph [105
km/h]).
• Keep the tires properly inflated and use
only the recommended size.
• Use the recommended engine oil.
• Perform all regularly scheduled
maintenance. Avoid these actions; they reduce your fuel
economy:
•
Sudden accelerations or hard
accelerations.
• Revving the engine before turning it off.
• Idle for periods longer than one minute.
• Warm up your vehicle on cold
mornings.
• Use the air conditioner or front
defroster.
• Use the speed control in hilly terrain.
• Rest your foot on the brake pedal while
driving.
• Drive a heavily loaded vehicle or tow a
trailer.
• Carry unnecessary weight
(approximately 1 mpg [0.4 km/L] is
lost for every 400 lb [180 kilogram] of
weight carried).
• Driving with the wheels out of
alignment.
Conditions
• Heavily loading a vehicle or towing a
trailer may reduce fuel economy at any
speed.
• Adding certain accessories to your
vehicle (for example bug deflectors,
rollbars, light bars, running boards, ski
racks or luggage racks) may reduce
fuel economy.
• To maximize the fuel economy, drive
with the tonneau cover installed (if
equipped).
• Using fuel blended with alcohol may
lower fuel economy.
• Fuel economy may decrease with lower
temperatures during the first 8– 10
miles (12 –16 kilometers) of driving.
• Driving on flat terrain offers improved
fuel economy as compared to driving
on hilly terrain.
210
F150 (TF6) , enUSA Driving Hints
Page 417 of 472
Eco Time Penalty
Select a low, medium or high cost for the
calculated Eco Route. The higher the
setting, the longer the time allotment is for
the route.
Avoid
These features allow you to choose to
have the system avoid freeways, toll roads,
ferries and car trains when planning your
route. Turn these features ON or OFF.
Use HOV Lanes
Have the system use high-occupancy
vehicle lanes, if available, when planning
your route.
Navigation Preferences
Guidance Prompts
Have the system use
Voice & Tones or
Tone Only on your programmed route.
Auto - Fill State/Province
Have the system automatically fill in the
state and province based on the
information already entered into the
system. Turn this feature
ON or OFF.
Traffic Preferences
Avoid Traffic Problems
Choose how you want the system to
handle traffic problems along your route.
• Automatic:
Have the system reroute
you to avoid traffic incidents that
develop and impact the current route.
The system does not provide a traffic
alert notification.
• Manual:
Have the system always
provide a traffic alert notification for
traffic incidents along the planned
route. You have a choice to accept or
ignore the notification before making
the route deviation. Traffic Alert Notification
Have the system display traffic alert
notifications.
Other traffic alert features allows you to
turn on certain, or all, traffic icons on the
map such as road work, incident, accidents
and closed roads. Scroll down to view all
the different types of alerts. Turn these
features
ON or OFF.
Avoid Areas
Choose areas which you want the system
to avoid when calculating a route for you.
Press
Add to program an entry. Once you
make a selection, the system tries to avoid
the area(s) if possible for all routes. To
delete a selection, choose the listing on
the screen. When the screen changes to
Avoid Areas Edit
, you can press Delete
at the bottom right of the screen.
Map Mode
Press the green bar in the upper right area
of the touchscreen to view map mode. Map
mode shows advanced viewing comprised
of both 2D city maps as well as 3D
landmarks (when available).
2D city maps show detailed outlines of
buildings, visible land use and land
elements and detailed railway
infrastructure for the most essential cities
around the globe. These maps also contain
features, such as town blocks, building
footprints, and railways.
3D landmarks appear as clear, visible
objects that are typically recognizable and
have a certain tourist value. The 3D
landmarks appear in 3D map mode only.
Coverage varies, and improves with
updated map releases.
414
F150 (TF6) , enUSA MyFord Touch
™
(If Equipped)