Page 49 of 244

opening for the eme rgency locking crank is
l ocated behind the protective cap.
Removing the square shaft
.,. Insert the threaded side of the crank into
the insertion opening
q fig. 52 .
.,. Turn the crank to the right until it is tightly
screwed into place@ .
.,. Pull the crank with the square shaft thread
ed onto it downward to remove the shaft
completely @.
Using the crank to lock the convertible
top
.,. Insert the other side of the crank (with the
mult ipoint head) into the opening until the
stop ring lies against the closing mo tor @
qfig . 52 .
.,. Turn the crank clockwise to open the retain
ers and pull the convertible top down at the
s ide .
.,. Turn the crank counter-clockwise until the
top is fully locked in place and the indicator
light on the instrument cluster goes out .
.,. Pull the crank out.
.,. Unscrew the square shaft from the crank .
.,. Insert the square shaft into the opening un
t il you hear it click into place .
.,. Use the protective cap to close off the inser -
t ion open ing .
The convertible top is now completely closed .
H ave the malfunct ion repaired as soon as pos
sible.
(Dl Tips
Turn the emergency operat ion screw in the
luggage compartment to the r ight to close
the convertible top hydraulic system.
Convertible top 47
Page 50 of 244

48 Clear vision
Clear vision Lights
Switching the headlights on and off
Fig . 53 Instr ument pane l: light sw itch
Fig. 54 Instr ument pane l: ligh t switch w ith dayti me
running lights (DR L)
The light switch must not be overturned past
the stops in
either direct ion.
Switching on automatic headlight
control*
.,. Turn the light switch to AUTO* ¢ fig. 53.
Switching on the side marker lights
... Turn the light switch to :;oo:.
Switching on the headlights and high
beam
... Turn the light switch to iD.
... Push the high beam lever forward towards
the instrument panel¢
page SO.
Switching off the lights
... Turn the light switch to 0.
The head lights only work when the ignition is
switched on. While start ing the engine or
when switching off the ignition, the head- lights
will go off and only the side ma rker
lights will be on.
Daytime running lights (DRL) (USA
models)
T he daytime running lights can be turned on
or off using this function. If the function is ac
tive, the daytime running lights are turned on
automatically when the ignit ion is switched
on.
The daytime running lights are activated
only
when the light switch is at the AUTO* or DRL *
position.
Daytime running lights (Canada models
only)
The daytime running lights are activated only
when the light switch ¢ fig. 53 is either at the
0 or the :;oo: position.
T he daytime r unning lights funct ion cannot be
turned off.
Automatic headlight control*
In the switch position AUTO the automatic
headlight control
is turned on. The low
beams are turned on automatically through a
light sensor as soon as ambient brightness
(e .g. when driving into a tunnel) falls below a
value preset at the factory. When ambient
brightness increases aga in, the low beams are
turned off again automatically ¢.&. .
In the
AUTO position the low beams are
switched off automatically when the ignition
is turned off .
Light Sensor Malfunction*
In the event of a light sensor malfunction, the
driver is notified in the instrument cluster dis
play:
El Automatic headlights/automatic wipers
defective
For safety reasons the low beams are turned
on permanently with the switch in
AUTO* .
However, you can continue to turn the lights
on and off using the light switch. Have the
Ill>-
Page 51 of 244

light sensor checked as soon as possible at a
dealership.
Adaptive light *
The benefit of adaptive l ight is that the curve
and the edge of the road are better i llum inat
ed . The adaptive light is contro lled automati
cally, depending on vehicle speed and steering
wheel angle.
When driving a round bends, the head lights
are contro lled according to steering wheel an
g le . So that there is no black area ahead of the
ve hic le, the two main beams pivot at different
angles. The system works above a speed of
about 6 mph (10 km/h).
Com ing home /le avi ng home function *
The function is swit ched on when the switch is
in the AUTO* position and the function is
shown as active in the driver information sys
tem.
The
coming hom e function illuminates the
area around the vehicle when the ign ition is
switched off and the driver's door is ope ned.
The length of time the lights remain on can be
set in the menu display
( Illumination > Exte
rior lights > coming home ).
The leavi ng home function i lluminates the
area around the vehicle when unlocking it.
A WARNING
- Never use dayt ime running l ights to see
where you are going. They are not bright
enough and w ill not let you see far
enough ahead for safety, especially at
dusk or when it is dar k. Always switch on
the low beams at dusk or when i t is dar k.
- Automatic headlights a re only intended
to assist the dr iver. They do not re lieve
t he driver of his responsibi lity to check
t he headlights and to turn them on man
ually according to the current light and
visibility conditions. For example, fog
and rain cannot be detected by the light
sensors. So a lways switch on the head
lights under these weather cond itions
and when driving in the dark
jO .
Clear vis ion 49
- Crashes can happen when you cannot see
the road ahead and when you cannot be
seen by other motorists.
- Always turn on the headlights so that
youcanseeahe adandsothatothe ~
can see your car from the back .
- Please observe legal regulat ions w hen
using the ligh ting systems des cribed.
(D Tips
- T he light sensor for head light control is
located in the rear view mirror mount.
Do not apply any stickers to t he wind
shield in th is area to preven t malfunc
tions or fa ilures.
- Some exter io r l ighting funct ions can be
adjusted in t he driver i nformat ion sys
t em
~page 24.
- I f you remove the igni tion from t he igni
t ion lock while the headligh ts are s till
on, a buzzer wi ll sound as long as the
driver's door is o pen to remind yo u to
t u rn off the lights.
- Always observe the specific local regula
tions for your area as to when to use your
lights.
- With automatic headlights, the high
beam f unction is also available, but w ith
one restrict ion: If you have not sw itched
the high beams back to low beams dur
ing automatic headlight operation (for
example, after d riving throug h a tunnel),
only the low beams come on the next
t ime au tomati c headlights a re swi tched
on. To use the high beams , you firs t have
t o pull the hig h beam lever back and
then push the lever fo rward again .
- In coo l or damp weather, the inside of
the headlights, turn signals an d tail
lights can fog over due to the tempera
t u re difference between the inside and
outside. They w ill clear shortly after
switching them on. This does not affect
the se rv ice life of the lighting.
Page 52 of 244

50 Clear vis ion
Front fog lights
F ig. 55 Fog light act ivation: light switch pos itio n on
veh icles WITHOUT sensor light
Switching on the front fog lights iO
.,. Do no t turn the light switch ·'t/- · ¢ fig. 55 to-
ward the fog light symbol
}D.
.,. Turn the light switch to :o o: or to io .
.,. Pull the ligh t switch to the first stop @.
When the front fog lights are on, the symbol
}D next to the light switch will i llum ina te.
@ Tips
With the switch in AUTO front fog lights
cannot be turned on in addit ion.
Turn signals and high beam lever
The lever on the left side of the steering col
umn is used to operate the turn signals and
the high beam as well as the headlight flash
er .
Fig. 56 Tu rn signa l and hig h beam lever
The turn signal and high beam lever has the
following functions:
Turn signals ¢ Q ©@
.,. Push the lever up as fa r as it ca n go to t urn
on the right turn s ignal or down to tu rn on
the left turn signal ¢
fig. 56 .
.,. Move the lever briefly unti l you meet res ist
ance and release it to flash three times .
.,. Move the lever (up or down) until you meet
resistance and hold it there to determine
the flashing time for the turn signals .
High be am gD @
.,. Push the lever forward to switch on the high
beam.
.,. Pull the lever back towards you to switch off
the high beam.
Headlight fla sh er gD @
.,. Pull the lever toward the steering whee l to
use the headlight flasher.
Not es on thes e features
- The turn signals on ly work wi th the ignition
sw itched on. The indicator lights
F-1 or rl in
the instrument cluster¢
page 12 also blink.
- After you have turned a co rner, the turn s ig-
na l switches off automa tically .
- The
high beam works on ly w hen the he ad
lights a re on . The indicator light
II in t he
instrument cluster illuminates when the
high beams are on.
- The
headlight flasher works only as long as
you ho ld the lever - even if there a re no
lights turned on. The indicator light
II in
the instrument cluster illuminates when you
use the headlight flasher.
A WARNING
-
Do not use the h igh beam or head light
flasher if yo u know that these could b lind
oncom ing traffic.
-
Page 53 of 244

Emergency flasher
The emergency flasher makes other motorists
a w are that you or your vehicle are in an emer
gency situation.
Fi g. 57 Center conso le: emergency flasher sw itch
.. Press the switch ~~ fig. 57, to switch the
emergency flasher on or off.
When the emerge ncy flashe r is on, al l four
turn signals blink at the same time. The t urn
signal indicator lights
II Hin the instrument
cluster, as we ll as the light in the emergency
flasher switch~ blink likewise. The emergen
cy flashers also work when the ignition is
turned off.
The emergency flasher will automatica lly
switch on if you are in an acc ident where the
airbag has deployed.
@ Tips
You should switch on the emergency flash
er when:
- you are the last vehicle sta nding in a traf
fic jam so that any other vehicles coming can see you, or when
- your vehicle has broken down or yo u are
i n an emergency situation, or when
-you r vehicle is being towed by a tow
truck or if yo u are towing a nothe r vehicle
behind you. Clear vi
sion 51
Interior lights
Interior lights
The interior lights include the reading lights
for the driver and the front passenger.
Fig. 58 Section from headli ner: Interior lights
Activating door contact circuit
.. Press the button @. The L ED in the button
ill um inates.
Deactivating door contact circuit
.. Press the button @. The LED in the button
goes out .
Front read ing lights ~
.. Press one of the switches ® to turn the
r ight or left reading light on or off.
With the door contact ci rcuit, the inter ior
lights turn on as soon as you unlock the vehi
cle or open the doors. The interior lights are
also turned on when the ignition key is re
moved. The lights turn off about 30 seconds
after the doors are closed . When the veh icle is
locked or when the ignition is turned on, the
in terior lig hts are tu rned off.
When a door is open, the inte rior lights are
tu rned off after about 10 minutes to preve nt
batte ry dra in ing.
The brightness of the lights is controlled au
tomat ica lly by a d immer when they are
switched on and off.
Page 54 of 244

52 Clear vis ion
Instrument panel illumination
F ig. 59 In strum ent panel ill uminatio n
The illumina tion of the instruments, displays
and the center conso le can be adjusted . You
regulate the br ightness of the inst ruments
with the left thumbwhee l
CJ:J ~ fig. 59 .
Ignition ON, light switch at @.
With the ignition switched ON, the glow of in
strument needles can be adjusted to appear
brighte r or d immer.
Ignition ON, light switch at ;oo~ or io .
With the l ights sw itched on, the brightness of
instrument cluster (i.e. needles, gauges and
displays) and center console illuminat ion can
be adjusted.
@ Note
The instrument cl uster and cente r console
illumination (gauges and needles) comes
on when you switch on the ignition and the
veh icle headlights are off. Be aware of the
following difference between mode ls built
to US or Canadian specifications:
- USA mode ls : illumination of the instru
ment cluster (gauges and needles), dash
and cente r consol e around the gearsh ift
l ever is controlled by a light senso r locat
ed in the instrument panel. The instru
ment pane l ill umination will a utomat i
ca lly become dimmer as the daylight
fades away and eventually will go o ut
complete ly when outside light is very
l ow . Th is is to rem ind you, the driver, to
switch on the headlights before it gets
too dark . -
Canada models: instr ument panel illumi
nation will stay bright regardless of the
intensity of ambient light . A lways be
aware of changes in outside light condi
tions while you are driving. Respond in
time to fading daylight by tur ning the
light switch to position fD (o r "AUTO" if
your car is equipped with this feature) to
t ur n on you r headlights.
Luggage compartment light
The light is located on the right side of the
lu ggage compartme nt. These lights come on
automat ica lly when the rea r lid is opened . The
lights turn off automatica lly if the lid is left
open for more then 10 minutes.
Vision
Adjusting the exterior mirrors
F ig. 60 Fo rwa rd sect io n of drive r's armr est: power mir
ror cont rol s
Turn the knob to the desired posit ion:
Q/ P -In this pos ition, you can adjust the
drive r's and front passenger's exte rior m irrors
by turning the knob in the desired d irection.
4iil -The mirrors are heated depending on the
outside temperature .
8 -The exterior mirror s fold in*
You are we ll-advised to fold the exterior mir
rors in when maneuvering in tight spaces or
when leaving the car parked close to other
vehicles. ..,,.
Page 55 of 244
 mirror surfaces in
crease your field of view. Remember that
vehicles or other objects will appear
smaller and farther away than when seen
i")
_& WARNING
- Curved (i. e. convex) mirror surfaces in
crease your field of view. Remember that
vehicles or other objects will appear
smaller and farther away than when seen
in a flat mirror.
If you use this mirror to
estimate distances of following vehicles
when changing lanes, you could estimate
incorrectly and cause an accident.
CD Note
- If the mirror housing is moved uninten
tionally (for example, while parking your
vehicle), then you must first fold the mir ror electrically. Do not readjust the mir
ror housing manually. You could damage
the motor which controls the mirror .
- If you wash the vehicle in an automatic
car wash, you must fold the exterior mir
rors in to reduce the risk of damage to
the mirrors . Never fold power folding ex
terior mirrors* by hand. Only fold them in and out using the power controls .
@ Tips
If there should be a malfunction in the
electrical system, you can still adjust the
exterior mirrors by pressing the edge of
the mirror .
Dimming the mirrors
Fig. 61 Automa tic dimming re arview mirror•
Manual anti-glare adjustment
• Move the small l ever (located on the bottom
edge of the mirror) to the rear.
Clear vision 53
Automatically dimming mirrors*
• To dim the rearview mirror and both exterior
mirrors, press the @button. The diode @
turns on . The rearview and exterior mirrors
dim automatically when light shines on
them, fo r ex ample from headlights on ave
hicle to the rear .
_& WARNING
Electrolyte fluid can leak from automatic
dimming mirrors if the glass is broken .
Electrolyte fluid can irritate skin, eyes and
respiratory system.
- Repeated or prolonged exposure to elec
trolyte can cause irritation to the respira
tory system, especially among people
with asthma or other respiratory condi
tions. Get fresh air immediately by leav
ing the vehicle or, if that is not possible,
open windows and doors all the way.
- If electrolyte gets into the eyes, flush
them thoroughly with large amounts of
clean water for at least 15 minutes·
. '
medical attention is recommended.
- If electrolyte contacts skin, flush affect
ed area with clean water for at least 15 minutes and then wash affected area
with soap and water; medical attention is recommended. Thoroughly wash af
fected clothing and shoes before reuse .
- If swallowed and person is conscious, rinse mouth with water for at least 15
minutes. Do not induce vomiting unless
instructed to do so by medical professio
nal. Get medical attention immediately .
CD Note
Liquid electrolyte leaking from broken mir
ror glass will damage any plastic surfaces
it comes in contact with. Clean up spilled
electrolyte immediately with clean water
and a sponge. .,..
Page 56 of 244

54 Clear vis ion
@ Tips
- Switching off the dimming function of
the inside rear view mirror also deact i
vates the automatic dimming f unction of
the exterior m irrors.
- The automatic dimming mirrors do not dim when the interior lighting is turned
on or the reverse gear is selected .
-Automat ic dimming for the m irror only
operates properly if the light striking the inside mirror is not hindered in any way.
Sun visors
Using the sun visors makes driving safer.
Fi g. 62 Sun v iso r
The vanity mirrors in the sun v isors are equ ip
ped with lids. Push lid in direction of a rrow to
open.
Wiper and washer system
Windshield wiper
The windshield wiper lever controls both the
windshield wipers and the washer system .
Fig. 63 Wiper lever: win ds hield w iper lever pos it ions
T he windshield wiper lever i=:> fig. 63 has the
following positions:
Int ermittent wiping ~l (activating rain
s e nsor)*
.. Move the lever up to position (D .
.. Move the interval set switch @, to change
the intervals.
Low wiper spe ed
.. Move the lever up to posit ion @.
High w ipe r speed
.. Move the lever up to posit ion @.
One-touch wip ing
.. Move the lever to position @ , when you
want to wipe the windshield
briefly.
Automat ic wip er/ washer
.. Pull the lever to position ® (t oward the
steering whee l) and hold .
.. Release the lever . The washer stops and the
w ipers keep going for about four seconds.
Turning off the wipers
.. Move the lever back to position @ .
The w indshield w ipers and washer only work
when the ignition is turned on . If you sw itch
off the igni tion with the windshie ld w iper lev
er st ill in the inte rva l wipe position and then
come back a whi le later and drive off, the ra in
sensor will reactivate itself after the vehicle speed has exceeded 4 mph (6 km/h) .
T he rai n sensor* is only activated with the
wiper lever set to position
(D . When it starts
to rain, the rain senso r will a utomat ically acti
vate the intermittent wiping mode .
T o reduce the sensi tivity of the sensor, move
swi tch @ down . To increase the sensi tivity,
move the switc h up. The higher you adjust the
sensitivity, the faster the senso r will react
when it senses moisture on the windsh ield.
The pauses between wiper turns depend not only on the sensitivity setting, but on the ve-
hicle speed as well. ..,.
 1
1 2
2 3
3 4
4 5
5 6
6 7
7 8
8 9
9 10
10 11
11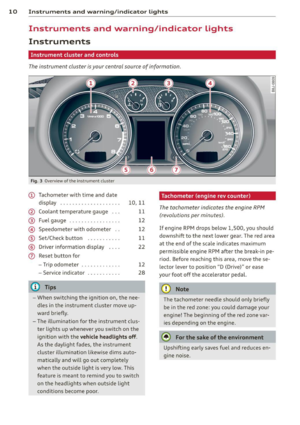 12
12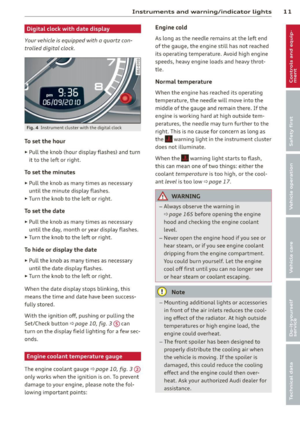 13
13 14
14 15
15 16
16 17
17 18
18 19
19 20
20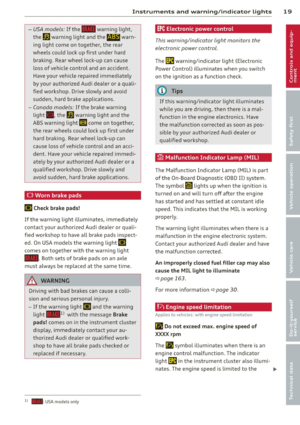 21
21 22
22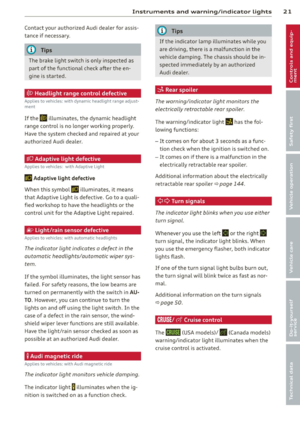 23
23 24
24 25
25 26
26 27
27 28
28 29
29 30
30 31
31 32
32 33
33 34
34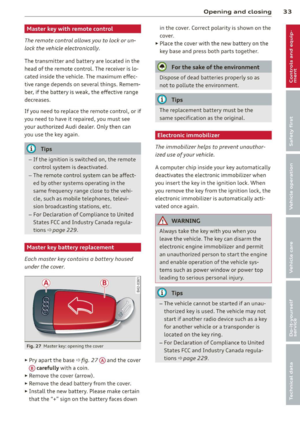 35
35 36
36 37
37 38
38 39
39 40
40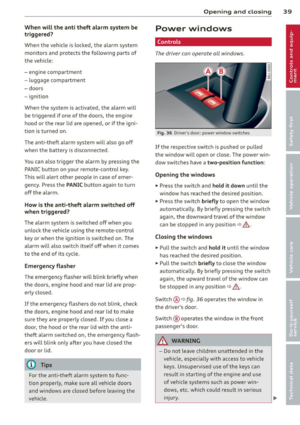 41
41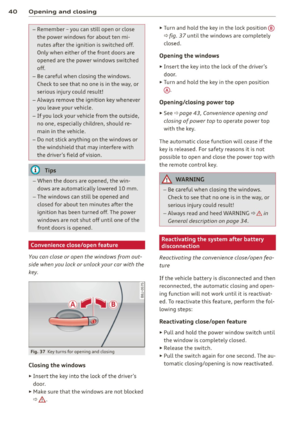 42
42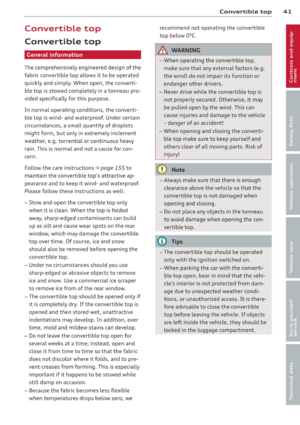 43
43 44
44 45
45 46
46 47
47 48
48 49
49 50
50 51
51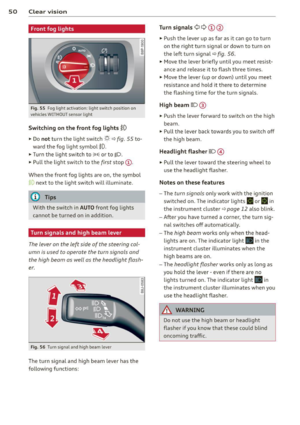 52
52 53
53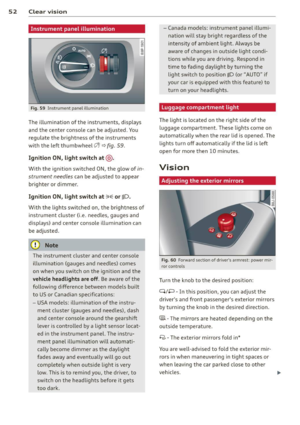 54
54 55
55 56
56 57
57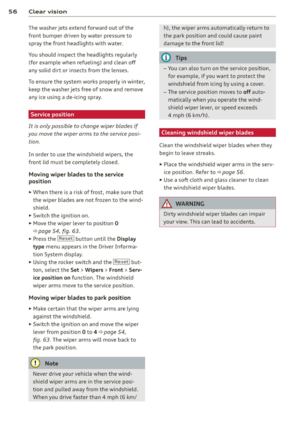 58
58 59
59 60
60 61
61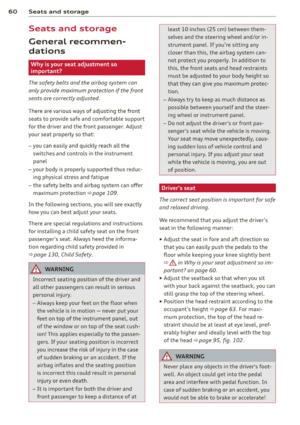 62
62 63
63 64
64 65
65 66
66 67
67 68
68 69
69 70
70 71
71 72
72 73
73 74
74 75
75 76
76 77
77 78
78 79
79 80
80 81
81 82
82 83
83 84
84 85
85 86
86 87
87 88
88 89
89 90
90 91
91 92
92 93
93 94
94 95
95 96
96 97
97 98
98 99
99 100
100 101
101 102
102 103
103 104
104 105
105 106
106 107
107 108
108 109
109 110
110 111
111 112
112 113
113 114
114 115
115 116
116 117
117 118
118 119
119 120
120 121
121 122
122 123
123 124
124 125
125 126
126 127
127 128
128 129
129 130
130 131
131 132
132 133
133 134
134 135
135 136
136 137
137 138
138 139
139 140
140 141
141 142
142 143
143 144
144 145
145 146
146 147
147 148
148 149
149 150
150 151
151 152
152 153
153 154
154 155
155 156
156 157
157 158
158 159
159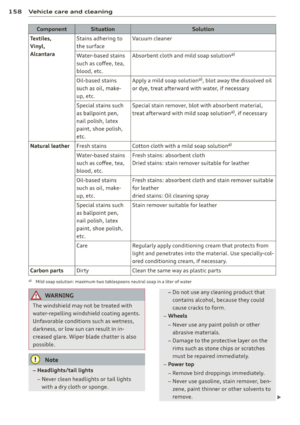 160
160 161
161 162
162 163
163 164
164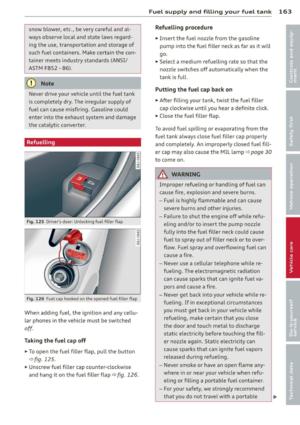 165
165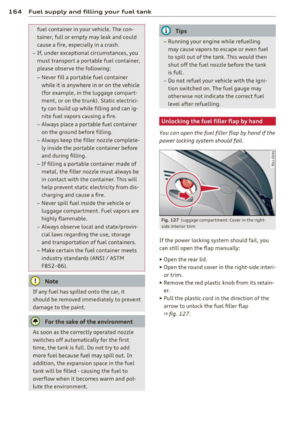 166
166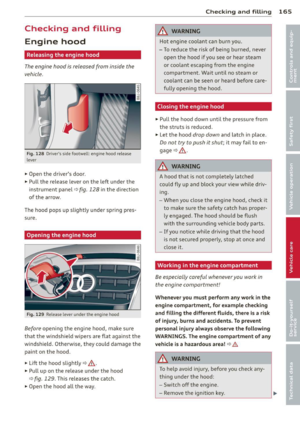 167
167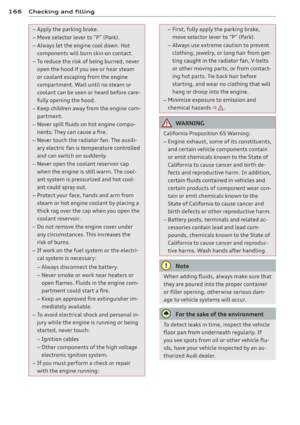 168
168 169
169 170
170 171
171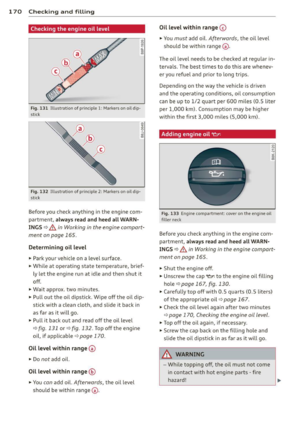 172
172 173
173 174
174 175
175 176
176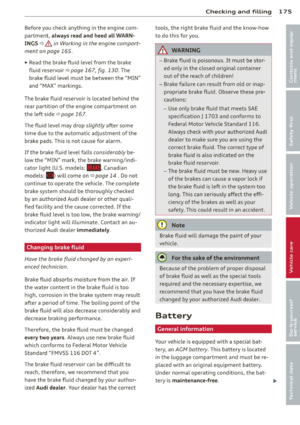 177
177 178
178 179
179 180
180 181
181 182
182 183
183 184
184 185
185 186
186 187
187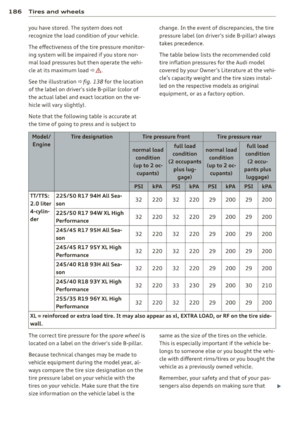 188
188 189
189 190
190 191
191 192
192 193
193 194
194 195
195 196
196 197
197 198
198 199
199 200
200 201
201 202
202 203
203 204
204 205
205 206
206 207
207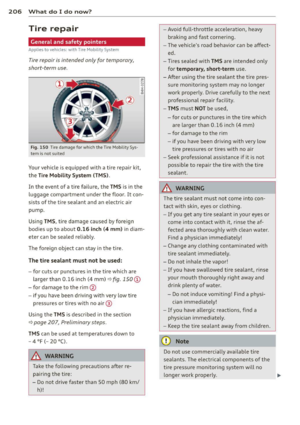 208
208 209
209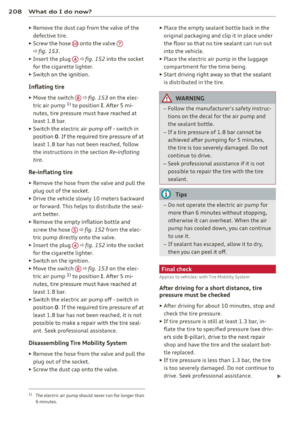 210
210 211
211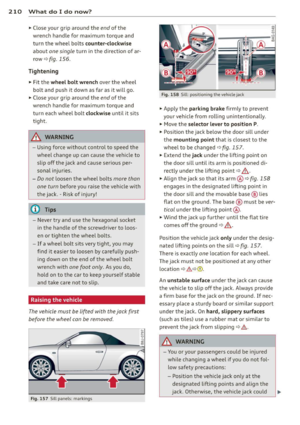 212
212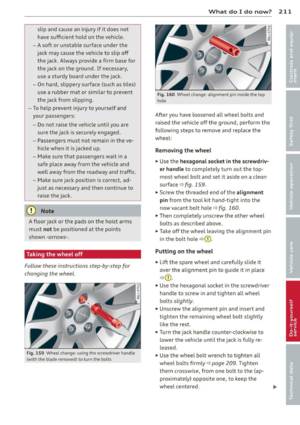 213
213 214
214 215
215 216
216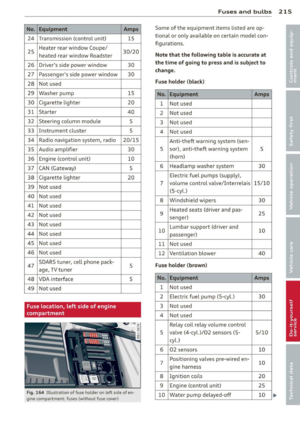 217
217 218
218 219
219 220
220 221
221 222
222 223
223 224
224 225
225 226
226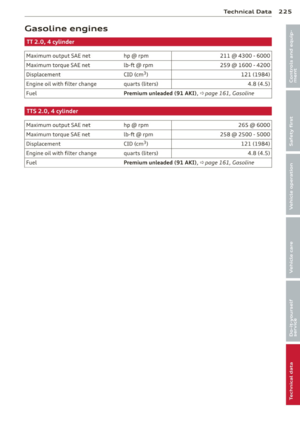 227
227 228
228 229
229 230
230 231
231 232
232 233
233 234
234 235
235 236
236 237
237 238
238 239
239 240
240 241
241 242
242 243
243