Page 89 of 244

_& WARNING
-Always adapt your driving to the traffic
flow.
- Only use Launch Control when road and
traffic conditions allow it and other driv
ers will not be endangered or annoyed by
your driving and the acceleration of the
vehicle .
- Make sure that ESC remains enabled .
With the ESC disabled, the veh icle could
brake away, particularly on a slick and
slippery road -risk of skidding!
- Once acce lerat ion is finished, switch ASR
on again by briefly pushing the ESC but
ton.
@ Tips
- The transm ission temperature may in
crease significantly after using the
Launch Control Program. If that hap
pens, the program may not be available
for a few minutes. I t will be availab le
again after a coo l-down period.
- When accelerating using the Launch
Control program, all vehicle parts are
subject to heavy loads . This can result in
increased wear.
Back-up program
Applies to vehicles: with S tronic
In the event of a system malfunction, there is
a back-up program.
I n the event of system mal func tion, the auto
matic transmission switches to the fail-safe
mode. A ll of the selector lever position dis
plays for the automatic transmission are high
lighted with a light background in the instru
ment cluster display . In some cases you can
not use reverse gear any more .
If the transmission switches to fail-safe mode, you should take the vehicle to an au
thorized Audi dealership as soon as possible
to have the condition corrected.
Transmission 87
Clutch is overheating
Applies to vehicles: with S tronic
• Clutch is overheating! Please stop vehi
cle!
If the symbols are illuminated, the clutch is
overheating and could be damaged if you con
tinue to drive. Stop the vehicle and a llow the
transmission to cool with the se lector lever in
the P posit ion while the engine runs at idle.
If
the warning does not turn off, do not continue
driving. See your authorized A udi dealer or
qualified repair facility for assistance. Other
wise serious transmission damage could re
sult. Once the indicator light has turned off,
drive to your authorized Audi dealer or quali
fied repa ir facility immed iately to have the
malfunction corrected.
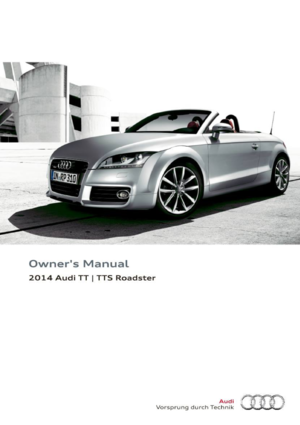
Selector lever emergency release
Applies to vehicles: wi th S tronic
If the vehicle's power supply fails, the selec
tor lever can be released in an emergency.
--
-
-
-
-
---Fig. 96 Se lector lever : Removing the selector lever
boot
.. ~
- ,
Fig. 97 Selector lever : Using the em erge ncy release to
move out of the Park pos it ion
T he emergency release mechanism is located
in the right front area under the selector lever ..,.
Page 90 of 244

88 Transmission
shift gate. Using the emergency re lease can
be complicated. We recommend contacting
your author ized Audi dealer for assistance, if
necessary.
Removing the selector lever boot
.,. Activate the parking brake .
.,. Carefully pry the selector lever boot out o f
t h e trim ® using a sma ll screwdriver .
.,. Pull both sides of the se lector lever boot up-
ward in the direction of the arrow @ .
.,. Fold the selector lever boot upward.
Selector lever eme rgency release
.,. Press the release lever down and hold it in
place
¢ fig . 97 .
.,. Press the release button in the selector lever
© and move the lever into the N pos ition .
.,. Clip the selector lever boot back into the
shift gate after using the emergency re
lease .
If the vehicle must be pushed or towed due to
a power failure (for example, the battery is
discharged), the selector lever must first be
moved to the N pos ition using the emergency
r e lease mechanism.
_& WARNING
Only move the selector lever out of the P
position when the parking brake is activat
ed. Otherwise, the vehicle could start to
move unintentiona lly when the selector
lever is moved out of the P position.
.
Page 91 of 244

Homelink
Universal remote
control
General information
The HomeLink universal remote control can
be programmed with hand-held transmitters
from existing equipment.
You must first program the Homelink trans
mitter before you can use the system
~ page 89, Programming the HomeLink
transmitter.
In order to program the Homelink transmit
ter for devices utilizing rolling code, a second
person on a ladder who can safely reach the
garage door opener motor is recommended.
It is also necessary to locate the "learn" but
ton on your garage door opener motor . Refer
to the operating instructions for the opener, as the location and color of this button may
vary by manufacturer .
You can still use the origina l remote control
for the device at any time.
A WARNING
-
- Never use the Homelink transmitter
with any garage door opener that does
have not the safety stop and reverse fea
ture as requ ired by federal safety stand
ards. This includes any garage door open
er model manufactured before April 1,
1982.
- A garage door opener which cannot de
tect an object, signaling the door to stop
and reverse does not meet current feder
al safety standards. Using a garage door
opener without these features increases
risk of serious injury or death.
- For safety reasons never release the
parking brake or start the engine while
anyone is standing in front of the vehicle.
- A garage door or an estate gate may
sometimes be set in motion when the Homelink remote control is being pro
grammed. If the device is repeatedly ac-
Homelink 89
tivated, this can overstrain motor and
damage its electrical components -an
overheated motor is a fire hazard!
- To avoid possible injuries or property
damage, please always make absolutely
certain that no persons or objects are lo
cated in the range of motion of any
equipment being operated.
(!) Tips
- If you would like more information on
Homelink, where to purchase the Home
Link compat ible products, or would like
to purchase the Homelink Home Light
ing Package, please call toll-free:
1-800-355-3515.
- For Declaration of Compliance to United
States FCC and Industry Canada regu la
tions
~page 229.
Programming the Homelink transmitter
The transmitter is programmed in two phas
es. For rolling code transmitters, a third
phase is also necessary.
Fig. 98 Overhead co nsole: Homelink keypad
Fig. 99 Fro nt bumper, d river side: locatio n of tra nsm it-
ter unit
IJ-
Page 92 of 244

90 Homelink
Phase 1:
programming the overhead keypad
1. Make sure yo ur vehicle is wit hin o peratin g
range of the remote contro lled garage
door opener .
2. Set the parking brake¢.&. in General in
formation on page 89 .
3. Tur n the ignition on . Do not sta rt the e n
g ine!
4 . Pr ess and hold the two ou ts ide Home Link
b uttons
(D and @for app rox imately 2 0
seconds un til indicator light @¢fig . 98
begins to flash. Then release both but
tons . Do not hold the buttons for longe r
than
30 seconds.
.,. This procedure only needs to be performed
once . It erases the factory-set defau lt codes
and does not have to be repeated to pro
gram addit ional remote cont rols .
S . Press and hold the Hom elink button
(D ,
® or @ unt il the indica to r li gh t@
starts flashi ng
slowly. Re lease the bu tton.
.,. The system will remain in programming
mode for 5 minutes .
Co to the front of the
vehicle and proceed with phase 2 .
Phase 2:
programming the bumper mounted tran s
mitter
6 . Hold the original remote control at a dis
tance between
0 -6 in . (0 -15 cm) from the
b umper below the appropriate head light
fo r you r vehicle
q fig. 99 (u se the sho rtest
d istance possible).
7 . Aim t he remo te con trol jus t below the
driver side hea dligh t.
8 . Pr ess and hold the activation button on
the remote cont ro l.
.,. May be different in Canada. If so, press and
re-press (cycle) the activat ion b utton on your
remote control every two seconds.
9 . The eme rgency flashers will flash
three
time s
(after abo ut 15 -60 seconds) when
the programm ing is successf ul. Release
the butto n on the remote control.
.,. To program more devi ces, repea t steps 4 to
9.
10. Press and ho ld the trained Homelink but
ton and observe the indicator light @
¢fig. 98.
.,. If the ind icator lig ht is solid/contin uous,
prog ramm ing is comp lete and your device
should activate when you press and release
t he tra ined Homel ink b utton .
.,. If the ind icator light blinks rapidly fo r
2 se c
onds and is then a so lid/continuous ligh t,
procee d w ith p hase
3 to progr am a roll ing
code device.
Phase 3: rolling code programming
.,. A seco nd person o n a ladde r who can safely
reach th e garage door opene r moto r is rec
ommended .
11. Loc ate t he "lear n" bu tton on t he g arage
doo r opener motor ( re fer to the operating
inst ructions for the opener, as the loca
tion of t his button may vary by man ufac
turer).
12. Press and release the learn b utton on the
garage door opene r motor .
.,. Note : once the b utton is p ressed, the re a re
30 seconds in w hich to in it iate the next
step.
13. On t he Home link keypad ins ide t he ve hi
cl e, fi rmly press and hol d the Home link
bu tton prev ious ly progr ammed in phases
1 an d 2 for two seconds and release. Re
peat th is sequence
twice.
.,. Some vehicles may require the press/hold/
release sequence up to three times to com
plete the trai ning process .
.,. Homelink should now activate your rolling
code equipped d evice .
If the 5 minute time limit is exceeded , the
emergency flashers will flash one time to in
dicate that the p rocess has been te rm ina ted .
In this case, repeat steps 4 through 9.
If the emergency flashers do not flash
three
t imes (afte r about 15 -60 seconds) , program
ming was not successful. I n this case, repeat
steps 4 through 9 .
Remote contro l units for garage do or openers
in Canada are set to stop transmitting radio
fr eq uency sig nals afte r two seconds. Th is t ime ..,.
Page 93 of 244

may not be sufficient for the Homelink sys
tem to learn the radio frequency signal. Per
form all other steps as descr ibed above.
Operating the Homelink transmitter
The HomeLink transmitter works in the same
manner as the original hand held remote con
trol that came with the system.
Fi g. 100 Overhead co nsole: Homeli nk keypad
• Press the app ropriate programmed button
© , @ or@ to activat e th e des ired remote
c o ntrol func tion
¢ &. in General informa
tion on page 89.
Reprogramming a single button
A HomeLink button can be reprogrammed in
dividually without affecting the other button
allocations.
Programming the overhead keypad
• Press the app ropriate Homel ink button u n-
t il t he indicato r light begins flashing slowly .
Programming the bumper mounted tran s
mitter
1. H old the original remote control at a dis
tance between
0 -5 in . (0 -13 cm) from the
bumper below the appropriate headlight
fo r you r vehi cle (u se the sh ortest dis tan ce
possib le).
2. A im the remote con tro l just below the
driver side head light.
3. Press and hold the activation button on the remote contro l.
4 . The emergency flashers wi ll flash
three
times
(after about 15 -60 seconds) w hen
Homelink 91
the p rogramming is successful. Now re
l ease the button on the remote control.
• If the dev ice utilizes a rolling code, p lease
follow phase 3 of ¢
page 89, Programming
the Home Link transmitter
for rolling code
programm ing .
Th is p rocedu re will cause the e xisting pro
gramming on the Homelink button to be
erased!
Erasing the programming of the
Homelink transmitter
When you erase the programming, the pro
gramming on all three of the transmitter channels with be lost!
• Perform steps 1 to 4 as described on
~ page 90, Phase 1: programming the over
head k eypad .
When completed, the Homelink system will
be in the prog ramm ing mode and is then
r eady to learn the codes fo r remote controlled
devices.
(D Tips
- Programmed buttons can not be erased
ind iv idually.
- For security reasons you are advised to erase the programming of the Homelink
system before yo u se ll you r vehicle.
Page 94 of 244

92 Driving Safel y
Driving Safely
General notes
Safe driving habits
Please remember -safety first!
This chapter contains important information,
tips, instructions and warnings that you need
to read and observe for your own safety, the
safety of your passengers and others . We have
summarized here what you need to know
about safety belts, a irbags, ch ild restra ints as
well as child safety. Your safety is for us
priori
ty number 1.
Always observe the info rmat ion
and warn ings in th is sect ion -fo r yo ur own
safety as well as for that of your passengers.
The information in this se ction app lies to all
model ve rsions of your veh icle . Some of the
feat ures desc ribed in this sec tions may be
standard equipment on some models, or may
be optional equipment on others . If you are
not sure, ask your authorized Aud i dealer.
A WARNING
- Make certain that you follow the instruc
t ions and heed the WARNINGS in this
Manual. It is in your interest and in the
interest of your passengers .
- Always keep the complete Owner's Liter
ature in your Audi when you lend or sell
yo ur vehicle so that this important info r
mation will a lways be ava ilable to the
dr iver and passenge rs.
- Always keep the Owner's literature handy
so that you can find i t eas ily if you have
ques tions.
Safety equipment
The safety features are part of the occupant
restraint system and work together to help
redu ce the risk of injury in a wide variety of
accident situations.
Your safety and the safety of your passenge rs
should not be left to chance. Advances in
technology have made a varie ty o f fea tures
avai la bl e to he lp re duce the risk of injury in an accident
. The following is a lis ting o f just a
few of the safety features in your Audi:
- sophis tic ated s afety be lts fo r drive r and a ll
passenger sea ting pos it ions,
- safety belt pre-tensione rs,
- fro nt airbags,
- knee airbags for the front seats,
- side airbags in the front seats,
- LATCH anchorages for child restraints,
- ad justab le steering column .
T hese ind iv idual safety features can wor k to
ge ther as a sys tem to he lp p rotec t you and
you r passengers in a wide range of accidents.
These features cannot wo rk as a system if
they are not always p roper ly adjusted and
properly used!
Safet y is everyb ody's re spon sibilit y!
Important things to do before driving
Safety is everybody's job! Vehicle and occu
pant safety always depends on the informed and careful driver.
For yo ur safety and the safety of you r passen
gers,
befor e driving alwa ys:
"' Make s ure that all lights and signa ls are op
erati ng correctly .
"' Ma ke su re t hat the t ire p ressu re is co rrec t.
"' Mak e su re that all windows are clean and a f
ford good vis ibility to the outs ide.
"' Sec ure all luggage and other items caref ully
I:!) page 66.
"'Make sure that nothing can interfere with
the pedals.
"' Adjust front seat, head res traint and mirrors
correctly for your height .
"' Inst ruct passe ngers to adjust the head re
st raints accord ing to the ir height .
"' Ma ke sur e to use the r igh t chi ld restraint
correc tly to protect c hild ren
¢ page 130,
Child Safety .
"'Sit properly in your seat and make sure that
your passengers do the same
I:!) page 60,
General recommendations. .,_
Page 95 of 244

.. Fasten your safety belt and wear it properly.
Also instruct your passengers to fasten their
safety belts properly ¢
page 101.
What impairs driving safety?
Safe driving is directly related to the condi
tion of the vehicle, the driver as well as the
driver's ability to concentrate on the road
without being distracted.
The driver is responsible for the safety of the
veh icle and a ll of its occupants . If your ability
to drive is impaired, safety risks for everybody
in the vehicle increase and you also become a
hazard to everyone else on the road ¢
,&..
Therefore:
.,. Do not let yourself be distracted by passen
gers or by us ing a cellular telephone.
.. NEVER drive when your driv ing ability is im
paired (by medicat ions, alcohol, drugs, etc.) .
.. Observe all traffic laws, ru les of the road
and speed limits and plain common sense.
.. ALWAYS adjust your speed to road, traffic
and weather conditions.
.. Take frequent breaks on long trips. Do not
drive for more than two hours at a stretch .
.. Do NOT drive when you are tired, under
pressure or when you are stressed.
A WARNING
Impaired driving safety increases the risk
of serious personal injury and death when
ever a vehicle is being used.
Drivin g Sa fely 93
Proper occupant
seating positions
Proper seating position for the driver
The proper driver seating position is impor
tant for safe, relaxed driving.
Fig. 101 The correct d istance between driver an d
steer ing wheel
For your own safety and to reduce the risk of
injury in the event of an accident, we recom
mend that you adjust the driver's seat to the
f o ll ow ing pos ition:
.,. Adjust the driver's seat so that you can easi
ly push the pedals all the way to the floo r
while keeping your knee(s) slightly bent
q&_ ,
.. Adjust the angle of the seatback so that it is
in an upright position so that your back
comes in full contact with it when you drive.
.. Adjust the steering wheel so that there is a
distance of at least 10 inches (25 cm) be
tween the steering wheel and your breast
bone¢
fig. 101. If not possible, see your au
thorized Audi dealership about adaptive
equ ipment .
.. Adjust the steering wheel so that the steer
ing wheel and airbag cover points at your
chest and not at your face .
.. Grasp the top of the steering whee l with
your elbow(s) slightly bent .
.. Adjust the head restraint so the upper edge
is as even as possible with the top of your
head . If that is not poss ible, try to adjust
the head restraint so that it is as close to
this pos ition as possib le .
.. Fasten and wear safety belts correctly
qpage 104.
Page 96 of 244

94 Driving Safely
• Always keep both feet in the footwell so
that you are in control of the vehicle at all
times.
For detailed information on how to adjust the
driver's seat, see
c::> page 61.
A WARNING
Drivers who are unbelted, out of position
or too close to the airbag can be seriously
injured by an airbag as it deploys. To help
reduce the risk of serious personal injury:
- Always adjust the driver's seat and the
steering wheel so that there are at least
10 inches (25 cm) between your breast
bone and the steering wheel.
- Always adjust the driver's seat and the
steering wheel so that there are at least
4 inches (10 cm) between the knees and
the lower part of the instrument panel.
- Always hold the steering wheel on the
outside of the steering wheel rim with
your hands at the 9 o'clock and 3 o'clock positions to help reduce the risk of per
sonal injury if the driver's airbag inflates.
- Never hold the steering wheel at the
12 o'clock position or with your hands at
other positions inside the steering wheel
rim or on the steering wheel hub. Hold
ing the steering wheel the wrong way
can cause serious injuries to the hands,
arms and head if the driver's airbag in
flates
- Pointing the steering wheel toward your
face decreases the ability of the supple
mental driver's airbag to protect you in a
collision.
- Always sit in an upright position and nev
er lean against or place any part of your
body too close to the area where the air
bags are located.
- Before driving, always adjust the front
seats and head restraints properly and
make sure that all passengers are prop
erly restrained.
- Never adjust the seats while the vehicle
is moving. Your seat may move unexpect- edly and you could lose control of the ve
hicle.
- Never drive with the backrest reclined or
tilted far back! The farther the backrests
are tilted back, the greater the risk of in
jury due to incorrect positioning of the safety belt and improper seating posi
tion .
- Children must always ride in child seats
c::> page 130. Special precautions apply
when installing a child seat on the front passenger seat¢
page 109.
Proper seating position for the front
passenger
The proper front passenger seating position
is important for safe, relaxed driving .
For your own safety and to reduce the risk of
injury in the event of an accident, we recom
mend that you adjust the seat for the front
passenger to the following position :
• Adjust the angle of the seatback so that it is
in an upright position and your back comes in full contact with it whenever the vehicle is
moving.
• Adjust the head restraint so that the upper
edge is as even with the top of your head as
possible but not lower than eye level and so
that it is as close to the back of your head as
possible
c::> page 95.
• Keep both feet flat on the floor in front of
the front passenger seat.
• Fasten and wear safety belts correctly
c::> page 104.
For detailed information on how to adjust the
front passenger's seat, see
c::> page 60 .
A WARNING
-
Front seat passengers who are unbelted,
out of position or too close to the airbag
can be seriously injured or killed by the air
bag as it unfolds. To help reduce the risk of
serious personal injury:
 1
1 2
2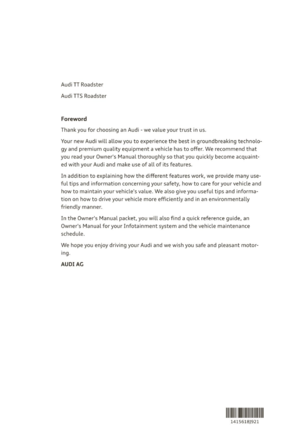 3
3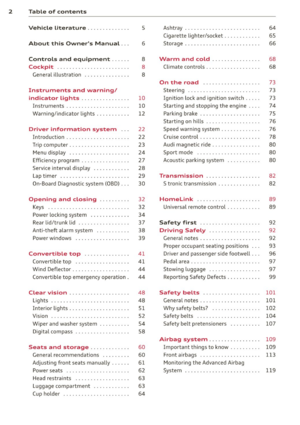 4
4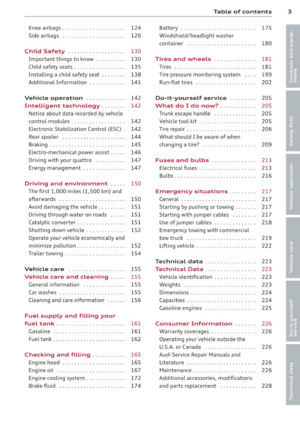 5
5 6
6 7
7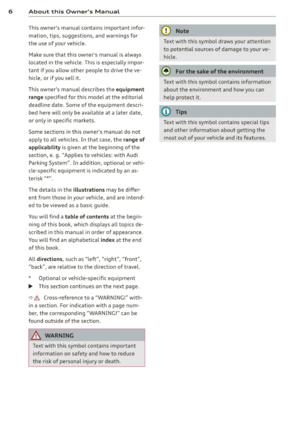 8
8 9
9 10
10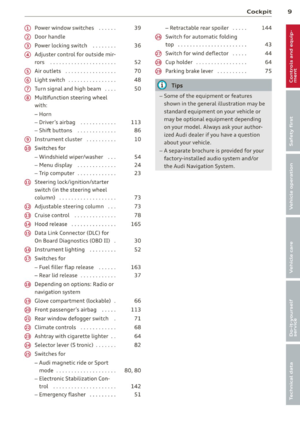 11
11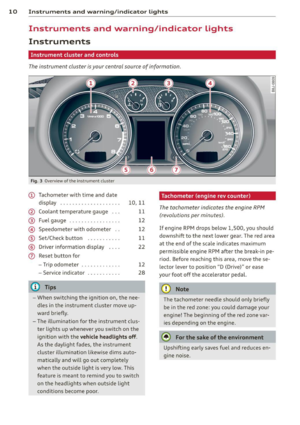 12
12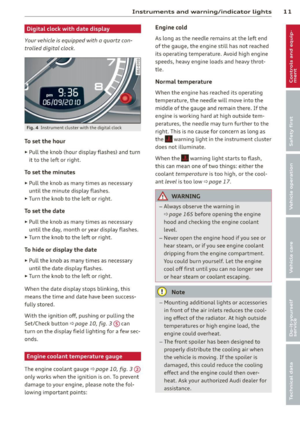 13
13 14
14 15
15 16
16 17
17 18
18 19
19 20
20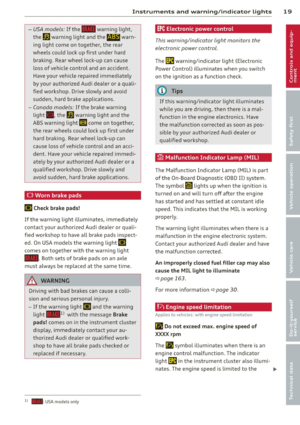 21
21 22
22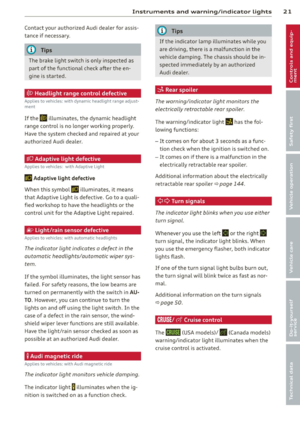 23
23 24
24 25
25 26
26 27
27 28
28 29
29 30
30 31
31 32
32 33
33 34
34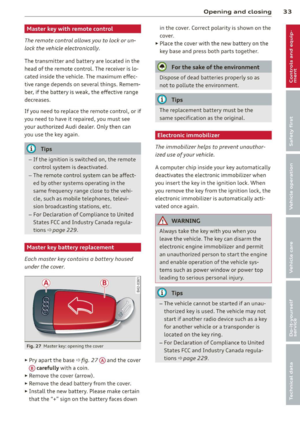 35
35 36
36 37
37 38
38 39
39 40
40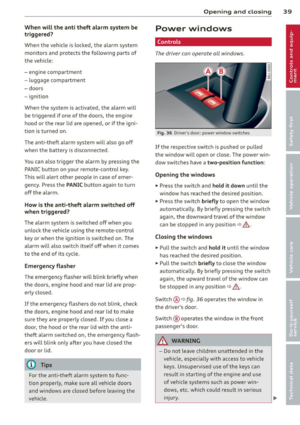 41
41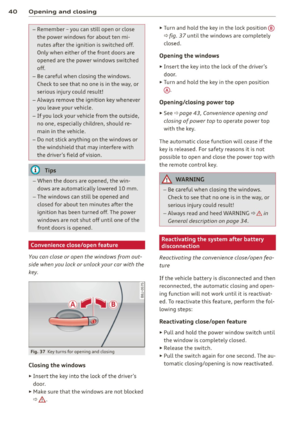 42
42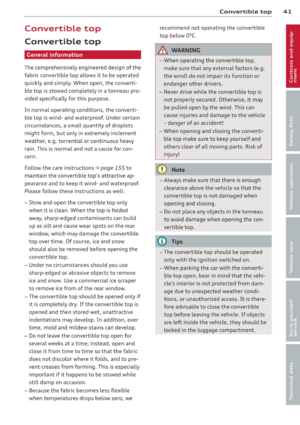 43
43 44
44 45
45 46
46 47
47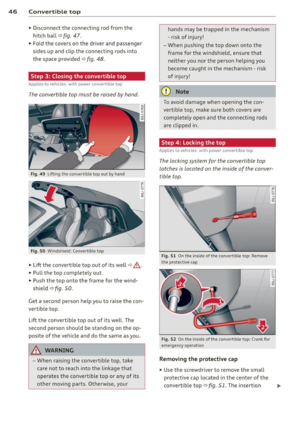 48
48 49
49 50
50 51
51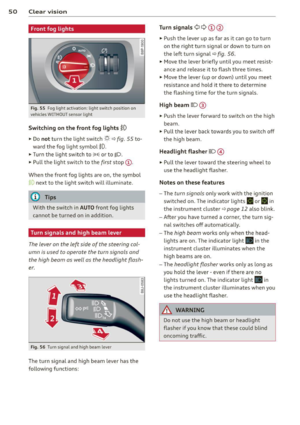 52
52 53
53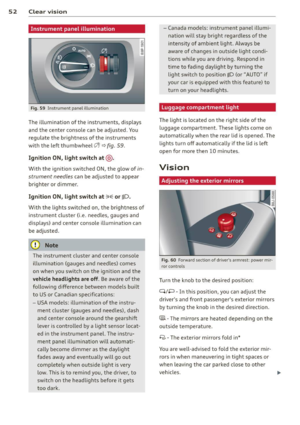 54
54 55
55 56
56 57
57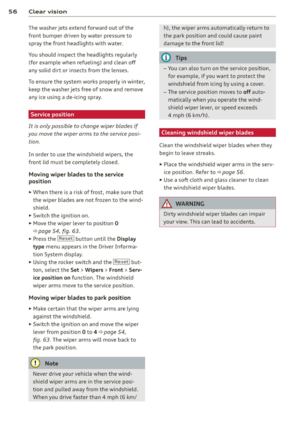 58
58 59
59 60
60 61
61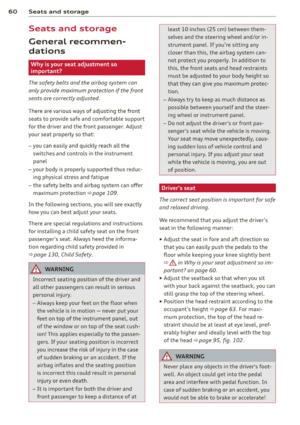 62
62 63
63 64
64 65
65 66
66 67
67 68
68 69
69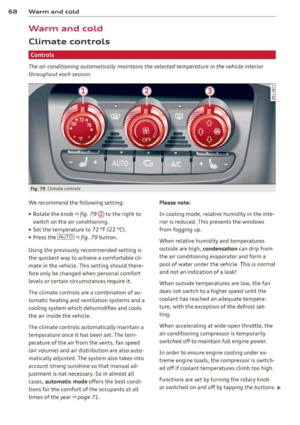 70
70 71
71 72
72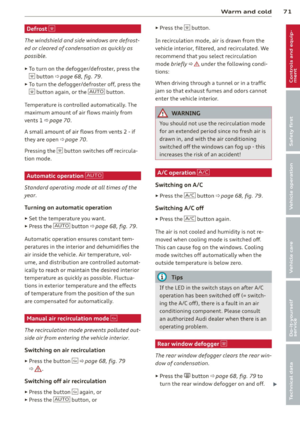 73
73 74
74 75
75 76
76 77
77 78
78 79
79 80
80 81
81 82
82 83
83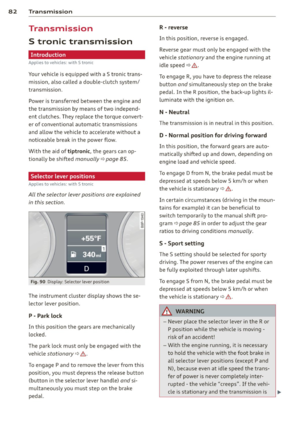 84
84 85
85 86
86 87
87 88
88 89
89 90
90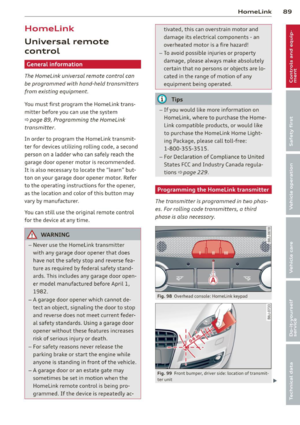 91
91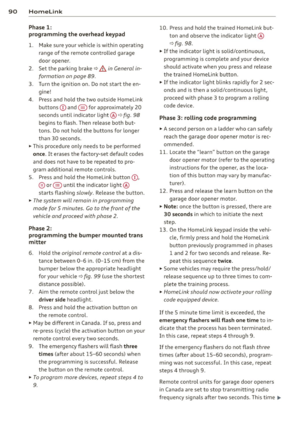 92
92 93
93 94
94 95
95 96
96 97
97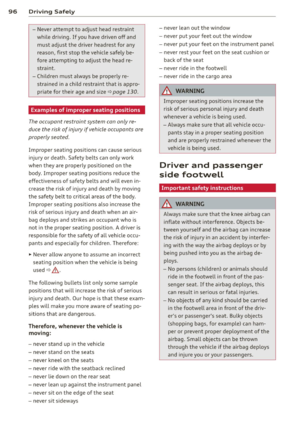 98
98 99
99 100
100 101
101 102
102 103
103 104
104 105
105 106
106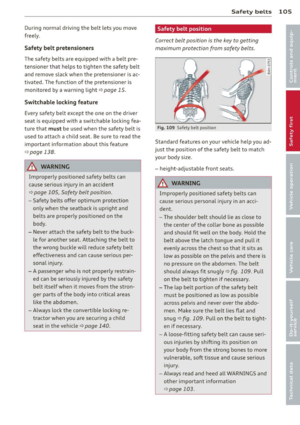 107
107 108
108 109
109 110
110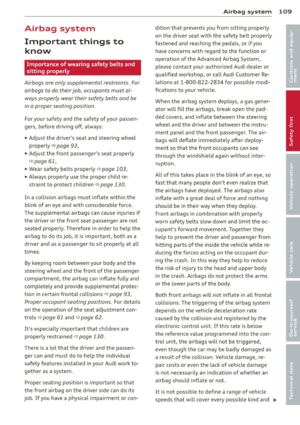 111
111 112
112 113
113 114
114 115
115 116
116 117
117 118
118 119
119 120
120 121
121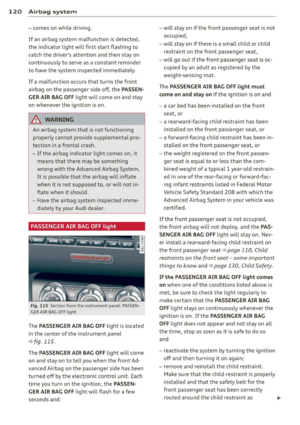 122
122 123
123 124
124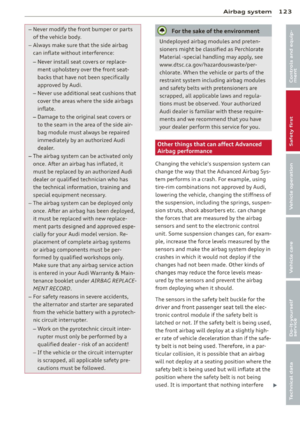 125
125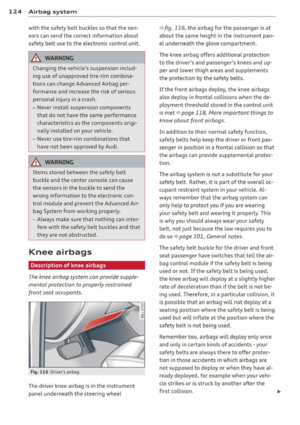 126
126 127
127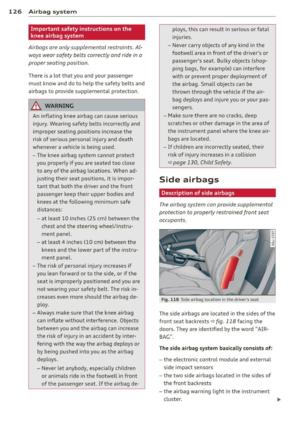 128
128 129
129 130
130 131
131 132
132 133
133 134
134 135
135 136
136 137
137 138
138 139
139 140
140 141
141 142
142 143
143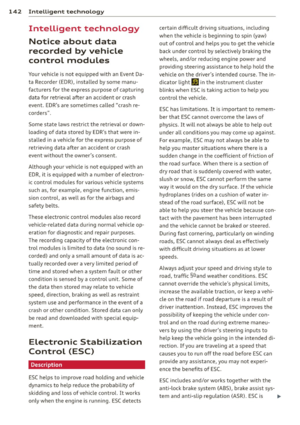 144
144 145
145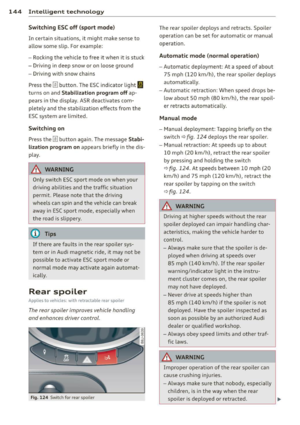 146
146 147
147 148
148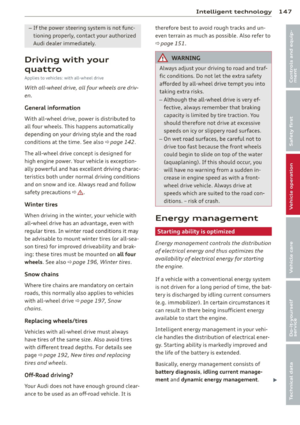 149
149 150
150 151
151 152
152 153
153 154
154 155
155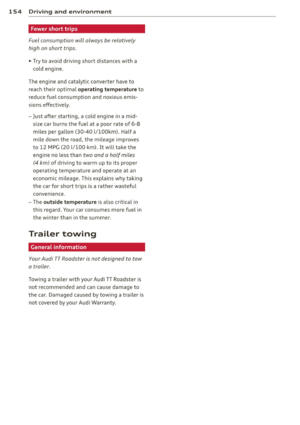 156
156 157
157 158
158 159
159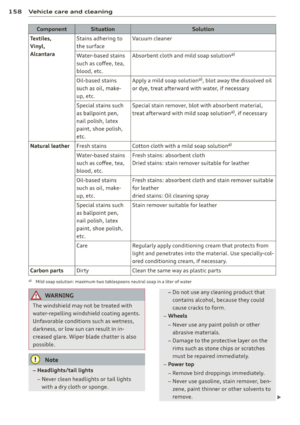 160
160 161
161 162
162 163
163 164
164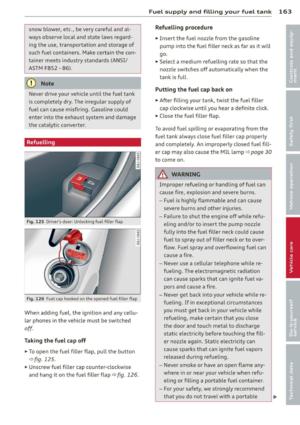 165
165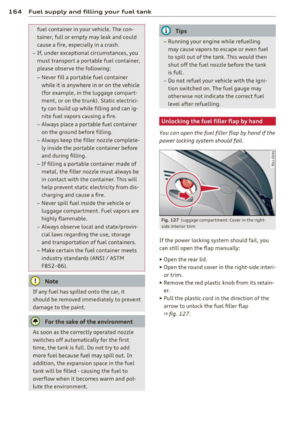 166
166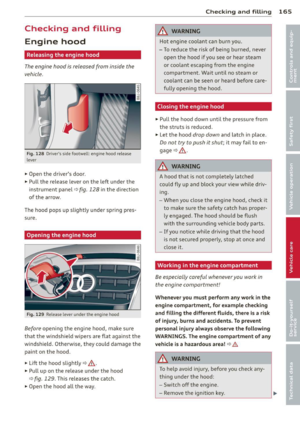 167
167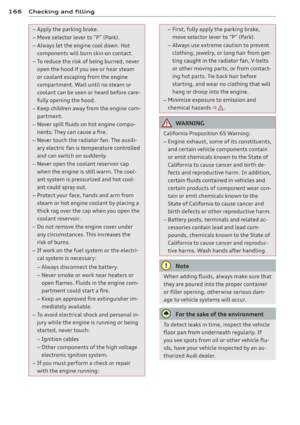 168
168 169
169 170
170 171
171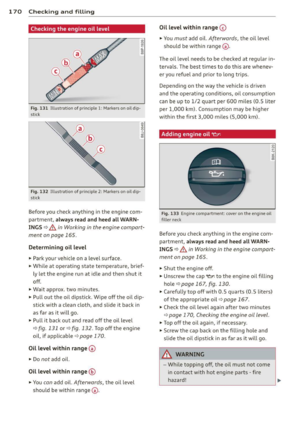 172
172 173
173 174
174 175
175 176
176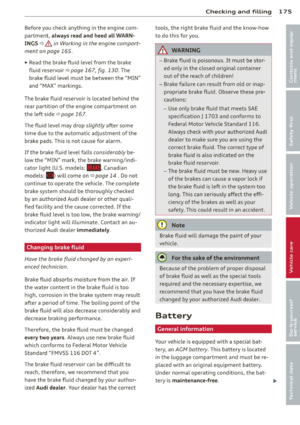 177
177 178
178 179
179 180
180 181
181 182
182 183
183 184
184 185
185 186
186 187
187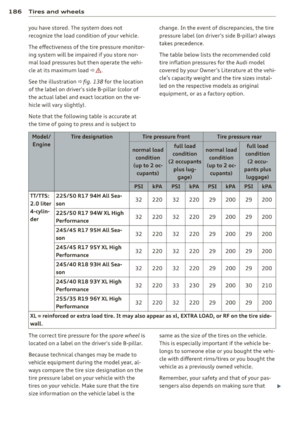 188
188 189
189 190
190 191
191 192
192 193
193 194
194 195
195 196
196 197
197 198
198 199
199 200
200 201
201 202
202 203
203 204
204 205
205 206
206 207
207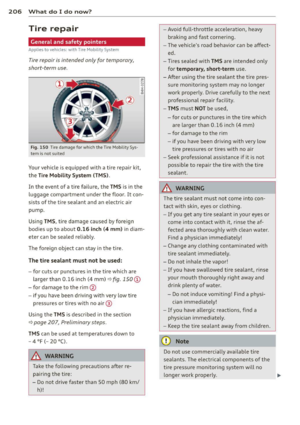 208
208 209
209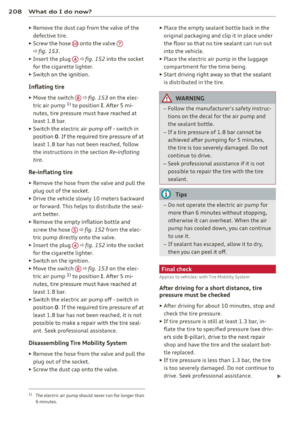 210
210 211
211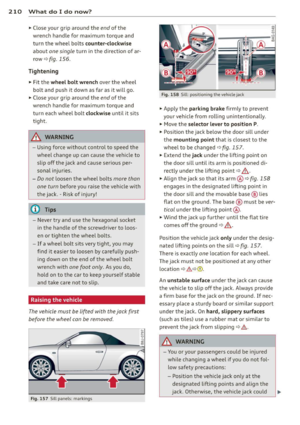 212
212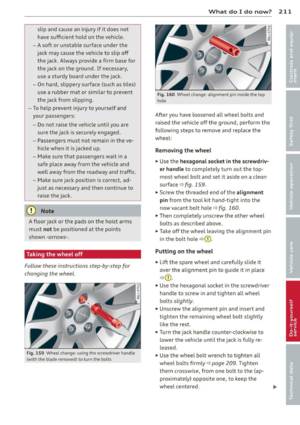 213
213 214
214 215
215 216
216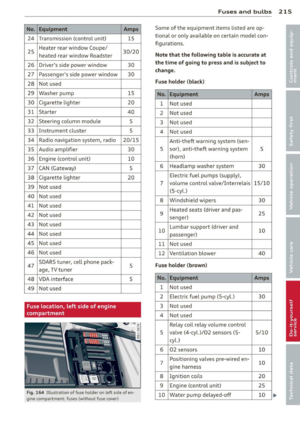 217
217 218
218 219
219 220
220 221
221 222
222 223
223 224
224 225
225 226
226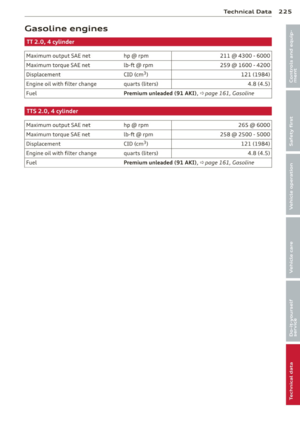 227
227 228
228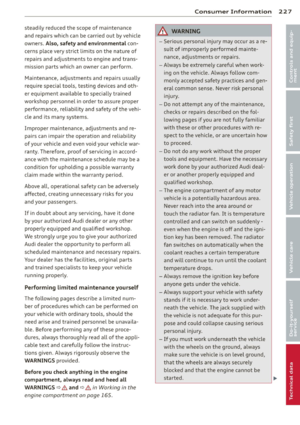 229
229 230
230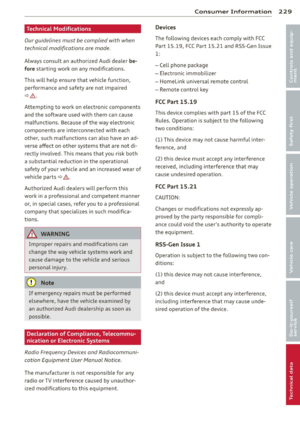 231
231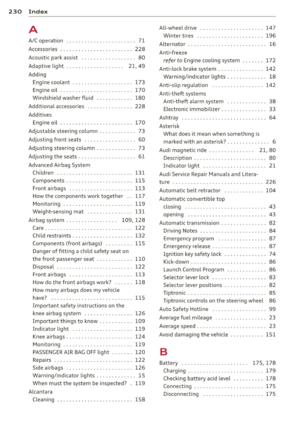 232
232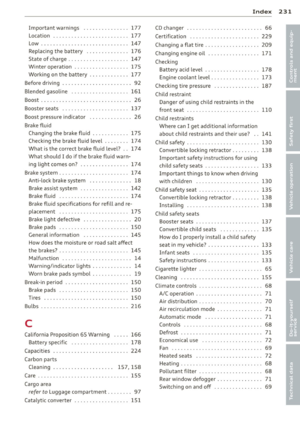 233
233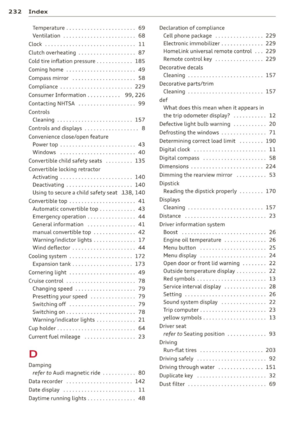 234
234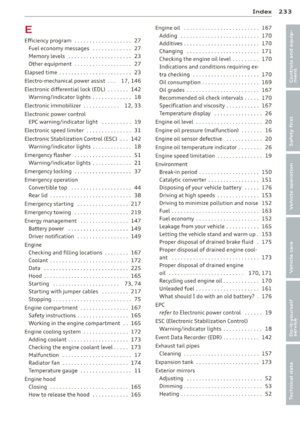 235
235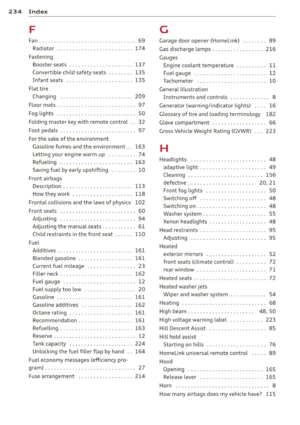 236
236 237
237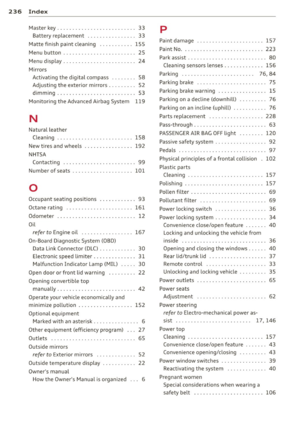 238
238 239
239 240
240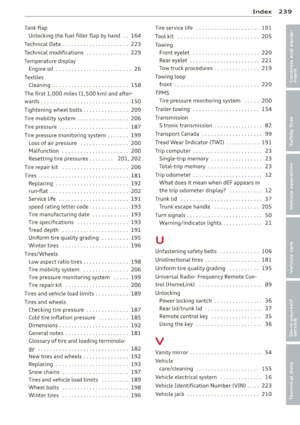 241
241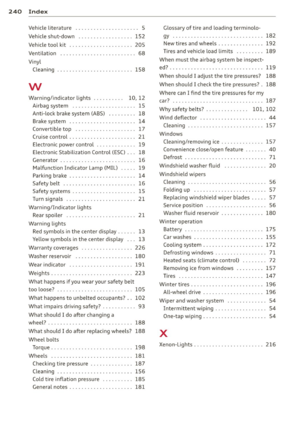 242
242 243
243