Page 249 of 292

-Do not change the tire pressure when the
temperature of the tire is high. This
could result in serious damage to the tire
and even cause the tire to burst, increas
ing the risk of an accident.
- A tire with low pressure flexes more. This
heats the tire up too much . Th is could
cause the tread to separate and even
cause the tire to burst, increasing the
risk of an accident .
- The tire pressure monitoring system
does not warn about damage or defects
in the tire construct ion that could cause
the tire to burst, for examp le. Inspect
your ti res regularly.
@) For the sake of the environment
Low tire pressure increases fuel consump
tion and tire wear.
(D Tips
-If tires are replaced, the sensors/valves
do not need to be removed or replaced.
Just replace the valve stem and, if neces
sary, the valve and the wheel electronics.
If you have questions, see your author
ized Audi dealer or a qualified workshop.
- Using the tire mobility kit can results in
an incorrect display or a malfunction in
the tire pressure monitoring system.
Have the sensors replaced by an author
ized Audi dealer or a qualified workshop.
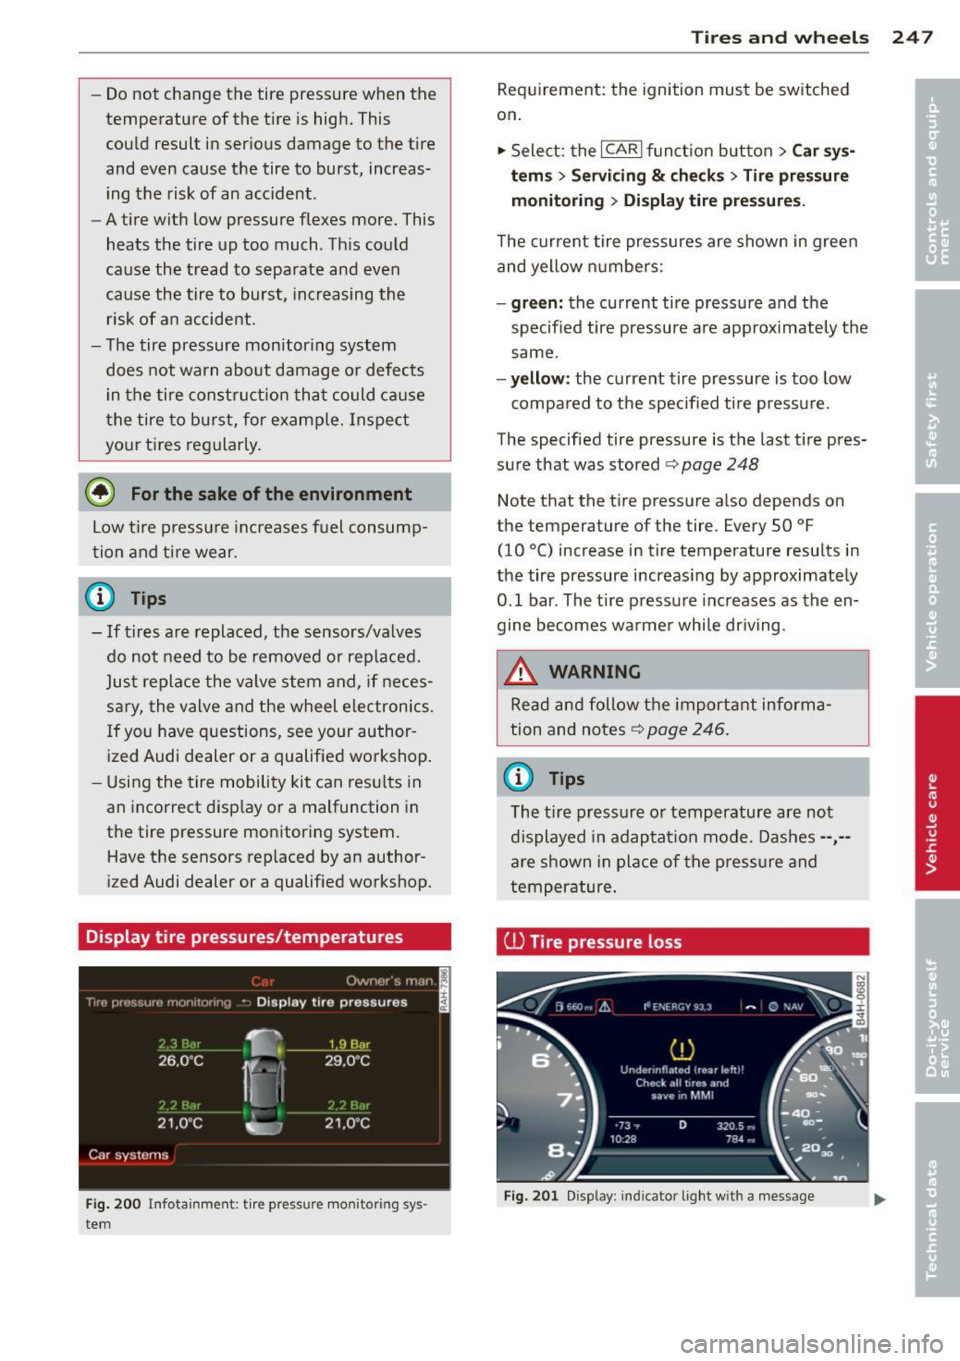
Display tire pressures/temperatures
Fig. 200 Infotai nm en t: t ire pres sur e mo nito rin g sys
tem
Tires and wheels 247
Requirement: the ignition must be switched
on .
'" Select: the
I CAR I function button > Car sys
tem s
> Servicing & checks > Tire pressure
monitoring
> Di sp lay tire pressures.
The current tire pressures are shown in green
and yellow numbers:
-green: the current tire pressure and the
specified tire pressure are approximately the
same.
-yellow: the current tire pressure is too low
compared to the specified tire pressure.
The specified tire pressure is the last tire pres
sure that was stored
c::> page 248
Note that the tire pressure also depends on
the temper ature of the tire . Every 50 °F
(10
°() increase in tire temperature results in
the tire pressure increas ing by approximately
0.1 bar . The tire pressure increases as the en
gine becomes warmer while driving .
.&_ WARNING
Read and follow the important informa
tion and notes
c::> page 246 .
© Tips
The t ire pressure or temperature are not
displayed in adaptat ion mode. Dashes--,-
are shown in place of the pressure and
temperature.
ill Tire pressure loss
Fig. 201 Disp lay: in dic ator light w ith a message
-
Page 250 of 292
![AUDI RS7 SPORTBACK 2014 Owners Manual 248 Tires and wheels
If the [fJ] indicator light turns on, the pressure
in at least one tire is too low or new sensors
were not adapted:
[f!l indicator lights turns on after t AUDI RS7 SPORTBACK 2014 Owners Manual 248 Tires and wheels
If the [fJ] indicator light turns on, the pressure
in at least one tire is too low or new sensors
were not adapted:
[f!l indicator lights turns on after t](/manual-img/6/57649/w960_57649-249.png)
248 Tires and wheels
If the [fJ] indicator light turns on, the pressure
in at least one tire is too low or new sensors
were not adapted:
[f!l indicator lights turns on after turning
the ignition on
The tire pressure is too low compared to the
specified pressure.
.,. Check and store the tire pressure(s) the next
time it is possible¢
page 248.
[f!l indicator light turns on while driving
Wheels with new sensors were not adapted or
the tire pressure has reached a critical level
compared to the spec ified pressure.
.,. Avoid unnecessary steering and braking ma
neuvers .
.,. Adapt your driving style to the situation .
.,. Stop as soon as possible and check the
ti re(s).
.,. If it is possible to continue driving, see an
authorized Audi dealer or a qualified work
shop immediately and have your tire(s) re
paired or replaced.
A WARNING
Read and follow the important informa
tion and notes
~page 246.
Storing new tire pressures
-
Correctly stored tire pressure specifications
are necessary for reliable tire pressure moni
toring.
.,. Check the tire pressures in all wheels.
.,. If necessary, correct the tire pressure ac
cording to the specifications on the sticker
on the side of the driver's door . Only correct
the pressure in tires whose temperature is
approximately the same as the ambient
temperature. If the temperature of the tire
is higher than ambient temperature, the tire
pressure must be increased approximately
0.2 bar above the value on the sticker.
.,. Switch on the ignition.
.,. Select :
I CARI function button > Car systems
> Tire pressure monitoring > Store tire pressures.
After storing,
the tire pressure
monitoring system measures the current
tire pressures and stores them as the new
specified pressures.
,. If the changed tire pressures are not dis
played in the Infotainment system, drive the
veh icle for approx imately 10 minutes so
that the sensor signal from the wheels is re
ceived aga in .
During this adaptation phase,--,--is displayed
for the pressure and temperature and the tire
pressure monitoring system is only partially
available.
It only provides a warning if one or
more tire pressures is be low the min imum
permitted spec ified pressure . If this is the
case, the
[fJ] indicator light appears with a
message.
A WARNING
Read and follow the important informa
tion and notes¢
page 246.
Malfunctions
Fig. 202 Display : indicator light with a message
-
If the tire pressure monitoring system is not
available,
the m indicator light appears in
the driver information system. The
[fJ] indica
tor light also blinks for approximately one mi
nutes each time the ignition is switched on.
The tire pressure monitoring system cannot be selected in the Infotainment system. The
malfunction could be caused by the following
examples:
- If the message appears at the end of the
adaptation phase, the system cannot detect
the wheels installed on the vehicle. This may
resu lt from one or more wheels being ..,.
Page 251 of 292
installed without wheel sensors or with in
compatible wheel sensors.
- A whee l sensor or another component has
failed.
- Using snow cha ins can affect the function of
the system because of the shie lding effect
of the chains.
- Th e tire pressure monitoring system is not
available due to a malfunction .
- Transmitters with the same frequency, such
as headphones or remote -contro lled devi
ces, may cause a temporary system ma l
function due to the strong electromagnetic
field.
The
ffim indicator light turns off once the ti re
press ure monitoring system is avai lab le again.
If you cannot correct the malfunction and the
m i ndicator light stays on, drive to an au
thor ized Audi dealer or a qualified workshop
to have the ma lfunction corrected .
Tires and wheels 249
•
•
Page 252 of 292

250 What do I do now?
What do I do now?
Emergency warning
triangle
App lies to vehicles: with emerge ncy warning triangle
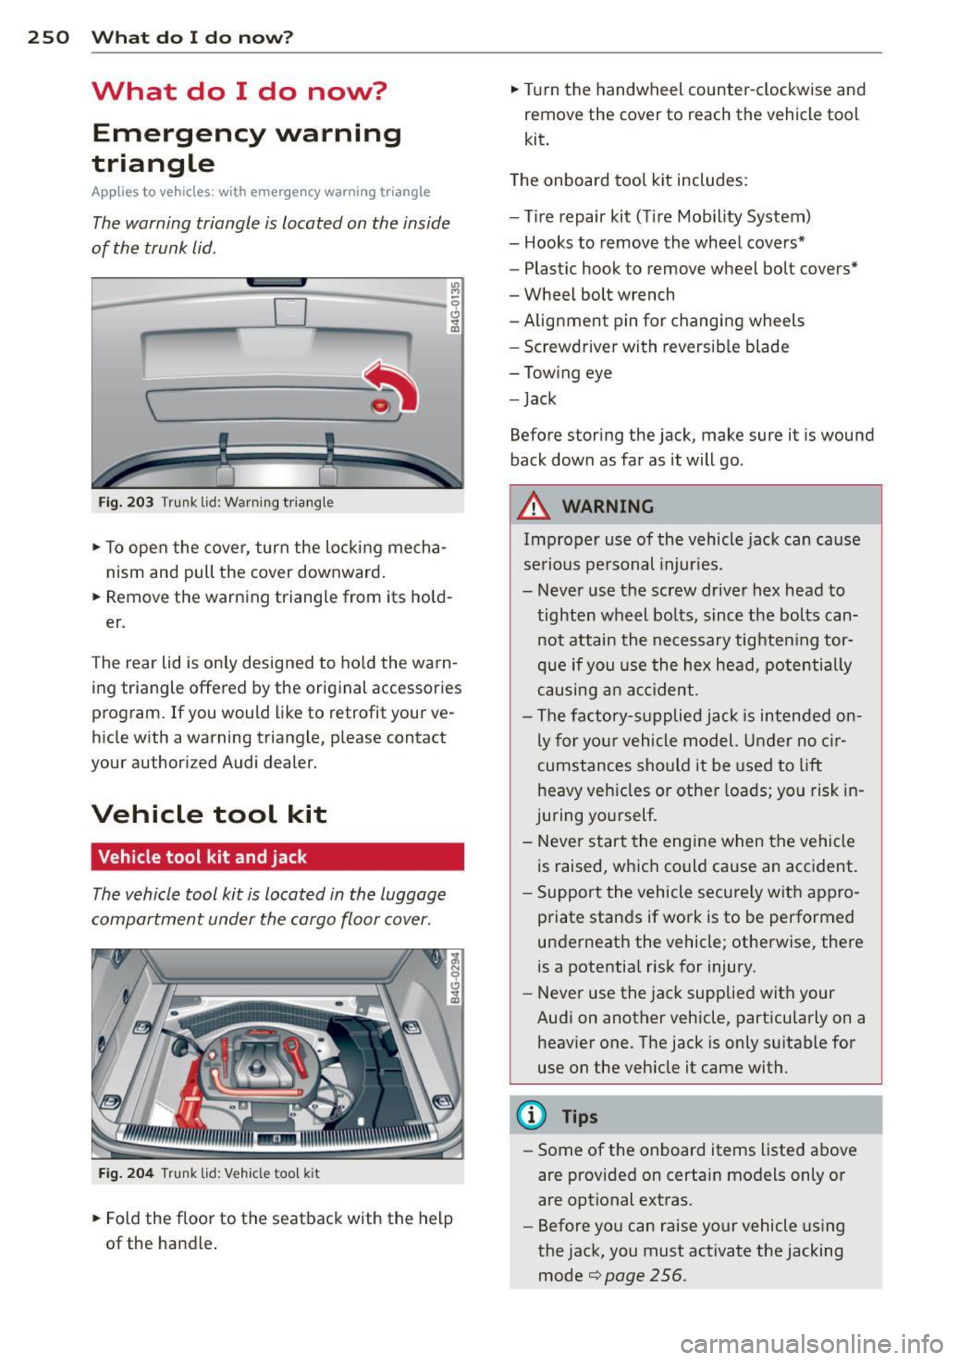
The warning triangle is located on the inside
of the trunk lid .
-
"' M ~ 0 6
~ ~
Fig. 203 Trunk lid: Warning triang le
.,. To open the cover, turn the locking mecha
nism and pull the cover downward .
" m
.,. Remove the warning triang le from its hold
er .
The rear lid is only designed to hold the warn
ing triangle offered by the original accessories
program. If you would like to retrofit your ve
hicle with a warning triangle, p lease contact
your authorized Audi dealer.
Vehicle tool kit
Vehicle tool kit and jack
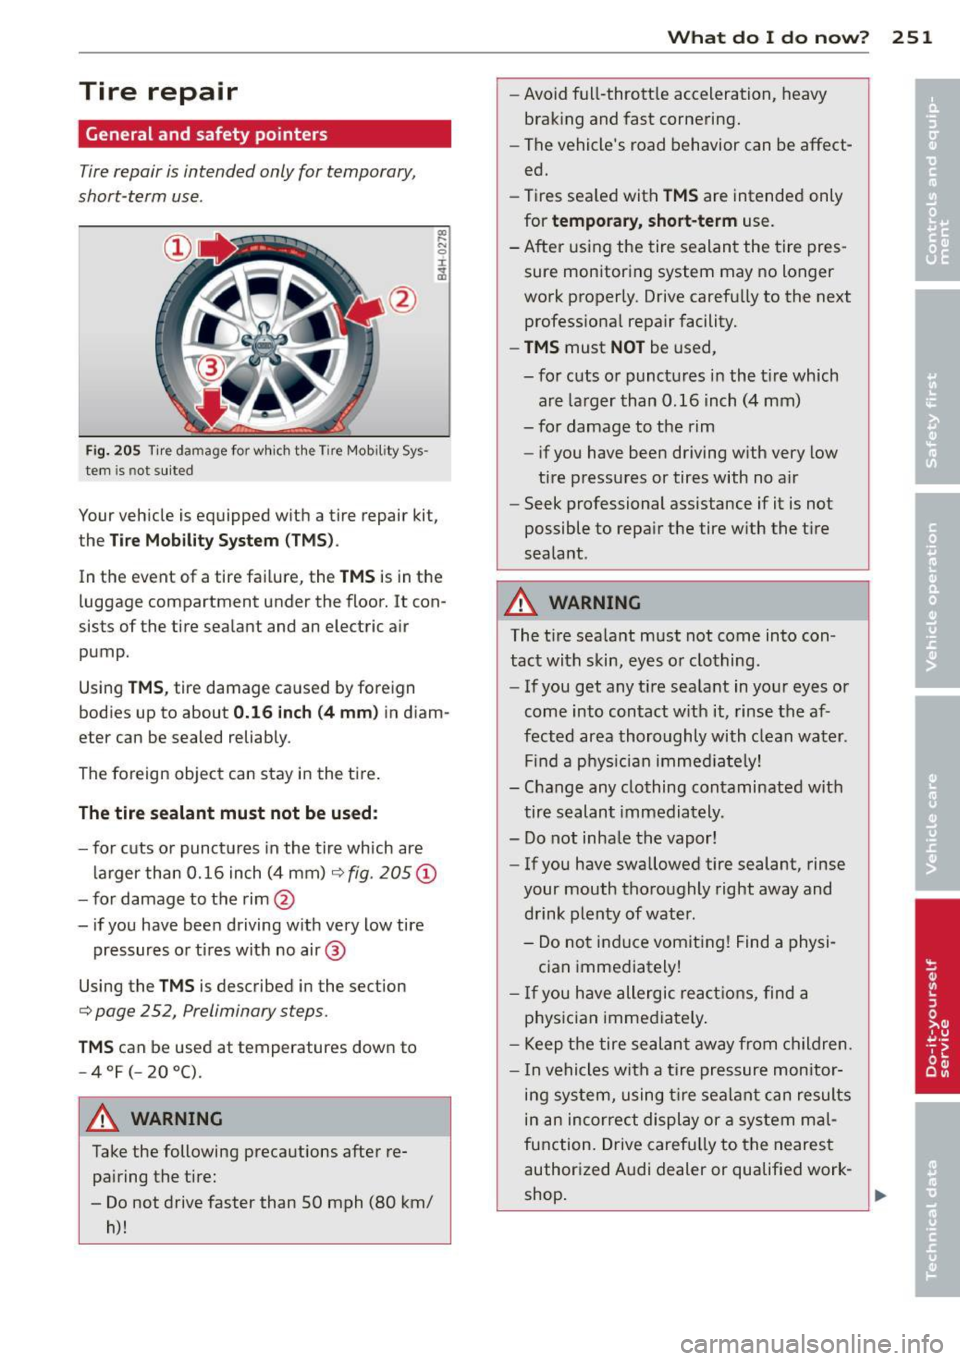
The vehicle tool kit is located in the luggage
compartment under the cargo floor cover.
Fig. 204 Trunk lid: V ehicl e too l kit
.,. Fold the floor to the seatback with the help
of the handle . .,.
Turn the handwheel counter-clockwise and
remove the cover to reach the veh icle tool
kit.
T he onboard tool kit includes :
- Tire repair kit (Tire Mobility System)
- Hooks to remove the wheel covers*
- Plastic hook to remove wheel bolt covers*
- Wheel bolt wrench
- Alignment pin for changing wheels
- Screwd river with reversible bla de
-Towing eye
-J ack
Before storing the jack, make sure it is wound
back down as far as it will go .
A WARNING
Improper use of the vehicle jack can cause
serious personal injuries.
- Never use the screw driver hex head to
tighten wheel bolts, since the bolts can
not attain the necessary tighten ing tor
que if you use the hex head, potentially
causing an accident .
- The factory-supplied jack is intended on
ly for your vehicle model. Under no cir
cumstances should it be used to lift
heavy veh icles or other loads; you risk in
juring yourself.
- Never start the engine when the vehicle
is raised, which could cause an acc ident.
- Support the vehicle securely with appro
priate stands if work is to be performed
underneath the vehicle; otherwise, there
is a potential risk for injury.
- Never use the jack supplied with your
Audi on another vehicle, particularly on a
heav ier one. The jack is only suitable for
use on the veh icle it came with.
@ Tips
- Some of the onboard items listed above
are provided on certain models only or
are optional extras .
- Before you can raise your vehicle using
the jack, you must activate the jacking
mode¢
page 256 .
Page 253 of 292

Tire repair
General and safety pointers
Tire repair is intended only for temporary,
short -term use .
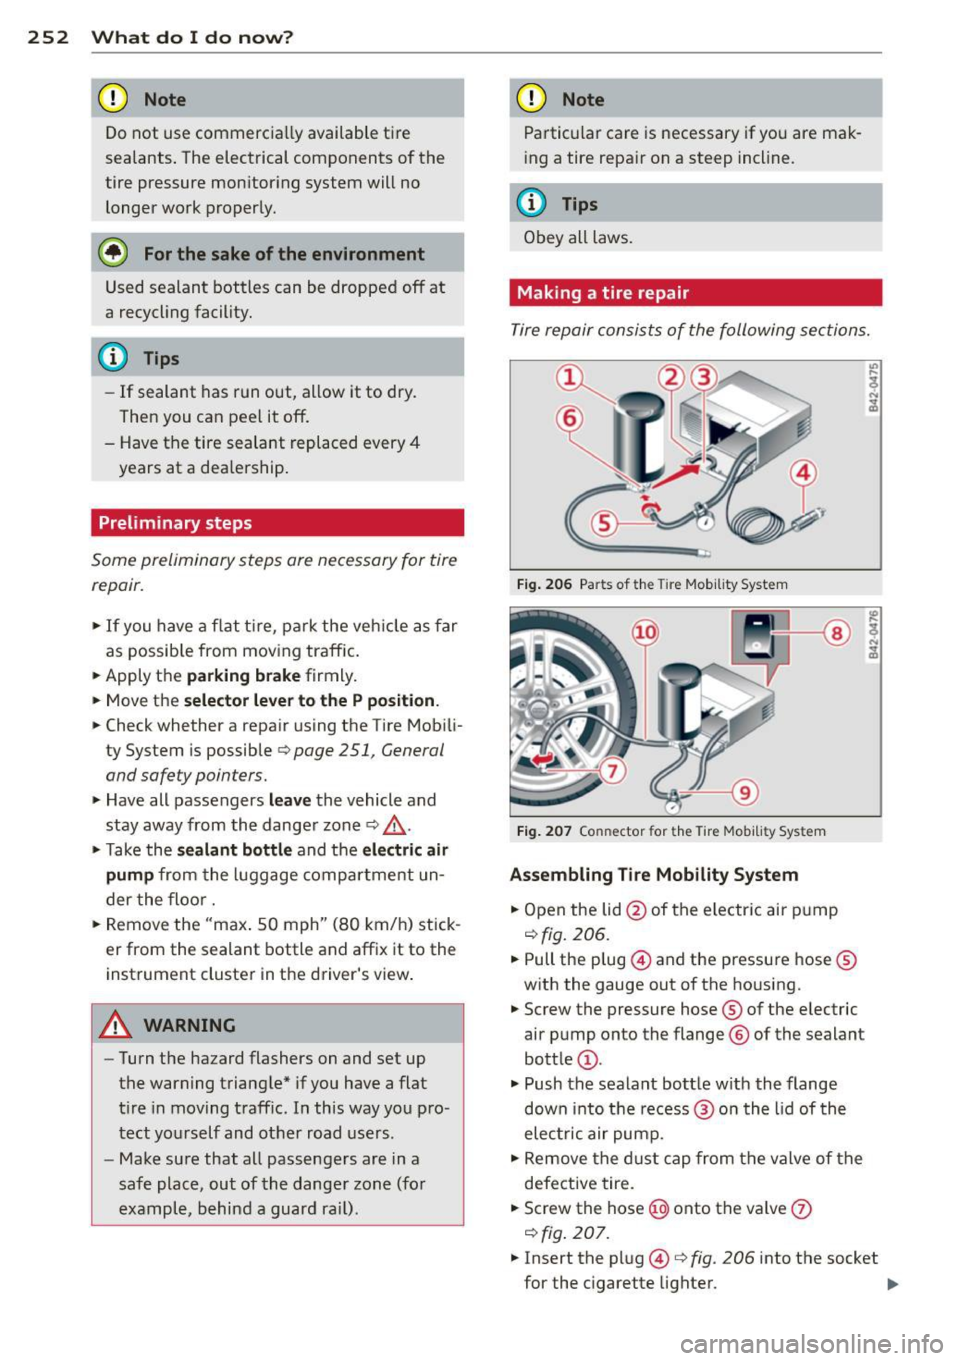
Fig. 205 Tire damage for w hich the Tire Mobil ity Sys ·
tern is not su ited
Your veh icle is equipped w ith a tire repair kit,
the
Ti re Mob ilit y Sys tem (TM S).
In the event of a tire fai lure, the TM S is in the
luggage compartment under the floor. It con
sists of the tire sealant and an electric air
pump.
Using
TMS , tire damage caused by foreign
bodies up to about
0.1 6 inch (4 mm ) in diam
eter can be sealed reliably.
The foreign object can stay in the tire .
The tire se alant must not be us ed :
- for c uts or punct ures in the tire which are
larger than 0.16 inch (4 mm)
¢ fig. 205 @
- for damage to the rim@
- if you have been driving with very low tire pressures or tires with no air @
Using the
TM S is described in the section
¢ page 252, Preliminary steps.
TM S can be used at temperatures down to
-4°F(-20°C) .
A WARNING
Take the following precautions after re
pairing the tire:
- Do not drive faster than
50 mph (80 km/
h)!
What do I d o now ? 251
-Avoid full-throttle acceleration, heavy
brak ing and fast cornering.
- The vehicle's road behavior can be affect
ed.
- Tires sea led with
T MS are intended only
for
t e mpo rary, sh or t-t erm use.
-After using the tire sealant the tire pres sure mon itoring system may no longer
work properly. Drive carefully to the next
professional repa ir facility.
- TMS must NOT be used,
- for cuts or punctu res in the t ire which
are larger than 0.16 inch (4 mm)
- for damage to the rim
- if you have been driving with very low
tire pressures or tires with no a ir
- Seek professional assistance if it is not
possible to repa ir the tire with the t ire
sealant .
A WARNING
The tire sea lant must not come into con
tact with skin, eyes o r clothing .
- If you get any tire sealant in your eyes or
come into contact w ith it, rinse the af
fected area thoroughly with clean water .
Find a phys ician immed iately!
- Change any clothing contaminated with
tire sealant immediately .
- Do not inha le the vapor!
- If you have swallowed tire sealant, rinse
your mouth thoroughly right away and
drink plenty of water .
- Do not induce vomiting! Find a physi
c ian immediately!
- I f you have allergic react ions, find a
physician immediately .
- Keep the tire sealant away from ch ildren .
- In vehicles with a tire pressure monitor-
ing system, using t ire sealant can results
in an incorrect display or a system mal
fu nction. Drive carefu lly to the neares t
authorized Audi dealer or qualified work-
shop . ..,.
Page 254 of 292

252 What do I do now?
(D Note
Do not use commerc ia lly available tire
sealants . The electrical components of the
tire pressure mon itoring system will no
longer work properly.
@ For the sake of the environment
Used sealant bottles can be dropped off at
a recycl ing facility.
@ Tips
- If sealant has run out, allow it to dry.
Then you can peel it off.
- Have the tire sealant replaced every 4
years at a dea lership.
Preliminary steps
Some preliminary steps ore necessary for tire
repair.
.,. If you have a fla t t ire, park the veh icle as far
as possible from moving traffic.
.,. Apply the
parking brake firmly .
.,. Move the
selector lever to the P position .
.,. Check whether a repair using the Tire Mobili
ty System is possible Q page 251, General
and safety pointers .
.,. Have all passengers leave the vehicle and
stay away from the danger zone
q ,& .
.,. Take the s ealant bottle and the electric air
pump
from the luggage compartment un
der the floor.
.,. Remove the "max . SO mph" (80 km/h) stick
er from the sealant bottle and aff ix it to the
instrument cluster in the driver's view .
A WARNING
-Turn the hazard flashers on and set up
the warning triangle* if you have a flat
tire in moving traffic. In this way you pro
tect you rs elf and other road users .
- Make sure that all passengers are in a
safe place, out of the danger zone (for
example, behind a guard ra il).
-
(D Note
Particular care is necessary if you are mak
ing a tire repa ir on a steep incl ine.
@ Tips
Obey all laws.
Making a tire repair
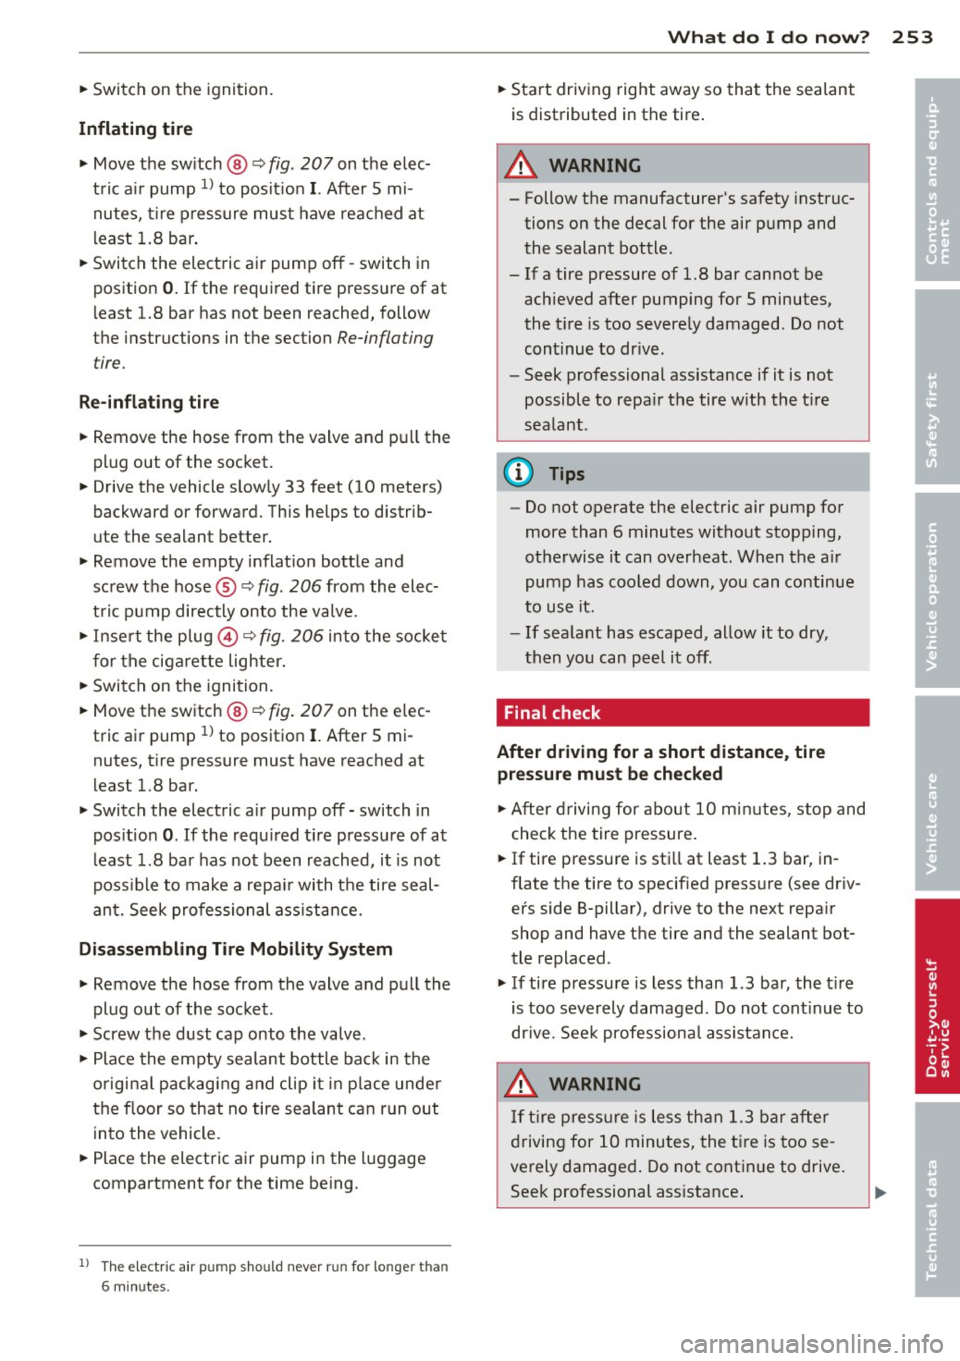
Tire repair consists of the following sections.
Fig. 206 Parts of t he Tire Mob ility System
Fig. 207 Co nn ector for the Tire Mobility Sys tem
Assembling Tire Mobility System
.,. Open the lid @of the electric air pump
qfig. 206.
.,. Pull the plug @and the pressure hose ®
with the gauge out of the housing .
.,. Screw the pressure hose ® of the electric
air pump onto the flange ® of the sealant
bottle @.
.,. Push the sealant bottle w ith the flange
down into the recess@ on the lid of the
electric air pump .
.,. Remove the d ust cap from the valve of the
defective tire .
.,. Screw the hose@) onto the valve
(J)
qfig. 207 .
.,. Insert the plug@¢ fig. 206 into the socket
for the cigarette lighter.
IJJ,
Page 255 of 292

~ Switch on the ignition.
Inflating tire
~ Move the sw itch @ c:> fig. 207 on t he e lec
t ric air pump
ll to posi tion I. After 5 mi
nutes, t ire press ure mus t have reac hed at
l east 1.8 ba r.
~ Switch the electric air pump off -switch in
position
0 . If the requi red tire p ressure of at
least 1.8 bar has not been reached, follow
the instructions in t he section
Re-inflating
tire.
Re -inflating tire
~ Remove the hose from the valve and p ull the
pl ug out of the soc ket .
~ Drive the vehicle s low ly 33 feet (10 meters)
backward or forward. Th is helps to distrib
ute the sealant better.
~ Remove the empty inflat ion bott le and
screw t he hose ®
c:> fig. 206 from the elec
t ric pump directly onto the va lve.
~ Inse rt the plug @ c:> fig. 206 into the so cket
f o r t he cig arette lighter.
~ Switch on the igni tion.
~ Move the sw itch @ c:>fig . 207 on the e lec
tric ai r pump
ll to positio n I. After 5 mi
nutes, t ire pressure must have reached at
least 1.8 bar.
~ Switch the electric a ir pump off - switch in
pos itio n
0. If the requ ired t ire pressu re of at
least 1.8 ba r has not been reached, it is not
poss ib le to make a repa ir with t he tire seal
an t. Seek profession al ass istance.
Disassembling Tire Mobility System
~ Remove the hose from the valve and pu ll the
plug out of the socket .
~ Screw the dust cap onto the va lve .
~ Pla ce the emp ty sealant bottle ba ck in the
o rigi nal packag ing and clip i t in place unde r
the floor so that no tire sealant can r un out
into the vehicle.
~ Place the elect ric a ir pump in the luggage
compartment fo r the time being .
l) The e lectr ic a ir pu m p sh oul d never r un for long er than
6 min utes.
What do I do now? 253
~ S tart driving rig ht away so tha t the sealant
is dist ributed in the tire .
A WARNING
- Follow the manufacturer 's sa fety instruc
tions on the decal for the air p ump and
the sealant bottle.
- If a tire pressure of 1.8 bar cannot be
achieved after pumping for S minutes,
the t ire is too severe ly damaged . Do not
con tinu e to dr ive .
- Seek pro fessional assistance if it is not
possible to repa ir the tire w ith the t ire
sealant.
(D Tips
- Do not operate the electric air pump for
more than 6 minutes witho ut stopping,
otherwise it can overheat . When the a ir
pump has coo led down, you can continue
to use it.
- If sea lant has escaped, allow it to dry,
t hen yo u can peel it off .
Final check
After driving for a short distance, tire pressure must be checked
~ A ft er driving for about 10 mi nutes, stop and
check the tire pressure.
~ If tire pressure is st ill at least 1.3 bar, in
flate the tire to specif ied p ress ure (see dr iv
er's side B-pillar), drive to the next repa ir
sh op and have t he tire and the sealant bot
tle replaced .
~ If tire pressu re is less than 1.3 bar, the tire
is too severely damaged. Do not cont inu e to
dr ive . See k professiona l as sistan ce.
A WARNING
If tir e press ure is less th an 1.3 bar a fter
d riving for 10 minutes, the t ire is too se
ve rely damage d. Do not cont in ue to drive .
Seek professional ass istance .
-
•
•
Page 256 of 292

254 What do I do now?
After a tire repa ir, have the sealant bottle
rep laced at a dealership. This restores full
functionality to the Tire Mob ility System.
Changing a wheel
Before changing a wheel
Observe the following precautions for your
own and your passenger's safety when chang
ing a wheel .
• After you experience a tire fa ilure, pull the
car well away from moving traffic and try to
reach
level g ro und before you stop¢ /.1..
• All passengers sho uld le ave the car a nd
move to a sa fe loca tion (fo r instance, beh ind
t h e guardrai l) ¢
/.1. .
• Engage the pa rking b rake to prevent your
vehicle from ro lling unintentionally ¢
/.1..
• Move selector leve r to position P ¢ &_ .
• Take the jack out of the luggage compart
ment
¢ page 250.
A WARNING
You or your passe ngers cou ld be injured
w hile c hanging a whee l if you do not fol
low t hese safety p re cau tions:
-If you have a flat t ire, move a safe dis
tan ce off the road. Tur n off the e ng in e,
tu rn the e mergen cy fla shers o n and use
other wa rning dev ices to alert o ther mo
torists.
- M ake su re th at passengers wai t in a safe
place away from the ve hicl e an d well
away from the road and traff ic.
- T o help p revent the veh icle from mov ing
s u dden ly and possibly slipping off the
jack, a lways fully set the parking bra ke
and bloc k the whee l diagona lly opp osite
the whee l being cha nged. When one
front whee l is lifted off the gro und, plac
ing the A utomat ic Transmiss io n in P
(Pa rk) will
not pre vent the vehicle from
moving. -
Before you change a wheel, be s ure t he
ground is level and firm. If necessary,
use a sturdy board under the jack.
- Always store the vehicle tool kit, the jack
and the rep laced tire in t he luggage com
partment
¢page 129.
(D Note
If you are changing the whee l on a steep
i ncl ine, use a roc k or similar object to
block the opposite whee l to prevent the
vehicle from moving.
(D Tips
- Before changing the wheel, you must ac
tivate the jacking mode, so that t he au
tomatic cont rols for the Adaptive Air
Suspension* do not ma ke it mo re d iff i
cult to lift the veh icle w it h the jack
¢page 256.
- Obey all laws.
Changing a wheel
When you change a wheel , follow these
quence described below step-by-step and in
exactly that order .
l. Activate the vehicle jack mode*
¢ page 256.
2. Remove the wheel bolt caps* . For more
details see also ¢
page 255, Wheels with
wheel bolt caps.
3. Loosen the wheel bolt s ¢page 255.
4. Loc ate the p roper moun ting point fo r the
j ack an d align the jack be low that poin t
¢page 256.
5. Raise the car with the jack¢ page 256.
6. Remove the wheel with the flat tire and
then insta ll the other whee[¢
page 258.
7. Tighte n all whee l bolts lightly .
8.
Lower the vehicle wi th the jack .
9 . Use the wheel bolt w rench and
firmly
t ig ht en al l w heel bo lt s¢ page 255.
10. Re place the wheel bolt caps* .