Page 265 of 316
 for a listing of the
speed rat ing letter codes and the maximum
speed at which the tires can be driven .
The speed ra")
was manufactured. Please see ¢ page 259,
Speed rating (letter code) for a listing of the
speed rat ing letter codes and the maximum
speed at which the tires can be driven .
The speed rating letter code(¢
page 250) is
on the side wall of the tire
c::> page 258.
A WARNING
Winter tires have maximum speed limits
that may be lower than your vehicle's max
imum speed. Always know the maximum
speed before driving off . Never drive faster
than the speed permitted for your specific
w inte r tires . This will cause damage to the
tires leading to an ac cident and serious
pe rsonal inj ury to you and yo ur passen
gers .
A WARNING
Driv ing faster than the maximum speed
for which the winter tires on your vehicle
were designed can ca use tire fai lure in
cl uding a blowout and sudden deflat ion,
loss of control, crashes and serious per
sonal injuries . Have worn or damaged tires
rep laced immed iate ly.
- Winter tires have maximum speed rat ing
that may be lower than your veh icle's
maximum speed .
- Never drive faster than the speed for
w hich the winter or other tires installed
on your veh icle are rated .
A WARNING
Always adjust your d rivi ng to the road and
traffic conditions. Neve r let the good ac
c eleration of the w inte r ti res and all-whee l
drive temp t you in to taking extra r is k s . A l
ways remember:
- When bra king, an a ll-wheel d rive vehicle
hand les in the s ame way as a front drive
vehicle.
- Drive carefu lly and reduce your speed on
icy and slippery roads, even winter tires
cannot he lp under blac k ice conditions.
Tire s an d wheel s 263
'
@) For the sake of the environment
Use summer tires when weather condi
tions permit. They are qu ieter, do not wear
as quickly and reduce fuel consumpt ion.
Snow chains
Snow cha ins may be fitted only to the rear
wheels, and o nly to certain tire sizes . Ask your
autho rized Aud i deale r on which tire sizes
snow cha ins can be used .
The snow chains must have low-prof ile links
and must not be th icker than 0.53 inch
(13.5 mm) , includ ing the lock .
Remove wheel center covers and trim discs
before putt ing snow cha ins on your vehicle
c::> Q) . For safety reasons cover caps must then
be fitted over the wheel bolts. These are ava il
able from autho rized Aud i dealers.
A WARNING
Using the wrong snow chai ns for your vehi
cle o r insta lling them incorrect ly can in
crease the risk of loss of cont ro l leading to
serious personal injury.
- Snow chains are available in different
sizes. A lways make sure to follow the in
structions p rov ided by the snow chain
manufacturer.
- When driving with snow chains never
drive faster than the speed permitted for
your specif ic snow chains.
- Always observe local regulations .
(D Note
-Remove snow chains before dr iv ing o n
roads not covered with snow to avoid
damaging tires and wea ring the snow
chains down unnecessarily.
- Snow chains, which come into direct con
tact with the whee l rim , can scratch or
damage it . Therefore, make sure that the
snow chains are suitably covered. Check
the pos ition of the snow chains after
•
•
Page 266 of 316

264 Tire s and wheel s
driving a few yards and correct if neces
sary. Follow the instructions from the
snow cha in manufacturer when doing so.
(D Tips
Where snow chains are mandatory oncer
tain roads, this normally also applies to
veh icles with all-wheel dr ive .
Wheel bolts
Wheel bolts must always be tightened to the
correct torque.
The design of whee l bolts is matched to the
factory insta lled rims . If different rims are fit
ted, the correct wheel bolts with the right l ength and correctly shaped bolt heads must
be used. This ensures that wheels are f itted
securely and that the brake system functions
correctly .
In certain circumstances, you may not use
wheel bolts from a different vehicle -even if it
is the same model
¢ page 295.
.&_ WARNING
Improperly tig htened or maintained wheel
bolts can become loose ca using loss of
cont ro l, a co llision and serious p ersona l in
Jury.
- Always keep the wheel bolts and the
threads in t he wheel hubs clea n so the
wheel bolts can tu rn easily and be prop
erly tigh tened.
- N ever grease or oil the wheel bo lts and
the threads in the wheel h ubs. They can
become loose w hile d riving if greased or
oiled, even if tightened to the specified
torq ue.
- Only use wheel bolts that be long to the
rim being installed.
- N ever use different whee ls bolts on your
vehicle.
- Always mai nta in the co rrec t tighte ning
tor que fo r the wheel bo lts to reduce the
risk of a wheel loss . If the tightening tor
que of the wheel bo lts is too low, they
can loosen and come out when the veh i- cle is moving.
If the tightening torque is
too high, the wheel bolts and threads
can be damaged and the wheel can be
come loose.
(D Note
The specified torque for the whee l bolts is
105 ft lb (140 Nm) with a to lerance of
± 7,4 ft lb(± 10 Nm). Torque wheel bolts
diagonally . After changing a wheel, the
torque must be checked as soon as poss i
ble with a to rque wrench -preferab ly by an
a uthorized Aud i dea le r or qualified wor k
shop.
Low aspect ratio tires
Your A udi is factory -eq uipped w it h low aspect
ratio tires. These tires have been thoroughly
tested and been se lected specifically for your
model for their superb performance, road fee l
and handling under a variety of driving condi
t ions . Ask your authorized Audi dealer for
more details .
The low aspect ratio of these tires is ind icated
by a numeral of
55 or less in the tire's s ize
designation . The numeral represents the ratio
of the tire's sidewall height in relation to its
t read width exp ressed in percentage. Conven
tiona l tires have a he ight/w idth rat io of 60 or
more.
Th e performanc e of low-a spect-ratio tire s is
pa rticularly sensi tive to improp er inflation
pre ssure. It i s ther efor e important that low
a spe ct ratio tir es are inflated to the spe cified
pre ssure and that the inflation pre ssure i s
regula rly checked and mainta ined. Tire pre s
sure s should be checked at lea st once a
month and al way s befo re a long trip
¢ page 2 53, Checking tire pressure.
What you can do to a void tire and rim
damage
Low aspect ratio tires can be damaged more
easily by impact w ith potholes, curbs, gul lies
or ridges on the road, particularly if the tire is
underinflated . ..,.
Page 267 of 316

In o rder to minimize the occurrence o f impact
damage to the tires of your vehicle, we recom mend that you observe the following precau
tions :
- Always maintain recommended inflation
pressures. Check your tire pressure every
2,000 miles (3,000 km) and add a ir if neces
sary.
- Drive carefu lly on roads with potholes, deep
gullies or ridges. The impact from driving
through or over such obstacles can damage
your tires. Impact with a curb may also cause damage to your tires .
- After any impact, immediately inspect your
tires or have them inspected by the nearest
authorized Aud i dealer . Replace a damaged
t ire as soon as poss ible .
- In spect your t ires every 2,000 miles (3,000
km) for damage and wear . Damage is not al
ways easy to see. Damage can lead to loss of
air and unde rinflation, wh ic h could eventu
ally cause ti re fail ure.
If yo u be lieve that a
ti re may have been damaged , replace the
tire as soon as possible.
- These tires may wear more quick ly than oth
ers.
- Please a lso remembe r that, whi le these t ires
deliver respons ive handling, they may ride
less comfortably and make more noise than
other c hoices.
Reduced p erformance in winter /cold
s ea son condit ion s
All ti res are designed for certain purposes .
The low aspect ratio, ultra hig h performance
tires originally installed on your veh icle are in
tended for max imum dry and wet road per
formance and handling . They are not suitable
for cold, snowy or icy weather cond it ions . If
you dr ive under those circumstances, you
should equip your vehicle with all-season or
winter tires, whi ch offe r better traction under
those cond it ions . We suggest you use the rec
ommended snow or all -season tires specified
for your ve hicle, or their equiva lent .
Refe r to ~
page 262 for mo re deta iled info r
mat io n regarding w in ter t ires.
Tire s an d wheel s 265
Tire pressure
monitoring system
ill General notes
App lies to vehicles : wi th tire p ress ure mo nito rin g system
Each tire, incl uding the spare (if provided),
shou ld be checked monthly when co ld and in
flated to the inflation pressure recommended
by the veh icle manufacturer on the veh icle
placard or tire inflation pressure label. (If your
vehicle has tires of a d ifferent size than the
s iz e indicated on the vehicle placard or tire in
flat io n pressu re labe l, you shou ld dete rmine
the p roper t ire inflation p ress ure fo r those
t i r es).
As an added safety feature, your veh icle has
been equipped with a tire pressure monitoring
system ( TPMS) that illum inates a low ti re
pressure te lltale whe n one or more o f your
ti res is significant ly under -inflated . According
ly, when the low tire pressure te lltale i llumi
nates, you shou ld stop and check your tires as
soon as possib le, and inflate them to the
proper pressure. Driving on a sign ificantly un
der- inflated t ire causes the tire to overheat
and can lead to tire fa ilure . Under-inflation al
so reduces fuel effic iency and tire tread life,
and may affect the vehicle 's hand ling and
stopp ing abil ity.
Please note that the TPMS is not a subst itute
fo r proper tire ma intenanc e, and it is the d riv
er's respo nsibility to maintain co rrect tire
pressure, even if under-inflation has not
reached the leve l to tr igger illum inat ion of the
T PMS low ti re p ressu re tellta le .
You r vehicle has also been equipped with a
T PMS ma lf u nction indicator to ind icate w hen
the sys tem is not operating prope rly . T he
T PMS ma lfunction indicator is combined w ith
the low tire pressure te lltale. When the sys
tem detects a malfunction, the telltale wi ll
flash for approximate ly one min ute and then
rema in con tinuously i llum inated . T hi s se
quence will continue upon subsequent vehicle
start-ups as long as the malfunct ion exists . ..,.
•
•
Page 268 of 316

266 Tire s and wheels
When the malfunction indicator is illuminat
ed, the system may not be able to detect or
signal low t ire pressure as intended. TPMS
malfunctions may occur for a variety of rea
sons, including the installation of replace
ment or alternate tires or wheels on the vehi
cle that prevent the TPMS from funct ioning
properly . Always check the TPMS malfunct ion
tellta le after replacing one or more t ires or
wheels on your veh icle to ensure that the re
p lacement or a lternate tires and wheels allow
the TPMS to continue to function properly.
Tire pressure indicator appears
Applies to vehicles: with tire pressure monitoring system
The tire pressure indicator in the instrument
cluster informs you if the tire pressure is too
low or if there is a system malfunction.
N
I
Fig. 210 Display: underinflation warning
Using the ABS sensors, the tire pressure moni
toring system compares the tire tread circum
ference and vibration characteristics of the in
dividual tires. If the pressure decreases in one
or more tires, th is is indicated in the instru
ment cluster w ith a
IE warning symbol and a
message
¢fig . 210. The dr iver message in the
display goes out after 5 seconds. The driver
message can be displayed again by pressing
the
! SET ! button. If on ly one tire is affected,
the display will indicate its position.
The tire pressure monitoring system must be
reset via radio or MMI * each time the pres
sures are adjusted (e. g . when switching be
tween partia l and full load pressure) or after
changing or replacing a tire on your vehicle
¢
page 267. The TPMS indicator only moni
tors the tire pressure that you have prev iously stored
. You can find the recommended tire
pressures for your vehicle on the label on driv
er's side B-pillar ¢
page 251.
Tire tread circumference and vibration charac
teristics can change and cause a tire pressure
warning if:
- the tir e pressure in one or more tires is too
low,
- the tir e has structural damage,
- the tir e pressure was changed, wheels rotat-
ed or replaced but the TPMS was not reset
¢page 267.
Warning symbols
IE Loss of pressure in at least one tire¢ .&..
Check the tire or tires and replace or repa ir if
necessary. The
IE indicato r light in the inst ru
ment cluster als o illuminates
¢ page 14.
Check/correct the pressures of all four tires
and reset TPMS via radio or MMI*.
ffim (T ire Pressure Mon itor ing System) Tire
pressure: System malfunction!.
If@m appears after switching the ignition on
or while dr iving and the
IE indicator light in
the instrume nt cluster blink s for app rox i
mately one minute and then stays on, there is
a system malfunction.
Attempt to store the correct tire pressure
¢
page 267 . If the indicator light does not
tu rn
off or if it turns on shortly thereafter, im
mediately drive you r vehicle to an authorized
A udi dealer or authorized repair facility to
have the malfunction corrected.
A WARNING
=
- If the tire pressure indicator appears in
the instrument cluster display, one or
more of your tires is sign ificant ly under
inflated. Reduce your speed immediately
and avoid any hard steer ing or braking
maneuvers. Stop as soon as possible and
check the tires and their pressures. In
flate the tire pressure to the proper pres
sure as ind icated on the vehicle's tire
p ressu re lab el¢
page 251. Driving on a
significantly under-inflated tire causes
Page 269 of 316

the tire to overheat and can lead to tire
failure. Under-inflation also is likely to
impair the vehicle's handling and stop
ping ability .
- The driver is responsible for maintaining
the correct tire pressures. You must
check the tire pressures regularly.
- Under certain conditions (such as a spor
ty driving style, winter conditions or un paved roads), the pressure monitor indi
cator may be delayed.
-Ask your authorized Audi dealer if run flat tires may be used on your vehicle .
Your vehicle registration becomes invalid if you use these tires when not permit
ted. Damage to your vehicle or accidents
could also result.
@ Tips
- The tire pressure monitoring system
stops working when there is an ESC/ABS
malfunction.
- Using snow chains may result in a system
malfunction.
- The tire pressure monitoring system on
your Audi was developed using tires with the "AO" or "RO" identification on the
tire sidewall¢
page 258. We recom
mend using these tires.
Reset tire pressure monitoring system
Applies to vehicles: with tire pressure monitoring system
If the tire pressure is adjusted, wheels are ro
tated or changed, the TPMS must be reset via
radio or MMI* .
.,. Before resetting the TPMS, the current pres
sures of all four tires must correspond to
the specified values. Adjust the tire pressure and reset the pressure in the tire pressure
monitoring system according to the load
you are carrying
¢ page 251 .
.. Turn on the ignition .
.,. Select :
I CARI function button > Tire pressure
monitoring
> Store now . Or
.,. Select: I CARI function button > Car systems*
control button > Servicing & checks > Tire
pressure monitoring
> Store tire pressures.
Tires and wheels 267
(D Tips
Do not store the tire pressure if there are
snow chains on the tire.
•
•
Page 270 of 316

268 What do I do now?
What do I do now?
Jack, tools and
inflatable spare tire
Onboard tool kit and vehicle jack
The vehicle tools and vehicle jack* are stored
in the luggage compartment under the floor
cover.
Fig . 211 Luggage compartment: on board tool kit and
vehicle jack
The vehicle jack* is stored under the on board
tool kit¢
fig. 211.
Hybrid drive*: the storage location of the on
board tool kit varies
¢ page 104.
The onboard tool kit includes:
- Hook for removing wheel covers*
- Plastic hook to remove whee l bolt covers*
- Alignment p in for changing wheels
- Wheel bolt wrench
- Folding chocks
- Screwdriver with reversible blade
- Socket (removable Torx socket)*
- 10 x 13 open ended wrench (for disconnect-
ing the battery cables)
-Towing eye
Before storing the jack*, make sure it is
wound back down as far as it will go.
& WARNING
Improper use of the vehicle jack* can
cause serious personal injuries.
- Never use the jack* supplied with your
Audi on another vehicle, particularly on a
heavier one . The jack* is only suitab le for
use on the vehicle it came with . -
Using a bumper jack to raise the vehicle
will damage the bumper system. The
jack may slip, causing injury.
- Never support your vehicle on cinder
blocks, bricks or other objects. These
may not be able to support the load and
could cause injury when they fa il.
- Never start or run the engine while the
veh icle is supported by the jack*.
- If you must work under the vehicle, al
ways use safety stands specifically de
signed for this purpose.
- Never use the hexagonal socket in the
handle of the screwdriver to loosen or
tighten the wheel bolts.
- Always make sure the inflatable spare
tire* and even a flat t ire are secured in
place and not loose, otherw ise they
could fly forward, causing personal injury
to passengers in the vehicle in an acci
dent or sudden maneuver.
@ Tips
Some of the on board items listed above
are provided on certain models only or are
optiona l extras.
Folding chocks
The folding chocks are part of the on board
tool kit.
Fi g. 2 12 Open ing folding choc ks
To use the chocks, you first have to raise the
support plate¢
fig . 212 (D and then insert
the locking plate with the two "tabs" into the
elongated holes in the base plate @¢& .
Ill>
Page 271 of 316

_& WARNING
-The chock cannot fulfil its funct ion and
may lose its stability if the "tabs" on the
support plate are not inserted cor rectly
into the elongated holes in the base
pla te. If th is happens, the vehicle may
st ar t to move whi le a wheel is being
changed .
- Never use the folding chocks if they are
damaged or i f th ey have not been assem
bled correct ly .
Removing bass box
Applies to vehicles: with bass box
Before the inflatable spare tire* can be taken
out, the bass box must
be removed.
Fig . 2 13 Spare w hee l well : Bas s box
Removing bas s bo x
.,. Lift up the cargo floor using the hand le .
.,. Sq ueeze the locking tabs
c:!;> fig . 213 (D of
the connector.
.,. Disconnect the connector @and place the
lead to one side.
.,. Turn the large screw counter -clockwise .
.,. Carefu lly remove the bass box .
Install ing bas s bo x
.,. Carefu lly place the bass box in the wheel.
The inscr ipt ion "FRONT" on the bass box
must face forward .
.,. Reconnect the connector that was removed .
.,. Secure the bass box with the large screw.
.,. Fold the cargo floor back down.
What do I d o now ? 269
Inflatable spare tire
Applies to vehicles: with inflatable spare tire
The inflatable spare tire expands to its full di
ameter when it is inflated.
Fi g. 21 4 In flatable spa re t ire w it h comp ressor
Removing inflatable spare tire
.,. Lift up the cargo floo r using t he handle .
.,. Remove the dirt t ray .
.,. Turn the large screw
c:!;> fig. 214 co unter
clockw ise .
.,. Remove the bass box as required
c:!;> page 269 .
.,. Take out the inflatable spare tire .
.,. Always store the vehicle tool kit, the jack*
and the replaced tire in the luggage com
partment
c:!;> page 145.
Stowing the inflatabl e spare t ire
.,. Release the air by unscrewing the valve
stem .
.,. Screw the valve stem back in afterwards .
.,. Wait a few hours befo re placing the wheel in
the spare wheel well
c:!;> .,&. .
"'Insta ll the bass box as required c:!;> page 269 .
.,. Secure the wheel with t he la rge screw .
.,. Place the d irt tr ay back in .
.,. Fold the cargo floor back down.
After using the inflatable spare wheel
T he inflatab le spare tire can be re-used as
l ong as it is not damaged and is not wo rn
down to the t read wea r indica tors
c:!;> ,& .
When you let the a ir out of the inflatab le
spare t ire , it does not assume its folded shape
again for s evera l hours . U nti l then , it canno t
be pla ced ba ck in the spare whee l we ll and
stowed secure ly.
Page 272 of 316

2 70 What do I do now?
A WARNING
-Never use the spare tire if it is damaged
or if it is worn down to the tread wear in
dicators.
- If the inflatable spare tire is more than 6
years old, use it only in an emergency
and with extreme caution and careful
driving.
- The inflatable spare tire is intended only
for temporary and short-term use. It
should be replaced as soon as possible
with the normal wheel and tire.
- The tire pressure value for the inflatable
spare tire is located on the driver's side
8-pillar
¢ page 251, fig. 206.
- Maximum permissible speed is SO mph
(80 km/h).
- Avoid full-throttle acceleration, heavy
braking, and fast cornering .
- When the air is let out of the inflatable
spare wheel, it does not assume its fold
ed shape for several hours. Until then, it
cannot be placed back in the spare wheel
well and stowed securely.
- Never drive with more than one inflata
ble spare tire.
- For technical reasons, the use of tire
chains on the inflatable spare tire is not
permitted .
If it is necessary to drive with
tire chains, the inflatable spare wheel
must be mounted on the front axle in the
event of a flat in a rear tire. The newly
available front wheel must then be in
stalled in place of the rear wheel with
the flat tire. Installing the tire chain be
fore mounting the wheel and tire is rec
ommended.
- Loose items in the passenger compart
ment can cause serious personal injury
during hard braking or in an accident.
Never store the inflatable spare tire or
jack* and tools in the passenger com
partment.
Q) Note
- The inflatable spare tire has been devel
oped specifically for this vehicle model.
It must not be exchanged or used for
other vehicle models. Similarly, inflata
ble tires from other vehicle models must
not be used.
- Normal summer or winter tires must not
be installed on the inflatable tire rim.
Inflating inflatable spare tire
Applies to vehicles : wit h in flatable spa re tire
Fig. 215 L u ggage compartment left side : compressor
.,. Remove the left trim panel in the luggage
compartment.
.,. Open the Velcro strap and remove the com
pressor ¢
fig. 215.
.,. Unscrew the valve stem from the spare tire.
.,. Screw the tire filler hose from the compres
sor firmly onto the valve of the spare tire .
.., Insert the plug from the compressor into a
socket of the vehicle
r=;, page 75 .
.., Switch the compressor on.
.., Let the compressor run until the value speci
fied on the tire pressure label is reached
r=;, page 251, fig. 206. Switch the compres
sor off after running for 12 minutes at the
most -danger of overheating!
A WARNING
= The compressor and the tire filler hose can
become extremely hot while they are run
ning -danger of burns!
(D Note
Switch the compressor off after running
for 12 minutes at the most -danger of
overheating! Allow the compressor to cool
down for a few minutes before you use it
again .
 1
1 2
2 3
3 4
4 5
5 6
6 7
7 8
8 9
9 10
10 11
11 12
12 13
13 14
14 15
15 16
16 17
17 18
18 19
19 20
20 21
21 22
22 23
23 24
24 25
25 26
26 27
27 28
28 29
29 30
30 31
31 32
32 33
33 34
34 35
35 36
36 37
37 38
38 39
39 40
40 41
41 42
42 43
43 44
44 45
45 46
46 47
47 48
48 49
49 50
50 51
51 52
52 53
53 54
54 55
55 56
56 57
57 58
58 59
59 60
60 61
61 62
62 63
63 64
64 65
65 66
66 67
67 68
68 69
69 70
70 71
71 72
72 73
73 74
74 75
75 76
76 77
77 78
78 79
79 80
80 81
81 82
82 83
83 84
84 85
85 86
86 87
87 88
88 89
89 90
90 91
91 92
92 93
93 94
94 95
95 96
96 97
97 98
98 99
99 100
100 101
101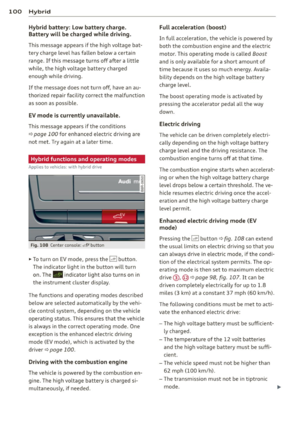 102
102 103
103 104
104 105
105 106
106 107
107 108
108 109
109 110
110 111
111 112
112 113
113 114
114 115
115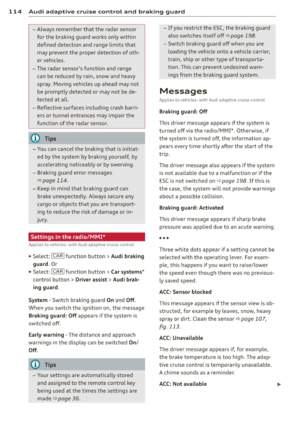 116
116 117
117 118
118 119
119 120
120 121
121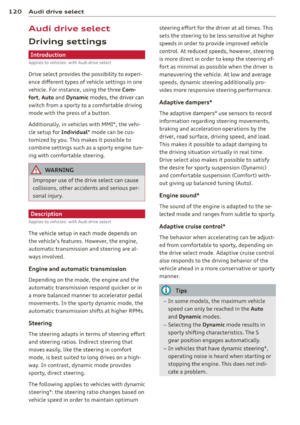 122
122 123
123 124
124 125
125 126
126 127
127 128
128 129
129 130
130 131
131 132
132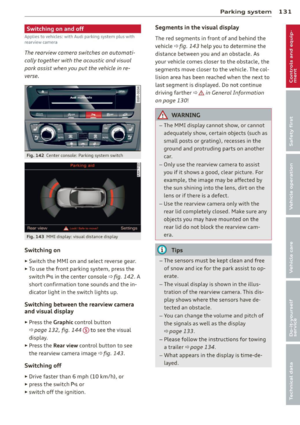 133
133 134
134 135
135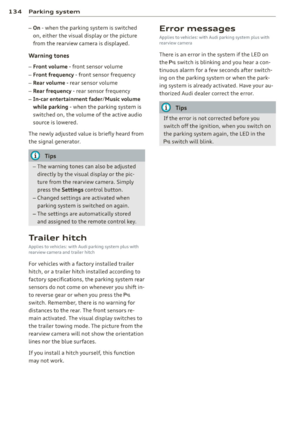 136
136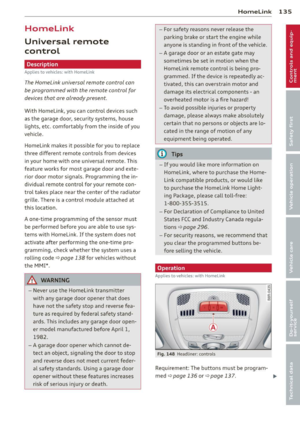 137
137 138
138 139
139 140
140 141
141 142
142 143
143 144
144 145
145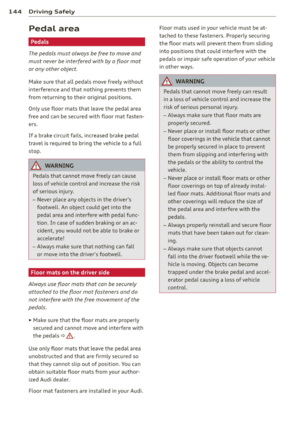 146
146 147
147 148
148 149
149 150
150 151
151 152
152 153
153 154
154 155
155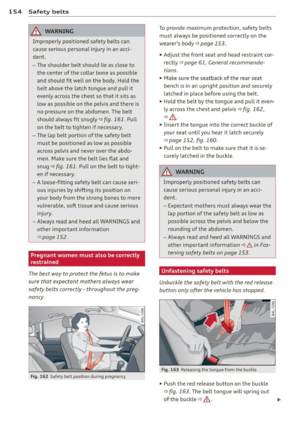 156
156 157
157 158
158 159
159 160
160 161
161 162
162 163
163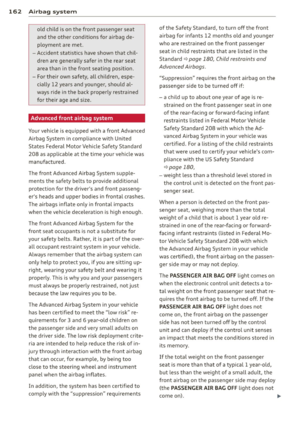 164
164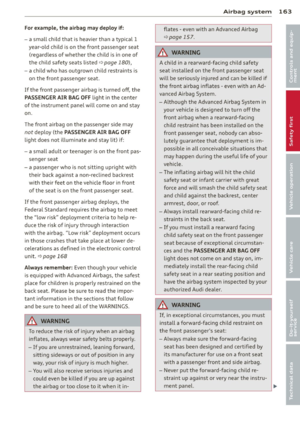 165
165 166
166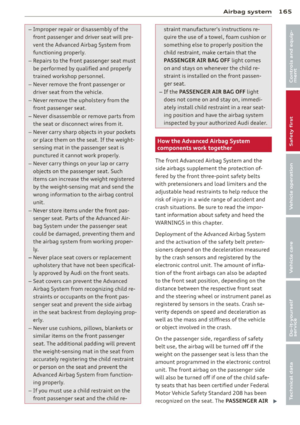 167
167 168
168 169
169 170
170 171
171 172
172 173
173 174
174 175
175 176
176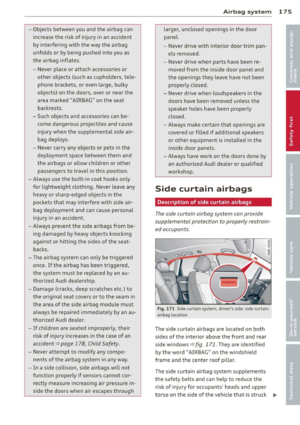 177
177 178
178 179
179 180
180 181
181 182
182 183
183 184
184 185
185 186
186 187
187 188
188 189
189 190
190 191
191 192
192 193
193 194
194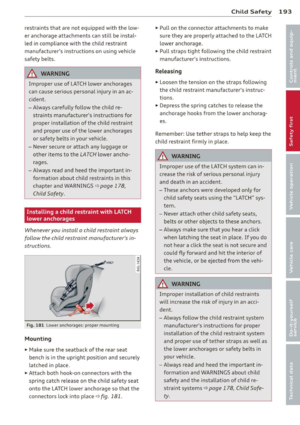 195
195 196
196 197
197 198
198 199
199 200
200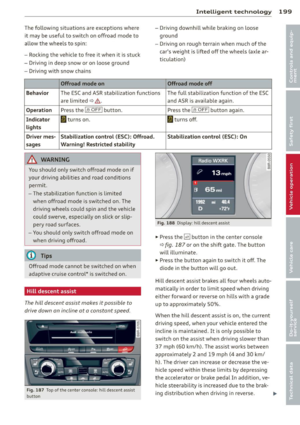 201
201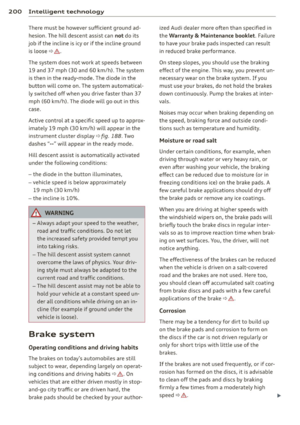 202
202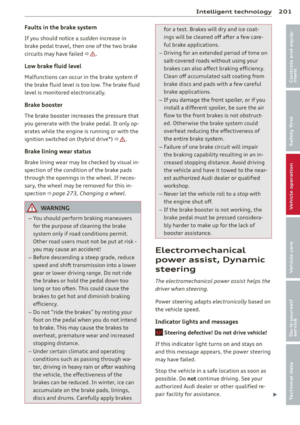 203
203 204
204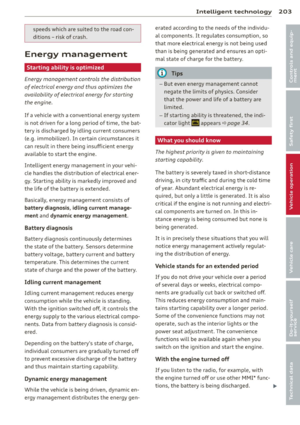 205
205 206
206 207
207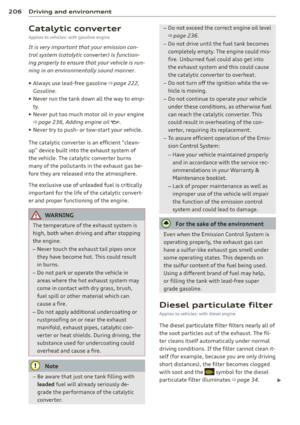 208
208 209
209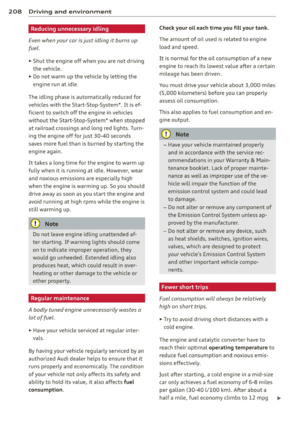 210
210 211
211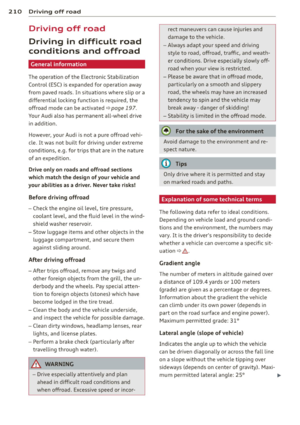 212
212 213
213 214
214 215
215 216
216 217
217 218
218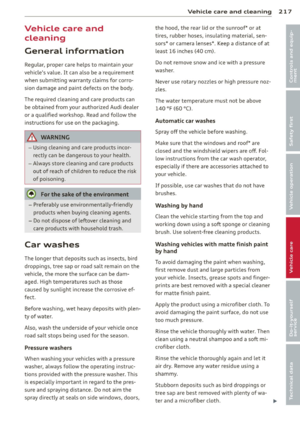 219
219 220
220 221
221 222
222 223
223 224
224 225
225 226
226 227
227 228
228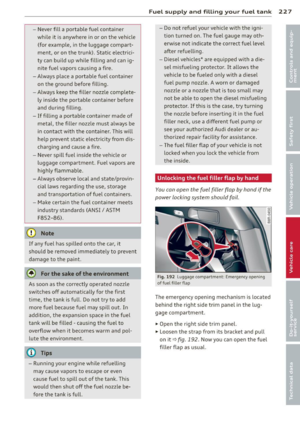 229
229 230
230 231
231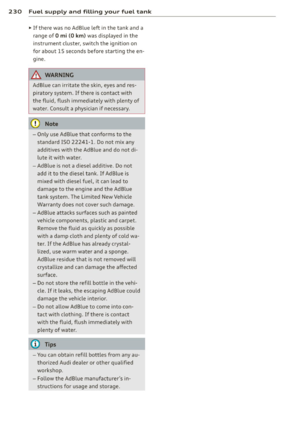 232
232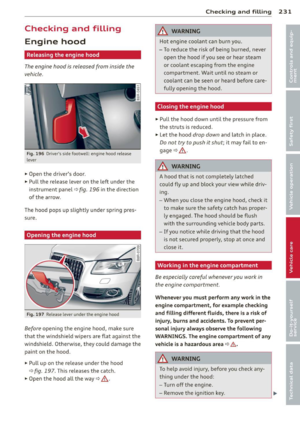 233
233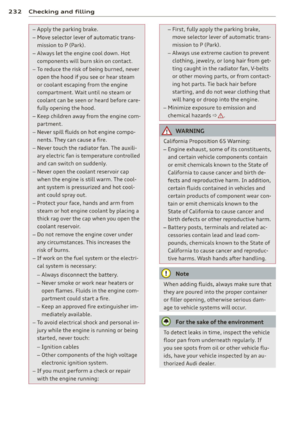 234
234 235
235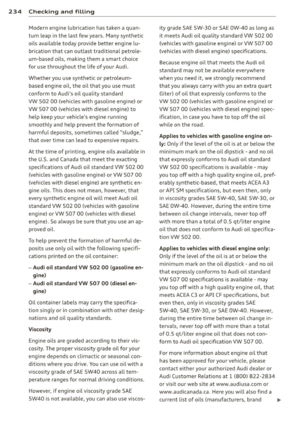 236
236 237
237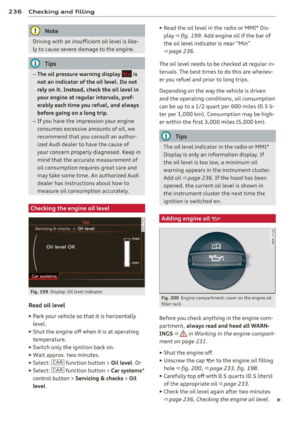 238
238 239
239 240
240 241
241 242
242 243
243 244
244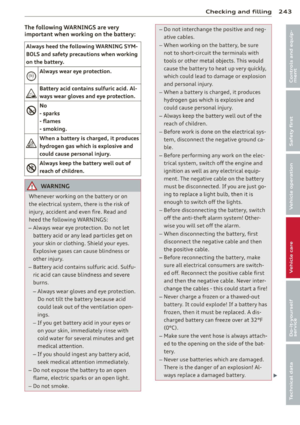 245
245 246
246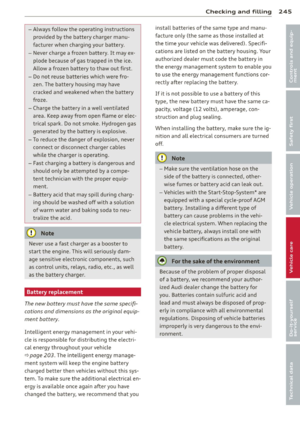 247
247 248
248 249
249 250
250 251
251 252
252 253
253 254
254 255
255 256
256 257
257 258
258 259
259 260
260 261
261 262
262 263
263 264
264 265
265 266
266 267
267 268
268 269
269 270
270 271
271 272
272 273
273 274
274 275
275 276
276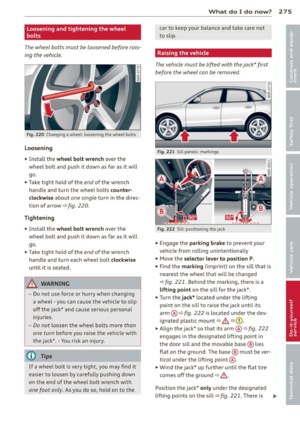 277
277 278
278 279
279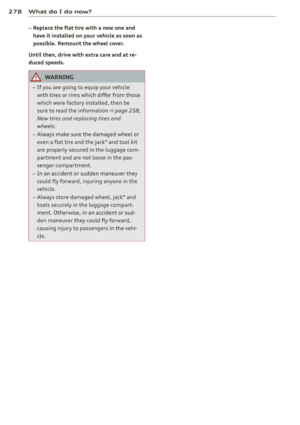 280
280 281
281 282
282 283
283 284
284 285
285 286
286 287
287 288
288 289
289 290
290 291
291 292
292 293
293 294
294 295
295 296
296 297
297 298
298 299
299 300
300 301
301 302
302 303
303 304
304 305
305 306
306 307
307 308
308 309
309 310
310 311
311 312
312 313
313 314
314 315
315