Page 145 of 266
 supports the driver w")
This chapter contains information on the following subjects:
Orientation lines and monitored area142
Switching on/off
143
Optical Parking Assistant (hereinafter only as a system) supports the driver when
parking and manoeuvring.
The display of factory-installed navigation system shows the area behind the ve- hicle along with orientation lines » Fig. 121 on page 142 .
The area behind the vehicle is monitored by a camera » Fig. 120 .
The system only operates if the ignition is switched on. More information about displaying and operating in the Display » Operating in-
structions for the navigation system .
WARNING■
The system can not replace the driver's attention. Careless or uncontrolled
use of the system can cause accidents and serious injuries.■
Adjust the speed and driving style to the current visibility, weather, road and
traffic conditions.
■
Make sure that the camera lens is not dirty or covered, otherwise the sys-
tem function can be significantly impaired. For information on clean-
ing » page 191 , Camera lens
■
The camera lens distorts and enlarges the field of view of the difference in
eye sight. Objects are displayed deformed.
CAUTION
■ The system can be used only if tailgate is fully closed.■Some items, such as thin columns, chain link fences or lattice may not be repre-
sented adequately in terms of display resolution.■
It is only a two-dimensional display. Therefore, protruding objects or roadway
depressions, for example, may not be recognised due to lack of space depth.
■
In a crash or damage the vehicle's rear camera can possibly deviate from the
correct position. If this is the case, have the sensor checked by a specialist ga-
rage.
CAUTIONWe recommend that you do not use the system in the following situations.■The display is poor, such as when visibility is poor or in the event of a dirty lens.■
The rear of the vehicle is heavily loaded (the area displayed behind the vehicle is
too short).
CAUTION
The objects shown in the display can be closer or even further away than they ap-
pear. This is especially the case in the following situations.■
When driving from a horizontal surface into a slope or a depression.
■
When driving from a slope or a depression onto a horizontal surface.
Orientation lines and monitored area
Fig. 121
The navigation system display - Orientation strokes / monitored
area
First read and observe the introductory information and safety warn-
ings
on page 141.
Immovable yellow orientation bars are shown along with the monitored area be-
hind the vehicle on the display.
The distance between the lateral guide bars corresponds to the vehicle width in-
cluding mirrors.
Explanation of graphic The distance behind the vehicle is about 40 cm (clearance limit).The distance behind the vehicle is approximately 100 cm.
AB142Driving
Page 146 of 266

The distance behind the vehicle is approximately 200 cm.
Detection range of the camera.
Area outside the detection range of the camera.
CAUTION
■ The orientation lines are immobile, and therefore the spacing of the bars behind
the vehicle will vary, depending on the vehicle load state and the road inclination.■
The orientation of strokes not for use at a distance estimation approach to the
above objects, such as a towing hitch and the rear of a truck, etc.
Switching on/off
First read and observe the introductory information and safety warn-
ings
on page 141.
Switching on
The system is activated automatically by engaging the reverse gear.
Switching off
The system is turned off when any of the following is present.
› The reverse gear is disengaged.
› The symbol key
is pressed.
› The speed of 15 km/h is exceeded.
› The ignition is switched off.
For cars without PDC (OPS), the system is turned off about 10 seconds after re- moving the reverse gear.
Note
In vehicles with front and rear parking aid sensors, parking assistance (OPS) is au-
tomatically displayed after disengaging the reverse gear.CDEPark assist
Introduction
This chapter contains information on the following subjects:
Finding a parking space
144
Parking
145
Manoeuvring out of a parallel parking space
146
Automatic brake assist
146
Information messages
146
The parking aid is part of the park assist system, therefore the information and
safety guidelines » page 140, Parking aid must be read and observed.
Park Assist (in the following referred to as the system) helps drivers park in suita- ble parallel and perpendicular parking places and also to manoeuvre out of paral-lel parking spaces.
The system only operates if the ignition is switched on. The displays, messages and system instructions are displayed in the MAXI DOTdisplay (in the display only below).
During the parking procedure the system only takes over the steering move- ments, the pedals continue to be operated by the driver.
When the system is activated, the warning light lights up
» Fig. 122 on
page 144 -
.
The traction control system (TCS) must always be switched on when parking.
Basis of the system function › The measurement and evaluation of the size of parking spaces when driving.
› The determination of the correct position of the vehicle for parking.
› The calculation of the line on which the vehicle drives backwards into the park-
ing space or forwards from the parking space.
› the automatic turning of the front wheels when parking in, or manoeuvring out
of the parking space.
143Assist systems
Page 147 of 266

WARNING■The system does not exempt the driver from his/her responsibility for park-
ing in and manoeuvring out of the parking space.■
External sound sources can have a detrimental effect on parking in and ma-
noeuvring out of the parking space. Under adverse conditions, this can cause
objects or people to not be recognized by the system.
■
When parking in, and manoeuvring out of parking spaces, the system auto-
matically executes quick steering movements. While it is doing so, do not place your hands between the steering wheel – risk of injury!
■
When parking or leaving a parking space on loose or slippery surfaces (grav-
el, snow, ice, etc.) you may stray from the calculated road because of the sur-
face conditions. Therefore we suggest that you do not use the system in such
situations.
CAUTION
■ If other vehicles are parked behind the kerb or on it, the system can also guide
your vehicle beyond the kerb or onto it. Ensure that the wheels or the wheel rims
of your vehicle are not damaged and if necessary intervene in time.■
Under certain circumstances, surfaces or structures of certain objects such as
wire mesh fences or powder snow cannot be recognised by the system.
■
The system function may be limited under adverse weather conditions (heavy
rain, water vapour, very low or high temperatures etc.).
■
The evaluation of the parking space and the parking procedure depends on the
circumference of the wheels on the vehicle. The system only works correctly if
the vehicle is fitted with the wheel size approved by the manufacturer.
■
If wheels other than those approved by the manufacturer are mounted, the re-
sulting position of the vehicle in the parking space can differ slightly. This can be avoided by readjusting the system at a specialist garage.
■
Under certain circumstances, the system may not function correctly, for exam-
ple, if the vehicle is fitted with snow chains or a temporary spare wheel.
Finding a parking spaceFig. 122
System button / display
First read and observe the introductory information and safety warn-
ings
on page 143.
The search for a suitable parking space takes place while the display is switched
off. If the display is not switched on using the symbol button until the driver
drives past the parking space, the system can assess and display this parking
space.
Finding a parallel parking space
›
Drive past the parking space at up to 40 km/h and a distance of 0.5 – 1.5 m.
›
Press once the symbol button
» Fig. 122 .
The display shows the following » Fig. 122 -
.
Finding a perpendicular parking space
›
Drive past the parking space at up to 20 km/h and a distance of 0.5 – 1.5 m.
›
Press twice the symbol button
» Fig. 122 .
The display shows the following » Fig. 122 -
.
The search area for the parking space on the driver's side is automatically indica-
ted on the display.
Activate the turn signal on the driver's side if you wish to park on this side of the
road. In the display the search area for the parking space is indicated on the driv-
er's side.
If suitable parking space is found, its parameters are stored until another suitable
parking space has been found or until a distance of 10 m had been driven after
finding the parking space.
144Driving
Page 148 of 266
 is shown in the display , the vehicle spe")
If the driver changes the parking mode while searching for a parking space, the
symbol button must be pressed again.
Note
If the symbol (km / h) is shown in the display , the vehicle speed should be
reduced below 40 km / hr (parallel parking) or below 20 km / hr (Transverse park- ing) .
Parking
Fig. 123
Display
First read and observe the introductory information and safety warn- ings
on page 143.
Explanation of graphic
Parking place recognised with the information to drive on.
Parking place recognised with the information to engage the reverse gear.
Indication for selecting the forward gear.
Indication for selecting the reverse gear.
The time limit for the parking procedure with the help of the system is 6 minutes. If the system has recognised a suitable parking space, this parking space is
shown in the display » Fig. 123 -
.
›
Continue driving forwards until the display appears » Fig. 123 -
.
›
Stop and ensure that the vehicle does not continue to move forward until the
parking procedure starts.
›
Select reverse gear or move the selector lever into position R.
ABCD› As soon as the following message is shown in the display:
Steering interv. ac-
tive. Monitor area around veh.! , let go of the steering wheel. The steering will
be taken over by the system.›
Observe the direct vicinity of the vehicle and reverse carefully.
In the event that the parking procedure cannot be carried out in one go, the park- ing process is completed in further stages.
›
If the display shows the flashing arrow forward » Fig. 123 - , then select the
first gear or move the selector lever into position D.
The display shows the icon (brake pedal).
›
Depress the brake pedal and wait until the steering wheel automatically rotates
into the required position, the symbol goes out.
›
Carefully drive forwards.
›
If the backwards arrow is flashing in the display » Fig. 123 -
, select reverse
gear again or move the selector lever into position R .
The display shows the
icon (brake pedal).
›
Depress the brake pedal and wait until the steering wheel automatically rotates
into the required position, the symbol
goes out.
›
Carefully move backwards.
You can repeat these steps several times in succession.
As soon as the parking procedure is completed, an audible signal sounds and the
following message appears in the display:
Park Assist ended. Take over steering
Automatic termination
The system terminates the parking procedure if one of the following cases arises.
› Speed of more than 7 km/h repeatedly exceeded during the parking procedure.
› Time limit of 6 minutes exceeded for the parking procedure.
› System button pressed.
› Engagement of the ASR system.
› TCS system switched off.
› Intervention of the driver in the automatic steering procedure (stops the steer-
ing wheel).
› Reverse gear disengaged or selector lever removed from the position
R when
reversing into the parking space.
› Selector lever moved to position
P.
› There is a system fault (system temporarily not available).
› Automatic braking for damage limitation.
145Assist systems
Page 149 of 266

If any of the above events occurs, the following warning message is dis-
played. » page 146 .
Manoeuvring out of a parallel parking space
First read and observe the introductory information and safety warn-
ings
on page 143.
Manoeuvring out
›
Press the symbol button
» Fig. 122 on page 144 once.
›
Activate the turn signal for side of the vehicle where the parking space is out of
which you wish to manoeuvre.
›
Select reverse gear or move the selector lever into position R.
›
As soon as the following message is shown in the display:
Steering interv. ac-
tive. Monitor area around veh.! , let go of the steering wheel. The steering will
be taken over by the system.
›
Observe the direct vicinity of the vehicle and reverse carefully.
›
Follow the system instructions shown in the display.
As soon as the parking procedure is completed, an audible signal sounds and the
following message appears in the information display:
Take over steering and continue driving
Automatic termination
The system terminates the manoeuvring procedure if one of the following cases
arises.
› Speed of more than 7 km/h exceeded during the manoeuvring procedure.
› System button pressed.
› Engagement of the ASR system.
› TCS system switched off.
› Intervention of the driver in the automatic steering procedure (stops the steer-
ing wheel).
› There is a system fault (system temporarily not available).
› Automatic braking for damage limitation.
If any of the above events occurs, the following warning message is dis-
played. » page 146 .
Automatic brake assist
First read and observe the introductory information and safety warn-
ings
on page 143.
The system provides assistance to the driver with automatic brake assist. The au-
tomatic brake assist does not exempt the driver from his/her responsibility for
the accelerator, brake and clutch.
Automatic braking for preventing cancellations caused by excessive speeds
To prevent the speed from exceeding 7 km/h and to subsequently prevent can-
cellation of the parking procedure, automatic brake support is initiated. The park-
ing procedure can be resumed after automatic braking.
Automatic braking takes place only once per parking procedure.
Automatic braking for damage limitation
The system detects an imminent collision based on the driving speed and the dis-
tance from the obstacle, automatic brake support is initiated.
The system function is ended after this automatic brake assist for damage limita-
tion.
WARNING■ Automatic brake assist only works as an element of the assist function. The
driver must always be ready to brake the vehicle him/herself.■
Automatic brake assist is ended after around 1.5 seconds. Depress the brak-
ing pedal so that the vehicle does not start moving by itself.
Information messages
First read and observe the introductory information and safety warn-
ings
on page 143.
Park Assist Brake interv. Speed too high
If a speed of 50 km / h is exceeded while searching for a parking space, the sys-
tem with the key symbol is must be reactivated.
Speed too high. Please take over steering!
The parking procedure was ended because the speed was exceeded. Park with a
max. speed of 7 km/h.
146Driving
Page 150 of 266

Driver steering intervention: Please take over steering!
The parking procedure is terminated due to a driver steering intervention. Park Assist finished. ASR deactivated.
The parking procedure cannot be carried out because the TCS system is deactiva- ted. Activate the TCS.
ASR deactivated. Please take over steering!
The parking procedure was ended because TCS was deactivated during the park-
ing procedure.
Trailer: Park Assist finished.
The parking procedure cannot be carried out because a trailer is hitched. Time limit exceeded. Please take over steering!
The parking procedure was ended because the time limit of 6 minutes was
passed.
Park Assist currently not available.
The system cannot be activated because a fault exists on the vehicle. Seek help
from a specialist garage.
Park Assist ended. System currently not available.
The parking procedure was ended because a fault exists on the vehicle. Seek help
from a specialist garage.
Park Assist faulty. Workshop!
The parking procedure is not possible because a fault exists in the system. Seek help from a specialist garage.
ASR intervention! Please take over steering!
The parking procedure is terminated by a TCS intervention. PARK ASSIST Turn on turn signal and select reverse gear
The prerequisites for manoeuvring out of a parking space using the system have
been met. Switch on the turn signals and shift into reverse.
Automatic space departure not possible. Space too small
The manoeuvring procedure using the system is not possible. The parking gap is too small.
Park Assist Brake interv. Speed too high
The driving speed during the parking procedure was too high - automatic brake
assist is initiated.
Cruise Control System
Introduction
This chapter contains information on the following subjects:
Activating/deactivating
148
Storing and maintaining speed
148
Changing the stored speed
148
Switching off temporarily
148
The Cruise Control System (CCS) maintains a set speed, more than 25 km/h, with-
out you having to actuate the accelerator pedal.
This is only possible within the range which is permitted by the power output and
braking power of the engine.
The warning light
illuminates in the instrument cluster when the cruise control
system is switched on.
WARNING■ For safety reasons, the cruise control system must not be used in dense
traffic or on unfavourable road surfaces (such as icy roads, slippery roads,
loose gravel) – risk of accident!■
The saved speed may only be resumed if it is not too high for the current
traffic conditions.
■
Always deactivate the cruise control system after use to prevent the system
being switched on unintentionally.
CAUTION
■ The cruise control system is not able to maintain a constant speed when driving
in areas with steeper gradients. The weight of the vehicle increases the speed at which it travels. In such cases, a lower gear should be engaged or the footbrake
applied.■
It is not possible to switch on the cruise control system if the first gear or re-
verse gear is engaged (Vehicles fitted with a manual transmission)
147Assist systems
Page 151 of 266
.■
The cruise control system may automatically switch of")
■The cruise control system cannot be activated when the selector lever is in po-
sitions P, N or R (vehicles with automatic transmission).■
The cruise control system may automatically switch off when some brake assist
systems (e.g. ESC) intervene, when the maximum permissible engine speed is ex- ceeded, etc.
Activating/deactivating
Fig. 124
Operating lever: Cruise control
system controls
First read and observe the introductory information and safety warn-
ings on page 147.
Activating
›
Move switch
A
» Fig. 124 into the ON position.
Deactivating
›
Move switch
A
» Fig. 124 into the OFF position.
Storing and maintaining speed
First read and observe the introductory information and safety warn-
ings
on page 147.
›
Activate the cruise control system » page 148.
›
Drive at the desired speed.
›
Push the rocker button
B
into the SET/- » Fig. 124 on page 148 position.
After you have released the rocker button
B
from the SET/- position, the speed
you have just stored is kept constant without having to depress the accelerator.
Changing the stored speed
First read and observe the introductory information and safety warn-
ings
on page 147.
Increasing the speed with the rocker button
B›
Push the rocker button
B
into the RES/+ » Fig. 124 on page 148 position.
If the rocker button is held in the RES/+ position, the speed will increase continu-
ously. Release the rocker button once the desired speed is reached. The set
speed is then stored in the memory.
Decreasing the speed with the rocker button
B
The stored speed can be reduced by pushing the rocker switch
B
into the
SET/- » Fig. 124 on page 148 position.
If the rocker button is pressed and held in the SET/- position, the speed will de-
crease continuously. Release the rocker button once the desired speed is
reached. The set speed is then stored in the memory.
If the rocker button is released at a speed of less than approx. 25 km/h, the speedis not stored and the memory is erased. Once the speed of the vehicle has in-
creased to more than approx. 25 km/h, the speed must then be stored again by
pushing the rocker button
B
into the SET/- position.
Increasing the speed with the accelerator
›
Depress the accelerator pedal.
Releasing the accelerator pedal will cause the speed to drop again to the set
speed.
Decreasing the speed with the brake pedal
The speed can also be reduced by depressing the brake pedal, which temporarily
deactivates the system » page 148.
Switching off temporarily
First read and observe the introductory information and safety warn-
ings
on page 147.
The cruise control system can be temporarily deactivated by pushing the switch
A
» Fig. 124 on page 148 into the spring-mounted CANCEL position or by de-
pressing the brake or clutch pedal.
The set speed remains stored in the memory.
148Driving
Page 152 of 266

Briefly push the rocker button B into the RES/+ position in order to resume the
stored speed after the clutch or brake pedal is released.
START-STOP
Introduction
This chapter contains information on the following subjects:
Starting/shutting down the engine
149
Operating conditions of the system
150
Manually activating/deactivating the system
150
Information messages
151
The START-STOP system helps you to save fuel while at the same time reducing
harmful exhaust emissions and CO 2 emissions.
The function is automatically activated each time the ignition is switched on. In the start-stop mode, the engine automatically switches to the vehicle's idle phase, e.g. when stopped at traffic lights. The engine restarts automatically
where necessary.
The system can work only if the following basic conditions are met. The driver's door is closed.
The driver has fastened the seat belt.
The bonnet is closed.The driving speed was higher than 4 km.h after the last stop.
No trailer is coupled.
WARNING■ The brake servo unit and power steering only operate if the engine is run-
ning.■
Never let the vehicle roll with the engine switched off.
CAUTION
Always deactivate the START-STOP system before driving through wa-
ter » page 134 .Note■
If the driver's seat belt is removed for more than approx. 30 seconds or the driv-
er's door is opened during stop mode on vehicles with manual transmission or au- tomatic transmission (when the selector lever in position P), the engine must be
started manually » page 120.■
After manually starting the engine on vehicles with manual transmission, auto-
matic engine shut down is not possible until the vehicle has travelled the re-
quired minimum distance for START-STOPP mode.
■
If, on vehicles with automatic transmission, the selector lever positions D, S or N
are selected after driving in reverse, the vehicle will first need to achieve a speed
of over 10 km/h before automatic engine shut down can take place again.
■
Changes to the outdoor temperature can have an effect on the internal temper-
ature of the vehicle battery even after several hours. If the vehicle remains out- doors for a long time in minus temperatures or in direct sunlight, it can take sev-
eral hours until the internal temperature of the vehicle battery reaches a suitable
temperature for proper operation of the START STOP system.
■
If the Climatronic is running in automatic mode, it is possible that under certain
conditions the engine may not switch off automatically.
Starting/shutting down the engine
First read and observe the introductory information and safety warn-ings
on page 149.
Vehicles with manual transmission
›
Stop the vehicle (where necessary, apply the handbrake).
›
Put the gear stick into Neutral.
›
Release the clutch pedal.
Automatic engine shut down (STOP phase) takes place. The warning symbol
appears in the instrument cluster display.
›
Depress the clutch pedal.
The automatic start procedure takes place again (START phase). The warning
symbol
goes out.
Vehicles with automatic transmission
›
Bring the vehicle to a stop and depress the brake pedal.
Automatic engine shut down takes place. The warning symbol
appears in the
instrument cluster display.
›
Release the brake pedal.
149Assist systems
 1
1 2
2 3
3 4
4 5
5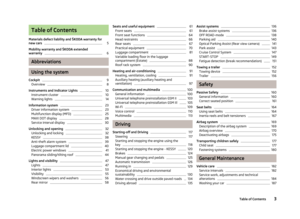 6
6 7
7 8
8 9
9 10
10 11
11 12
12 13
13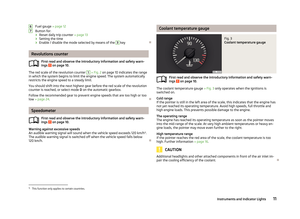 14
14 15
15 16
16 17
17 18
18 19
19 20
20 21
21 22
22 23
23 24
24 25
25 26
26 27
27 28
28 29
29 30
30 31
31 32
32 33
33 34
34 35
35 36
36 37
37 38
38 39
39 40
40 41
41 42
42 43
43 44
44 45
45 46
46 47
47 48
48 49
49 50
50 51
51 52
52 53
53 54
54 55
55 56
56 57
57 58
58 59
59 60
60 61
61 62
62 63
63 64
64 65
65 66
66 67
67 68
68 69
69 70
70 71
71 72
72 73
73 74
74 75
75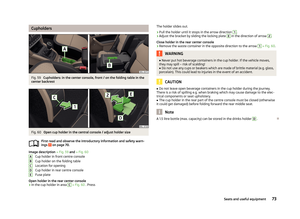 76
76 77
77 78
78 79
79 80
80 81
81 82
82 83
83 84
84 85
85 86
86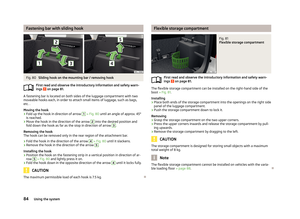 87
87 88
88 89
89 90
90 91
91 92
92 93
93 94
94 95
95 96
96 97
97 98
98 99
99 100
100 101
101 102
102 103
103 104
104 105
105 106
106 107
107 108
108 109
109 110
110 111
111 112
112 113
113 114
114 115
115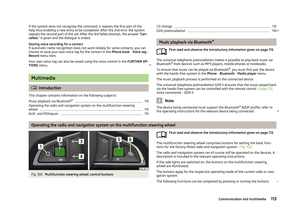 116
116 117
117 118
118 119
119 120
120 121
121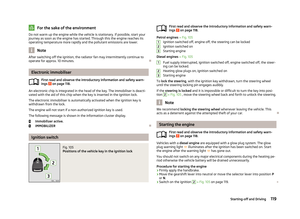 122
122 123
123 124
124 125
125 126
126 127
127 128
128 129
129 130
130 131
131 132
132 133
133 134
134 135
135 136
136 137
137 138
138 139
139 140
140 141
141 142
142 143
143 144
144 145
145 146
146 147
147 148
148 149
149 150
150 151
151 152
152 153
153 154
154 155
155 156
156 157
157 158
158 159
159 160
160 161
161 162
162 163
163 164
164 165
165 166
166 167
167 168
168 169
169 170
170 171
171 172
172 173
173 174
174 175
175 176
176 177
177 178
178 179
179 180
180 181
181 182
182 183
183 184
184 185
185 186
186 187
187 188
188 189
189 190
190 191
191 192
192 193
193 194
194 195
195 196
196 197
197 198
198 199
199 200
200 201
201 202
202 203
203 204
204 205
205 206
206 207
207 208
208 209
209 210
210 211
211 212
212 213
213 214
214 215
215 216
216 217
217 218
218 219
219 220
220 221
221 222
222 223
223 224
224 225
225 226
226 227
227 228
228 229
229 230
230 231
231 232
232 233
233 234
234 235
235 236
236 237
237 238
238 239
239 240
240 241
241 242
242 243
243 244
244 245
245 246
246 247
247 248
248 249
249 250
250 251
251 252
252 253
253 254
254 255
255 256
256 257
257 258
258 259
259 260
260 261
261 262
262 263
263 264
264 265
265