Page 113 of 266
›
Switch on the Wi-Fi network")
If menu item Open is set in the Phone - Wi-Fi - Settings - Encryption menu, the
connection is made automatically.
Connecting using WPS (service for easy connection)›
Switch on the Wi-Fi network » page 109, Switching Wi-Fi network on/off .
›
Open the Phone - Wi-Fi - WPS config. menu in the instrument cluster.
›
In the device to be connected, select the connection using WPS function - see
operating instructions for the device to be connected.
If the Pushbutton menu item is selected in the instrument cluster, the Wi-Fi con-
nection is made automatically.
If the WPS PIN menu item is selected in the instrument cluster, then a PIN must
be entered in the device to be connected and the instrument cluster.
Use WLAN network in MAXI DOT display
First read and observe the introductory information given on page 109.
When a Wi-Fi network is switched on, the following menu items are displayed
when the Wi-Fi menu item is selected:
■ Off - Switch off the WLAN network (depending on the context)
■ Device list - Display a list of external devices
■ Active device - Display a list of active devices
■ Block - Block device connections
■ Known devices - Display a list of known devices
■ Rename - Rename the device
■ Block - Block device connections
■ Device blocked - Display of a list of blocked devices
■ Unblock - Remove the connection block
■ Delete lists - Delete device lists
■ Known devices - Delete the list of known devices
■ Device blocked - Delete the list of blocked devices
■ Both lists - Delete both device lists
■ Password - Use of password to log on to the WLAN network
■ Show - Display a password to log on to the WLAN network
■ Generate - Generate a new password to log on to the WLAN network
■ Wi-Fi Name - Use of WLAN network name
■ Show - Display the WLAN network name
■ Rename - Rename the WLAN network
■
WPS config. - Wi-Fi network connection using WPS
■ Pushbutton - Automatic connection
■ WPS PIN - PIN entry for the connection
■ Data counter - Display information about the volume of data transferred
■ Current conn. - Display of the volume of data transferred for the current con-
nection
■ Total - Display of the total volume of data transferred
■ Reset - Resetting of the information about the volume of data transferred
■ Settings - WLAN network settings
■ Access point - Access point settings
■ Settings - Access point management
■ APN - Change the access point name
■ User name - User Name
■ Password - Password
■ Reset - Reset access point factory settings
■ Prioritisation - Set the connection priority
■ Calls - Set the connection priority for calls
■ Data - Set the connection priority for data transfer
■ Encryption - Set the encryption
■ WPA2 - Enable WPA 2 encryption
■ Open - No encryption
■ Visibility - Set the WLAN network visibility
■ Visible - WLAN network is visible to other devices
■ Invisible - WLAN network is not visible to other devices
■ Data roaming - Set the data roaming
■ No roaming - Data roaming is not allowed
■ Allow - Data roaming is allowed
■ Always ask - Question setting for data roaming
■ Wi-Fi Channel - Select WLAN network channels (preferably set to channel 11)
■ Channel 1 ... Channel 11 - Display the WLAN network channels
■ Reset - Reset Wi-Fi network factory settings
Voice control
Introduction
This chapter contains information on the following subjects:
Dialogue
111
Voice commands - GSM II
112
Voice commands - GSM III
112
110Using the system
Page 114 of 266
 makes it possiblet")
DialogueFig. 99
Multifunction steering wheel
First read and observe the introductory information given on page 110.
The voice control system (hereinafter referred to as the system) makes it possibleto use voice commands for some functions of the hands-free system.
The period of time during which the system is ready to receive voice commandsand to carry them out is called a dialogue. The system gives audible feedback and guides you if necessary through the relevant functions.
Optimum understanding of the voice commands depends on several factors. › Speak with a normal tone of voice without intonation and excessive pauses.
› Avoid a bad pronunciation.
› Close the doors, windows and sliding roof, to reduce or stop disturbing exterior
noise.
› You are recommended to speak louder at higher speeds, so that the sound of
your voice is not drowned out by the increased ambient noise.
› During the dialogue, limit additional noise in the vehicle, e.g. passengers talking
at the same time.
› Do not speak, if the system makes an announcement.
The microphone for voice control is inserted in the moulded headliner and direc- ted to the driver and front passenger. Therefore the driver and the front passen-ger can operate the equipment.
Entering a phone number
The telephone number can be entered as a continuous series of individually spo- ken digits (the whole number at once) or in the form of digital blocks (separated
by short pauses). After each order of digits (separation through brief voice pause)
all of the digits detected up to now are repeated by the system.
The digits 0 - 9, symbols +, , # are permitted. The system detects no continuous
digit combinations such as twenty-three, but only individually spoken digits (two,
three).
Activating voice control - GSM II
By briefly pressing the button 1
» Fig. 99 on the multifunction steering wheel.
Deactivating voice control - GSM II If the system is currently playing a message, the message that is currently being played must be terminated by briefly pressing button
1
» Fig. 99 on the multi-
function steering wheel.
If the system is expecting a voice command, you can end the dialogue yourself:
› with the
CANCEL voice command;
› by briefly pressing the button
1
» Fig. 99 on the multifunction steering wheel.
Activating voice control - GSM III The dialogue can be started at any time by pressing the button
1
» Fig. 99 on
the multifunction steering wheel 1)
.
Deactivating voice control - GSM III
If the system is currently playing a message, the message that is currently being
played must be terminated by pressing the button
1
» Fig. 99 on the multi-func-
tion steering wheel.
If the system is expecting a voice command, you can end the dialogue yourself:
› with the
CANCEL voice command;
› by briefly pressing the button
1
» Fig. 99 on the multifunction steering wheel.
1)
Not valid for vehicles with the Columbus navigation system.
111Communication and multimedia
Page 115 of 266

Note■The dialogue of an incoming call is immediately interrupted.■The voice control is only possible in vehicles fitted with a multifunction steering
wheel with telephone control.■
On vehicles that are factory-fitted with the Columbus navigation system, it is
only possible to operate the voice control for the telephone via this device » Oper-
ating instructions for the Columbus navigation system , chapter Voice control for
the navigation system .
Voice commands - GSM II
First read and observe the introductory information given on page 110.
Basic voice commands
Voice commandActionHELPAfter this command, the system repeats all possible
commands.CALL XYZThis command calls up the contact from the phone book.PHONE BOOKAfter this command, for example, the phone book
can be repeated back to you, a voice entry for the
contact can be updated or deleted, etc.CALL HISTORYLists of dialled numbers, missed calls, etc.DIAL NUMBERAfter this command, a telephone number can be en-
tered in order to establish a connection with the re-
quested party.REDIALAfter this command the system calls the last dialled
number.MUSIC a)Play music from the mobile phone or another paired
device.FURTHER OPTIONSAfter this command the system offers additional
context-dependent commands.SETTINGSSelection for setting Bluetooth ®
, dialogue etc.CANCELThe dialogue is ended.a)
On vehicles fitted with the Amundsen+ navigation system, this function can be accessed via the navi-
gation system menu; refer to the » operating instructions for the Amundsen+ navigation system .
If a voice command is not detected, the system answers with “ Pardon?”, and a
new entry can be made. After the 2nd error the system repeats the aid. After the
3rd failed attempt, the answer “ Cancelled.” is given and the dialogue is ended.
Storing voice recording for a contact
If automatic name recognition does not work reliably for some contacts, you can choose to save your own voice tag for the contact in the Phone book - Voice tag -
Record menu item.
Your own voice tag can also be saved using the voice control in the FURTHER OP-
TIONS menu.
Voice commands - GSM III
First read and observe the introductory information given on page 110.
Basic voice commands
Voice commandActionHELPAfter this command, the system repeats all possible
commands.CALL NAMEAfter this command, a name can be entered to es-
tablish a connection with the requested party.DIAL NUMBERAfter this command, a telephone number can be en-
tered in order to establish a connection with the re-
quested party.REDIALThe last selected telephone number is selected.READ ADDRESSBOOKThe system reads out contacts from the telephone
book.READ MESSAGESThe system reads the messages which were re-
ceived while the telephone was connected to the
control unit.SHORT DIALOGUEThe help is significantly reduced (good operating knowledge provided).LONG DIALOGUEThe help is not reduced (suitable for beginners).CANCELThe dialogue is ended. 112Using the system
Page 116 of 266

If the system does not recognise the command, it repeats the first part of thehelp thus enabling a new entry to be completed. After the 2nd error the systemrepeats the second part of the aid. After the 3rd failed attempt, the answer “ Can-
celled. ” is given and the dialogue is ended.
Storing voice recording for a contact
If automatic name recognition does not work reliably for some contacts, you can
choose to save your own voice tag for the contact in the Phone book - Voice tag -
Record menu item.
Your own voice tag can also be saved using the voice control in the FURTHER OP-
TIONS menu.
Multimedia
Introduction
This chapter contains information on the following subjects:
Music playback via Bluetooth ®
113
Operating the radio and navigation system on the multifunction steering
wheel
113
AUX- and MDIinputs
115CD change115DVD-preinstallation116
Music playback via Bluetooth ®
First read and observe the introductory information given on page 113.
The universal telephone preinstallation makes it possible to play back music via
Bluetooth ®
from devices such as MP3 players, mobile phones or notebooks.
To ensure that music can be played via Bluetooth ®
, you must first pair the device
with the hands-free system in the Phone - Bluetooth - Media player menu.
The music playback process is performed on the connected device.
The universal telephone preinstallation GSM II ensures that the music played back
via the hands-free system can be controlled with the remote control » page 112,
Voice commands - GSM II .
Note
The device being connected must support the Bluetooth ®
A2DP profile; refer to
the operating instructions for the relevant device being connected.
Operating the radio and navigation system on the multifunction steering wheel
Fig. 100
Multifunction steering wheel: control buttons
First read and observe the introductory information given on page 113.
The multifunction steering wheel comprises buttons for setting the basic func-
tions for the factory-fitted radio and navigation system » Fig. 100.
The radio and navigation system can of course still be operated on the devices. A
description is included in the relevant operating instructions.
If the side lights are switched on, the buttons on the multifunction steeringwheel are illuminated.
The buttons apply for the respective operating mode of the current radio or navi- gation system.
The following functions can be completed by pressing or turning the buttons.
113Communication and multimedia
Page 117 of 266
Interrupt current
navigation an-nouncement2Turn upwardsIncr")
Button/di-al
» Fig. 10 0
ActionRadioTVAudio sourcesDVD videoNavigation
1Presschanging the audio source2
PressSwitch sound on/off (MUTE )Interrupt current
navigation an-nouncement2Turn upwardsIncrease the volume2Turn downwardsReduce the volume3Press brieflySkip to next channelSkip to next channelSkip to next trackSkip to next chapterWithout functionInterrupt traffic report3Press and hold but- tonWithout functionFast forwardWithout function4
Press brieflySwitch to previous channelSwitch to previouschannelSwitch to start of tracka)Switch to previous
chapterWithout functionInterrupt traffic report4Press and hold but- tonWithout functionFast rewindWithout function5Turn upwardsSwitch to previous channel and displayList of stored/accessible channelsSkip to next channelSkip to next trackSkip to next chapterShow the option tostop navigation ordisplay the list of recent destina- tions5Turn downwardsSwitch to the next channel and displayList of stored / accessible channelsSwitch to previous channelSwitch to start of tracka)Switch to previous
chapter6Press brieflyCall up the main menua)
To go to the previous track, press the adjustment wheel twice or rotate it by two positions.
114Using the system
Page 118 of 266
 and to play back mus")
AUX- and MDIinputsFirst read and observe the introductory information given on page 113.
The AUX and MDI inputs are used to connect external audio sources (e.g. iPod ormp3 player) and to play back music from these devices via the factory-fitted radio
or navigation system.
The AUX input for external audio sources is located below the armrest of the
front seats and is marked with the 1)
symbol.
The MDI input is above the storage compartment in the front center console and
has the identifier
» page 72 characterized.
For a description of use, refer to the operating instructions for the relevant radio or navigation system.
CD change
Fig. 101
The CD changer
First read and observe the introductory information given on page 113.
The CD changer for the radio and navigation system is located in the left side trim panel of the boot.
Inserting the CD›Touch the button C » Fig. 101 and guide the CD (compact disc) into the CD-caseB
. The CD is automatically loaded onto the lowest free position in the CD
changer. The indicator light in the corresponding button
D
stops flashing.
Filling the CD changer with CDs
›
Press and hold the button
C
» Fig. 101 for longer than 2 seconds and guide the
CDs one after the other (maximum 6 CDs) into the CD case
B
. The indicator
lights in the buttons
D
stop flashing.
Inserting a CD at a specific position
›
Press the button
C
» Fig. 101 . The indicator lights in the buttons
D
illuminate
the memory spaces that are already assigned and flash in the case of free mem-
ory spaces.
›
Touch the desired button
D
and guide the CD into the CD-case
B
.
Ejecting a CD
›
Press button
A
» Fig. 101 . For assigned memory spaces, the indicator lights
now illuminate in the buttons
D
.
›
Press the corresponding button
D
. The CD is ejected.
Ejecting all CDs
›
Press and hold the button
A
» Fig. 101 for more than 2 seconds. All CDs in the
CD-changer are ejected consecutively.
Note
■ Insert a CD, with the labelled side facing up, into the CD slot B » Fig. 101 until it
is automatically drawn in. The play function will start automatically.■
After loading a CD into the CD changer, wait until the indicator light of the cor-
responding button
D
is illuminated. Then the CD case
B
is free to load the next
CD.
■
If a position is selected, on which a CD is already located, this CD is ejected. Re-
move the ejected CD and load the desired CD.
1)
For vehicles with the navigation system Amundsen + the AUX input located on the front panel of the
navigation device » manual of the navigation system Amundsen + .
115Communication and multimedia
Page 119 of 266

DVD-preinstallationFig. 102
Seat backrest - left front seat/right front seat
First read and observe the introductory information given on page 113.
Explanation of graphic Openings for attachment of DVD player holderAudio/video input
Connection input, DVD player
Only one DVD pre-installation is factory-installed in the seat backrest of the front seat.
The DVD player holder and DVD player can be purchased from ŠKODA original ac-
cessories. For a description of the use, refer to the operating instructions for these devices and equipment.
WARNING■ If there are passengers on both of the rear seats, the DVD player holder
must not be used on its own (without the DVD player) - risk of injury!■
The inclination of the holder can be adjusted to three preset positions. Be
careful not to injure fingers between the holder and the backrest when changes to the position of the DVD player holder are made.
■
The DVD player holder must not be used when the rear seat backrest or the
rear seat is folded forward or has been removed completely.
ABCNoteFollow the instructions given in the operating instructions of the DVD player hold-
er/DVD player.
116Using the system
Page 120 of 266

Driving
Starting-off and Driving
Steering
Introduction
Fig. 103
Correct seated position for the
driver
This chapter contains information on the following subjects:
Adjusting the steering wheel position
117
Power steering
118WARNING■ When driving, hold the steering wheel with both hands firmly on the outer
edge in the 9 o'clock and 3 o'clock position. Never hold the steering wheel in
the 12 o'clock position or in any other way (e.g. in the middle or inner edge of
the steering wheel). In such cases, you could severely injure the arms, hands
and head when the driver airbag is deployed.■
Never adjust the steering wheel when the vehicle is moving only when the
vehicle is stationary!
WARNING (Continued)■ Adjust the steering wheel so that the distance A » Fig. 103 between the
steering wheel and your chest is at least 25 cm. Adjust the distance of the
legs to the circuit board in the region of the knee airbag in such a way that it
is at least 10 cm B
If you do not comply with the minimum distance, this will
mean that the airbag system will not protect you - hazard!
■
If the steering wheel is adjusted further towards the head, the protection
provided by the driver airbag in the event of an accident is reduced. Check that the steering wheel is aligned to the chest.
Adjusting the steering wheel position
Fig. 104
Adjustable steering wheel: Lever
below steering wheel
First read and observe the introductory information and safety warn-
ings on page 117.
The height and forward/back position of the steering wheel can be adjusted.
›
First of all adjust the driver's seat » page 61.
›
Swivel the lever underneath the steering wheel downwards » Fig. 104.
›
Adjust the steering wheel to the desired position (with regard to the height and
forward/back position).
›
Push the lever upwards to the stop.
WARNINGThe lever for adjusting the steering wheel must be locked whilst driving so
that the steering wheel cannot accidentally change position during the jour-
ney – risk of accident!
117Starting-off and Driving
 1
1 2
2 3
3 4
4 5
5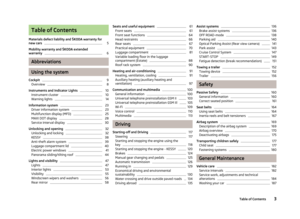 6
6 7
7 8
8 9
9 10
10 11
11 12
12 13
13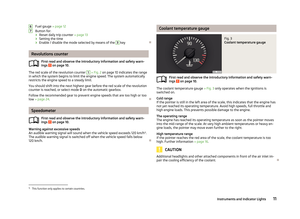 14
14 15
15 16
16 17
17 18
18 19
19 20
20 21
21 22
22 23
23 24
24 25
25 26
26 27
27 28
28 29
29 30
30 31
31 32
32 33
33 34
34 35
35 36
36 37
37 38
38 39
39 40
40 41
41 42
42 43
43 44
44 45
45 46
46 47
47 48
48 49
49 50
50 51
51 52
52 53
53 54
54 55
55 56
56 57
57 58
58 59
59 60
60 61
61 62
62 63
63 64
64 65
65 66
66 67
67 68
68 69
69 70
70 71
71 72
72 73
73 74
74 75
75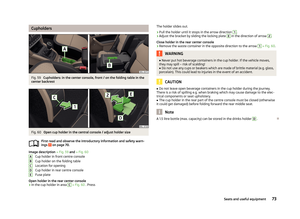 76
76 77
77 78
78 79
79 80
80 81
81 82
82 83
83 84
84 85
85 86
86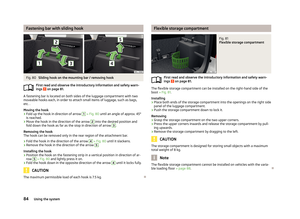 87
87 88
88 89
89 90
90 91
91 92
92 93
93 94
94 95
95 96
96 97
97 98
98 99
99 100
100 101
101 102
102 103
103 104
104 105
105 106
106 107
107 108
108 109
109 110
110 111
111 112
112 113
113 114
114 115
115 116
116 117
117 118
118 119
119 120
120 121
121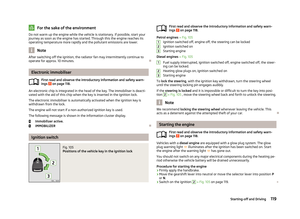 122
122 123
123 124
124 125
125 126
126 127
127 128
128 129
129 130
130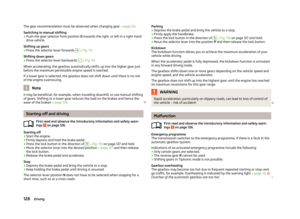 131
131 132
132 133
133 134
134 135
135 136
136 137
137 138
138 139
139 140
140 141
141 142
142 143
143 144
144 145
145 146
146 147
147 148
148 149
149 150
150 151
151 152
152 153
153 154
154 155
155 156
156 157
157 158
158 159
159 160
160 161
161 162
162 163
163 164
164 165
165 166
166 167
167 168
168 169
169 170
170 171
171 172
172 173
173 174
174 175
175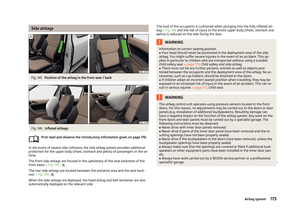 176
176 177
177 178
178 179
179 180
180 181
181 182
182 183
183 184
184 185
185 186
186 187
187 188
188 189
189 190
190 191
191 192
192 193
193 194
194 195
195 196
196 197
197 198
198 199
199 200
200 201
201 202
202 203
203 204
204 205
205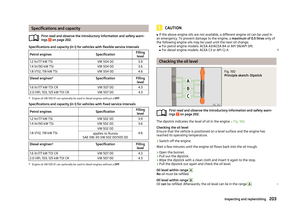 206
206 207
207 208
208 209
209 210
210 211
211 212
212 213
213 214
214 215
215 216
216 217
217 218
218 219
219 220
220 221
221 222
222 223
223 224
224 225
225 226
226 227
227 228
228 229
229 230
230 231
231 232
232 233
233 234
234 235
235 236
236 237
237 238
238 239
239 240
240 241
241 242
242 243
243 244
244 245
245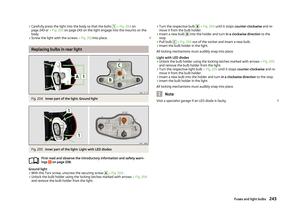 246
246 247
247 248
248 249
249 250
250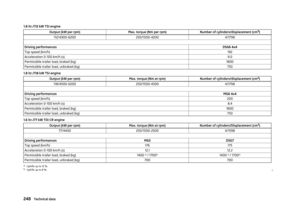 251
251 252
252 253
253 254
254 255
255 256
256 257
257 258
258 259
259 260
260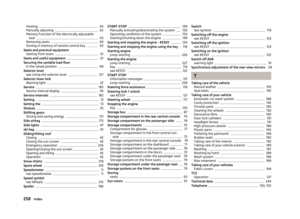 261
261 262
262 263
263 264
264 265
265