Page 65 of 274
 Owners Manual Note■Each time the ignition switches off for the third time, the position of the wind-
screen wipers changes. This counteracts an early fatigue of the wiper rubbers.■
The rear window wiper only op")
Note■Each time the ignition switches off for the third time, the position of the wind-
screen wipers changes. This counteracts an early fatigue of the wiper rubbers.■
The rear window wiper only operates if the boot lid is closed.
■
Keep the wiper blades clean. They may become soiled, e.g., with wax residues
after washing in automatic car wash systems » page 197.
■
The windscreen washer nozzles for the windscreen are heated when the en-
gine is running and the outside temperature is less than approx. +10 °C.
Windscreen wipers and washers
Fig. 44
Operating lever: Windscreen
wipers and washer settings
First read and observe the introductory information and safety warn-
ings on page 61.
Lever positions » Fig. 44
Wipers off
Periodic windscreen wiping/automatic wiping in rain
slow windscreen wiping
rapid windscreen wiping
Flick windscreen wiping (spring-tensioned position)
Automatic wipe/wash for windscreen (spring-tensioned position) Wiping the rear window pane (the windscreen wiper wipes at regular inter- vals after a few seconds)
Automatic wipe/wash for the rear window (spring-tensioned position)
Switches for setting the required break between the individual wiper strokes
(
1
periodic windscreen wiping) or the wiper speed in rain (
1
automatic
windscreen wiping in rain)
01234567AAutomatic wipe/wash for windscreen
The wash system operates immediately, the windscreen wipers wipe somewhat
later. The wash system and the windscreen wiper operate simultaneously at a
speed of more than 120 km/h.
Letting go of the lever will cause the windscreen wash system to stop and the wiper to continue for another 3-4 wiper strokes (depending on the period of
spraying of the windscreen).
At a speed of more than 2 km/h, the wiper wipes once again 5 seconds after the
last wiper stroke in order to wipe the last drops from the windscreen. This func-
tion can be activated/deactivated by a specialist garage.
Automatic wipe/wash for the rear window (Superb Combi)The wash system operates immediately, the windscreen wiper wipes somewhat later.
Letting go of the lever will cause the windscreen wash system to stop and the
wiper to continue for another 2-3 wiper strokes (depending on the period of
spraying of the windscreen). The lever remains in position 6
» Fig. 44 .
Automatic rear window wiper (Superb Combi)
If the lever is in position
2
» Fig. 44 or
3
the rear window is wiped every
30 or 10 seconds if the vehicle's speed exceeds 5 km/h.
If automatic windscreen wiping in rain is activated (the lever is in the position
1
)
the function is only active if the windscreen wipers operate in continuous mode
(no break between each wiping process).
Automatic rear window wiping can be activated/deactivated via the MAXI DOT
display in the menu item Rear wiper » page 29 .
Winter setting of the windscreen wiper If the windscreen wipers are in rest position, they cannot be folded out from the
windscreen. For this reason we recommend adjusting the windscreen wipers in
winter so that they can be folded out from the windscreen easily.
› Switch on the windscreen wipers.
› Switch off the ignition.
The windscreen wipers remain in the position in which they were when switching
off the ignition.
The service position can also be used as a winter position » page 243.
62Using the system
Page 66 of 274
 Owners Manual NoteIf the slow or the fast wiper setting is switched on and the vehicle speed decrea-
ses to below 4 km/h, the wiper speed is incrementally set to a lower wiper speed.
The original setting is restore")
NoteIf the slow or the fast wiper setting is switched on and the vehicle speed decrea-
ses to below 4 km/h, the wiper speed is incrementally set to a lower wiper speed.
The original setting is restored step by step when the speed of the vehicle ex-
ceeds 8 km/h.
Alternative parking position of the rear windscreen wiper
(Superb Combi)
First read and observe the introductory information and safety warn-ings
on page 61.
Each time after switching off the engine for the second time, the wiper blade of
the rear window wiper is tilted. This prolongs the life of the wiper blade.
Activation/deactivation
›
Switch on the ignition.
›
Push the operating lever to position
6
» Fig. 44 on page 62 five times in suc-
cession within 5 seconds.
›
Switch off the ignition. After switching on the ignition again, the alternative park position of the rear window wiper is activated/deactivated.
Headlight cleaning system
First read and observe the introductory information and safety warn-
ings
on page 61.
After the ignition is turned on headlamps are always cleaned at the first and after
every tenth spraying of the windscreen
5
» Fig. 44 on page 62 when the low
beam or high beam is switched on.
You should remove stubborn dirt (such as insect residues) from the headlight len-
ses at regular intervals, for example when refuelling. The following guidelines
must be observed » page 200, Headlight lenses .
To ensure the proper operation of the cleaning system during the winter, any snow should be removed from the washer nozzle fixtures and ice should be
cleared with a de-icing spray.
CAUTIONNever remove the nozzles from the headlight cleaning system by hand – risk of
damage!
Rear mirror
Introduction
This chapter contains information on the following subjects:
Interior mirror
64
Exterior mirrors
65WARNING■ Make sure that the mirror is not covered by ice, snow, mist or other objects.■Convex (curved outward) or aspheric exterior mirrors increase the field of vi-
sion. They do, however, make objects appear smaller in the mirror. These mir-
rors are therefore only of limited use for estimating distances to the following
vehicles.■
Whenever possible use the interior mirror for estimating the distances to
the following vehicles.
■
The illuminated display of an external navigation unit can lead to operation-
al faults to the automatic dimming interior mirror – risk of accident.
WARNINGAutomatic dimming mirrors contain an electrolytic fluid which may leak should
the mirror glass break.■
The leaking electrolytic fluid can irritate the skin, eyes and breath apparatus.
Immediately seek out fresh air and leave the vehicle. If this is not possible,
open all windows and doors.
■
If you swallow electrolytic fluid, seek medical assistance immediately.
■
If your eyes or skin come into contact with the electrolytic fluid, immediately
wash the affected area for a few minutes long with a lot of water. Then con-
sult a doctor immediately.
63Lights and visibility
Page 67 of 274
 Owners Manual CAUTIONNever mechanically fold in or fold back the exterior mirrors with the fold-in func-
tion by hand as this will damage the electric drive.
Note
■
Automatic mirror dimming operates only pro")
CAUTIONNever mechanically fold in or fold back the exterior mirrors with the fold-in func-
tion by hand as this will damage the electric drive.
Note
■
Automatic mirror dimming operates only properly if the sun screen for the rear
window in the housing on the boot cover is not in use or the light striking the in- terior rear-view mirror is not affected by other objects.■
If the automatic interior mirror dimming is switched off, the exterior mirror dim-
ming is also switched off.
■
The mirror heater only operates when the engine is running and up to an out-
side temperature of +35 ℃.
■
Do not touch the surface of the exterior mirrors if the exterior mirror heater is
switched on.
■
If the electrical exterior mirror setting fails at any time, the mirrors can be adjus-
ted by hand by pressing on the edge of the mirror surface.
■
Contact a specialist garage if there is a fault with the power setting function for
the exterior mirrors.
Interior mirror
Fig. 45
Manual dimming interior mirror
Fig. 46
Automatic dimming mirror
First read and observe the introductory information and safety warn-
ings on page 63.
Manual dimming interior mirror
›
To dim the mirror set the lever on the rear view mirror in the direction of front
wheel - arrow
A
» Fig. 45 .
›
To restore the original position, adjust the lever on the rear view mirror in the
direction of the front wheel off - arrow
B.
Automatic dimming mirror
›
To activate the Auto Dimmer, press the
D
button, the indicator light
C
illumi-
nates » Fig. 46 .
›
To disable auto-dimming, press the
D
button again, the indicator light
C
goes
out.
If automatic dimming is activated, the mirror dims automatically depending on
the light striking the mirror from the rear.
When the interior lights are switched on or the reverse gear is engaged, the mir-ror always moves back into the basic position (not dimmed).
Do not attach external navigation devices on to the windscreen or in the vicinity
of the automatic dimming interior mirror » page 63,
in section Introduction .
64Using the system
Page 68 of 274
 Owners Manual Exterior mirrorsFig. 47
Knob for the mirrors
First read and observe the introductory information and safety warn-
ings on page 63.
By moving the knob in the direction of the arrow, the mirror can be")
Exterior mirrorsFig. 47
Knob for the mirrors
First read and observe the introductory information and safety warn-
ings on page 63.
By moving the knob in the direction of the arrow, the mirror can be adjusted to
the desired position » Fig. 47.
The movement of the mirror surface is identical to the movement of the rotary
knob.
The knob can be moved into the following positions. adjust the left mirror or both mirrors
adjust right mirror or both mirrors
Switch off mirror control
Mirror heater
folding in both exterior mirrors
Adjusting both mirrors in sync
After the rotary knob to position
or in right-hand drive in the position
provided,
both mirrors may be adjusted simultaneously.
The synchronous adjustment of the two mirrors can be activated/deactivated via
the MAXI DOTdisplay in the menu item Mirror adjust » page 29.
Folding-in both of the exterior mirrors with the rotary knob
It is only possible to fold in both exterior mirrors when the ignition is switched on and at a speed of up to 15 km/h.
The mirrors are folded back into the driving position after the rotary knob is
turned from the position
to a different one.
Folding-in both of the exterior mirrors using the remote control key
The entire mirror can be folded by pressing the symbol button on the remote
control key for 2 seconds. All windows must be closed.
The exterior mirror is folded back into the driving position when the ignition isswitched on.
Automatic dimming mirror
The exterior mirrors are dimmed together with the automatic dimming interior
mirror » page 64 .
Tilting surface of front passenger mirror On vehicles fitted with the memory function for the driver's seat » page 69, the
surface of the mirror tilts down slightly when the reverse gear is engaged and the
rotary knob is in the position
or in position on vehicles with right-hand drive
» Fig. 47 . This provides an aid in seeing the kerb of the pavement when parking
the car.
The mirror returns into its initial position after the rotary knob is moved out of po- sition
(or position
on vehicles with right-hand drive) and put into another posi-
tion or if the speed is more than 15 km/h.
The tilt of the mirror surface can be activated/deactivated via the MAXI DOT dis-play in the menu item Mirror down» page 29.
Memory function for mirrors
On vehicles fitted with a memory function for the driver seat, the relevant setting
for the exterior mirrors is also stored automatically when the seat position is stor-
ed » page 69 .
65Lights and visibility
Page 69 of 274
 Owners Manual Seats and useful equipment
Adjusting the seats
Introduction
This chapter contains information on the following subjects:
Manually adjusting the front seats
67
Electric front seat adjustment
67
Head")
Seats and useful equipment
Adjusting the seats
Introduction
This chapter contains information on the following subjects:
Manually adjusting the front seats
67
Electric front seat adjustment
67
Head restraints
68
Memory function of the electrically adjustable seat
69
Memory function of the remote control key
69
The driver's seat should be adjusted in such a way that the pedals can be fully
pressed to the floor with slightly bent legs.
The seat backrest on the driver's seat should be adjusted in such a way that the
upper point of the steering wheel can be easily reached with slightly bent arms.
Correct adjustment of the seats is particularly important:
› for safely and quickly reaching the controls;
› for a relaxed body position that reduces fatigue;
› for achieving maximum protection from the seat belts and the airbag system.
WARNINGGeneral information■Caution when adjusting the seat! You may suffer injuries or bruises as a re-
sult of adjusting the seat without paying proper attention.■
The electric front seat adjustment is still functional if the ignition is switch-
ed off (even with the ignition key removed). Therefore, children should never
be left unattended in the vehicle.
■
The seat backrests must not be tilted too far back when driving, as this will
impair the function of the seat belts and of the airbag system – risk of injury!
■
Never carry more people than the number of seats in the vehicle.
■
Each occupant must correctly fasten the seat belt belonging to the seat.
Children must be fastened » page 186, Transporting children safely with a
suitable restraint system.
WARNING (Continued)■ The front seats and head restraints must be adjusted to match the body
size at all times and the seat belt must always be fastened properly to provide
the most effective levels of protection to the passengers.■
Do not carry any objects on the front passenger seat except objects de-
signed for this purpose (e.g. child seats) – risk of accident!
WARNINGInformation for the driver■Only adjust the driver's seat when the vehicle is stationary – risk of accident!■
Maintain a distance of at least 25 cm from the steering wheel, and a dis-
tance of at least 10 cm between the legs and the dash panel at the height of
the knee airbag. Not maintaining this minimum distance will mean that the
airbag system will not be able to properly protect you - hazard!
■
Ensure that there are no objects in the driver's footwell, as these may get
caught in the pedal apparatus when driving or braking » page 139. You would
then no longer be able to operate the clutch, brake or accelerate.
WARNINGInformation for the front seat passenger■Maintain a distance of at least 25 cm to the dash panel. Not maintaining this
minimum distance will mean that the airbag system will not be able to proper-
ly protect you - hazard!■
Always keep your feet in the footwell when the car is being driven - never
place your feet on the instrument panel, out of the window or on the surfaces of the seats. You will be exposed to increased risk of injury if it becomes nec-
essary to apply the brake or in the event of an accident. If an airbag is de-
ployed, you may suffer fatal injuries when adopting an incorrect seated posi- tion!
Note
■ After a certain time, play can develop within the adjustment mechanism of the
backrest angle.■
For safety reasons, it is not possible to store the seat position in the electric
seat memory and remote control key memory if the inclination angle of the seat
backrest is more than 102° in relation to the seat cushion.
■
Each time you store the position of the electrically adjustable driver's seat and
exterior mirrors, the existing setting is deleted.
66Using the system
Page 70 of 274
 Owners Manual Manually adjusting the front seatsFig. 48
Controls / setting
First read and observe the introductory information and safety warn- ings
on page 66.
Adjusting a seat in a forward/back direction
›
P")
Manually adjusting the front seatsFig. 48
Controls / setting
First read and observe the introductory information and safety warn- ings
on page 66.
Adjusting a seat in a forward/back direction
›
Pull the lever
A
» Fig. 48 in the direction of the arrow 1 and push the seat in
the required direction.
The lock must click into place after you release the lever.
Adjusting height of seat
›
Again push/pull the lever
B
» Fig. 48 in the direction of one of the arrows 2.
Adjusting the angle of the seat backrest
›
Relieve any pressure from the seat backrest (do not lean on it) and turn the handwheel
C
» Fig. 48 in the direction of the arrow 3.
Adjusting lumbar support
›
Push the lever
D
» Fig. 48 in the direction of one of the arrows 4.
Electric front seat adjustmentFig. 49
Adjusting controls / lumbar support
Fig. 50
Setting: Seat pad / backrest
First read and observe the introductory information and safety warn-
ings
on page 66.
Adjusting a seat in a forward/back direction
›
Push the switch
B
» Fig. 49 in the direction of one of the arrows 3 » Fig. 50 .
Set the height of the seat cushion
›
Push the switch
B
» Fig. 49 in the direction of one of the arrows 5 » Fig. 50 .
Adjust the angle of the seat cushion
›
Push the switch
B
» Fig. 49 in the direction of one of the arrows 4 » Fig. 50 .
Adjusting the angle of the seat backrest
›
Push the switch
C
» Fig. 49 in the direction of one of the arrows 6 » Fig. 50 .
67Seats and useful equipment
Page 71 of 274
 Owners Manual Reducing or increasing the curvature of the lumbar support›Push the switch A in the region of one of the arrows2» Fig. 49 .
Raising or lowering the curvature of the lumbar support›
Push the switc")
Reducing or increasing the curvature of the lumbar support›Push the switch A in the region of one of the arrows2» Fig. 49 .
Raising or lowering the curvature of the lumbar support›
Push the switch
A
in the region of one of the arrows 1» Fig. 49 .
The adjusted driver's seat position can be set in the memory of the
seat » page 69 or the remote control key » page 69.
Note
If the setting procedure is interrupted, you will need to press the button again.
Head restraints
Fig. 51
Headrest: adjusting / removing
Fig. 52
Rear centre head rests in vehi-
cles with the TOP TETHER sys-
tem
First read and observe the introductory information and safety warn-
ings on page 66.
Best protection is achieved if the top edge of the head rest is at the same level as the upper part of your head.
Setting height
›
Grasp the side of the head restraint with both hands and push it upwards as re-
quired » Fig. 51 - .
›
To move the head restraint downwards, press and hold the safety but-
ton » Fig. 51 - with one hand and press the head restraint downwards with
the other hand.
The front seats and head rests must be adjusted to match the body size at all
times and the seat belt must always be fastened properly to provide the most ef-
fective levels of protection to the passengers » page 170, Correct seated posi-
tion .
Removing/installing
›
Pull the head restraint up out of the seat backrest as far as the stop (for the rear head restraints fold the seat backrest forward).
›
Press the locking button in direction of the arrow » Fig. 51 -
and pull the head
restraint out.
›
To re-insert the head restraint, push it far enough down into the seat backrest until the locking button clicks into place.
Removing and installing rear middle head rest Applies to vehicles using the TOP TETHER system.
›
Pull the head restraint out of the seat backrest as far as the stop.
›
Press the locking button in the direction of arrow
1
» Fig. 52 , simultaneously
press the locking button into the opening
2
using a flat screwdriver with a
width of maximum 5 mm and pull out the head rest.
›
To re-insert the head restraint, push it far enough down into the seat backrest until the locking button clicks into place.
WARNING■ The head rests must be correctly adjusted to avoid risk of injury.■Never drive with the head restraints removed - risk of injury.■
If the rear seats are occupied, the rear head rests must not be in the lower
position. 68Using the system
Page 72 of 274
 Owners Manual NoteThe middle rear head restraint is adjustable in two positions.
Memory function of the electrically adjustable seat
Fig. 53
Memory buttons and SET button
First read and observe the introductory")
NoteThe middle rear head restraint is adjustable in two positions.
Memory function of the electrically adjustable seat
Fig. 53
Memory buttons and SET button
First read and observe the introductory information and safety warn-
ings on page 66.
The memory function for the driver's seat provides the option to store the posi-
tions of the driver's seat and the external mirrors. Each of the three memory but-
tons
B
» Fig. 53 can be assigned a set position.
Storing seat and exterior mirror settings for driving forward
›
Switch on the ignition.
›
Adjust the seat to the desired position.
›
Adjust both of the exterior mirrors » page 65.
›
Press the button SET
A
» Fig. 53 .
›
Within 10 seconds after pressing the SET button, press the desired memory
button
B
.
An acknowledgment sound confirms the storage.
Saving front passenger mirror settings when reversing
›
Switch on the ignition.
›
Press the required memory button
B
» Fig. 53 .
›
Move the rotary knob for the exterior mirror control into position
» page 65 .
›
Engage reverse gear.
›
Adjust the front passenger's mirror to the desired position » page 65.
›Disengage reverse gear.
The set position of the exterior mirror is stored.
Retrieving the saved setting›
Briefly press the desired memory button
B
» Fig. 53 with the ignition on.
or
›
Press and hold the desired memory button
B
with the ignition off or when the
ignition is on and travelling at a speed of more than 5 km / h.
Stopping the ongoing adjustment
›
Press any button on the driver's seat or the button on the remote control
key.
Note
Each time new seat and exterior mirror settings for forward travel are saved, the
individual setting for the right exterior mirror for reverse travel must also be
saved again.
Memory function of the remote control key
First read and observe the introductory information and safety warn-ings
on page 66.
The automatic storage of the driver's seat and exterior mirror positions when
locking the vehicle can be turned on in the memory of the remote control key (af-
terwards only as function of automatic storage).
Storing seat and exterior mirror settings for driving forward
›
Enable automatic storage.
When automatic storage is activated, the current positions of the driver's seat
and the external mirrors are saved in the memory of the remote control key each
time the vehicle is locked. When the vehicle is next unlocked using the same key,
the driver's seat and the external mirrors assume the positions stored in the
memory of this key 1)
.
Saving front passenger mirror settings when reversing
›
Unlock the vehicle with the remote control key.
1)
The vehicle must be locked and unlocked with the same key to save the seat and exterior mirror po-
sition to the key.
69Seats and useful equipment
 1
1 2
2 3
3 4
4 5
5 6
6 7
7 8
8 9
9 10
10 11
11 12
12 13
13 14
14 15
15 16
16 17
17 18
18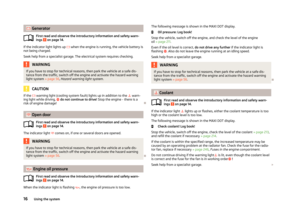 19
19 20
20 21
21 22
22 23
23 24
24 25
25 26
26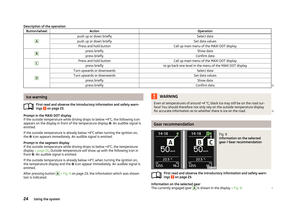 27
27 28
28 29
29 30
30 31
31 32
32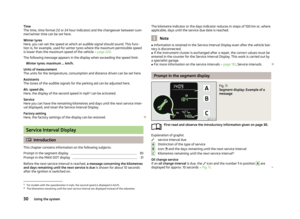 33
33 34
34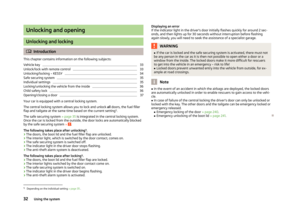 35
35 36
36 37
37 38
38 39
39 40
40 41
41 42
42 43
43 44
44 45
45 46
46 47
47 48
48 49
49 50
50 51
51 52
52 53
53 54
54 55
55 56
56 57
57 58
58 59
59 60
60 61
61 62
62 63
63 64
64 65
65 66
66 67
67 68
68 69
69 70
70 71
71 72
72 73
73 74
74 75
75 76
76 77
77 78
78 79
79 80
80 81
81 82
82 83
83 84
84 85
85 86
86 87
87 88
88 89
89 90
90 91
91 92
92 93
93 94
94 95
95 96
96 97
97 98
98 99
99 100
100 101
101 102
102 103
103 104
104 105
105 106
106 107
107 108
108 109
109 110
110 111
111 112
112 113
113 114
114 115
115 116
116 117
117 118
118 119
119 120
120 121
121 122
122 123
123 124
124 125
125 126
126 127
127 128
128 129
129 130
130 131
131 132
132 133
133 134
134 135
135 136
136 137
137 138
138 139
139 140
140 141
141 142
142 143
143 144
144 145
145 146
146 147
147 148
148 149
149 150
150 151
151 152
152 153
153 154
154 155
155 156
156 157
157 158
158 159
159 160
160 161
161 162
162 163
163 164
164 165
165 166
166 167
167 168
168 169
169 170
170 171
171 172
172 173
173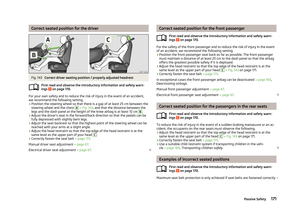 174
174 175
175 176
176 177
177 178
178 179
179 180
180 181
181 182
182 183
183 184
184 185
185 186
186 187
187 188
188 189
189 190
190 191
191 192
192 193
193 194
194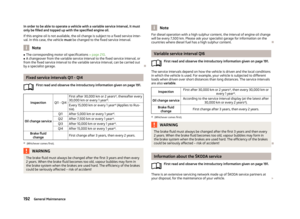 195
195 196
196 197
197 198
198 199
199 200
200 201
201 202
202 203
203 204
204 205
205 206
206 207
207 208
208 209
209 210
210 211
211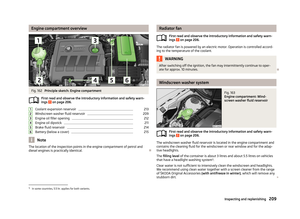 212
212 213
213 214
214 215
215 216
216 217
217 218
218 219
219 220
220 221
221 222
222 223
223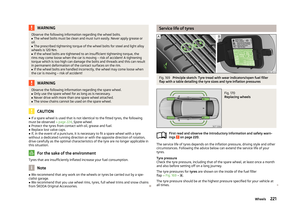 224
224 225
225 226
226 227
227 228
228 229
229 230
230 231
231 232
232 233
233 234
234 235
235 236
236 237
237 238
238 239
239 240
240 241
241 242
242 243
243 244
244 245
245 246
246 247
247 248
248 249
249 250
250 251
251 252
252 253
253 254
254 255
255 256
256 257
257 258
258 259
259 260
260 261
261 262
262 263
263 264
264 265
265 266
266 267
267 268
268 269
269 270
270 271
271 272
272 273
273