Page 173 of 402

2. The system displays a message screen andannounces the contents of the message to
warn that power output is restricted and in-
form the driver of the reason for this occur-
rence and what action is to be taken.
INDICATORS FOR MAINTENANCE
1. Tire replacement indicator
This indicator appears when the customer set
distance comes for replacing tires. You can set or
reset the distance for replacing tires. (See �Trip
computer�.)
WARNING
The tire replacement indicator is not a
substitute for regular tire checks, includ-
ing tire pressure checks. See �Changingwheels and tires�
in the section. Many
factors including tire inflation, align-
ment, driving habits and road conditions
affect tire wear and when tires should be
replaced. Setting the tire replacement in-
dicator for a certain driving distance
does not mean your tires will last that
long. Use the tire replacement indicator
as a guide only and always perform regu-
lar tire checks. Failure to perform regular
tire checks, including tire pressure
checks could result in tire failure. Serious
vehicle damage could occur and may
lead to a collision, which could result in
serious personal injury or death.
2. 3. 4. “Other” indicator
These indicators appears when the customer set
distance comes for checking or replacing main-
tenance items other than the tires. Other mainte-
nance items can include such things as the tire
rotation. You can set or reset the distance for
checking or replacing the items. (See �Trip com-
puter�.) For scheduled maintenance items and
intervals, see your NISSAN Service and Mainte-
nance Guide.
2-34Instruments and controls
Page 174 of 402
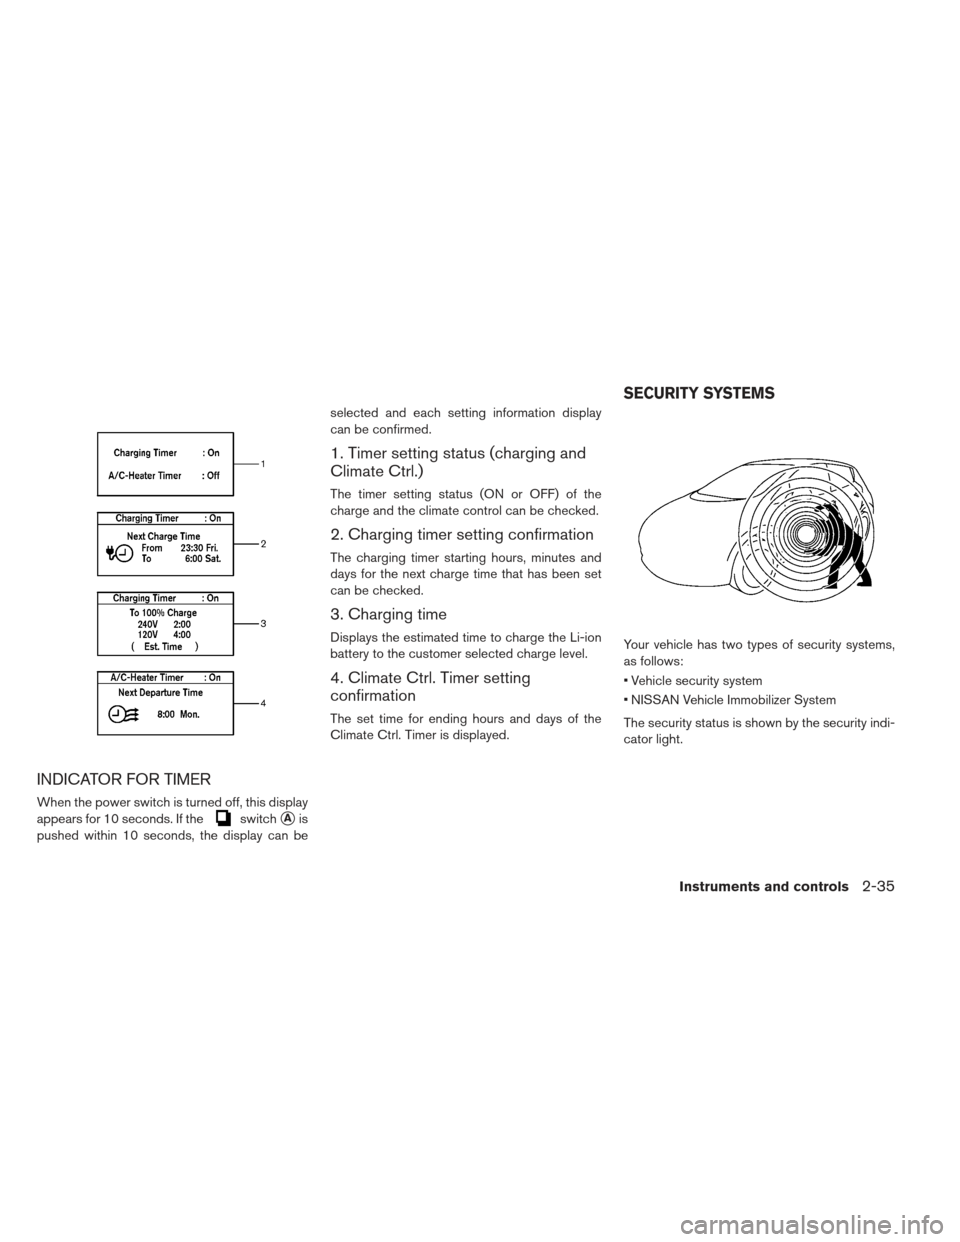
INDICATOR FOR TIMER
When the power switch is turned off, this display
appears for 10 seconds. If the
switch�Ais
pushed within 10 seconds, the display can be selected and each setting information display
can be confirmed.
1. Timer setting status (charging and
Climate Ctrl.)
The timer setting status (ON or OFF) of the
charge and the climate control can be checked.
2. Charging timer setting confirmation
The charging timer starting hours, minutes and
days for the next charge time that has been set
can be checked.
3. Charging time
Displays the estimated time to charge the Li-ion
battery to the customer selected charge level.
4. Climate Ctrl. Timer setting
confirmation
The set time for ending hours and days of the
Climate Ctrl. Timer is displayed.
Your vehicle has two types of security systems,
as follows:
Vehicle security system
NISSAN Vehicle Immobilizer System
The security status is shown by the security indi-
cator light.
SECURITY SYSTEMS
Instruments and controls2-35
Page 180 of 402
 , place the power
switch in the ON position and push the switch
�1
on. The indicator light will illuminate. Push the
switc")
To defog/defrost the rear window glass and out-
side mirrors (if so equipped) , place the power
switch in the ON position and push the switch
�1
on. The indicator light will illuminate. Push the
switch again to turn the defroster off.It will automatically turn off in approximately 15
minutes.CAUTION
When cleaning the inner side of the rear
window, be careful not to scratch or dam-
age the rear window defroster. The instrument brightness control switch can be
operated when the power switch is in the ON
position. When the switch is operated, the dot
matrix liquid crystal display switches to the
brightness adjustment mode.
Push the switch
�1to display the setting menu of
the brightness control on the dot matrix liquid
crystal display.
Push the
�1button to move the bar to the + side.
If the bar reaches the maximum brightness, a
chime will sound. If the button
�1is pushed again
when the brightness is at the maximum setting,
the instrument lights turn off.
Type AType B
REAR WINDOW AND OUTSIDE
MIRROR DEFROSTER SWITCH INSTRUMENT BRIGHTNESS
CONTROL
Instruments and controls2-41
Page 212 of 402
WARNING SIGNALS
To help prevent the vehicle from moving unex-
pectedly by erroneous operation of the Intelligent
Key listed on the following chart or to help pre-
vent the vehicle from being stolen, chime or beep
sounds inside and outside the vehicle and a
warning displays in the dot matrix liquid crystal
display.
When a chime or beep sounds or the warning
displays, be sure to check the vehicle and Intelli-
gent Key.
See�Troubleshooting guide� and�Dot matrix liq-
uid crystal display� in the�Instruments and con-
trols� section.
Pre-driving checks and adjustments3-11
Page 213 of 402

TROUBLESHOOTING GUIDE
SymptomPossible causeAction to take
When opening the driver’s door to
get out of the vehicleThe inside warning chime sounds continuously. The power switch is pushed to the OFF po-
sition while the driver’s door is open.
Close the driver’s door.
The power switch is in the ACC position. Push the power switch to the OFF position then
close the driver’s door.
When closing the door after getting
out of the vehicle The KEY is not detected warning appears on the
display, the outside chime sounds 3 times and the
inside warning chime sounds for a few seconds. The power switch is in the ACC or ON posi-
tion.
Push the power switch to the OFF position.
When closing the door with the in-
side lock knob turned to LOCK The outside chime sounds for a few seconds and
all the doors unlock. The Intelligent Key is inside the vehicle or
cargo area.
Carry the Intelligent Key with you.
When pushing the request switch or
the “LOCK”
button on the Intel-
ligent Key to lock the door The outside chime sounds for a few seconds. The Intelligent Key is inside the vehicle or a
cargo area.
Carry the Intelligent Key with you.
A door is not closed securely. Close the door securely.
When pushing the power switch in
the READY to drive position The Intelligent Key battery discharge indicator ap-
pears on the display.
The Intelligent Key battery charge is low.Replace the battery with a new one. See
�Key
battery replacement �in the �Maintenance and
do-it-yourself
�section.
The Key is not detected warning appears on the
display and the inside warning chime sounds for a
few seconds. The Intelligent Key is not in the vehicle. Carry the Intelligent Key with you.
When pushing the power switch The Intelligent Key system warning indicator ap-
pears on the display. It warns of a malfunction with the Intelligent
Key system.
Contact a NISSAN certified LEAF dealer.
3-12Pre-driving checks and adjustments
Page 226 of 402
.............4-2
How to read the displayed lines .............4-2
Difference between predicted and actual
distances")
4 Heater, air conditioner, audio and phone
systems
Rearview monitor (if so equipped).............4-2
How to read the displayed lines .............4-2
Difference between predicted and actual
distances ......................... .4-3
Adjusting the screen .................. .4-5
Operating tips ...................... .4-5
Vents ............................. .4-6
Center vents ....................... .4-6
Side vents ........................ .4-6
Climate control system ................... .4-7
Automatic climate control (models without
Navigation System) .................. .4-10
Automatic climate control (models with
Navigation System) .................. .4-17
Audio system (models without Navigation System). . .4-26 Radio .......................... .4-26
FM radio reception .................. .4-26
AM radio reception .................. .4-27
Satellite radio reception ................4-27
Audio operation precautions ..............4-28FM-AM-SAT radio with compact disc (CD) player
(models without Navigation System)
.........4-35
USB memory operation ................ .4-39
iPod® player operation ................4-41
CD Care and cleaning ................ .4-43
Steering wheel switch for audio control
(if so equipped) .................... .4-43
Antenna ......................... .4-44
Car phone or CB radio ................ .4-45
Bluetooth® hands-free phone system without
navigation system ..................... .4-45
Regulatory information ................ .4-47
Using the system ................... .4-47
Control buttons .................... .4-49
Getting started ..................... .4-49
List of voice commands ................4-51
Voice adaptation (VA) mode ..............4-55
Manual control ..................... .4-56
Troubleshooting guide ................ .4-58
Page 227 of 402
 position, the monitor display shows a
rearward view from the vehicle.
WARNING
The system is designed as an aid to the driver in detecting large")
When the shift selector is shifted into the R
(Reverse) position, the monitor display shows a
rearward view from the vehicle.
WARNING
The system is designed as an aid to the driver in detecting large stationary ob-
jects to help avoid damaging the ve-
hicle. The system will not detect small
objects below the bumper, and may
not detect objects close to the bumper
or on the ground.
The RearView Monitor is a conve- nience but it is not a substitute for
proper backing. Always turn and check
that it is safe to do so before backing
up. Always back up slowly.
Objects viewed in the RearView Moni- tor differ from actual distance because
a wide-angle lens is used.
Make sure that the hatch is securely closed when backing up.
Do not put anything on the rearview camera. The rearview camera is in-
stalled on top of the hatch. When washing the vehicle with high
pressure water, be sure not to spray it
around the camera. Otherwise, water
may enter the camera unit causing wa-
ter condensation on the lens, a mal-
function, fire or an electric shock.
Do not strike the camera. It is a preci- sion instrument. Otherwise, it may
malfunction or cause damage result-
ing in a fire or an electric shock.
CAUTION
There is a plastic cover over the camera.
Do not scratch the cover when cleaning
dirt or snow from the cover.
HOW TO READ THE DISPLAYED
LINES
Guiding lines which indicate the vehicle width
and distances to objects with reference to the
vehicle body line
�Aare displayed on the monitor.
Distance guide lines:
Indicate distances from the vehicle body.
Red line
�1: approx. 1.5 ft (0.5 m)
Yellow line
�2: approx. 3 ft (1 m)
Green line
�3: approx. 7 ft (2 m)
Green line
�4: approx. 10 ft (3 m)
REARVIEW MONITOR (IF SO
EQUIPPED)
4-2Heater, air conditioner, audio and phone systems
Page 228 of 402
DIFFERENCE BETWEEN
PREDICTED AND ACTUAL
DISTANCES
The distance guide line and the vehicle width
guide line should be used as a reference only
when the vehicle is on a level, paved surface. The
distance viewed on the monitor is for reference
only and may be different than the actual distance
between the vehicle and displayed objects.
Backing up on a steep uphill
When backing up the vehicle up a hill, the dis-
tance guide lines and the vehicle width guide
lines are shown closer than the actual distance.
For example, the display shows 3 ft (1.0 m) to the
place
�A, but the actual 3 ft (1.0 m) distance onthe hill is the place
�B. Note that any object on
the hill is further than it appears on the monitor.
Heater, air conditioner, audio and phone systems4-3