Page 74 of 402
3. The “Charging Timer” screen is displayed. Tochange the time or turn the timer on or off,
push the
switch. 4. To turn the timer on or off, use the
switch to highlight “On” or “Off” and then
push the
switch. If “On” is selected, an
additional screen is displayed that allows you
to change the time of the charging timer. 5. The hour portion of the time is highlighted on
the screen. Push the
switch to change
the hour field in increments of one hour. Push
the
switch to move to the minutes field.
6. Push the
switch to change the minute
field in increments of ten minutes. Push the
switch to finish setting the charging
timer.
ChargingCH-25
Page 76 of 402
3. Touch [Set Timer 1] or [Set Timer 2].4. Touch [% Charge].5. Touch [80% Charging (Improves Battery Lon-
gevity)]. The indicator light illuminates when
the long life mode is set to on.
6. Touch [BACK] to return to the previous screen.
7. Touch [Save Timer] when the settings are complete and a settings confirmation screen
is displayed.
ChargingCH-27
Page 79 of 402
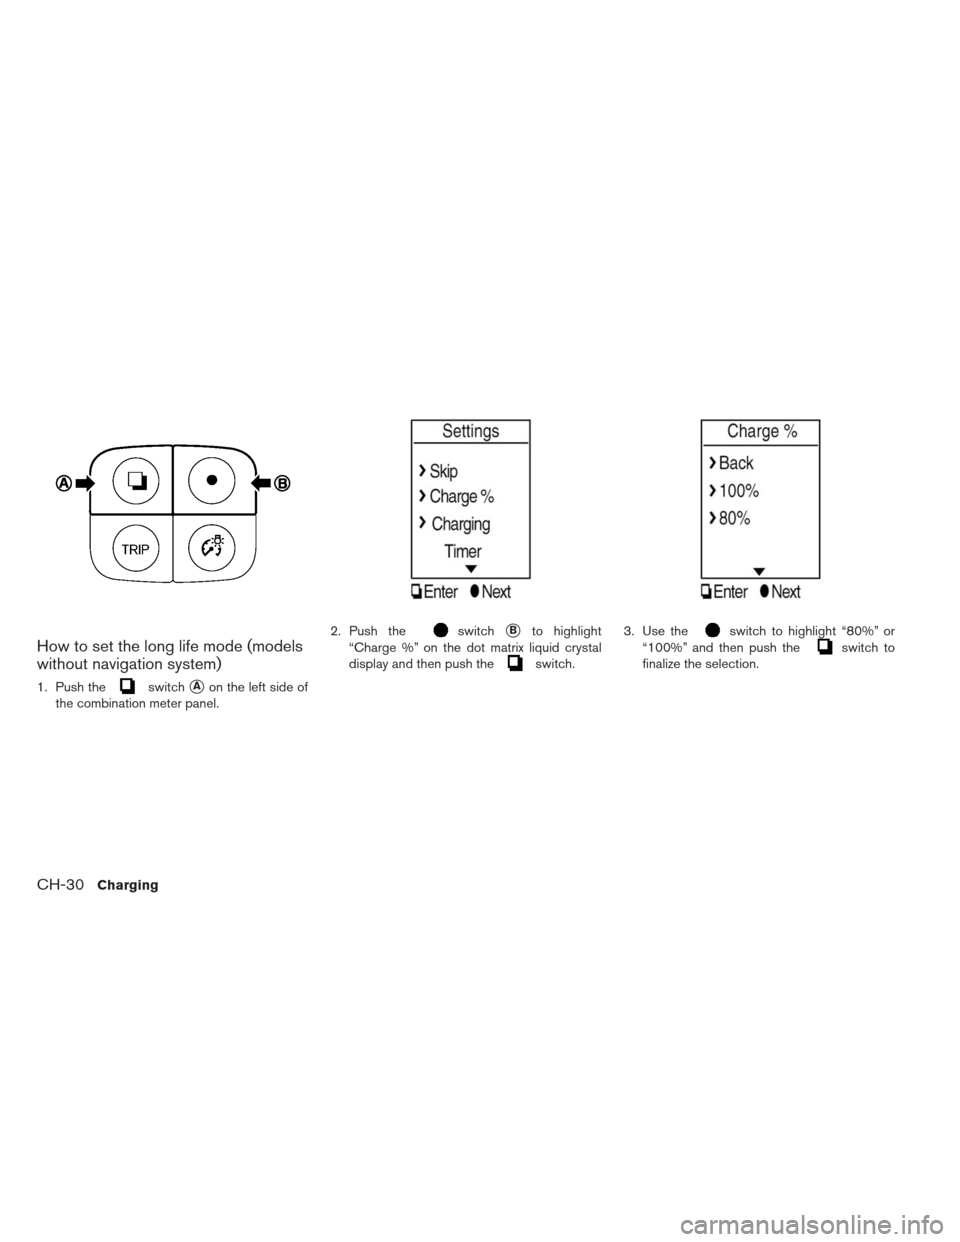
How to set the long life mode (models
without navigation system)
1. Push theswitch�Aon the left side of
the combination meter panel. 2. Push the
switch�Bto highlight
“Charge %” on the dot matrix liquid crystal
display and then push the
switch. 3. Use the
switch to highlight “80%” or
“100%” and then push the
switch to
finalize the selection.
CH-30Charging
Page 80 of 402

IMMEDIATE CHARGE
When a charging timer is not turned on, charging
automatically starts when a normal or trickle
charge connector is connected to the vehicle.
Use the immediate charge mode anytime you
want to start charging when a charging timer is
turned on by performing the following:
1. Place the power switch in the OFF position.
2. Press the immediate charge switch.
3. Connect the normal or trickle charge cablewhen the charging status indicator light changes to display immediate charge mode.
See
�Charging status indicator light�.
NOTE:
You have 15 minutes to connect a normal
or trickle charge connector to the vehicle
after the immediate charge switch is
pressed. If a charge connector is not con-
nected to the vehicle within 15 minutes,
the vehicle automatically returns to the
previous setting.
Immediate charge will be available for 15
minutes before returning automatically to
the previous setting.
To cancel immediate charge mode press
the immediate charge switch again.
If charge cable is disconnected, the Li-ion
battery automatically switches to charg-
ing timer. To perform an immediate
charge again, press the immediate charge
switch and connect charge cable.
If the charge cable is already connected,
press the immediate charge switch to
start performing an immediate charge.
CHARGING RELATED REMOTE
FUNCTION (MODELS WITH
NAVIGATION SYSTEM)
This vehicle incorporates a communication de-
vice that is called a TCU (Telematics Communi-
cation Unit) . The communication connection be-
tween this unit and NISSAN CARWINGS™ Data
Center allows for various remote function ser-
vices.
Li-ion battery status check:
The charging status of the Li-ion battery can
be checked using your personal computer or
internet enabled smart phone even if you are
not in the vehicle.
Remote charge:
The function of starting Li-ion battery charge
or starting the heater and air conditioner is
available using your personal computer or in-
ternet enabled smart phone.
Unplugged status:
A notification e-mail will be sent to your per-
sonal computer or internet enabled smart
phone if the plug is not connected at the
certain time you selected, after you turning off
the power switch in registered place.
ChargingCH-31
Page 82 of 402
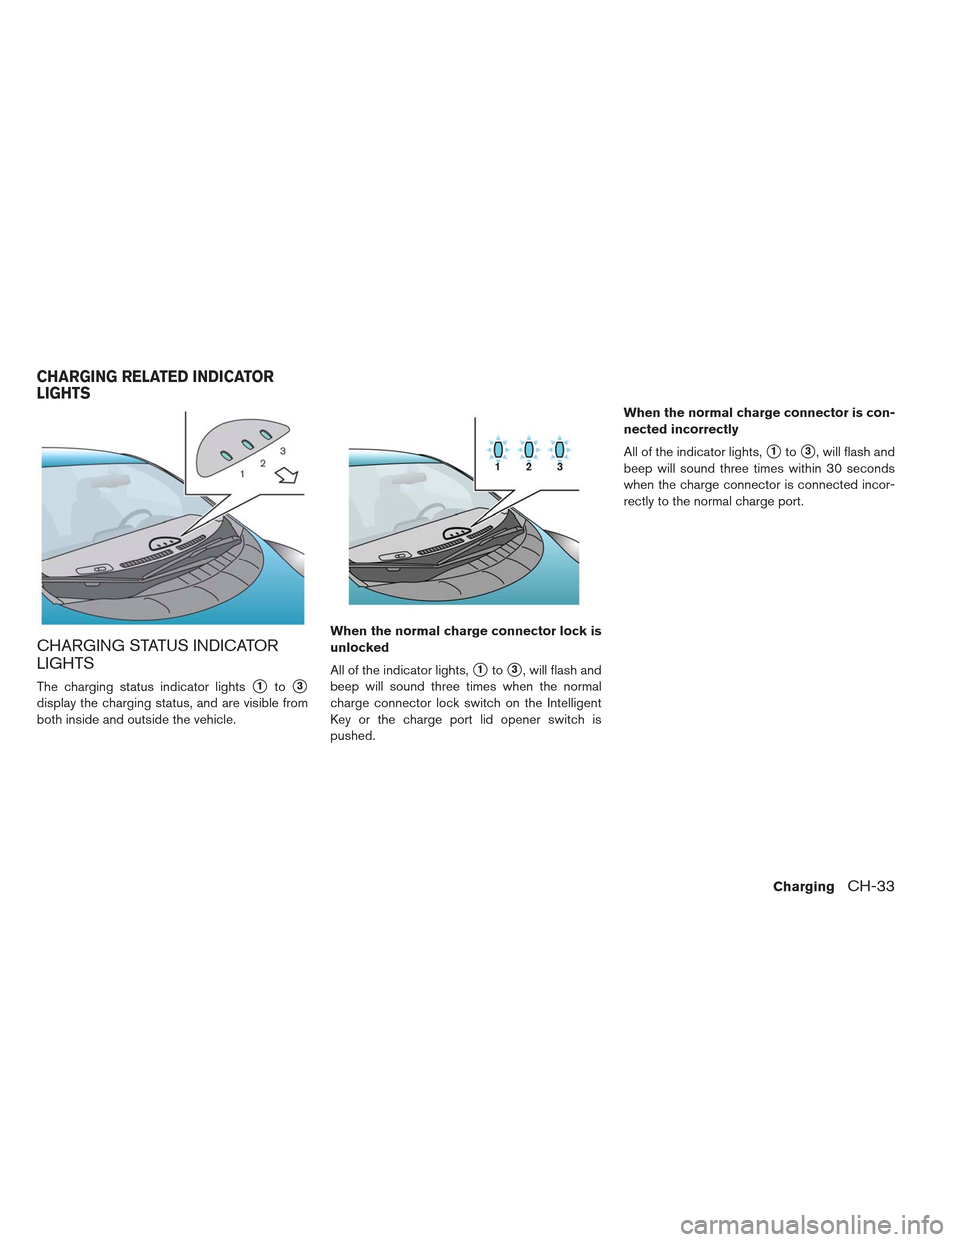
CHARGING STATUS INDICATOR
LIGHTS
The charging status indicator lights�1to�3
display the charging status, and are visible from
both inside and outside the vehicle.When the normal charge connector lock is
unlocked
All of the indicator lights,
�1to�3, will flash and
beep will sound three times when the normal
charge connector lock switch on the Intelligent
Key or the charge port lid opener switch is
pushed. When the normal charge connector is con-
nected incorrectly
All of the indicator lights,
�1to�3, will flash and
beep will sound three times within 30 seconds
when the charge connector is connected incor-
rectly to the normal charge port.
CHARGING RELATED INDICATOR
LIGHTS
ChargingCH-33
Page 83 of 402
Ready for charging timer
If charging timer is set, the indicator lights illumi-
nate, in order from
�1to�3. The indicator lights
turn off after approximately 5 minutes. Ready for immediate charge
When the power switch is off and if the immedi-
ate charge switch is pressed while the charge
cable is not connected, the indicator light
�2
illuminates.
This indicator light
�2illuminates when the ve-
hicle is ready for immediate charge. You have 15
minutes to connect the charge connector to the
vehicle. If the charge connector is not connected
within 15 minutes, the indicator light
�2turns off
and you must start the immediate charge mode
again to charge the Li-ion battery. When charging
When the Li-ion battery is being charged, the
charging status indicator lights will change de-
pending on the amount the Li-ion battery is
charged.
*: This value is also displayed by the illumination
of segments of the Li-ion battery available charge
gauge on the instrument panel.
CH-34Charging
Page 87 of 402

SymptomPossible cause Possible solution
Charging cannot be per-
formed. The vehicle power switch is in the ON position. Before charging, place the vehicle power switch in the OFF position.
Both the normal charge connector and the quick
charge connector are connected at the same time.
The normal charge connector and the quick charge connector cannot be connected at the same time.
The Li-ion battery is already charged to the charge
amount that has been set. Charging can not be performed if the Li-ion battery is already charged to the charge amount that has
been set. Charging automatically turns off if the Li-ion battery is charged to the charge amount that has
been set.
The temperature of the Li-ion battery is too hot or
cold to charge. Confirm the Li-ion battery temperature by checking the Li-ion battery temperature gauge. If the gauge
indicates the Li-ion battery is too hot (red zone) or too cold (blue zone) , charging is not possible. Allow
the Li-ion battery to cool or warm up before charging. See
�Li-ion battery temperature gauge�in the �2
Instruments and controls
�section.
The 12-volt battery is discharged. The Li-ion battery can be charged if the vehicle electrical systems can not be turned on. If the 12-volt
battery is discharged, charge or jump start the 12-volt battery. See
�Jump starting�in the �6 In case of
emergency
�section.
The vehicle has a malfunction. The vehicle or charger may have a malfunction. Confirm if the warning light on the meter is illumi-
nated. Confirm if the indicator on the charger is indicating a malfunction . If a warning is displayed,
stop charging and contact a NISSAN certified LEAF dealer.
Normal charge or trickle
charge cannot be performed. There is no electrical power coming from the
outlet.
Confirm that there has not been a power failure. Make sure the breaker is on. If an outlet with a timer
device installed is used, power will only be available at the time set by the timer.
The electrical plug is not connected correctly. Confirm the electrical plug is connected correctly (trickle charge only) .
The charge connector is not connected cor-
rectly. Confirm the charge connector is connected correctly.
Immediate charge cannot be performed. Charging timer has been set.
Turn off the charging timer. See�Charging timer
�.
Charging does not start because the charge
amount has been set to 80% and the Li-ion battery
is already charged to more than 80%. When the charge percentage in the long life mode is set to 80%, the Li-ion battery cannot be charged
more than 80%. Confirm the charge percentage set in the long life mode. Change the charging
percentage to the desired charge setting.
CHARGING TROUBLESHOOTING
GUIDE
CH-38Charging
Page 137 of 402

When a pretensioner activates, smoke is re-
leased and a loud noise may be heard. The smoke
is not harmful and does not indicate a fire. Care
should be taken not to inhale it, as it may cause
irritation and choking. Those with a history of a
breathing condition should get fresh air promptly.
After pretensioner activation, load limiters allow
the seat belt to release webbing (if necessary) to
reduce forces against the chest.
The supplemental air bag warning light
is
used to indicate malfunctions in the pretensioner
system. (See �Supplemental air bag warning
light� for more details.) If the supplemental air bag
warning light indicates there is a malfunction,
have the system checked by a NISSAN certified
LEAF dealer.
When selling your vehicle, we request that you
inform the buyer about the pretensioner system
and guide the buyer to the appropriate sections
in this Owner’s Manual.
SUPPLEMENTAL AIR BAG
WARNING LABELS
Warning labels about the supplemental front-
impact air bag system are placed in the vehicle as
shown in the illustration.
�1SRS air bag
The warning labels are located on the surface of
the sun visors.
SUPPLEMENTAL AIR BAG
WARNING LIGHT
The supplemental air bag warning light, display-
ing
in the instrument panel, monitors the
circuits of the Air bag Control Unit (ACU) , satel-
lite sensors, crash zone sensor, occupant classi-
fication sensors, the supplemental front-impact
air bag, front seat-mounted side-impact supple-
mental air bag, roof-mounted curtain side-impact
supplemental air bag and seat belt pretensioner
systems. The monitored circuits include air bag
systems, pretensioners and all related wiring.
1-48Safety–Seats, seat belts and supplemental restraint system

![NISSAN LEAF 2013 1.G Owners Manual 3. Touch [Set Timer 1] or [Set Timer 2].4. Touch [% Charge].5. Touch [80% Charging (Improves Battery Lon-
gevity)]. The indicator light illuminates when
the long life mode is set to on.
6. Touch [BACK](/manual-img/5/325/w960_325-75.png "NISSAN LEAF 2013 1.G Owners Manual 3. Touch [Set Timer 1] or [Set Timer 2].4. Touch [% Charge].5. Touch [80% Charging (Improves Battery Lon-
gevity)]. The indicator light illuminates when
the long life mode is set to on.
6. Touch [BACK")