2013 MERCEDES-BENZ SL-CLASS ROADSTER key
[x] Cancel search: keyPage 450 of 572

X
Press the i number key (for a DVD
changer) or the o number key (for a
single DVD drive).
This selects the connected external audio
device directly. The basic menu for Media
Interface appears ( Y page 447).
Switching on via the media list
The external
device is connected to the Media
Interface ( Y page 446).
X Select the entry under position 0 (DVD
changer) or
position 5 (single DVD drive) in
the media list by turning cVd the COMAND
controller and press W to confirm
(Y page 426).
COMAND activates the connected device.
You will see a message to this effect. Then,
the basic menu for the Media Interface
appears ( Y page 447).
If no device is connected, you will see the
Media Interface entry instead of a
device name.
Selecting music files Note
COMAND displays the data stored on the
iPod
®
, iPhone ®
or MP3 player according to
the filing structure used in the respective
medium.
Selecting by skipping to a track
X To skip forwards or back to a track:
turn
cVd
the COMAND controller when the
display/selection window is active.
or
X Press the E or F button.
The skip
forward function skips to the next
track. The skip back function skips to the
beginning of the current track if the track
has been playing for more than eight
seconds. If the track has been playing for
less than eight seconds, it skips to the start
of the previous track. If you have selected
a playback option other than Normal Track Sequence, the track sequence is
random.
Selecting using the number keypad
X To make an entry: press
the l button.
An input menu appears. The number of
characters available for input depends on
the number of stored tracks.
X To enter a track number: press a
number
key, e.g. q.
The digit is entered in the first position in
the input line.
i COMAND will ignore and not display an
invalid digit.
X Enter more numbers if desired.
The track plays after the last possible
number is entered.
i Pressing and holding a number key for
more than two seconds completes the
entry, and the corresponding track is
played.
Fast forwarding/rewinding
X While the display/selection window is
active, slide XVY and hold the COMAND
controller until the desired position has
been reached.
or
X Press and hold the F or E button
until the desired position is reached.
i On an iPod ®
or iPhone ®
, fast rewind only
functions within the current track.
Selecting a category/playlist/folder Overview
For
an
iPod®
, iPhone ®
or certain MP3 players,
you can select tracks using categories or
folders.
Depending on the device connected, the
following categories may be available, for
example:
R Current Tracklist
R Keyword Search
R Playlists (e.g. All)448
Audio
COMAND
Page 451 of 572
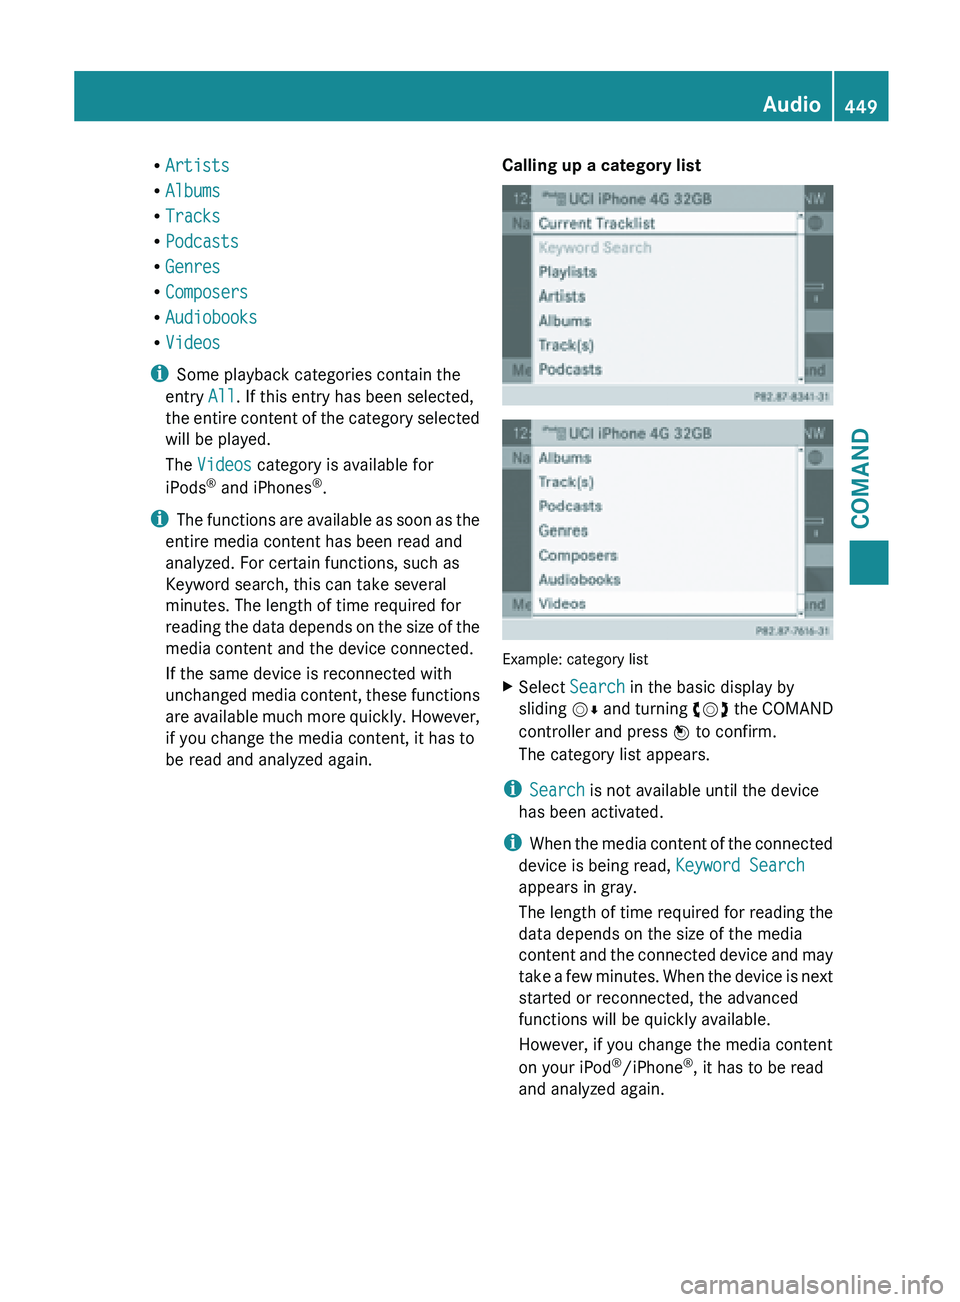
R
Artists
R Albums
R Tracks
R Podcasts
R Genres
R Composers
R Audiobooks
R Videos
i Some playback categories contain the
entry All. If this entry has been selected,
the entire
content of the category selected
will be played.
The Videos category is available for
iPods ®
and iPhones ®
.
i The functions are available as soon as the
entire media content has been read and
analyzed. For certain functions, such as
Keyword search, this can take several
minutes. The length of time required for
reading the data depends on the size of the
media content and the device connected.
If the same device is reconnected with
unchanged media content, these functions
are available much more quickly. However,
if you change the media content, it has to
be read and analyzed again. Calling up a category list
Example: category list
X
Select Search in the basic display by
sliding VÆ and
turning cVd the COMAND
controller and press W to confirm.
The category list appears.
i Search is not available until the device
has been activated.
i When the
media content of the connected
device is being read, Keyword Search
appears in gray.
The length of time required for reading the
data depends on the size of the media
content and the connected device and may
take a few minutes. When the device is next
started or reconnected, the advanced
functions will be quickly available.
However, if you change the media content
on your iPod ®
/iPhone ®
, it has to be read
and analyzed again. Audio
449
COMAND Z
Page 452 of 572
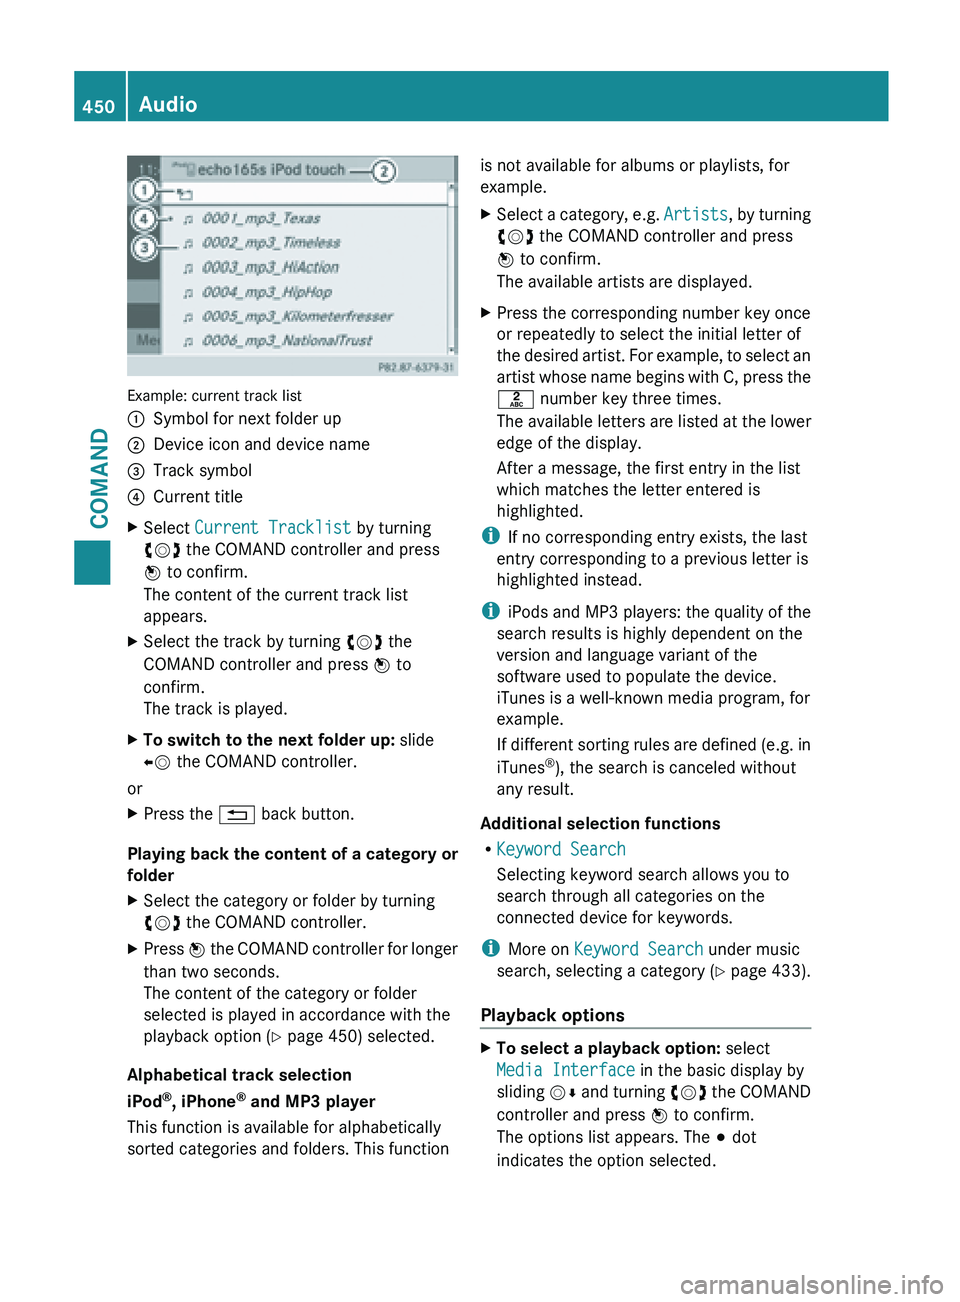
Example: current track list
:
Symbol for next folder up
; Device icon and device name
= Track symbol
? Current title
X Select Current Tracklist by turning
cVd the COMAND controller and press
W to confirm.
The content of the current track list
appears.
X Select the track by turning cVd the
COMAND controller and press W to
confirm.
The track is played.
X To switch to the next folder up: slide
XV the COMAND controller.
or
X Press the % back button.
Playing back the content of a category or
folder
X Select the category or folder by turning
cVd the COMAND controller.
X Press W the COMAND controller for longer
than two seconds.
The content of the category or folder
selected is played in accordance with the
playback option
(Y page 450) selected.
Alphabetical track selection
iPod ®
, iPhone ®
and MP3 player
This function is available for alphabetically
sorted categories and folders. This function is not available for albums or playlists, for
example.
X
Select a category, e.g. Artists, by
turning
cVd the COMAND controller and press
W to confirm.
The available artists are displayed.
X Press the corresponding number key once
or repeatedly to select the initial letter of
the desired
artist. For example, to select an
artist whose name begins with C, press the
l number key three times.
The available letters are listed at the lower
edge of the display.
After a message, the first entry in the list
which matches the letter entered is
highlighted.
i If no corresponding entry exists, the last
entry corresponding to a previous letter is
highlighted instead.
i iPods and
MP3 players: the quality of the
search results is highly dependent on the
version and language variant of the
software used to populate the device.
iTunes is a well-known media program, for
example.
If different sorting rules are defined (e.g. in
iTunes ®
), the search is canceled without
any result.
Additional selection functions
R Keyword Search
Selecting keyword search allows you to
search through all categories on the
connected device for keywords.
i More on Keyword Search under music
search, selecting a category ( Y page 433).
Playback options X
To select a playback option: select
Media Interface in the basic display by
sliding VÆ
and
turning cVd the COMAND
controller and press W to confirm.
The options list appears. The # dot
indicates the option selected. 450
Audio
COMAND
Page 466 of 572
X
To select winter sport areas: select In
Winter Sports Areas in the menu, and
confirm by pressing W.
X Select a state, e.g. Colorado, and press
W to confirm.
X Select a winter sports area from the menu
and press W to confirm.
The weather data and other information is
displayed for the winter sports area that
has been selected. The data is supplied by
the nearest weather station.
The information chart shows the following
information (if available):
R
ski slopes/ski lifts
R snowboarding and nighttime opening
R snow conditions (e.g. snow depth)
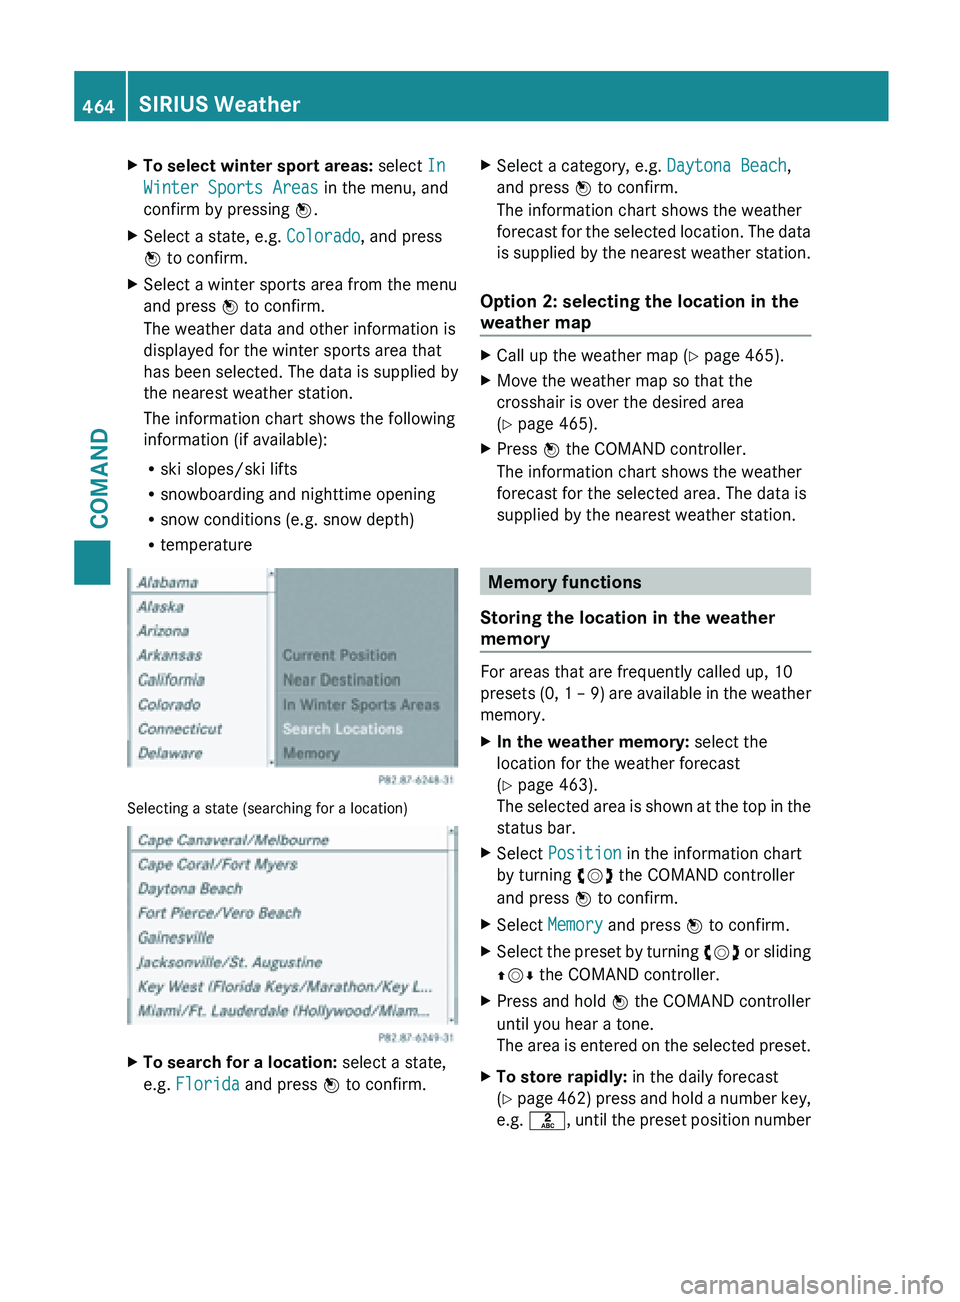
R temperature Selecting a state (searching for a location)
X
To search for a location: select a state,
e.g. Florida and press W to confirm. X
Select a category, e.g. Daytona Beach,
and press W to confirm.
The information chart shows the weather
forecast for
the selected location. The data
is supplied by the nearest weather station.
Option 2: selecting the location in the
weather map X
Call up the weather map ( Y page 465).
X Move the weather map so that the
crosshair is over the desired area
(Y page 465).
X Press W the COMAND controller.
The information chart shows the weather
forecast for the selected area. The data is
supplied by the nearest weather station. Memory functions
Storing the location in the weather
memory For areas that are frequently called up, 10
presets (0,
1 – 9) are available in the weather
memory.
X In the weather memory: select the
location for the weather forecast
(Y page 463).
The selected
area is shown at the top in the
status bar.
X Select Position in the information chart
by turning cVd the COMAND controller
and press W to confirm.
X Select Memory and press W to confirm.
X Select the preset by turning cVd or
sliding
ZVÆ the COMAND controller.
X Press and hold W the COMAND controller
until you hear a tone.
The area
is entered on the selected preset.
X To store rapidly: in the daily forecast
(Y page
462) press and hold a number key,
e.g. l, until the preset position number464
SIRIUS Weather
COMAND
Page 467 of 572
is shown in the status bar in front of the
area name.
i You can
also use this function in the five-
day forecast ( Y page 462), and in the
detailed information view ( Y page 462).
Selecting a location from the weather
memory X
From the weather memory: in the
information chart, select Position by
turning cVd the COMAND controller and
press W to confirm.
X Select Memory and press W to confirm.
X Select a preset that contains an entry by
turning cVd or sliding ZVÆ the COMAND
controller and press W to confirm.
The weather data for the selected area is
displayed.
X Rapid selection: if there is an entry
available in
the weather memory, e.g. when
the daily forecast is shown, briefly press a
number key, such as l.
The weather data for the selected location
is displayed. Weather map
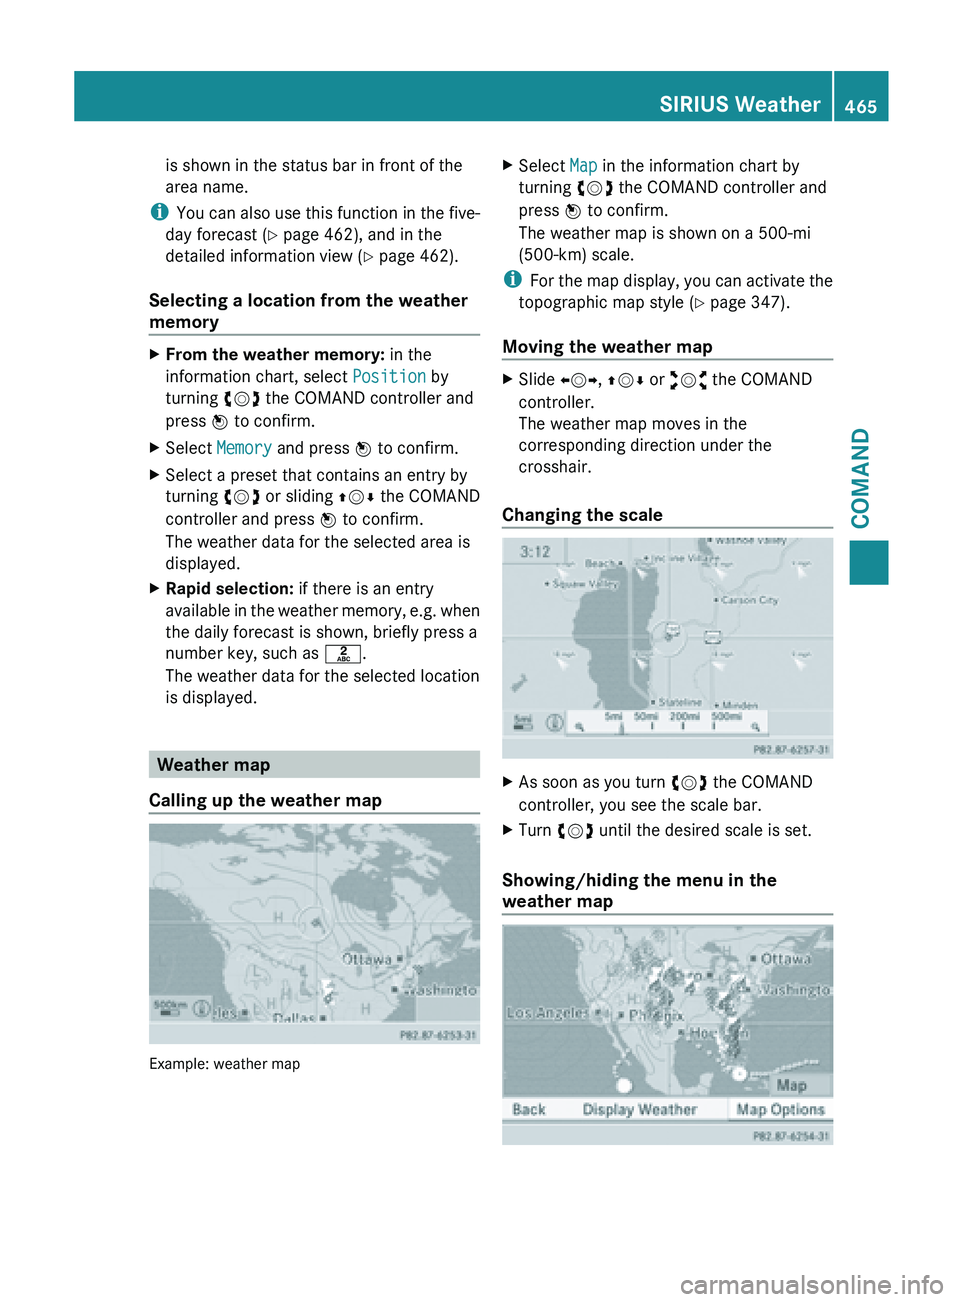
Calling up the weather map Example: weather map X
Select Map in the information chart by
turning cVd the COMAND controller and
press W to confirm.
The weather map is shown on a 500-mi
(500-km) scale.
i For the
map display, you can activate the
topographic map style ( Y page 347).
Moving the weather map X
Slide XVY, ZVÆ or aVb the COMAND
controller.
The weather map moves in the
corresponding direction under the
crosshair.
Changing the scale X
As soon as you turn cVd the COMAND
controller, you see the scale bar.
X Turn cVd until the desired scale is set.
Showing/hiding the menu in the
weather map SIRIUS Weather
465
COMAND Z
Page 476 of 572
Useful information
i This Operator's Manual describes all
models and all standard and optional
equipment of your vehicle available at the
time of publication of the Operator's
Manual. Country-specific differences are
possible. Please
note that your vehicle may
not be equipped with all features
described. This also applies to safety-
related systems and functions.
i Read the information on qualified
specialist workshops: ( Y page 31).Stowage areas
Stowage space
Important safety notes G
WARNING
To
help avoid personal injury during a collision
or sudden maneuver, exercise care when
storing objects in the vehicle. Put luggage or
cargo in the trunk if possible.
Do not pile luggage or cargo higher than the
seat backrests.
Keep compartment lids closed. This will help
to prevent stored objects from being thrown
about and injuring vehicle occupants during
R braking
R vehicle maneuvers
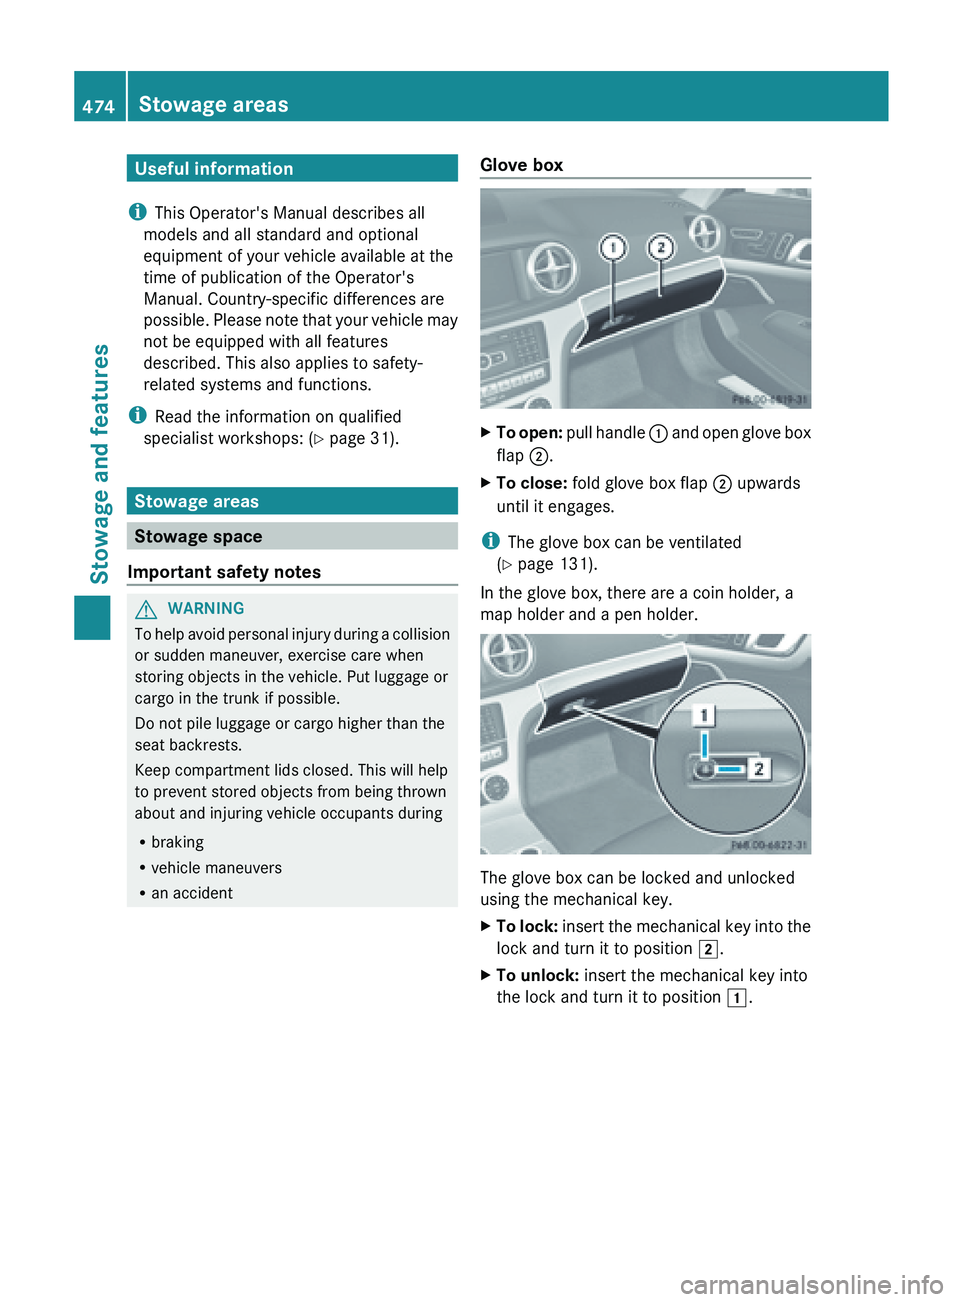
R an accident Glove box X
To open:
pull handle :
and open glove box
flap ;.
X To close: fold glove box flap ; upwards
until it engages.
i The glove box can be ventilated
(Y page 131).
In the glove box, there are a coin holder, a
map holder and a pen holder. The glove box can be locked and unlocked
using the mechanical key.
X
To
lock:
insert the mechanical key into the
lock and turn it to position 2
.
X To unlock: insert the mechanical key into
the lock and turn it to position 1.474
Stowage areas
Stowage and features
Page 482 of 572
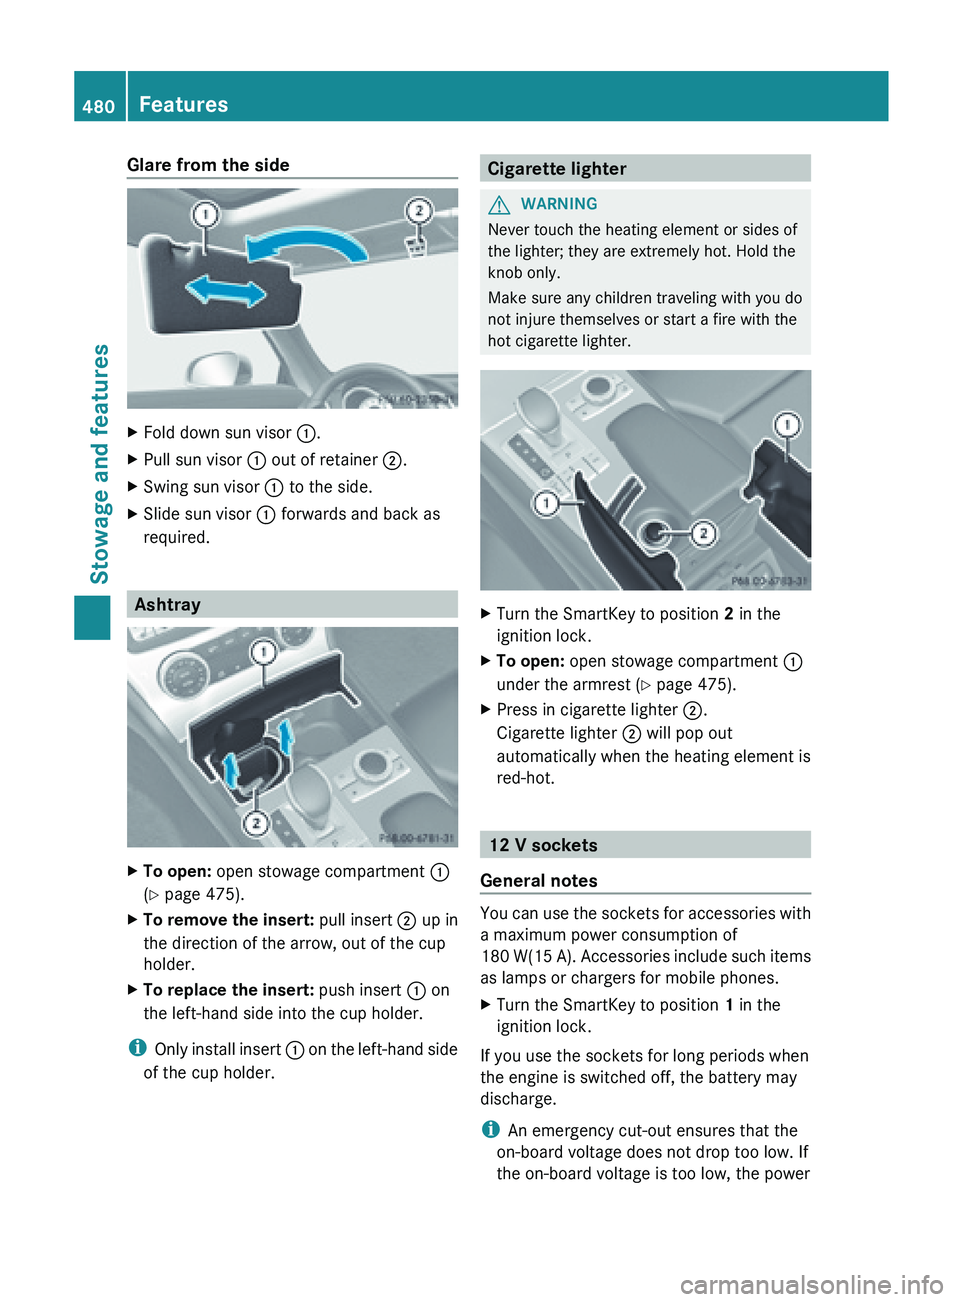
Glare from the side
X
Fold down sun visor :.
X Pull sun visor : out of retainer ;.
X Swing sun visor : to the side.
X Slide sun visor : forwards and back as
required. Ashtray
X
To open: open stowage compartment :
(Y page 475).
X To remove the insert: pull insert ; up in
the direction of the arrow, out of the cup
holder.
X To replace the insert: push insert : on
the left-hand side into the cup holder.
i Only install
insert : on the left-hand side
of the cup holder. Cigarette lighter
G
WARNING
Never touch the heating element or sides of
the lighter; they are extremely hot. Hold the
knob only.
Make sure any children traveling with you do
not injure themselves or start a fire with the
hot cigarette lighter. X
Turn the SmartKey to position 2 in the
ignition lock.
X To open: open stowage compartment :
under the armrest (Y page 475).
X Press in cigarette lighter ;.
Cigarette lighter ; will pop out
automatically when the heating element is
red-hot. 12 V sockets
General notes You can use the sockets for accessories with
a maximum power consumption of
180
W(15
A). Accessories include such items
as lamps or chargers for mobile phones.
X Turn the SmartKey to position 1 in the
ignition lock.
If you use the sockets for long periods when
the engine is switched off, the battery may
discharge.
i An emergency cut-out ensures that the
on-board voltage does not drop too low. If
the on-board voltage is too low, the power 480
Features
Stowage and features
Page 485 of 572

Integrated garage door opener on the rear-view
mirror
Garage door remote control
A is not part of
the integrated garage door opener.
X Before programming for the first time, clear
the memory of the integrated garage door
opener (Y page 485).
X Turn the SmartKey to position 2 in the
ignition lock.
X Press and hold one of the buttons ;
to ? on the integrated garage door
opener.
After a
short time, indicator lamp : starts
flashing yellow.
i Indicator lamp : flashes yellow
immediately the first time button ;, =
or ? is
programmed. If the selected button
has already been programmed, indicator
lamp : will only start flashing yellow at a
rate of once a second after ten seconds
have elapsed.
X Release button ;, = or ?.
X Point garage door remote control A
towards buttons ; to ? on the rear-view
mirror at a distance of 2 to 8 inches (5 to
20 cm).
i The required distance between remote
control A
and the integrated garage door
opener depends on the garage door drive
system. Several attempts might be
necessary. You should test every position
for at least 25 seconds before trying
another position. X
Press and hold button B on
remote control
A until indicator lamp : lights up green.
If indicator lamp : lights up green or
flashes, then programming has been
successful.
X Release button ;, = or ? on the
integrated garage door opener and button
B on garage door remote control A.
If indicator lamp : lights up red:
X Repeat the programming procedure for the
corresponding button on the rear-view
mirror. When doing so, vary the distance
between remote control A and the rear-
view mirror.
i If the indicator lamp flashes green after
successful programming, the garage door
system is
operating on a rolling code. After
programming, you must synchronize the
garage door opener integrated in the rear-
view mirror with the receiver of the garage
door system.
Synchronizing the rolling code
Your vehicle must be within reach of the
garage door or exterior gate drive. Make sure
that neither your vehicle nor any persons/
objects are present within the sweep of the
door or gate.
Observe the safety notes when performing
the rolling code synchronization
(Y page 481).
X Turn the SmartKey to position 2 in the
ignition lock.
X Press the programming button of the door
or gate drive (see the door or gate drive
operating instructions, e.g. under
"Programming of additional remote
controls"). Features
483
Stowage and features Z