2013 Lancia Thema lock
[x] Cancel search: lockPage 185 of 336

has been selected. Touch the back
arrow soft-key to return to the previous
menu.NOTE:
The seat will return to the
memorized seat location (if Recall
Memory with Remote Key Unlock is
set to ON) when the Remote Keyless
Entry (RKE) transmitter is used to
unlock the door. Refer to “Driver
Memory Seat” in “Understanding
The Features Of Your Vehicle” for
further information.
Engine Off Options
After pressing the Engine Off Options
soft-key the following settings will be
available.
Easy Exit Seat (for versions/
markets, where provided)This feature provides automatic driver
seat positioning to enhance driver
mobility when entering and exiting the
vehicle. To make your selection, touch
the Easy Exit Seats soft-key, until a
check-mark appears next to setting,
showing that setting has been selected.
Touch the back arrow soft-key to re-
turn to the previous menu.
Engine Off Power Delay (for
versions/markets, where provided)When this feature is selected, the power
window switches, radio, Uconnect™
phone system (for versions/markets,
where provided), DVD video system
(for versions/markets, where pro-
vided), power sunroof (for versions/
markets, where provided), and power
outlets will remain active for up to
10 minutes after the ignition is cycled
to OFF.
Opening either front door will
cancel this feature. To change the
Engine Off Power Delay status touch
the 0 seconds, 45 seconds, 5 minutes or
10 minutes soft-key. Then touch the
arrow back soft-key.
Headlight Off Delay
When this feature is selected, the
driver can choose to have the head-
lights remain on for 0, 30, 60, or
90 seconds when exiting the vehicle.
To change the Headlight Off Delay
status touch the + or - soft-key to
select your desired time interval.
Touch the back arrow soft-key to re-
turn to the previous menu. Compass Settings
After pressing the Compass Settings
soft-key the following settings will be
available.
Variance
Compass Variance is the difference
between Magnetic North and Geo-
graphic North. To compensate for
the differences the variance should be
set for the zone where the vehicle is
driven, per the zone map. Once
properly set, the compass will auto-
matically compensate for the differ-
ences, and provide the most accurate
compass heading.
NOTE: Keep magnetic materials
away from the top of the instru-
ment panel, such as iPod's, Mobile
Phones, Laptops and Radar Detec-
tors. This is where the compass
module is located, and it can cause
interference with the compass sen-
sor, and it may give false readings.
179
Page 187 of 336

Equalizer
When in this display you may adjust
the Bass, Mid and Treble settings.
Adjust the settings with the + and –
setting soft-keys or by selecting any
point on the scale between the + and –
soft-keys. Then touch the arrow back
soft-key.
NOTE: Bass/Mid/Treble allow
you to simply slide your finger up
or down to change the setting as
well as touch directly on the de-
sired setting.
Speed Adjusted VolumeThis feature increases or decreases
volume relative to vehicle speed. To
change the Speed Adjusted Volume
touch the Off, 1, 2 or 3 soft-key. Then
touch the arrow back soft-key. Music Info Cleanup (for versions/
markets, where provided)
This feature helps organize music files
for optimized music navigation. To
make your selection, touch the Music
Info Cleanup soft-key, select On or Off
followed by pressing the arrow back
soft-key. Surround Sound (for versions/
markets, where provided)
This feature provides simulated sur-
round sound mode. To make your se-
lection, touch the Surround Sound
soft-key, select On or Off followed by
pressing the arrow back soft-key.
Phone/Bluetooth
After pressing the Phone/Bluetooth
soft-key the following settings will be
available.
Paired Devices
This feature shows which phones are
paired to the Phone/Bluetooth system.
For further information, refer to the
Uconnect Touch™ Supplement.SOUND SYSTEMS
Refer to your Sound Systems Booklet.
NAVIGATION SYSTEM
(for versions/markets,
where provided)
Refer to your Uconnect Touch™ User
Manual.
SETTING THE ANALOG
CLOCK
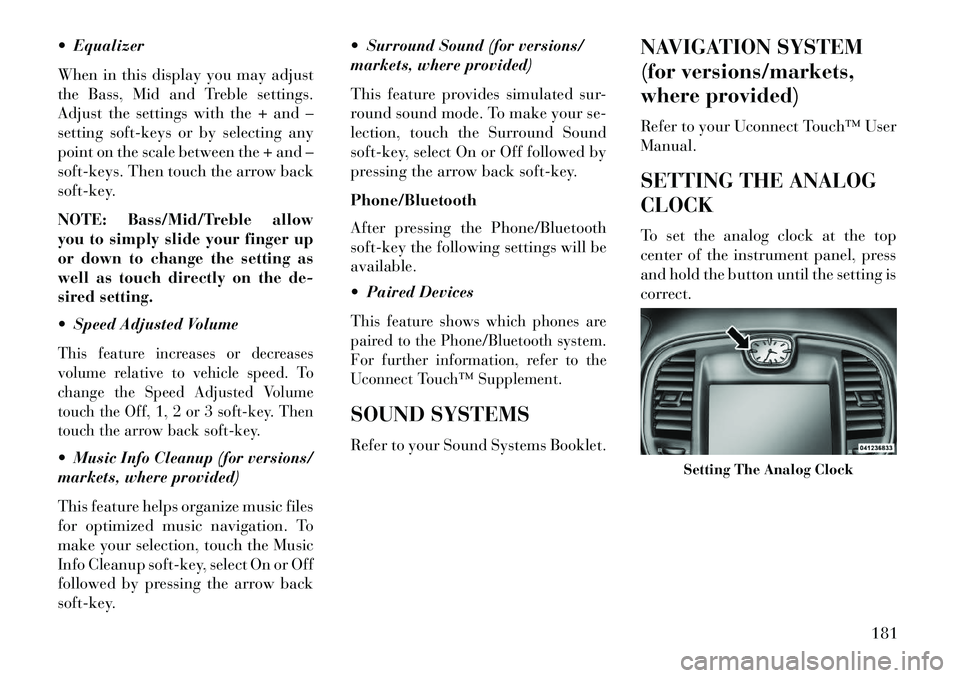
To set the analog clock at the top
center of the instrument panel, press
and hold the button until the setting is
correct.
Setting The Analog Clock
181
Page 189 of 336

Mode will only be available for video
media sources (DVDs, Video CDs, or
other video media supported by the
radio). Some audio will sound better
in DSS modes, others in Stereo mode.
When in “Audio Surround” mode,
balance is set automatically. Fader
control is available in surround mode
but should be set to the center position
for optimal surround performance.
STEERING WHEEL
AUDIO CONTROLS
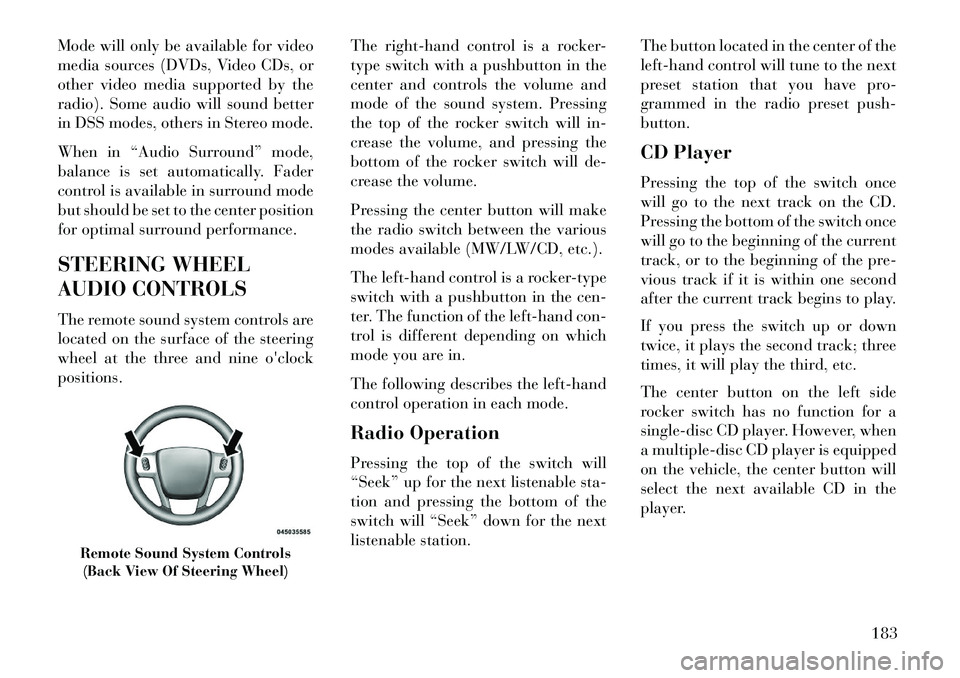
The remote sound system controls are
located on the surface of the steering
wheel at the three and nine o'clock
positions.The right-hand control is a rocker-
type switch with a pushbutton in the
center and controls the volume and
mode of the sound system. Pressing
the top of the rocker switch will in-
crease the volume, and pressing the
bottom of the rocker switch will de-
crease the volume.
Pressing the center button will make
the radio switch between the various
modes available (MW/LW/CD, etc.).
The left-hand control is a rocker-type
switch with a pushbutton in the cen-
ter. The function of the left-hand con-
trol is different depending on which
mode you are in.
The following describes the left-hand
control operation in each mode.
Radio Operation
Pressing the top of the switch will
“Seek” up for the next listenable sta-
tion and pressing the bottom of the
switch will “Seek” down for the next
listenable station.The button located in the center of the
left-hand control will tune to the next
preset station that you have pro-
grammed in the radio preset push-
button.
CD Player
Pressing the top of the switch once
will go to the next track on the CD.
Pressing the bottom of the switch once
will go to the beginning of the current
track, or to the beginning of the pre-
vious track if it is within one second
after the current track begins to play.
If you press the switch up or down
twice, it plays the second track; three
times, it will play the third, etc.
The center button on the left side
rocker switch has no function for a
single-disc CD player. However, when
a multiple-disc CD player is equipped
on the vehicle, the center button will
select the next available CD in the
player.
Remote Sound System Controls
(Back View Of Steering Wheel)
183
Page 191 of 336

Soft-Keys
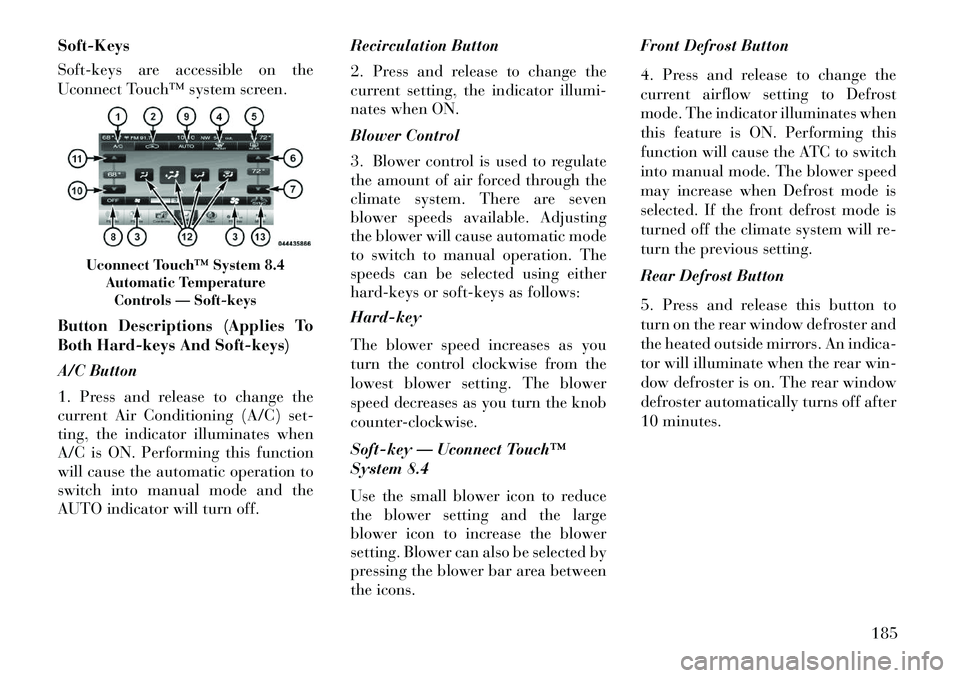
Soft-keys are accessible on the
Uconnect Touch™ system screen.
Button Descriptions (Applies To
Both Hard-keys And Soft-keys)
A/C Button
1. Press and release to change the
current Air Conditioning (A/C) set-
ting, the indicator illuminates when
A/C is ON. Performing this function
will cause the automatic operation to
switch into manual mode and the
AUTO indicator will turn off.Recirculation Button
2. Press and release to change the
current setting, the indicator illumi-
nates when ON.
Blower Control
3. Blower control is used to regulate
the amount of air forced through the
climate system. There are seven
blower speeds available. Adjusting
the blower will cause automatic mode
to switch to manual operation. The
speeds can be selected using either
hard-keys or soft-keys as follows:
Hard-key
The blower speed increases as you
turn the control clockwise from the
lowest blower setting. The blower
speed decreases as you turn the knob
counter-clockwise.
Soft-key — Uconnect Touch™
System 8.4
Use the small blower icon to reduce
the blower setting and the large
blower icon to increase the blower
setting. Blower can also be selected by
pressing the blower bar area between
the icons.Front Defrost Button
4. Press and release to change the
current airflow setting to Defrost
mode. The indicator illuminates when
this feature is ON. Performing this
function will cause the ATC to switch
into manual mode. The blower speed
may increase when Defrost mode is
selected. If the front defrost mode is
turned off the climate system will re-
turn the previous setting.
Rear Defrost Button
5. Press and release this button to
turn on the rear window defroster and
the heated outside mirrors. An indica-
tor will illuminate when the rear win-
dow defroster is on. The rear window
defroster automatically turns off after
10 minutes.
Uconnect Touch™ System 8.4
Automatic TemperatureControls — Soft-keys
185
Page 197 of 336

5
STARTING AND OPERATING
STARTING PROCEDURES . . . . . . . . . . . . . . . . . .195 KEYLESS ENTERNGO™ . . . . . . . . . . . . . . .195
NORMAL STARTING — GASOLINE ENGINE . . .195 EXTREME COLD WEATHER(BELOW �29°C) . . . . . . . . . . . . . . . . . . . . . . . .196
IF ENGINE FAILS TO START . . . . . . . . . . . . . .196
After Starting . . . . . . . . . . . . . . . . . . . . . . . . . .197
NORMAL STARTING – DIESEL ENGINE . . . . .197
AUTOMATIC TRANSMISSION . . . . . . . . . . . . . . .199
KEY IGNITION PARK INTERLOCK . . . . . . . . .200
BRAKE/TRANSMISSION SHIFTINTERLOCK SYSTEM . . . . . . . . . . . . . . . . . . .200
EIGHT -SPEED AUTOMATIC
TRANSMISSION – 3.6L ENGINE . . . . . . . . . . .200
GEAR RANGES . . . . . . . . . . . . . . . . . . . . . . . .201
FIVE-SPEED AUTOMATIC TRANSMISSION – 3.0L DIESEL ENGINE . . . .204
GEAR RANGES . . . . . . . . . . . . . . . . . . . . . . . .205
AUTOSTICK® (for versions/markets, where provided) . . . . . . . . . . . . . . . . . . . . . . . . .208
OPERATION – 3.6L ENGINE . . . . . . . . . . . . . . .208
OPERATION – 3.0L DIESEL ENGINE . . . . . . . .209
191
Page 198 of 336

ALL-WHEEL DRIVE (AWD)(for versions/markets, where provided) . . . . . . . .210
DRIVING ON SLIPPERY SURFACES . . . . . . . . . .210 ACCELERATION. . . . . . . . . . . . . . . . . . . . . . . .210
TRACTION . . . . . . . . . . . . . . . . . . . . . . . . . . . .211
DRIVING THROUGH WATER . . . . . . . . . . . . . . .211
FLOWING/RISING WATER. . . . . . . . . . . . . . . .211
SHALLOW STANDING WATER. . . . . . . . . . . . .211
POWER STEERING . . . . . . . . . . . . . . . . . . . . . . .212
PARKING BRAKE . . . . . . . . . . . . . . . . . . . . . . . .213
ANTI-LOCK BRAKE SYSTEM . . . . . . . . . . . . . . .214
ELECTRONIC BRAKE CONTROL SYSTEM . . . . .216
ANTI-LOCK BRAKE SYSTEM (ABS) . . . . . . . .216
TRACTION CONTROL SYSTEM (TCS) . . . . . . .216
BRAKE ASSIST SYSTEM (BAS) . . . . . . . . . . . .216
ELECTRONIC STABILITY CONTROL (ESC) . . . .217 HILL START ASSIST (HSA) . . . . . . . . . . . . . . .218
READY ALERT BRAKING . . . . . . . . . . . . . . . .220
RAIN BRAKE SUPPORT . . . . . . . . . . . . . . . . . .220
ESC ACTIVATION/MALFUNCTION INDICATOR
LIGHT AND ESC OFF INDICATOR LIGHT . . . . .220 SYNCHRONIZING ESC . . . . . . . . . . . . . . . . . . .221
TIRE SAFETY INFORMATION . . . . . . . . . . . . . . .221
Tire Markings . . . . . . . . . . . . . . . . . . . . . . . . .221
Tire Identification Number (TIN) . . . . . . . . . . .223
Tire Terminology And Definitions. . . . . . . . . . .224
Tire Loading And Tire Pressure . . . . . . . . . . . .225
192
Page 201 of 336

STARTING
PROCEDURES
Before starting your vehicle, adjust
your seat, adjust the inside and out-
side mirrors, fasten your seat belt, and
if present, instruct all other occupants
to buckle their seat belts.WARNING!
When leaving the vehicle, alwaysremove the key fob and lock your
vehicle.
Never leave children alone in a vehicle, or with access to an un-
locked vehicle. Allowing children
to be in a vehicle unattended is
dangerous for a number of rea-
sons. A child or others could
be seriously or fatally injured.
Children should be warned not to
touch the parking brake, brake
pedal or the shift lever.
Do not leave the key fob in or near the vehicle, and do not leave Key-
less Enter-N-Go in the ACC or
ON/RUN mode. A child could
operate power windows, other
controls, or move the vehicle. KEYLESS ENTERNGO™
This feature allows
the driver to oper-
ate the ignition
switch with the
push of a button,
as long as the Re-
mote Keyless Entry
(RKE) transmitter is in the passenger
compartment.
NORMAL STARTING —
GASOLINE ENGINE
Using The ENGINE START/STOP
Button
1. The transmission must be in PARK
or NEUTRAL.
2. Press and hold the brake pedal
while pressing the ENGINE START/
STOP button once.
3.
The system takes over and attempts
to start the vehicle. If the vehicle fails to
start, the starter will disengage auto-
matically after 10 seconds.
4. If you wish to stop the cranking of
the engine prior to the engine starting,
press the button again. NOTE:
Normal starting of either a
cold or a warm engine is obtained
without pumping or pressing the
accelerator pedal.
To Turn Off The Engine Using
ENGINE START/STOP Button
1.
Place the shift lever in PARK, then
press and release the ENGINE START/
STOP button.
2. The ignition switch will return to
the OFF position.
3.
If the shift lever is not in PARK and
the vehicle speed is above 8 km/h, the
ENGINE START/STOP button must
be held for two seconds before the en-
gine shuts off. The ignition switch po-
sition will remain in the ACC position
until the shift lever is in PARK and the
button is pressed twice to the OFF
position. If the shift lever is not in
PARK and the ENGINE START/STOP
button is pressed once, the EVIC will
display a “Vehicle Not In Park” mes-
sage and the engine will remain run-
ning. Never leave a vehicle out of the
PARK position, or it could roll.
195
Page 202 of 336

NOTE:
If the ignition switch is
left in the ACC or RUN (engine not
running) position and the trans-
mission is in PARK, the system
will automatically time out after
30 minutes of inactivity and the
ignition will switch to the OFF
position.
ENGINE START/STOP Button
Functions – With Driver’s Foot
OFF The Brake Pedal (In PARK
Or NEUTRAL Position)
The Keyless Enter-N-Go feature oper-
ates similar to an ignition switch. It
has four positions, OFF, ACC, RUN
and START. To change the ignition
switch positions without starting the
vehicle and use the accessories follow
these steps.
Starting with the ignition switch in the OFF position:
Press the ENGINE START/STOP button once to change the ignition
switch to the ACC position (ACC
will illuminate), Press the ENGINE START/STOP
button a second time to change the
ignition switch to the RUN position
(RUN will illuminate),
Press the ENGINE START/STOP button a third time to return the
ignition switch to the OFF position
(OFF will illuminate).
EXTREME COLD
WEATHER (BELOW �29°C)
To ensure reliable starting at these
temperatures, use of an externally
powered electric engine block heater
is recommended.
IF ENGINE FAILS TO
START
WARNING!
Never pour fuel or other flam- mable liquids into the throttle
body air inlet opening in an at-
tempt to start the vehicle. This
could result in a flash fire causing
serious personal injury.
(Continued)
WARNING!(Continued)
Do not attempt to push or tow your vehicle to get it started. Ve-
hicles equipped with an auto-
matic transmission cannot be
started this way. Unburned fuel
could enter the catalytic con-
verter and once the engine has
started, ignite and damage the
converter and vehicle.
If the vehicle has a discharged battery, booster cables may be
used to obtain a start from a
booster battery or the battery in
another vehicle. This type of start
can be dangerous if done improp-
erly. Refer to “Jump Starting” in
“What To Do In Emergencies” for
further information.
196