Page 153 of 352
RemoteControl Button Standard Screens
Menu Screens
AM/FM/
MW/LW SAT–
Audio HDD–
HardDisc
Drive DISC/
DVD AUX/AUX1/AUX2
Mode
Select Menu Screen
Setup
Right
Arrow FF Tune Up* Next
Channel*Next
ChannelFast
ForwardAudio:
Fast
ForwardNot
AvailableSelection
Right
Selection
Right
Video
Play: Fast
Forward
Video
Menu: Selection
Right
Left
Arrow
RW Tune
Down*
Previous
Channel*Previous
ChannelFast
RewindAudio:
Fast
RewindNot
AvailableSelection
Left
Selection
Left
Video
Play: Fast
Rewind
Video
Menu: Selection
Left
Enter Show
Numeric
Entry
Menu*Show
Numeric
Entry
Menu*Not
Available
Show
Numeric
Entry
MenuAudio:
Show
Numeric
EntryNot
Available
Activate
Selected
ItemNot
Available
Video
Play: Not
Available
Video
Menu: Activate
Selected
Item
147
KNOWING
YOUR
VEHICLE
SAFETY
STARTING
AND
DRIVING
WARNING
LIGHTS
AND
MESSAGES
IN AN
EMERGENCY
SERVICING
AND
CARETECHNICAL
SPECIFICATIONSCONTENTS
Page 154 of 352
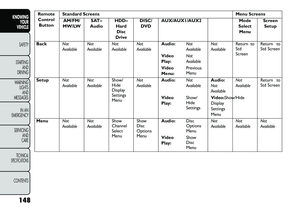
RemoteControl Button Standard Screens
Menu Screens
AM/FM/
MW/LW SAT–
Audio HDD–
HardDisc
Drive DISC/
DVD AUX/AUX1/AUX2
Mode
Select Menu Screen
Setup
Back Not
AvailableNot
AvailableNot
AvailableNot
AvailableAudio:
Not
AvailableNot
AvailableReturn to
Std
ScreenReturn to
Std Screen
Video
Play: Not
Available
Video
Menu: Previous
Menu
Setup Not
AvailableNot
AvailableShow/
Hide
Display
Settings
MenuNot
Available
Audio:
Not
AvailableAudio:
Not
AvailableNot
Available
Return to
Std Screen
Video
Play: Show/
Hide
SettingsVideo:Show/Hide
Display
Settings
Menu
Menu Not
AvailableNot
AvailableShow
Channel
Select
MenuShow
Disc
Options
MenuAudio:
Disc
Options
MenuNot
Available
Not
AvailableNot
Available
Video
Play: Show
Disc
Menu
148
KNOWING YOUR
VEHICLE
SAFETY
S
TARTING AND
DRIVING
WARNING LIGHTSAND
MESSAGES
IN AN
EMERGENCY
SERVICING AND
CARETECHNICAL
SPECIFICATIONSCONTENTS
Page 155 of 352

RemoteControl Button Standard Screens
Menu Screens
AM/FM/
MW/LW SAT–
Audio HDD–
HardDisc
Drive DISC/
DVD AUX/AUX1/AUX2
Mode
Select Menu Screen
Setup
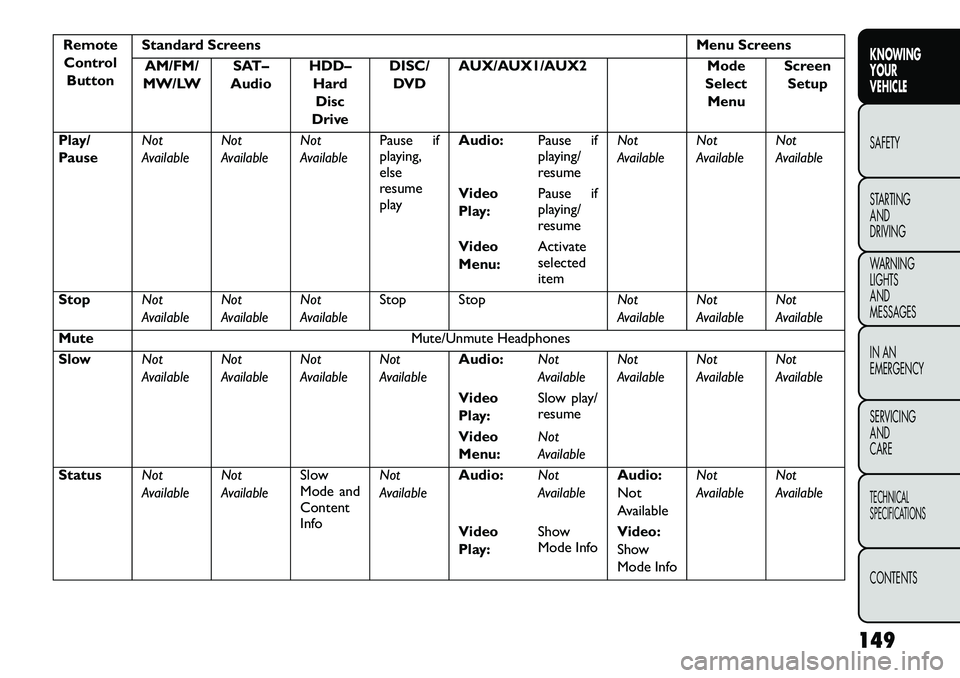
Play/
Pause Not
AvailableNot
AvailableNot
AvailablePause if
playing,
else
resume
playAudio:
Pause if
playing/
resumeNot
Available
Not
AvailableNot
Available
Video
Play: Pause if
playing/
resume
Video
Menu: Activate
selected
item
Stop Not
AvailableNot
AvailableNot
AvailableStop Stop
Not
AvailableNot
AvailableNot
Available
Mute Mute/Unmute Headphones
Slow Not
AvailableNot
AvailableNot
AvailableNot
AvailableAudio:
Not
AvailableNot
AvailableNot
AvailableNot
Available
Video
Play: Slow play/
resume
Video
Menu: Not
Available
Status Not
AvailableNot
AvailableSlow
Mode and
Content
InfoNot
Available
Audio:
Not
AvailableAudio:
Not
AvailableNot
Available
Not
Available
Video
Play: Show
Mode Info
Video:
Show
Mode Info
149
KNOWING
YOUR
VEHICLE
SAFETY
STARTING
AND
DRIVING
WARNING
LIGHTS
AND
MESSAGES
IN AN
EMERGENCY
SERVICING
AND
CARETECHNICAL
SPECIFICATIONSCONTENTS
Page 156 of 352

RemoteControl Button Standard Screens
Menu Screens
AM/FM/
MW/LW SAT–
Audio HDD–
HardDisc
Drive DISC/
DVD AUX/AUX1/AUX2
Mode
Select Menu Screen
Setup
Mode Show Mode Select Menu Advance
to Next
Mode
Show
Mode
Select Item
Prog Up Next
Preset*Next
Preset*Not
AvailableNot
AvailableNext Disc (if player is
changer) Not
AvailableNot
AvailableNot
Available
Prog
Down Previous
Preset*
Previous
Preset*Not
AvailableNot
AvailablePrevious Disc (if player
is changer) Not
AvailableNot
AvailableNot
Available
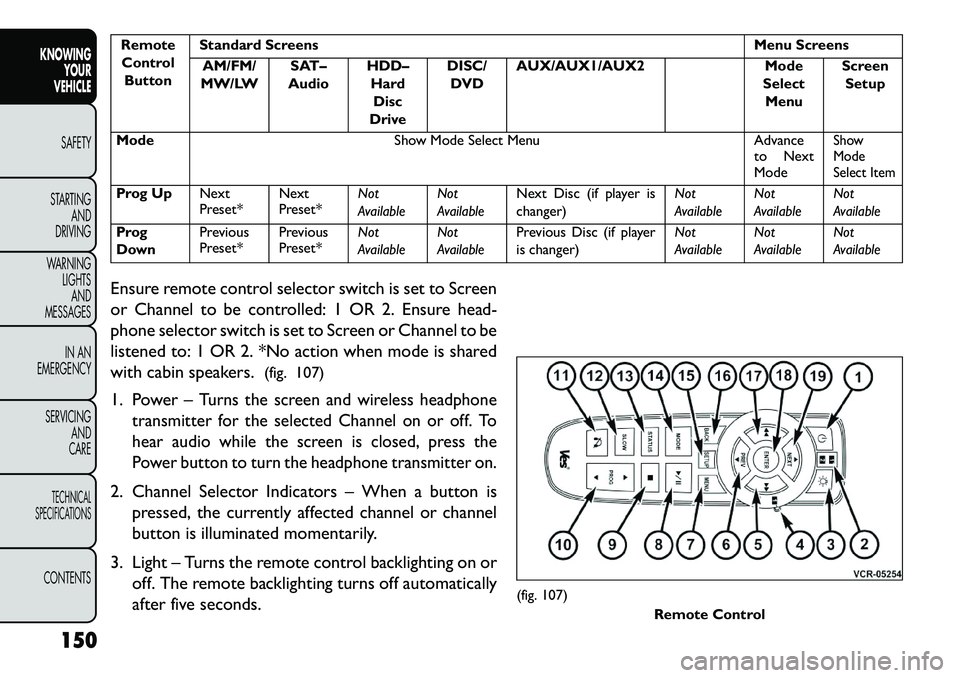
Ensure remote control selector switch is set to Screen
or Channel to be controlled: 1 OR 2. Ensure head-
phone selector switch is set to Screen or Channel to be
listened to: 1 OR 2. *No action when mode is shared
with cabin speakers. (fig. 107)
1. Power –
Turns the screen and wireless headphone
transmitter for the selected Channel on or off. To
hear audio while the screen is closed, press the
Power button to turn the headphone transmitter on.
2. Channel Selector Indicators – When a button is
pressed, the currently affected channel or channel
button is illuminated momentarily.
3. Light – Turns the remote control backlighting on or off. The remote backlighting turns off automatically
after five seconds.
(fig. 107) Remote Control
150
KNOWING YOUR
VEHICLE
SAFETY
S
TARTING AND
DRIVING
WARNING LIGHTSAND
MESSAGES
IN AN
EMERGENCY
SERVICING AND
CARETECHNICAL
SPECIFICATIONSCONTENTS
Page 157 of 352

4. Channel/Screen Selector Switch - Indicates whichchannel is being controlled by the remote control.
When the selector switch is in the Channel 1
position, the remote controls the functionality of
headphone Channel 1 (right side of the screen).
When the selector switch is in the Channel 2,
position the remote controls the functionality of
headphone Channel 2 (left side of the screen).
5. ▸▸ – In radio modes, press to seek the next tunable
station. In disc modes, press and hold to fast for-
ward through the current audio track or video
chapter. In menu modes use to navigate in the menu.
6. ▾/ Prev – In radio modes, press to select to the
previous station. In disc modes, press to advance to
the start of the current or previous audio track or
video chapter. In menu modes, use to navigate in the
menu.
7. MENU – Press to return to the main menu of a DVD disc, to select a satellite audio channel from the
Station list, or select playback modes (RANDOM
for a CD).
8. ▸/||
(Play/Pause) – Begin/resume or pause disc play.
9. ▪(Stop) – Stops disc play
10. PROG Up/Down – When listening to a radio mode, pressing PROG Up selects the next preset
and pressing PROG Down selects the previous preset stored in the radio. When listening to com-
pressed audio on a data disc, PROG Up selects the
next directory and PROG Down selects the pre-
vious directory. When listening to a disc in a radio
with a multiple-disc changer, PROG Up selects the
next disc and PROG Down selects the previous
disc.
11. MUTE – Press to mute the headphone audio out- put for the selected channel.
12. SLOW – Press to slow playback of a DVD disc. Press play (▸) to resume normal play.
13. STATUS – Press to display the current status.
14. MODE – Press to change the mode of the selected channel. See the Mode Selection section of this
manual for details on changing modes.
15. SETUP – When in a video mode, press the SETUP button to access the display settings (see the
display settings section) to access the DVD setup
menu, select the menu button on the radio. When
a disc is loaded in the DVD player (for versions/
markets, where provided) and the VES™ mode is
selected and the disc is stopped, press the SETUP
button to access the DVD Setup menu. (see the
DVD Setup Menu of this manual.)
151
KNOWING
YOUR
VEHICLE
SAFETY
STARTING
AND
DRIVING
WARNING
LIGHTS
AND
MESSAGES
IN AN
EMERGENCY
SERVICING
AND
CARETECHNICAL
SPECIFICATIONSCONTENTS
Page 158 of 352

16. BACK – When navigating in menu mode, press toreturn to the previous screen. When navigating a
DVDs disc menu, the operation depends on the
disc’s contents.
17. ◂◂– In radio modes, press to seek to the previous
tunable station. In disc modes, press and hold to
fast rewind through the current audio track or
video chapter. In menu modes use to navigate in
the menu.
18. ENTER – Press to select the highlighted option in a menu.
19. ▴/ NEXT – In radio modes, press to select to the
next station. In disc modes, press to advance to
the next audio track or video chapter. In menu
modes, use to navigate in the menu.
Remote Control Storage
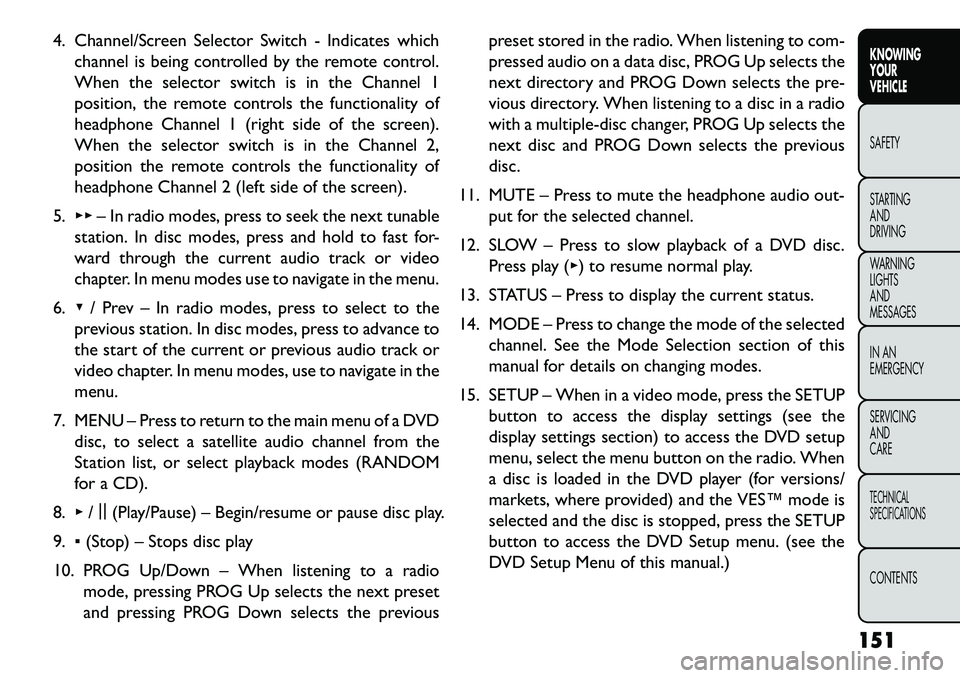
The video screen(s) come with a built in storage
compartment for the remote control which is acces-
sible when the screen is opened. To remove the re-
mote, use your index finger to pull and rotate the
remote towards you. Do not try to pull the remote
straight down as it will be very difficult to remove. To
return the remote back into its storage area, insert one
long edge of the remote into the two retaining clips first, and then rotate the remote back up into the other
two retaining clips until it snaps back into position.
(fig. 108)
Locking The Remote Control
All remote control functionality can be disabled as a
parental control feature.
To disable the Remote Control from making any
changes, press the Video Lock button add follow the
radio’s instructions (select menu, rear ves, lock). If
the vehicle is not equipped with a DVD player, follow
the radio’s instructions to turn Video Lock on. The
radio and the video screen(s) indicate when Video
Lock is active.
(fig. 108) The Remote Control Storage
152
KNOWING YOUR
VEHICLE
SAFETY
S
TARTING AND
DRIVING
WARNING LIGHTSAND
MESSAGES
IN AN
EMERGENCY
SERVICING AND
CARETECHNICAL
SPECIFICATIONSCONTENTS
Page 159 of 352

Pressing the Video Lock again or turning the ignitionOFF turns Video Lock OFF and allows remote con-
trol operation of the VES™.
Replacing The Remote Control Batteries
The remote control requires two AAA batteries for
operation. To replace the batteries:
Locate the battery compartment on the back of the remote, then slide the battery cover downward.
Replace the batteries, making sure to orient them according to the polarity diagram shown.
Replace the battery compartment cover.
Headphones Operation
The headphones receive two separate channels of
audio using an infrared transmitter from the video
screen.
If no audio is heard after increasing the volume control,
verify that the screen is turned on and in the down
position and that the channel is not muted and the
headphone channel selector switch is on the desired
channel. If audio is still not heard, check that fully
charged batteries are installed in the headphones.
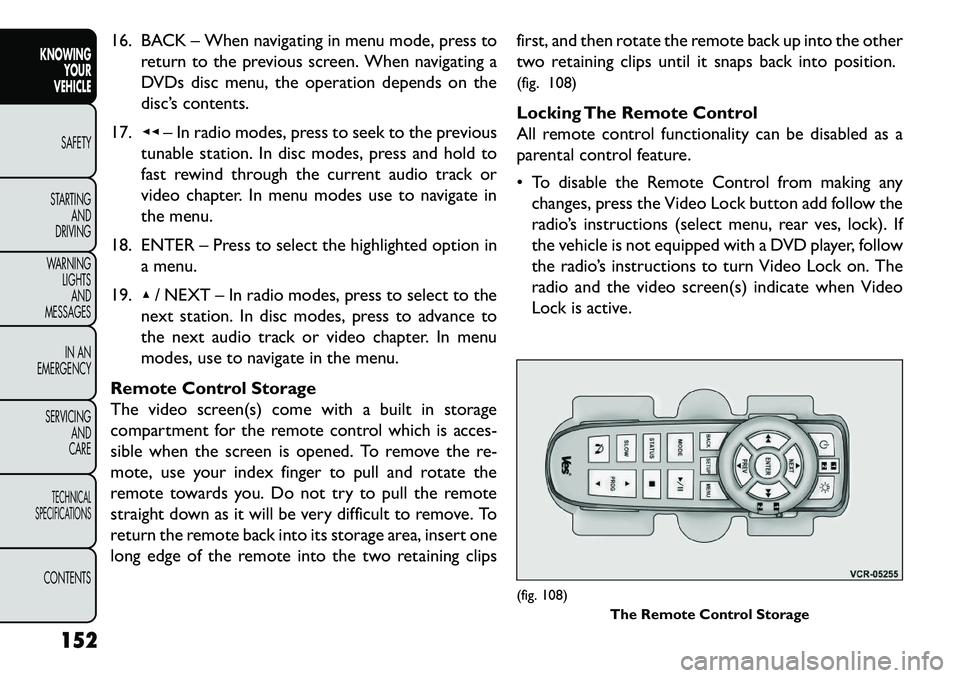
(fig. 109)
Controls
The headphone power indicator and controls are lo-
cated on the right ear cup. NOTE:
The rear video system must be turned on
before sound can be heard from the headphones. To
conserve battery life, the headphones will automati-
cally turn off approximately three minutes after the
rear video system is turned off.
Changing the Audio Mode for Headphones
1. Ensure the Remote Control channel/screen selec- tor switch is in the same position as the headphone
selector switch.
(fig. 109)1. Volume Control
2. Power Button
3. Channel Selection Switch
4. Power Indicator
153
KNOWING
YOUR
VEHICLE
SAFETY
S
TARTING
AND
DRIVING
WARNING
LIGHTS
AND
MESSAGES
IN AN
EMERGENCY
SERVICING
AND
CARETECHNICAL
SPECIFICATIONSCONTENTS
Page 160 of 352

NOTE:
When both switches are on Channel 1, the Remoteis controlling Channel 1 and the headphones are
tuned to the audio of the VES™ Channel 1.
When both switches are on Channel 2, the Remote is controlling Channel 2 and the headphones are
tuned to the audio of the VES™ Channel 2.
2. Press the MODE button on the remote control.
3. If the video screen is displaying a video source (such as a DVD Video), pressing STATUS shows the status
on a popup banner at the bottom of the screen.
Pressing the MODE button will advance to the next
mode. When the mode is in an audio only source
(such as FM), the Mode Selection menu appears on
screen.
4. When the Mode Selection menu appears on screen, use the cursor buttons on the remote control to
navigate to the available modes and press the EN-
TER button to select the new mode.
5. To cancel out of the Mode Selection menu, press the BACK button on the remote control. Replacing The Headphone Batteries
Each set of headphones requires two AAA batteries for
operation. To replace the batteries:
Locate the battery compartment on the left ear cup
of the headphones, and then slide the battery cover
downward.
Replace the batteries, making sure to orient them according to the polarity diagram shown.
Replace the battery compartment cover.
Unwired
®Stereo Headphone Lifetime
Limited Warranty
Who Does This Warranty Cover? This warranty
covers the initial user or purchaser ("you" or "your") of
this particular Unwired Technology LLC ("Unwired")
wireless headphone ("Product"). The warranty is not
transferable.
How Long Does The Coverage Last? This war-
ranty lasts as long as you own the Product.
What DoesThis Warranty Cover? Except as speci-
fied below, this warranty covers any Product that in
normal use is defective in workmanship or materials.
What Does This Warranty Not Cover? This war-
ranty does not cover any damage or defect that results
from misuse, abuse or modification of the Product
other than by Unwired. Foam earpieces, which will
154
KNOWING YOUR
VEHICLE
SAFETY
S
TARTING AND
DRIVING
WARNING LIGHTSAND
MESSAGES
IN AN
EMERGENCY
SERVICING AND
CARETECHNICAL
SPECIFICATIONSCONTENTS