Page 65 of 294

-The use of a roof rack can negative ly af
fect the way a vehicle handles. Cargo
that is large, heavy, bulky, long or flat
will have a greater negative influence on
the vehicle's aerodynamics, center of
gravity and overall handling . Always
dr ive slowly, avo id sudden braking and
maneuvers when transporting cargo on
the roof of your vehicle.
- Never exceed the max imum permissible
load carry ing capacity of the roof of your
vehicle, the perm issib le axle weights and
the permissible total weight of your vehi
cle
c::> page 269, Weights.
@) For the sake of the environment
As a result of the increased w ind resist
ance created by a roof rack, your vehicle is
using fue l unnecessarily . So remove the
roof rack after using it .
Luggage compartment
General information
A WARNING
Read and follow the important safety pre
cautions on c:>
page 130, Stowing lug
gage.
Enlarging the luggage compartment
App lies to vehicles: with fold ing rear seatback
The backrests can be folded forward sepa
rately or together using the two release lev
ers .
0
Fig. 64 Luggage compartment: re lease leve r
Seats and storage 63
Fig. 65 Backrest: release lever, securing knob and latc h
Release lever in luggage compartment
... Pull the release lever c:> fig. 64 in the direc
tion of the arrow to fo ld the backrest for
ward .
Release handle on the backrest
... Pull the release lever@c:> fig. 65 in the di
rection of the arrow to fold the backrest for
ward .
Folding the backrest b ack into the upright
position
... Fold the backrest back up again until it
latches and the red marking @ is no longer
visible
c:> .&_ .
You can lock the backrest when it is latched in
place using the mechanical key
c:> page 34 ©
c:> fig . 65 . This prevents any access to the lug
gage compartment from the vehicle interior.
You can only enlarge the luggage compart ment if the backrest is not locked.
A WARNING
-
- The backrest must always be securely
latched so that the safety belt of the cen
ter seating position can work properly to
he lp protect the occupant.
- The backrest must be securely latched in
position so that no items contained in
the lu ggage compa rtment can slide for
ward upon sudden braking.
- Always check whether the latch is fully
e ngag ed by pull ing the seatback for
ward .
Page 66 of 294

64 Seats and storage
-Never allow safety belts to become dam
aged by being caught in door or seat
hardware.
- Torn or frayed safety belts can tear and
damaged belt hardware can break in a
crash. Inspect the belts periodically.
Belts showing damage to webbing, bind
ings, buckles, or retractors must be re
placed.
(D Note
- If you move the front seat back when the
rear seat backrest is folded forward, you
could damage the head restraints on the
rear seat.
- Slide the belt guide on the outside safety
belt all the way up before folding the
backrest back forward. Make sure the
seat belt is not pinched or damaged
when the rear seat backrest if folded
back. Other objects should be removed
from the rear seat bench to protect the
seatback from damage.
Tie-downs and cargo net
Applies to vehicles: with cargo net
The cargo net prevents small objects from
sliding.
Fig. 66 Luggage compartment: cargo net stretched
ou t
Fig. 67 Luggage compart ment : cargo net at the top of
t he lu ggage compar tmen t
Net stretched out
.. To secure objects with the cargo net, hang
the front hooks on the net in the tie-downs
first and then hang the rear hooks~
fig. 66.
Net at the top of the luggage
compartment
.. Hang the hooks on the cargo net in the tie
downs on the floor at the rear of the lug
gage compartment ~
fig. 67.
.. Fold down the hooks at the upper area of
the luggage compartment down, pull the
net up and hang the eyelets on the net on
the hooks .
In a collision, the laws of physics mean that
even smaller items that are loose in the vehi
cle will turn into heavy missiles that can cause
serious injury. Items in the vehicle pick up ki
netic energy which varies with the vehicle and
the weight of the item. Vehicle speed is the
most significant factor.
For example, in a frontal collision at a speed
of 30 mph (48 km/h), the forces acting on a
10-lb (S kg) object are about
20 times the
normal weight of the item. This means that
the weight of the item would suddenly be the
equivalent of about 200 lbs (90 kg). One can
easily imagine the injuries that an item of that
weight flying freely through the passenger compartment can cause in a collision at a
speed considered relatively low.
Page 67 of 294

_& WARNING
Weak, damaged or improper straps used
to secure items to tie-downs can fa il dur
ing hard brak ing or in a collision and cause
ser ious personal injury .
- Always use suitable retaining straps and properly secure items to the tie-downs in
the luggage compartment to help pre
vent items from shifting or flying for
wa rd.
- Never attach a child seat tether strap to
a tie-down .
- For strength-related reasons, the mount
ing hooks can only be used to secure ob
jects we ighing up to 10 lb. (5 kg). Heavi
er objects will not be adequately secured
- there is a risk of injury .
Ski sack
Applies to vehicles: with ski sack
Long objects such as skis or snowboards can
be transported in the ski sack .
Fig . 68 B ackr est: pass-thr ough cover
.. To load the sk i sa ck in the veh icle, fold the
rea r cente r arm res t down.
.. Fo ld the pass- through cover down
Q fig . 68.
.. Slide the sk i sa ck from the luggage com
partment through the opening with the zip
per at the rear .
.. Secure the sk i sack
Q page 65.
_& WARNING ,..__
Objects must on ly be transported in the ski
sack since the ski sack can be sec ured . In
dividual objects cannot be secured. There
is a risk of injury .
Sea ts a nd s to rage 65
@ Tips
-You can open the pass-through from the
luggage compartment. Push the release
button down and push the cover for
ward.
- You can lock or unlock the pass-through
using the mechanical key. This preven ts
any access to the luggage compar tment
from the vehicle interior .
Securing the ski sack
Applies to vehicles: w ith ski sack
The ski sa ck mu st be secured in the luggage
compartment.
F ig. 69 Luggage compar tment: Se curing the s ki s ack
F ig. 70 Rea r ben ch s eat: secur ing the sk i sack
There are two straps with hooks on the bot
tom side of the ski sac k
q fig. 69@. There is
also a secu ring strap ®
q fig. 70 on the sack.
.. To secu re the ski sack in the luggage com-
pa rtment, hang the hooks in the rear t ie
downs
q fig. 69 .
.. Tighten the strap on the ski sack to prevent
the objects in the sack from sliding
q fig. 70. ...
Page 68 of 294

66 Seat s a nd s tor ag e
8_ WARNING
-
- The ski sack is intended only for the
transportation of skis and other light ob
jects . To reduce the risk of serious per
sonal injury, never transport heavy or
pointed objects in the ski sack.
- When brak ing rapidly or during an acci
dent, the load could be displaced and
ca use injury to occupants.
- Sharp edges on the load must be covered
for protect ion. Always fasten the belt
t ightly around the sack and its contents
¢ fig. 70.
-For safety reasons, do not transport
more than two pairs of skis in the ski
sack .
- You must sec ure the ski sac k with the
st rap after loading.
- Make su re a ll objects that you are t rans
porting in the pass-through are secured.
Otherwise they cou ld slide around during
sudden braking maneuvers and cause in
jury.
(D Tips
- Never stow the sk i sack away when it is
still wet or damp (for examp le, snow
melting from skis). Allow it to dry com
plete ly before stowing it away.
- When transporting skis or snowboards, tighten the securing strap between the bindings.
- Position skis in the ski sack wit h the
pointed ends facing the front and ski
po les with the pointed ends facing the
rear.
- You can lock or un lock the pass-through
u sing the mechanical key. This prevents
any access to the luggage compartment
from the vehicle interior .
Parcel shelf
The parcel shelf behind the rear seatback can
be used to car ry light items of cloth ing .
8_ WARNING
No heavy or hard objects should be p laced
on the parcel shelf. They are a hazard to
the veh icle occupants during s udden brak
i ng . The is a risk of injury .
(D Note
Please make sure that the heating w ires
for the rear window defogger are not dam
age by abrasive objects .
(D Tips
To ensure problem-free ven tilation , the
vent ilation slots between the rear window
and the pa rcel she lf must not be covered .
Page 69 of 294

Warm and cold Climate controls
Description
Th e climate control sy stem warms, cools and
adds humidity to the a ir in the veh icle inter io r.
It is the most effect ive when the windows and
sunroof are closed . If the re is a build-up of
h eat inside the vehicle, ventilation can help to
speed up the cooling process .
I n all he ating mode functions except
defrost,
the blower on ly switches to a higher speed
once the engine coolant has reached a certain
temperature.
Condensat ion from the cooling sys tem can
d rip and form a puddle of water under the ve
h icle. This is normal and does not mean there
is a leak .
Pollutant filter
The po llutant filte r removes po llutants such
as dus t and pollen from the air.
The air pollutants filte r must be changed at
the intervals spec ified in you r Wa rra nty
&
M aintenance book let, so tha t the air condi
tioner can prope rly work .
If you drive your vehicle in an area w ith h igh
a ir po llution, the fi lter may need to be
changed more frequent ly than specified in
your Aud i Warranty
& Ma intenance bookle t. If
in doubt, ask your authorized A udi Service Ad
v isor for advice .
Key coded settings
The clima te control sett ings are automat ically
stored and assigned to the remote co ntro l key
that is in use.
WARNING
Reduced vis ibili ty is dangero us and can
cause accidents.
Warm and c old 67
-For safe driving it is very important that
all windows be free of ice, snow and con
densat ion.
- Comp letely fam iliarize yourse lf with the
proper use and funct ion of the heat ing
and ve nti lation system and especially
how to defog and defrost the w indows.
- Never use the windshield wiper/washer
system in freez ing weather unt il you
have warmed the w indshield first, using
the heating and ventilation system. The
washer sol ution may free ze o n the wind
shie ld an d red uce visib ility.
(D Note
- If you suspect that the air conditioner has been damaged, switch the system
off to avoid furt her damage and have it
i n spected by a q ua lified dea lership.
- Repairs to the Audi air condition er re
quire specia l techni cal know ledge and
speci al tools. Contact an autho rized Aud i
dealer fo r ass istance.
@ For the sake of the environment
B y reduci ng the amou nt of f uel you use,
you also re duce the amount of pollu tan ts
emitted in to the a ir.
(D Tips
- Keep the air intake s lo ts ( in fro nt of the
w indshield) free from ice, snow and de
br is in order to maintai n the proper f unc
tion of the climate control system.
- T he energy m anagement system may
switch the seat heating* or rear window
defroster off temporar ily . These systems
are available again as soon as the energy
balance has been restored.
- Air escapes through vents under the rear
window. When placing items of clothing
on the luggage compartment cover, en
sure that the openings are not covered.
Page 70 of 294

68 Warm and cold
Operation
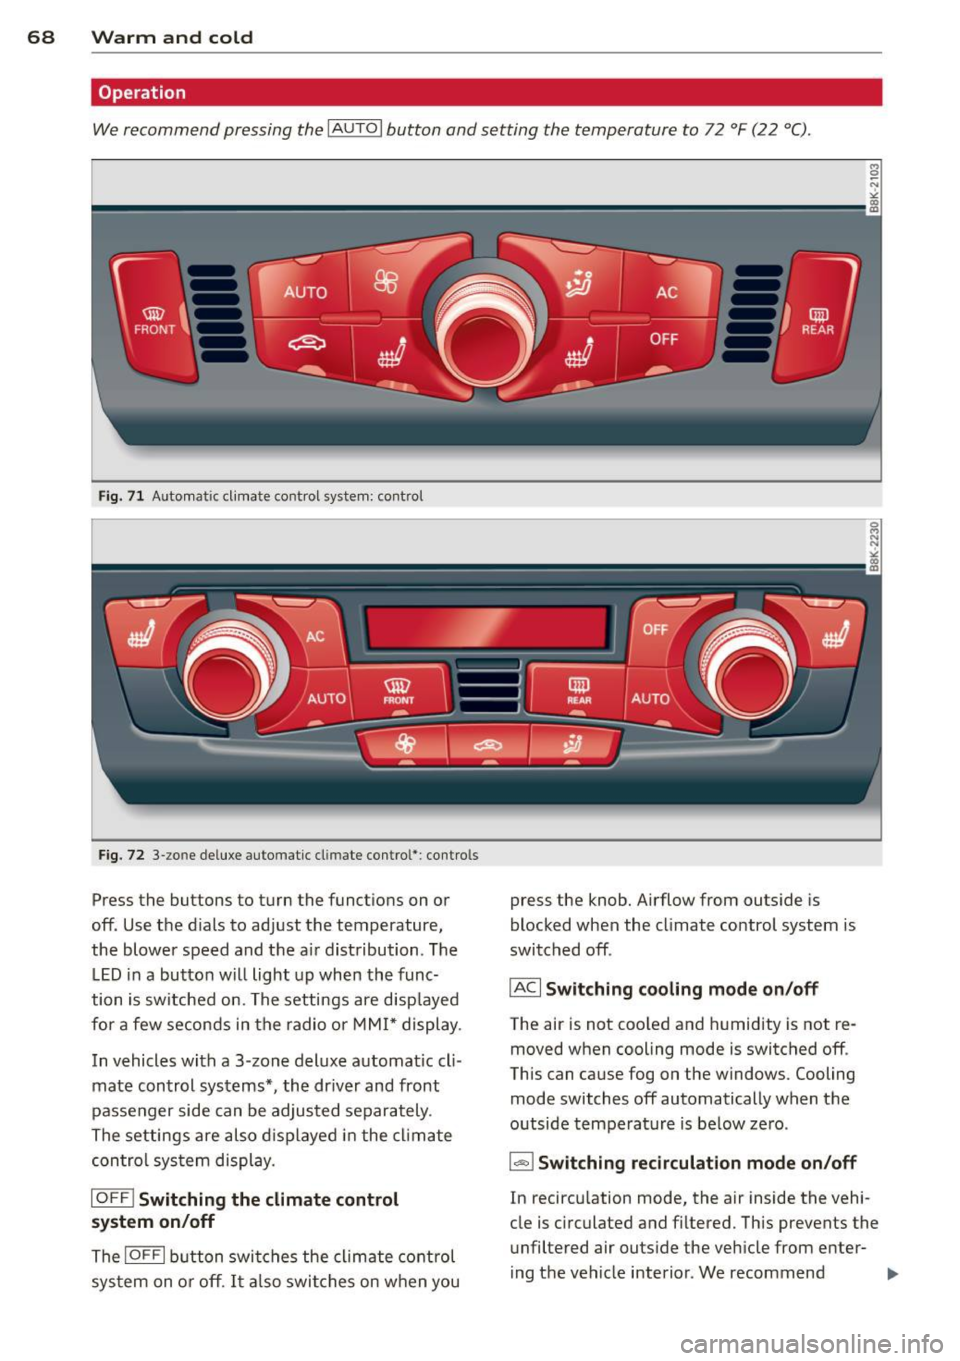
We recommend pressing the IAUTOI button and setting the temperature to 72 °F (22 °C) .
Fig. 71 Automat ic cl imate control system: control
Fig. 72 3-zo ne de luxe automatic cl imate contro l' : contro ls
Press the buttons to turn the funct ions on or
off. Use the d ials to adjust the temperature,
the blower speed and the a ir distribution . The
LED in a button will light up when the func
tion is switched on. The settings are disp layed
for a few seconds in the radio or MMI* display .
In vehicles with a 3 -zone deluxe automat ic cl i
mate control systems*, the dr iver and front
passenger side can be adjusted separately .
The settings are also displayed in the climate
control sys tem display.
IOFF I Switching the climate control
system on/off
The IOFFI button switches the climate control
sys tem on or off . It also switches on when you press the knob. Airflow from outside
is
blocked when the climate control system is
switched off .
IAC I Switching cooling mode on/off
The air is not coo led and humidity is not re
moved when cooling mode is switched off .
This can cause fog on the windows. Cooling
mode switches off automatically when the
outside temperature is below ze ro .
1- 1 Switching recirculation mode on/off
In recircu lation mode, the air inside the vehi
cle is c irculated and filtered. This prevents the
unfiltered air outside the vehicle from enter
ing the vehicle interior . We recommend
Page 71 of 294

switching recirculation mode on when driving
through a tunnel or when sitting in traffic
c::>_& .
The IAU TO I button or I@ FR ON T I button
switches recircu lation mode off .
IAUTO I Switching automatic mode on
Automatic mode ma inta ins a constant tem
peratu re inside the vehi cle. Air temperature,
a irflow and air d istribution are controlled au
tomatically.
Adjusting th e tempe ratur e
Temperatures between 60 °F (+16 °C) and
84 °F ( +28 °C) can be set . Outside of this
range,
L O or HI will appear in the cl imate con
trol system disp lay. At both of these settings,
the climate control system runs continuously
at maximum cooling or heating power . There
is no temperature regu lation.
~ Ad just ing the airflow
You can adjust the airflow manually to su it
your needs . To have the airflow regulated au
tomatically, press the IAUTO ! button.
~Adjusting the air distribution
You can manually se lect the vents where the
a ir will flow. To have the air d istr ibution regu
l ated automatically, press the
IAU TOI button .
~ Adjusting seat heat ing *
Pressing the button switches the seat heating
on at the highest sett ing (level 3). The LEDs
indicate the temperature leve l. To reduce the
temperature, press the button again . To
switch the seat heating off , press the button
repeatedly unt il the L ED turns off.
After 10 minutes , the seat heat ing automati
cally switches from level 3 to level 2.
I @ FRON T I Switch the d efro ster on /off
The windshield and s ide windows are defrost
ed or cleared of condensation as quickly as
possible. The max imum amount of air flows
mainly from the vents below the windsh ield.
Recirculation mode switches off . T he tempera
ture is controlled a utomat ica lly.
Warm and c old 69
The !AUTO ! button switches the defroster off.
lmn R EAR ! Switching rear window heater
on /off
T he rea r window heater on ly operates when
the engine is running. It sw itches off auto
matically after a few m inutes, depending on
the outs ide temperature .
T o p reven t the re ar window heater from
switching off automatically, press and hold
the
l oo REARI b utton for more than 2 seconds .
This remains stored until the ign ition is
switched off .
Air vents
You can open and close the center and rear air
vents using the thumbwheels . The levers ad
just the direction of the airflow from the
vents.
In vehicles with a 3 -zone deluxe automatic cli
mate control system*, you can adjust the air
temperature in the rear by turning the thumb
whee l toward the red side to make it warmer
or toward t he blue side to make it coo ler.
A WARNING ...
- Do not use the recircu lation for extended
pe riods of time . The windows could fog
up since no fresh a ir can enter the vehi
cle .
If the windows fog up, press the air
reci rculation button aga in immediately
to switch off the air reci rc u lation func
tion or se lect defrost .
- I ndividuals w ith red uced sensitivity to
pa in or temperature cou ld deve lop burns
when using t he seat heating function. To
red uce the risk of injury, these individu
a ls shou ld not use seat heating.
(D Note
To avoid damage to the heat ing e lements
i n the seats, do not kneel on the seats or
place heavy loads on a small area of the
seat.
Page 72 of 294
70 Warm and cold
The seat heating only works when the seat
detects body weight on it. P lacing objects
on the seat cou ld create enough we ight to
sw itch seat heat ing on.
Setup
The basic climate control settings can be ad
justed in the radio or MM!* .
.. Se lect:
ICARI function button> A /C control
button . Or
.. Se lect:
I CARI funct ion button> Car sys -
tems "
control button > AC.
Automatic recirculation*
When switched on, automatic recirculation
controls the recirculation mode automatica lly.
If the windows fog up, press the
1 ~ FRONT I
button.
Synchronization*
When synch roniza tion is switched on, the
same settings are applied to both the drive r
and front passenger, except for the seat heat ing/ventilation*. Synchronization switches off
when you ad just the settings on the front pas
senger's side.
You can a lso switch synchronization on by
press ing and ho lding the knob on the driver's
side.